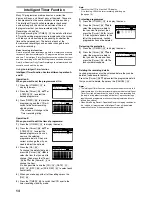
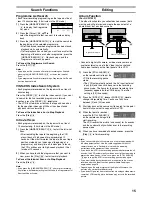
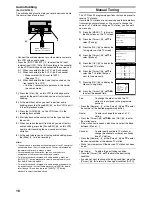
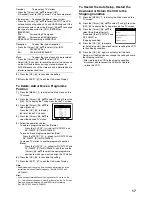
background image

5

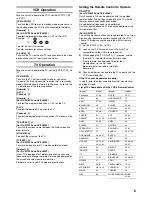
VCR Operation

When you want to operate the VCR, set the [VCR/TV] 

(23)


to [VCR].

[VCR-ON/OFF] 

(1)

To switch the VCR from on to standby mode or vice versa. In 
the standby mode, the VCR is still connected to the mains.

[Numeric] 

(2)

(For NV-FJ732F and NV-FJ632F)

To select the programme positions (1–99) of the VCR.
Example:

9:

19:

To enter a S

HOW

V

IEW

 number.

To enter numbers for various settings.

[AV LINK] 

(35)

To switch the TV from normal TV reception over to the video 
playback channel (AV input) (and vice versa).

TV Operation

When you want to operate the TV, set the [VCR/TV] 

(23)

 to 

[TV].

[TV-ON/OFF] 

(1)

To switch the TV on from standby mode or vice versa.
On some TVs it is only possible to switch the TV to standby 
mode with this button, but not on. In this case, try to turn the 
TV on with one of the following buttons:

[Numeric] 

(2)

[AV] 

(3)

[Channel] 

(33)

[Numeric] 

(2)

(For NV-FJ732F and NV-FJ632F)

To select the programme positions (1–99) on the TV.

[AV] 

(3)

To select the desired AV input on the TV.

[Channel] 

(33)

To select the desired programme position (TV station) on the 
TV.

[TV ASPECT] 

(35)

(For NV-FJ732F and NV-FJ632F)

To switch the screen format between the wide-screen and 
other formats.

[VOLUME] 

(32)

To adjust the volume of the TV.

[TV/TEXT] 

(34)

(For NV-FJ732F and NV-FJ632F)

To switch between normal TV mode and teletext mode.

[Teletext] 

(37)

(For NV-FJ732F and NV-FJ632F)

If your TV is equipped for Teletext reception, you can use 
these buttons to change the teletext information displayed on 
the screen and select desired information.
For details, refer to your TV’s operating instructions.

Setting the Remote Control to Operate 
Your TV

(For NV-FJ632F and NV-FJ628F)

Only Panasonic TVs can be operated with the provided 
remote control. The settings for operating the TV with the 
remote control have already been made.
No additional settings need to be performed.
However, some Panasonic TVs cannot be operated using 
this remote control.

(For NV-FJ732F)

This setting procedure allows you to operate the TVs of most 
brands using the remote control supplied with this VCR.
• Some TV models cannot be operated with this remote 

control.

1)

Set the [VCR/TV] 

(23)

 to [TV].

2)

Look up your TV’s manufacturer in the list of TVs 
compatible with the VCR’s remote control.

3)

While keeping the [TV-ON/OFF] 

(1)

 pressed, use the 

[Numeric] 

(2)

 to enter the manufacturer’s code.

If there is more than one code listed for that 
manufacturer, try the first code.
Be sure to enter the code in two digits.
Example: 01

4)

Check whether you can operate the TV correctly with the 
VCR’s remote control.

If the TV cannot be operated properly:

In step 

3

, enter the other code listed for that manufacturer 

and repeat step 

4

List of TVs Compatible with the VCR’s Remote Control

1

9

9

[Brand]

[Code]

Panasonic

01–04

AIWA

35

AKAI

27, 30

BLAUPUNKT

09

BRANDT

10, 15

BUSH

05, 06

CURTIS

31

DESMET

05, 31, 33

DUAL

05, 06

ELEMIS

31

FERGUSON

10

GOLDSTAR/LG

31

GOODMANS

05, 06, 31

GRUNDIG

09

HITACHI

22, 23, 31, 
40, 41, 42

INNO HIT

34

IRRADIO

30

ITT

25

JVC

17, 39

LOEWE

07

METZ

28, 31

MITSUBISHI

06, 19, 20

MIVAR

24

NEC

36

[Brand]

[Code]

NOKIA

25–27

NORDMENDE

10

ORION

37

PHILIPS

05, 06

PHONOLA

31, 33

PIONEER

38

PYE

05, 06

RADIOLA

05, 06

SABA

10

SALORA

26

SAMSUNG

31, 32

SANSUI

05, 31, 33

SANYO

21

SBR

06

SCHNEIDER

05, 06, 29, 
30, 31

SELECO

06, 25

SHARP

18

SIEMENS

09

SINUDYNE

05, 06, 33

SONY

08

TELEFUNKEN

10–14

THOMSON

10, 15

TOSHIBA

16

WHITE WESTINGHOUSE

05, 06

Summary of Contents for NV-FJ732F

Page 1: ...15 Editing 15 Manual Tuning 16 Setting the VCR s Clock 18 Various Settings 18 Other Function 20 Before Requesting Service 21 Index 23 Specifications 23 Model No NV FJ732F NV FJ632F NV FJ628F Please read through all these operating instructions especially the safety information before connecting or operating the video cassette recorder or adjusting any settings VQT9548 Contents Page EJECT CVC A DUB...

Page 2: ...Magnets or electromagnetic objects Touching internal parts of the VCR Water or some other liquid Lightning Disconnect the aerial plug from the VCR during lightning storms Anything heavy on the VCR Connecting or handling the equipment with wet hands Using a cell phone near the VCR because doing so may cause noise to adversely affect the picture and sound Do Wipe the VCR with a clean and dry cloth I...

Page 3: ... OSD DISPLAY RESET SP LP EP r s r s r s ON OFF TV SV V AV MENU EXIT OK PROG CHECK TIMER I TIMER Á LIBRARY SEARCH INDEX 1 2 3 4 5 6 7 8 9 A B C D E F G H I J K L M N O P Q R T S 0 U V STILL ALBUM REPLAY REC VCR DATE CANCEL SP LP EP r s r s r s ON OFF TV SV V AV MENU EXIT OK PROG CHECK TIMER Á LIBRARY SEARCH INDEX NV FJ628F NV FJ732F NV FJ632F has no VCR 1 2 16 EJECT CVC A DUB AV3 IN L MONO AUDIO VI...

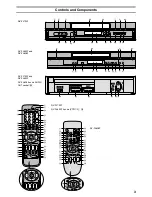
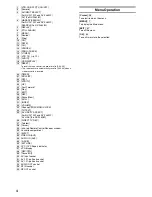
Page 4: ...ast Forward 26 Play 27 EXIT 28 REC 29 Pause Slow 30 SV V 31 INDEX 32 VOLUME 33 Channel TRACKING V LOCK 34 TV TEXT 35 AV LINK TV ASPECT For NV FJ732F and NV FJ632F AV LINK Fo NV FJ628F 36 DIRECT TV REC 37 Teletext 38 Cursor 39 Infra red Remote Control Receiver window 40 Cassette compartment 41 EJECT 42 VIDEO IN AV3 43 AUDIO IN AV3 44 A DUB 45 EXT LINK 46 CVC CVC Super indicator 47 VCR display 48 RE...

Page 5: ...trol to Operate Your TV For NV FJ632F and NV FJ628F Only Panasonic TVs can be operated with the provided remote control The settings for operating the TV with the remote control have already been made No additional settings need to be performed However some Panasonic TVs cannot be operated using this remote control For NV FJ732F This setting procedure allows you to operate the TVs of most brands u...

Page 6: ...ations and to adjust the clock When the TV has finished its own auto setup the VCR is automatically switched on and the downloading of the setup data from the TV to the VCR starts Applicable to TVs with Q Link or DATA LOGIC function If your TV is equipped with the Easy Link Megalogic or SMARTLINK function the Country setting menu appears on the TV screen Press the Cursor 38 3421 to select the desi...

Page 7: ... When the indication appears on the VCR display the Auto Setup is complete For NV FJ628F The clock setting menu appears after Auto Setup has finished Press the Cursor 38 3421 to set the correct time and date Press the OK 24 to conclude the setting To cancel the Auto Setup before it has finished Press the EXIT 27 When the clock setting menu appears after Auto Setup has finished even NV FJ732F and N...

Page 8: ...y back S VHS Cassette Tape SQPB S VHS Quasi Playback It is also possible to play back tapes recorded in the S VHS system Some picture noise may occur depending on the type of tape used It is not possible to fully obtain the high resolution that S VHS is capable of It is not possible to record in the S VHS system with this VCR To Play back a Recorded Part Repeatedly Press the Play 26 on the remote ...

Page 9: ...dication in the following order For certain cassettes the remaining tape time may not be displayed correctly Clock Counter Remaining Tape Time Clock To Select the Recording Duration and Perform Timer Recording OTR One Touch Recording 1 Press the REC OTR 48 to start recording 2 Press the REC OTR 48 on the VCR repeatedly to select the desired recording duration Every time you press this button the r...

Page 10: ...h you want to record copy onto this VCR 5 When that point is reached press the Pause Slow 29 again to start recording the new picture and sound from the playback unit 6 To record copy additional scenes press the Pause Slow 29 to put this VCR in the recording pause mode and then perform above step again 7 At the point where you want to stop recording press the Stop 9 to finish recording Hint The ne...

Page 11: ...r Decoder here refers to the device used to decode scrambled broadcasts Pay TV 1 Decoder not supplied 2 21 pin Scart socket 3 21 pin Scart cable not supplied 1 Connect a 21 pin Scart cable not supplied to the AV2 21 pin Scart socket on the VCR and to the 21 pin Scart socket on the decoder 2 Connect the decoder s mains lead to an AC mains socket 3 Set AV2 to DECODER For details see page 19 AV Link ...

Page 12: ...ple Programming a timer recording of a TV programme with the SHOWVIEW number 721114 1 Press the SV V 30 to display the menu for entering the SHOWVIEW number on the TV 2 Press the Numeric 2 to enter the SHOWVIEW number If you have entered a wrong digit press the Cursor 38 2 and then enter the correct digit 3 Press the OK 24 to display the programmed content 4 Press the SP LP EP 21 to set the desire...

Page 13: ...synchronises the recording start and stop with the actual broadcasting start and stop of the TV programme Press the Cursor 38 3421 to make the ON indication appear ON must be displayed under VPS PDC on the TV screen The TV station must broadcast VPS PDC signals The programme starting time must be set correctly to the starting time listed in the newspaper magazine To Check Change or Cancel Timer Re...

Page 14: ...is flashing check the timer recording details again See page 13 Protecting programmes 1 Press the I TIMER 15 to display the menu 2 Press the Cursor 38 43 to select the programme details that you want to protect then press the Cursor 38 1 to lock it A lock symbol appears to the left of the programme Locked programmes cannot be deleted Releasing the protection 1 Press the I TIMER 15 to display the m...

Page 15: ...t cassette the Programme List Search will be activated Editing Album Function For NV FJ732F The album function lets you collect desired scenes both moving and still pictures and create the equivalent of a photo album but on video cassette Connect a digital still camera a video movie camera or another external source to the Video Input socket and Audio Input sockets on the front panel of this VCR 1...

Page 16: ...UDIO 17 during playback to select the mixed sound Manual Tuning This VCR has 99 programme positions that can be preset to receive TV stations If available TV stations are not received due to extraordinary transmission circumstances or if you want to change the name of a TV station or change a TV station you can set it up manually 1 Press the MENU 7 to display the Main menu on the TV screen 2 Press...

Page 17: ...sert a blank programme position Add Press the DATE 11 r green for NV FJ732F and NV FJ632F B for NV FJ628F To move a TV station to another programme position Move Press the ON 10 r yellow for NV FJ732F and NV FJ632F C for NV FJ628F and then use the Cursor 38 34 to select the new programme position to which you want to assign the TV station 6 Press the OK 24 to conclude the setting 7 Press the EXIT ...

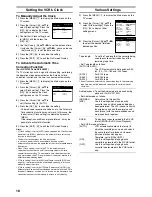
Page 18: ...the time may not be maintained correctly In this case manually adjust the clock If Clock setting is set to AUTO and Power save to ON the Automatic time correction function does not work while the VCR is turned off However as soon as it is turned on the Automatic time correction function is activated and the clock is set correctly Various Settings 1 Press the MENU 7 to display the Main menu on the ...

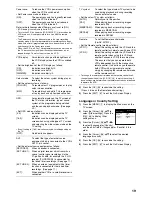
Page 19: ...d EXT LINK 1 When a digital receiver which transmits a special control signal recordings via the 21 pin Scart cable for example the F U N receiver TU DSF30 S3 is connected for the linked timer recordings See page 11 EXT LINK 2 When an external equipment with a timer function is connected for the linked timer recordings See page 11 EXT When another VCR or a satellite receiver is connected TV system...

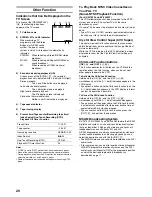
Page 20: ... The crystal view control function ensures that you always obtain the optimum picture quality so that you get the best picture automatically While the VCR is turned on the CVC indication is always displayed to show that the Crystal View Control Super is activated Child Lock Function buttons OK 24 and OFF i 22 This function deactivates all buttons on the VCR and the remote control Use this function...

Page 21: ...t may not be possible to adjust the tracking If you play back a cassette that was recorded on another unit of VCR the picture quality may be inferior in the normal playback slow playback and still playback and it may need to manual adjust the tracking by above method Also on some TVs the picture may scroll up and down in the special playback functions However these are not malfunctions Before Requ...

Page 22: ...s used Use a cassette with an intact tab or if you want to erase the previously recorded contents on the cassette cover the tab hole with two layers of adhesive tape The playback picture of a recorded programme is distorted or no picture can be seen The aerial or aerial lead connection is defective Check the connections If the picture displayed on the TV is also distorted there is something wrong ...

Page 23: ...re than 43 dB SP Audio more than 65 dB Hi Fi Dynamic Range Audio more than 90 dB Hi Fi audio track Audio Frequency Response 20 Hz 20 kHz Hi Fi Operating Temperature 5oC 40oC Operating Humidity 35 80 Weight 3 5 kg Dimensions 430 W a87 H a282 D mm A Audio 18 20 Audio dubbing 16 Auto Setup 7 17 AV input 5 AV link 11 B Battery 2 C Child lock 20 Clock 18 Colour mode 19 Condensation 2 Country setting 6 ...

Page 24: ...Matsushita Electric Industrial Co Ltd http www panasonic co jp global ...

Reviews: