background image

- 2 -

Page

• Caution for AC Mains Lead (UK and Ireland only) ................ 2
• Important Safety Instructions for the User ............................ 3
• Cautions................................................................................ 3
• Identification of main parts .................................................... 4

ASSEMBLY INSTRUCTIONS

A) How to attach the handle  .............................................. 5
B) Tool storage.................................................................... 5
C) Attaching hose ............................................................... 6
D) Mains lead storage......................................................... 6

HOW TO OPERATE YOUR VACUUM CLEANER

A) Mains lead...................................................................... 7
B) On/Off switch.................................................................. 7
C) Handle release ............................................................... 8
D) How to use the accessories ........................................ 8-9

PERFORMANCE FEATURES

A) Edge cleaning .............................................................. 10
B) Automatic adjusting nozzle .......................................... 10
C) Motor protection system............................................... 10

TABLE OF CONTENTS

Page

MAINTENANCE AND SERVICING

A) Dust bag replacement ...................................................11
B) Secondary filter cleaning/replacement ..........................12
C) HEPA media exhaust filter replacement ............................12
D) Belt replacement ...........................................................13
E) Clog removal .................................................................14
F)

Beater bar cleaning .......................................................15

G) Cleaning exterior ...........................................................15
H) Troubleshooting.............................................................16

• Specifications.......................................................................17
• Disposal information ............................................................17
• Consumables / Accessories.................................................18
• Guarantee  ...........................................................................19
• Reminder for Customer .......................................................19

FOR YOUR SAFETY PLEASE READ THE FOLLOWING TEXT CAREFULLY

This appliance is supplied with a moulded three pin mains plug for your safety and convenience.
A 13 amp fuse is fitted in this plug.
Should the fuse need to be replaced please ensure that the replacement fuse has rating of 13 amps and that it is approved by ASTA
or BSI to BS1362.
Check for the ASTA mark

or the BSI mark

on the body of the fuse.

If the plug contains a removable fuse cover you must ensure that it is refitted when the fuse is replaced.
If you lose the fuse cover the plug must not be used until a replacement cover is obtained.
A replacement fuse cover can be purchased from your local Panasonic Dealer.
IF THE FITTED MOULDED PLUG IS UNSUITABLE FOR THE SOCKET OUTLET IN YOUR HOME THEN THE FUSE SHOULD BE
REMOVED AND THE PLUG CUT OFF AND DISPOSED OF SAFELY. THERE IS A DANGER OF SEVERE ELECTRICAL SHOCK IF
THE CUT OFF PLUG IS INSERTED INTO ANY 13 AMP SOCKET.
If a new plug is to be fitted please observe the wiring code as shown below.
If in any doubt please consult a qualified electrician.

IMPORTANT: 

The wires in this mains lead are coloured in accordance with the following code:

Blue : Neutral
Brown : Live

As the colours of the wire in the mains lead of this appliance may not correspond with the coloured markings identifying the terminals
in your plug, proceed as follows:
The wire which is coloured BLUE must be connected to the terminal in the plug which is marked with the letter N or coloured BLACK.
The wire which is coloured BROWN must be connected to the terminal in the plug which is marked with the letter L or coloured RED.
Under no circumstances should either of these wires be connected to the earth terminal of the three pin plug, marked with the letter
E or the Earth Symbol

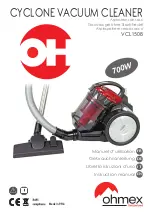
How to replace the Fuse:

• There are two types of the supplied AC Mains Lead : A and B as shown below.
1 Open the fuse compartment with a screwdriver.
2 Replace the fuse and fuse cover if detachable.

ASA

CAUTION FOR AC MAINS LEAD (UK and Ireland only)

TYPE A

TYPE B

Summary of Contents for MC-UG522

Page 1: ...odel No MC UG522 Thank you for purchasing this vacuum cleaner Please read these instructions carefully before using the vacuum cleaner and save these instruction for future reference This product complies with the directive 2006 95 EC and 2004 108 EC ...

Page 2: ...ted when the fuse is replaced If you lose the fuse cover the plug must not be used until a replacement cover is obtained A replacement fuse cover can be purchased from your local Panasonic Dealer IF THE FITTED MOULDED PLUG IS UNSUITABLE FOR THE SOCKET OUTLET IN YOUR HOME THEN THE FUSE SHOULD BE REMOVED AND THE PLUG CUT OFF AND DISPOSED OF SAFELY THERE IS A DANGER OF SEVERE ELECTRICAL SHOCK IF THE ...

Page 3: ... dust bin in place Do not use wet filters after wash see E Secondary Filter Cleaning Turn off all controls before unplugging Do not use to pick up flammable or combustible materials or others that may become so or use in areas where they may be present This appliance should be serviced by an authorised Panasonic Service Centre and only genuine Panasonic spare parts should be used Use extra care wh...

Page 4: ...Suction Inlet On Off Switch Wand Holder Carrying Handle Hose Holder Locking Notch Belt inside Cover Release Dust Cover Dust Bag inside Wand Crevice Tool Exhaust Filter inside Secondary Filter inside Furniture Guard Beater Bar underneath Handle Quick Release Cord Hook Lower Cord Hook ...

Page 5: ... illustration Using screwdriver tighten handle screw NOTE It may be necessary to adjust the handle slightly to align the screw hole Handle Screw 1 2 1 1 ASSEMBLY INSTRUCTIONS Wand Crevice Tool Insert the wand and crevice tool into the storage locations as shown Insert the dusting brush into the back of the vacuum cleaner B TOOL STORAGE Dusting Brush 1 2 1 1 ...

Page 6: ...he hose handle Twist the wand to lock in place C ATTACHING HOSE Hose Wand Hose Holder 1 2 Lower Cord Hook Quick Release Cord Hook Locking Notch 1 1 Make sure that the quick release cord hook is rotated in the upright position as shown Insert mains lead into the locking notch on rear of the handle Wrap mains lead loosely around quick release cord hook and lower cord hook Lock the plug onto the main...

Page 7: ...n then wrap cord loosely around quick release cord hook and lower cord hook Refer to MAINS LEAD STORAGE page 6 HOW TO OPERATE YOUR VACUUM CLEANER B ON OFF SWITCH To turn vacuum cleaner on or off press on the on off switch On Off Switch 1 1 CAUTION To prevent damaging carpeted floors tiled floors linoleum etc Do not leave the beater bar rotating in the same place for too long CAUTION Moving parts T...

Page 8: ...sition for cleaning under furniture Step on nozzle top and pull back to change from normal use position to low position Move vacuum cleaner to middle position for normal use Move vacuum cleaner to upright position for storage and tool use 1 2 1 3 1 4 D HOW TO USE THE ACCESSORIES 1 1 Crevice Tool Wand NOTE Hold the handle to support the vacuum cleaner when using tools and disconnecting or attaching...

Page 9: ... with beater bar The crevice tool may be used on the following items Furniture Cushions Curtains Stairs Walls 1 2 Wand Dusting Brush Crevice Tool Hose Handle 1 3 1 4 1 5 Note Always clean tools before using The dusting brush may be used on the following items Furniture Curtains Stairs Walls 1 6 1 7 CAUTION While using the accessories hold the handle with one hand to avoid pulling the vacuum cleane...

Page 10: ...FEATURES 1 1 BYPASS VALVE This vacuum cleaner has a motor protector bypass valve which prevents motor overheating and damage The valve opens to provide cooling air when a clog or full bag prevents normal air flow to the vacuum cleaner suction motor You will notice a change of sound as air rushes through the valve opening To correct problem install a new dust bag or locate and remove the clog Refer...

Page 11: ...Pull outward to remove dust cover Latch Dust Bag Spread out new dust bag taking care not to tear bag A DUST BAG REPLACEMENT NOTE Always operate vacuum cleaner with genuine Panasonic dust bags Recommended Best Filtration HEPA Media Dust Bag Type U 13 AMC D1EP Alternate Good Filtration Paper Dust Bag Type U 14 AMC M1EP 1 1 1 2 1 3 Place dust cover on vacuum cleaner by aligning groove on dust cover w...

Page 12: ...gent or soap DO NOT wash in a dishwasher Once the filter is washed clean squeeze by hand and allow to air dry DO NOT install the filter when damp Allow filter to dry for 24 hours before placing back into vacuum cleaner Reinstall the exhaust filter cover by inserting the tab into the slot in the vacuum cleaner Press firmly to snap exhaust filter cover into place Turn off and unplug the vacuum clean...

Page 13: ... in the nozzle and 2 rotating to installed position Lay unit with nozzle flat as shown Remove beater bar by carefully lifting out Remove worn or broken belt Clean beater bar and the end caps Refer to BEATER BAR CLEANING page 15 Belt Motor Shaft Beater Bar 2 1 Tabs Slots 1 4 Belt Motor Shaft End Cap Beater Bar Groove 1 5 1 6 Lay unit on floor bottom up with nozzle flat Install the four screws to th...

Page 14: ...e hose from the wand holder and check the nozzle for clogging Lay unit on floor with nozzle flat as shown Remove nozzle hose from body by 1 pressing in locking tab and 2 sliding up and 3 out of retaining slot Check and clear any obstructions 2 1 3 Nozzle Hose Locking Tab 1 5 1 1 Reinstall hose and connect hose to wand Refer to ATTACHING HOSE page 6 Reinstall wand to nozzle hose Return the vacuum c...

Page 15: ...zard Disconnect electrical supply before servicing or cleaning the vacuum cleaner Failure to do so could result in electrical shock or personal injury from vacuum cleaner suddenly starting Remove lower plate Refer to BELT REPLACEMENT page 13 Cut off any hair thread string carpet pile and lint entangled around beater bar with a pair of scissors Remove beater bar Refer to BELT REPLACEMENT page 13 Re...

Page 16: ...Motor protection system 5 Check for clogs page 14 activated 6 Dirty secondary filter and or exhaust 6 Clean or change filters page 12 filter Beater bar does not turn 1 Worn or broken belt 1 Replace belt page 13 2 Beater bar entangled 2 Clean beater bar page 15 Sound changes 1 New carpet fuzz clogged air path 1 Refer to BYPASS VALVE page 10 and CLOG REMOVAL page 14 PROBLEM POSSIBLE CAUSE POSSIBLE S...

Page 17: ...tailer upon the purchase of an equivalent new product Disposing of this product correctly will help to save valuable resources and prevent any potential negative effects on human health and the environment which could otherwise arise from inappropriate waste handling Please contact your local authority for further details of your nearest designated collection point Penalties may be applicable for ...

Page 18: ... are provided directly by Panasonic U K It couldn t be simpler Also available through our Internet is direct shopping for a wide range of finished products Take a browse on our website for further details 18 DESCRIPTION MC UG522 HEPA media exhaust filter Part number AC38KDDJZØØØ Secondary filter Part number AC37KDKTZØØØ Crevice tool Part number AC6ØRZFZVU7 Dusting brush Part number AC63RYUZVØ7 Wan...

Page 19: ...t by our representatives in the country of sale is applied Using dust bags which are not those of Panasonic will make the guarantee invalid Repairs should be done by Panasonic service persons or technicians Otherwise the guarantee will be invalid For more information refer to the warranty card which has been included with this product Model Number Serial Number Date Purchased Dealer s Name Dealer ...

Page 20: ...poration of North America All Rights Reserved Pursuant to the directive 2004 108 EC article 9 2 Panasonic Testing Centre Panasonic Service Europe a division of Panasonic Marketing Europe GmbH Winsbergring 15 22525 Hamburg F R Germany CØ1ZDVM2ØEØØ Issued in 06 2012 ACØ1ZDVMZØEØ Printed in Mexico ...

Reviews: