background image

10   

VQT4T06 (ENG)

Touch operations

This camera’s touch screen senses pressure that is applied to the 

screen.

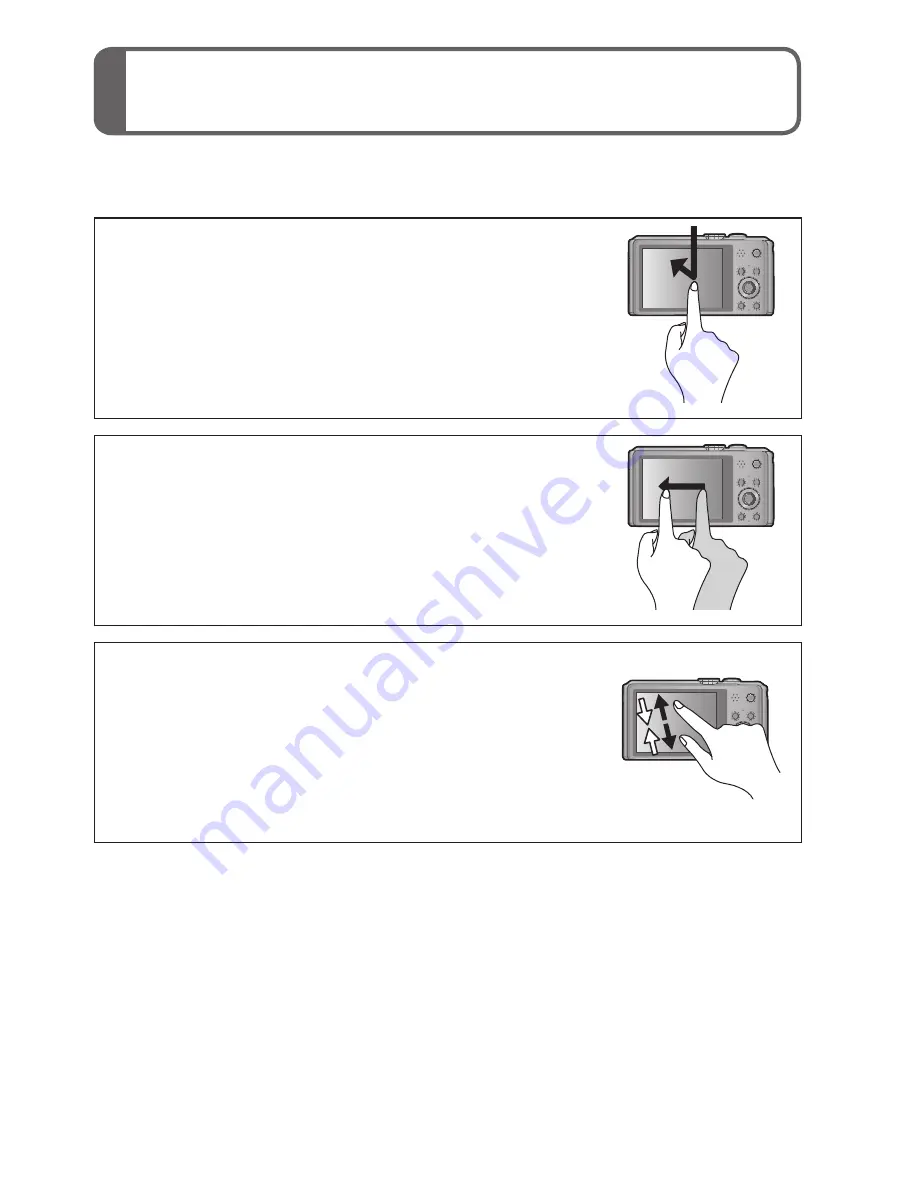
Touch

To “touch” is to press the touch screen and then 

pull the finger back again.

Touching is used to select icons or pictures, among 

other actions.

Drag

To “drag” is to touch and slide your finger 

across the touch screen surface.

Dragging (sliding your finger across the screen) is 

used to scroll the pictures or change the range of the 

pictures displayed.

Pinch (spread/pinch)

On the touch panel, spread (pinch out) your 2 

fingers to zoom in, and pinch (pinch in) your 2 

fingers to zoom out. You use it when zooming 

in/out of playback pictures etc.

 •You can also zoom in by quickly touching the touch 

screen twice. (If the display was enlarged, it returns 

to the same magnification ratio.)

Summary of Contents for Lumix DMC-TZ40

Page 1: ...e read these instructions carefully before using this product and save this manual for future use More detailed instructions on the operation of this camera are contained in Operating Instructions for advanced features PDF format in the supplied disc Install it on your PC to read it GN ...

Page 2: ...ed Information for Your Safety WARNING To reduce the risk of fire electric shock or product damage Do not expose this unit to rain moisture dripping or splashing Use only the recommended accessories Do not remove covers Do not repair this unit by yourself Refer servicing to qualified service personnel The socket outlet shall be installed near the equipment and shall be easily accessible Product id...

Page 3: ...e from electromagnetic equipment such as microwave ovens TVs video games etc If you use this unit on top of or near a TV the pictures and or sound on this unit may be disrupted by electromagnetic wave radiation Do not use this unit near cell phones because doing so may result in noise adversely affecting the pictures and or sound Recorded data may be damaged or pictures may be distorted by strong ...

Page 4: ...ial activity and or was obtained from a video provider licensed to provide AVC Video No license is granted or shall be implied for any other use Additional information may be obtained from MPEG LA LLC See http www mpegla com If you see this symbol Information on Disposal in other Countries outside the European Union This symbol is only valid in the European Union If you wish to discard this produc...

Page 5: ...memory card optional 12 Charging the battery 13 Setting the clock 14 Setting the menu 16 Taking pictures 17 Recording motion pictures 18 Viewing your pictures 20 Deleting pictures 20 GPS and map functions 21 Recording viewing pictures with a smartphone tablet 24 Reading the Operating Instructions PDF format 29 Supplied software 30 Specifications 31 Limited Warranty ONLY FOR AUSTRALIA 34 ...

Page 6: ...e or humidity Avoid these conditions which may make the lens or LCD monitor dirty cause mould or damage the camera If condensation does occur turn off the camera and wait about two hours before using it Once the camera adjusts to the surrounding temperature the fogging will clear naturally About the compass Information measured with this unit is simply a rough estimate Please do not use for profes...

Page 7: ...on your PC Map data Operating Instructions for advanced features DVD is indicated as disc in the text SD Memory Card SDHC Memory Card and SDXC Memory Card are indicated as card in the text Cards are optional You can record or play back pictures on the built in memory when you are not using a card Consult the dealer or your nearest Service Centre if you lose the supplied accessories You can purchas...

Page 8: ...e Panasonic DC coupler DMW DCC14 optional and AC adaptor DMW AC5G optional are used Mode dial Flash Self timer indicator AF Assist Lamp NFC antenna Lens barrel GPS status indicator Microphones Tripod mount Ensure that the tripod is stable Card Battery door Release lever DC coupler cover Lens Do not touch the lens barrier Speaker Zoom lever Motion picture button Camera ON OFF button Shutter button ...

Page 9: ...n lamp Q MENU Delete Cancel button DISP button HDMI socket AV OUT DIGITAL socket This socket is also used when charging the battery We recommend using the supplied hand strap to avoid dropping the camera LCD monitor Do not connect any other cables except the HDMI micro cable RP CHEU15 optional Doing so may cause malfunction ...

Page 10: ... your finger across the touch screen surface Dragging sliding your finger across the screen is used to scroll the pictures or change the range of the pictures displayed Pinch spread pinch On the touch panel spread pinch out your 2 fingers to zoom in and pinch pinch in your 2 fingers to zoom out You use it when zooming in out of playback pictures etc You can also zoom in by quickly touching the tou...

Page 11: ...protective sheet available on the market attached to its screen or if the screen is not very responsive touch the screen with a little more pressure If your hand is pressed against the touch screen when holding the camera the touch screen will not work properly Do not press on the LCD monitor with hard pointed tips such as ballpoint pens Do not press the touch screen with your fingernails Clean th...

Page 12: ...y lever Card Insert the card all the way firmly until it clicks Do not touch the terminals on the back of the card Close the door Slide the release lever to the LOCK position To remove To remove battery Move lever in direction of arrow Lever To remove card Push the card until it clicks then pull the card out Press Pull out Always use genuine Panasonic batteries DMW BCM13E If you use other batterie...

Page 13: ...adaptor supplied or a PC To the electrical outlet USB connection cable supplied Charging lamp On Charging in progress approx 210 min if fully depleted Off Charging stops When using the AC adaptor supplied observe the following points as improper connections may cause malfunctions Do not use any other USB connection cables except the supplied one or a genuine Panasonic USB connection cable DMW USBC...

Page 14: ... minute display order or time display format and press to set Press MENU SET to set To cancel Press button Confirm the setting and press MENU SET To return to the previous screen press button Press to select Yes and press MENU SET if automatically correcting time of day using the GPS function To manually set date and time select No When you select automatic time adjustment using the GPS function G...

Page 15: ... area is displayed press MENU SET Press to set your home area and press MENU SET The current time and home area are set Changing time settings Select Clock Set from Rec or Setup menu perform and Please see the next page on how to set the menu ...

Page 16: ...he menu Switching to the Rec menu Use cursor button to select Rec and press MENU SET The menu type can also be selected by touch operations Press to select AF Mode and then press MENU SET Depending on the item its setting may not appear or it may be displayed in a different way Press to select and then press MENU SET to set Press button several times to close the menu ...

Page 17: ... value settings Determine aperture then record pictures Determine shutter speed then record pictures Determine aperture and shutter speed then record pictures Record pictures using pre registered settings Record panorama pictures Take pictures using Scene modes Take pictures by selecting your preferred picture effect Take a picture Press halfway press lightly and focus Press fully press the button...

Page 18: ... can record motion pictures with audio stereo Zoom can also be used during recording Press the motion picture button to start recording Press the motion picture button again to end recording Remaining recording time approx Elapsed recording time ...

Page 19: ...iles the recording time for such motion pictures will be shorter than 29 minutes 59 seconds If Rec Quality of AVCHD motion pictures is set to FHD you can continuously record a motion picture for up to 29 minutes 59 seconds If the surrounding temperature is high or a motion picture is recorded continuously is displayed and recording may be stopped halfway through to protect the camera Motion pictur...

Page 20: ...ayback button while the camera is off you can turn the camera on in Playback Mode To play back a motion picture touch after selecting a picture To switch to Recording Mode press the playback button again or press the shutter button halfway during playback Deleted pictures cannot be recovered Press button to delete the displayed picture Press to select Yes and then press MENU SET ...

Page 21: ...ecute positioning Press MENU SET Press to select GPS menu and press MENU SET Press to select GPS Setting and press MENU SET Press to select ON and press MENU SET A message appears on the screen After confirming the message press MENU SET When GPS Setting is ON the GPS function works even if the camera is turned off Electromagnetic waves from the camera can affect instruments and meters During take...

Page 22: ...s off it means that positioning was unsuccessful Positioning executed successfully blue Positioning result icons Time elapsed after successful positioning minute Positioning failed No location information place name information available Positioning will take time in environments where it is difficult to receive the signals from the GPS satellites For details refer to Using the GPS function to rec...

Page 23: ...oning is currently available As with zooming in out of pictures you can also zoom in out of the map by operating the zoom lever or by using the pinch function You can drag the screen or press the cursor button to operate the display location of a map When you press the button it will return to the previous display Displaying the recording location When you press the DISP button the pictures that w...

Page 24: ...et to perform the following operations of a Wi Fi compatible LUMIX Panasonic Image App is indicated as Image App in the text Installation procedure Connect your smartphone tablet to the Internet and please install Panasonic Image App from the following site Google Play Store for Android App StoreSM for iOS Version 1 2 or above Supported OS Android 2 2 Android 4 2 iOS 4 3 iOS 6 0 In the search fiel...

Page 25: ...or information on how to adjust settings please read the manual for your smartphone tablet When manually connecting without the NFC function Operating this unit Press the Wi Fi button Press to select New Connection and press MENU SET Press to select Remote Shooting and press MENU SET On your smartphone tablet Select the SSID displayed on the camera and enter the password The SSID displayed differs...

Page 26: ...et scratched For information on how to use NFC compatible devices please contact the device manufacturer If there is no immediate reaction slightly move the position where the smartphone tablet was placed Press to select Yes and press MENU SET Place your smartphone tablet over this area of the unit again When the connection is complete live images captured by the camera will be displayed on your s...

Page 27: ...ding temperature is high or a motion picture is recorded continuously recording may be stopped halfway through to protect the camera Also the picture quality setting change message may be displayed when the recording starts Playing back pictures in the camera Select on a smartphone tablet You can save pictures on the smartphone tablet You can send pictures to a WEB service etc The screen differs d...

Page 28: ...use the NFC function to easily send the picture Start up Image App on your smartphone tablet Display the still picture to be transferred to your smartphone tablet on the 1 picture screen full screen Place your smartphone tablet to the side of this unit The still picture displayed on this unit is transferred to your smartphone tablet It may take several minutes to complete the picture transfer depe...

Page 29: ...he Operating Instructions supplied Click the Operating Instructions Select the desired language and then click Operating Instructions to install To return to the install menu Double click the Operating Instructions shortcut icon on the desktop When the Operating Instructions PDF format will not open You will need Adobe Acrobat Reader 5 0 or later or Adobe Reader 7 0 or later to browse or print the...

Page 30: ...stall a shortcut to the trial version download site For details about using LoiLoScope please download and see the manual from the following site http loilo tv product 20 Compatible OS Windows 8 7 Vista XP For details about operating environment and usage please read Operating Instructions for advanced features PDF format or the manuals for each software PHOTOfunSTUDIO LoiLoScope are not compatibl...

Page 31: ...Max Wide to F6 4 Max Tele Image Stabiliser Optical method Focus range P A S M 50 cm Max Wide 2 m Max Tele to Macro Intelligent Auto Motion picture 3 cm Max Wide 1 m Max Tele to 5 to 7 is 2 m to Scene Mode The focus ranges listed above may vary depending on the selected Scene Mode Shutter system Electronic shutter Mechanical shutter Minimum Illumination Approx 10 lx when i Low light is used the shu...

Page 32: ...n Exif 2 3 standard DPOF corresponding MPO Motion pictures AVCHD MP4 Audio compression format AVCHD Dolby Digital 2 ch MP4 AAC 2 ch Interface Digital USB 2 0 High Speed Analogue video NTSC PAL Composite Switched by menu Audio Audio line output Monaural Terminal HDMI MicroHDMI TypeD AV OUT DIGITAL Dedicated jack 8 pin Dimensions Approx 108 3 mm W x 58 9 mm H x 27 7 mm D excluding the projection par...

Page 33: ...l frequency 2412 MHz to 2462 MHz 1 11ch Encryption method Wi Fi compliant WPA WPA2 Access method Infrastructure mode AC adaptor Panasonic VSK0776 Information for your safety Input 110 V to 240 V 50 60 Hz 0 2 A Output 5 V 800 mA Battery pack lithium ion Panasonic DMW BCM13E Information for your safety Voltage capacity 3 6 V 1250 mAh ...

Page 34: ... to below and use the Service Centre Locator for the name address of the nearest Authorised Service Centre Send or take the product to a Panasonic Authorised Service Centre together with your proof of purchase receipt as a proof of purchase date Please note that freight and insurance to and or from your nearest Authorised Service Centre must be arranged by you Note that home or pick up delivery se...

Page 35: ...d trademarks or trademarks of Microsoft Corporation in the United States and or other countries Mac and Mac OS are trademarks of Apple Inc registered in the U S and other countries This product incorporates the following software 1 the software developed independently by or for Panasonic Corporation 2 the software owned by third party and licensed to Panasonic Corporation and or 3 open sourced sof...

Page 36: ...d WPA2 are marks or registered marks of the Wi Fi Alliance DLNA the DLNA Logo and DLNA CERTIFIED are trademarks service marks or certification marks of the Digital Living Network Alliance This product uses DynaFont from DynaComware Corporation DynaFont is a registered trademark of DynaComware Taiwan Inc Other names company names and product names mentioned in these instructions are trademarks or r...

Reviews: