background image

Advanced (Recording pictures)

37

VQT1C60

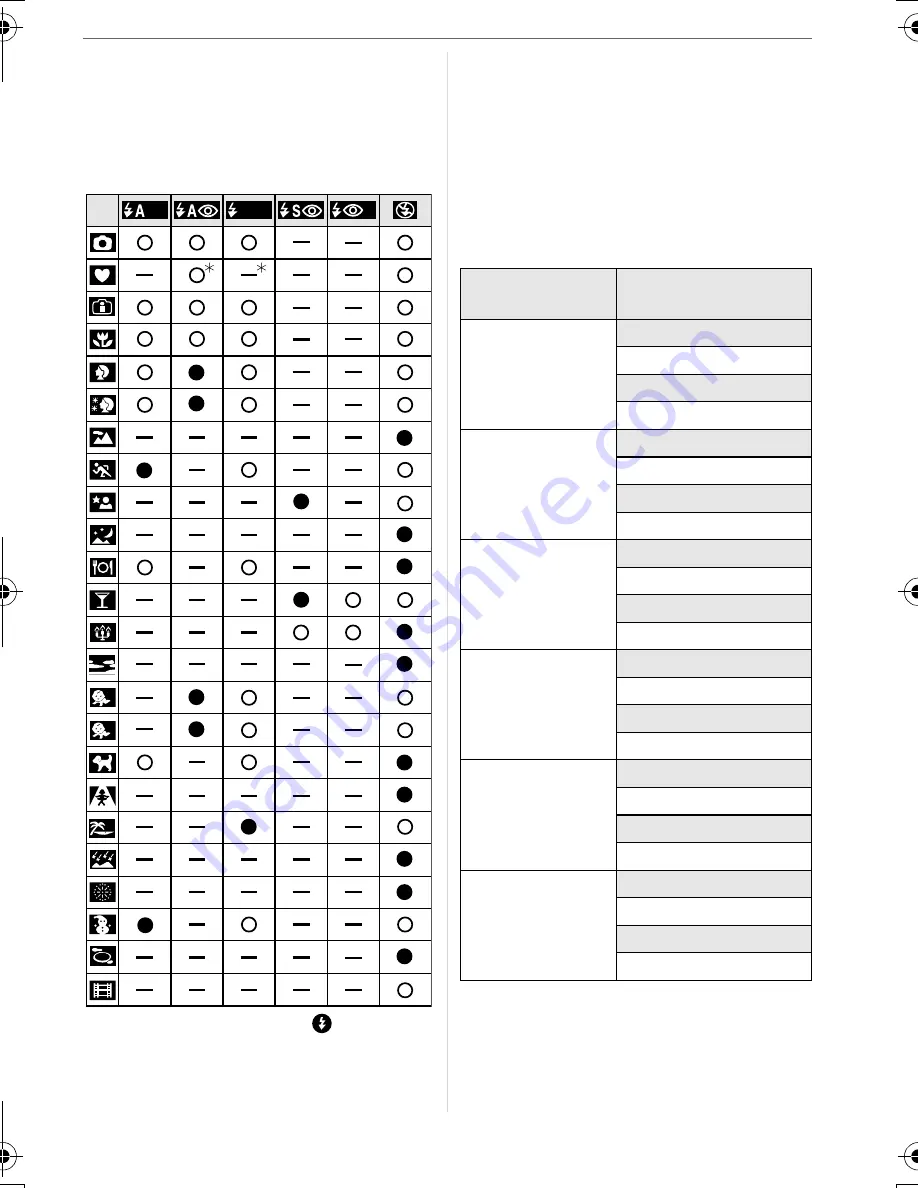
Available flash settings by recording 
mode

The available flash settings depend on the 
recording mode.
(

±

: Available, —: Not available, 

¥

 :Initial 

setting)

¢

2 It becomes Forced ON [

], when the 

backlight compensation function is 
activated.

• The flash setting may change if the 

recording mode is changed. Set the flash 
setting again if necessary.

• The flash setting is memorised even if the 

camera is turned off. However, the scene 
mode flash setting is reset to the initial 
setting when the scene mode is changed.

Available flash range by ISO 
sensitivity

• The available flash range is an 

approximation.

• The available focus range differs 

depending on the recording mode. (P101)

2

1

2

2

ISO sensitivity 

(P58)

Available flash range

[AUTO]

Wide

50 cm to 5.4 m

Tele

50 cm to 3.3 m

[ISO100]

Wide

50 cm to 2.1 m

Tele

50 cm to 1.3 m

[ISO200]

Wide

50 cm to 3.0 m

Tele

50 cm to 1.8 m

[ISO400]

Wide

60 cm to 4.2 m

Tele

60 cm to 2.6 m

[ISO800]

Wide

80 cm to 6.0 m

Tele

60 cm to 3.7 m

[ISO1250]

Wide

1.0 m to 6.3 m

Tele

80 cm to 3.9 m

VQT1C60ENG.book  37 ページ  2007年1月11日 木曜日 午後6時49分

Summary of Contents for Lumix DMC-LZ7

Page 1: ...PC Operating Instructions Digital Camera Model No DMC LZ7 VQT1C60 Before use please read these instructions completely GN ...

Page 2: ...panies concerned IF THE POWER CORD OF THIS EQUIPMENT IS DAMAGED IT MUST BE REPLACED WITH AN ELECTRICALLY APPROVED POWER CORD If you see this symbol WARNING TO REDUCE THE RISK OF FIRE ELECTRIC SHOCK OR PRODUCT DAMAGE DO NOT EXPOSE THIS APPARATUS TO RAIN MOISTURE DRIPPING OR SPLASHING AND THAT NO OBJECTS FILLED WITH LIQUIDS SUCH AS VASES SHALL BE PLACED ON THE APPARATUS USE ONLY THE RECOMMENDED ACCE...

Page 3: ...p Condensation occurs when the ambient temperature or humidity changes Be careful of condensation since it causes lens stains fungus and camera malfunction If condensation occurs turn the camera off and leave it for about 2 hours The fog will disappear naturally when the temperature of the camera becomes close to the ambient temperature Read together with the Cautions for Use P89 About cards that ...

Page 4: ...bout the LCD Monitor 33 Changing the information displayed 33 Recording a picture with the camera held high above your head High angle mode 35 Taking Pictures using the Built in Flash 36 Taking Pictures with the Self timer 39 Compensating the Exposure 40 Changing the sensitivity according to the movement of the subject being recorded 41 Taking Close up Pictures 42 Taking pictures that match the sc...

Page 5: ...ion Pictures 66 Using the PLAY mode menu 67 SLIDE SHOW Playing back pictures in order for a fixed duration 68 FAVORITE Setting your favourite pictures 69 ROTATE DISP ROTATE To display the picture rotated 69 DATE STAMP Imprinting information such as the date on the recorded pictures 71 DPOF PRINT Setting the picture to print and the number of prints 73 PROTECT Preventing accidental erasure of pictu...

Page 6: ...ed as card in the text Cards are optional You can record or play back pictures on the built in memory when you are not using a card P14 Consult the dealer or your nearest servicentre if you lose the supplied accessories You can purchase the accessories separately Names of the Components 1 Lens P90 2 Flash P36 3 Self timer indicator P39 AF assist lamp P62 4 LCD monitor P21 33 87 5 Status indicator ...

Page 7: ...Camera ON OFF switch P8 15 16 Strap eyelet When detaching the strap untie the knot in the string with a pointed object and then detach it 17 Lens barrel 18 Card door P13 19 DIGITAL AV OUT socket P79 82 86 20 DC IN socket P79 82 Always use a genuine Panasonic AC adaptor DMW AC6G optional 21 Battery door P13 22 Tripod receptacle When you use a tripod make sure the tripod is stable when the camera is...

Page 8: ...o not use the card optional you can record or play back pictures on the built in memory P14 Refer to P14 when you use a card 2 Turn the camera on to take pictures Set the clock P15 Select the type of battery in use on BATTERY TYPE in the SETUP menu P18 1 Set the mode dial to 2 Press the shutter button to take pictures P22 3 Play back the pictures 1 Set the mode dial to 2 Select the picture you wan...

Page 9: ...fe and conditions of the batteries Battery performance temporarily deteriorates in low temperature conditions 10 C or less However it recovers when the temperature returns to normal Depending on the temperature and the conditions of use the camera may not operate properly and the batteries may become exhausted without warning because the battery indication is not displayed correctly This is not a ...

Page 10: ...d together with the batteries when warming them in your pocket If there is grease or dirt on the battery poles the recording playback time may become extremely short Before inserting the batteries clean the battery terminals with a soft dry cloth Ni MH Batteries Nickel Metal Hydride You can use Ni MH batteries after charging them with a nickel metal hydride battery charger However improper handlin...

Page 11: ... batteries for a long period of time we recommend charging them once a year Remove the batteries from the camera and store them again after they have completely discharged Battery life The number of recordable pictures By CIPA standard in normal picture mode Recording conditions by CIPA standard Temperature 23 C Humidity 50 when the LCD monitor is on Using a Panasonic SD Memory Card 16 MB Starting...

Page 12: ... time will also vary depending on the brand and type of batteries used We recommend using power save mode P19 or economy mode P19 or turning off the camera frequently while recording to maintain battery power Batteries Used Number of recordable pictures Panasonic Oxyride batteries supplied or optional Approx 50 pictures Approx 25 min Panasonic Alkaline batteries optional Approx 40 pictures Approx ...

Page 13: ...on terminals on the back side of the card The card may be damaged if it is not fully inserted 3 1 Close the battery door and the card door 2 Slide the battery door and the card door to the end and then close them firmly If the card door cannot be completely closed remove the card check its direction and then insert it again Select the battery type being used in BATTERY TYPE in the SETUP menu P18 R...

Page 14: ...me available Please confirm the latest information on the following website http panasonic co jp pavc global cs This Site is English only This unit SDHC compatible equipment is compatible with SD Memory Cards based on SD Memory Card Specifications and formatted in FAT12 system and FAT16 system It is also compatible with SDHC Memory Cards based on SD Memory Card Specifications and formatted in FAT3...

Page 15: ... whether or not the clock setting is correct Changing the clock setting 1 Press MENU SET 2 Press 3 4 to select CLOCK SET P63 3 Press 1 and then perform steps 2 and 3 to set the clock 4 Press MENU SET to close the menu You can also set the clock in the SETUP menu P18 When batteries have been inserted for more than 3 hours the clock setting is stored in the camera for approximately 3 months even if ...

Page 16: ...de dial is rotated P20 Basic Normal picture mode P22 Use this mode for normal recording Simple mode P24 This mode is recommended for beginners Playback mode P30 This mode allows you to play back recorded pictures Advanced Intelligent ISO sensitivity mode P41 This allows you to set the optimal ISO sensitivity and shutter speed according to the movement and the brightness of the subject Macro mode P...

Page 17: ...ing the menu items The following example shows how to set AF MODE when normal picture mode is selected 1 Press 3 4 to select the menu item Press 4 at A to switch to the next menu screen 2 Press 1 3 Press 3 4 to select the setting 4 Press MENU SET to set EXIT MENU SELECT AUTO SENSITIVITY PICT SIZE ASPECT RATIO AWB W BALANCE REC 1 3 QUALITY A B C EXIT MENU SELECT AUTO SENSITIVITY SENSITIVITY PICT SI...

Page 18: ...line batteries or Ni MH batteries OXYRIDE ZR6 Oxyride batteries If the type of battery being used and the type of battery selected are not the same the battery indication will not be displayed correctly CLOCK SET Changing the date and time Press to display the SETUP menu and select the item to set P17 Change date and time P15 AUTO REVIEW Displaying the recorded picture Press to display the SETUP m...

Page 19: ...e camera is not operated for about 15 seconds or for about 5 seconds after recording The status indicator lights while the LCD monitor is turned off Press any button to turn on the LCD monitor again Power save mode is fixed to 2MIN in economy mode However power save mode is not activated when using the AC adaptor DMW AC6G optional Economy mode is not activated in the following cases In simple mode...

Page 20: ...gs are reset the following settings are also reset The birthday setting for BABY1 BABY2 P46 and PET P47 in scene mode The number of days that have passed since the departure date in TRAVEL DATE P51 The WORLD TIME setting P53 The battery type setting the folder number and the clock setting are not changed VIDEO OUT Playback mode only Press to display the SETUP menu and select the item to set P17 Se...

Page 21: ...hen using the card Do not do the following when the access indication lamps lights The card or the data on the card may be damaged and this unit may no longer operate normally Turn the camera off Remove the batteries or the card if used Shake or bump this unit Disconnect the AC adaptor DMW AC6G optional when using the AC adaptor Do not do the above when pictures are being read or deleted or the bu...

Page 22: ...the point you want to focus on 3 Press the shutter button halfway to focus The focus indication 2 lights green and the AF area 1 turns white to green 3 Aperture value 4 Shutter speed The focus range is 50 cm to Wide 1 2 m to Tele The subject is not focused in the following cases When the focus indication blinks green When the AF area turns white to red or the AF area is not displayed Focus sound b...

Page 23: ...bjects in a scene When there is dirt or dust on glass between the lens and the subject When there are illuminated or glittering objects around the subject When taking a picture in dark places When the subject is moving fast When the scene has low contrast When jitter occurs When recording a very bright subject When taking a close up picture of the subject Try the AF AE lock technique or macro mode...

Page 24: ...ng caused by pressing the shutter button when you are using a tripod P39 Shutter speed will be slower particularly in the following cases Keep the camera still from the moment the shutter button is pressed until the picture appears on the screen We recommend using a tripod NIGHT PORTRAIT P45 NIGHT SCENERY P45 PARTY P45 CANDLE LIGHT P46 STARRY SKY P48 FIREWORKS P48 When the shutter speed is slowed ...

Page 25: ...de AUTO REVIEW P18 1SEC POWER SAVE P19 5MIN ECONOMY P19 OFF Self timer P39 10 seconds Optical Image Stabilizer P61 MODE1 W BALANCE P56 AWB SENSITIVITY P58 This setting becomes the same as when the highest ISO sensitivity is set to ISO800 in intelligent ISO sensitivity mode P41 ASPECT RATIO PICT SIZE QUALITY P58 ENLARGE 7M 4qk6q 10k15cm 2 5M EZ E MAIL 0 3M EZ AF MODE P60 AF ASSIST LAMP P62 ON You c...

Page 26: ...ion When using the flash it is fixed to Forced ON The flash setting is fixed to AUTO Red eye reduction when the backlight compensation function is set to OFF Taking Pictures with the Zoom You can make people and subjects appear closer with the 6k optical zoom and landscapes can be recorded in wide angle 35 mm film camera equivalent 37 mm to 222 mm Set the picture size to something other than the h...

Page 27: ... Extra optical Zoom If you set a picture size that activates the extra optical zoom the extra optical zoom icon is displayed on the screen when you use the zoom function The zoom will stop moving for an instant near W 1k when the extra optical zoom is used This is not a malfunction The indicated zoom magnification is an approximation In motion picture mode and HIGH SENS in scene mode the extra opt...

Page 28: ...ressed when the zoom position is not Wide You can further extend the zoom to the digital zoom range when D ZOOM P28 is set to ON In ENLARGE in simple mode HIGH SENS P47 in scene mode and motion picture mode the zoom becomes up to 6k optical zoom The indicated zoom magnification is an approximation A maximum of 24k zoom can be achieved with the 6k optical zoom and the 4k digital zoom when D ZOOM is...

Page 29: ...ictures The indicated zoom magnification is an approximation The digital zoom does not work in the following cases In simple mode In Intelligent ISO sensitivity mode In SPORTS BABY1 BABY2 PET and HIGH SENS in scene mode Checking the Recorded Picture Review You can check the recorded pictures while still in REC mode 1 Press 4 REV The last recorded picture appears for about 10 seconds Review is canc...

Page 30: ...ted pictures Playing back pictures Press 2 1 to select the picture 2 Plays back the previous picture 1 Plays back the next picture Fast forwarding Fast rewinding Press and hold 2 1 during playback 2 Fast rewind 1 Fast forward The file number A and the picture number B only change one by one Release 2 1 when the number of the desired picture appears to play back the picture If you press and hold 2 ...

Page 31: ...eleted appears on the screen To delete MULTI DELETE ALL DELETE 1 Press twice 2 Press 3 4 to select MULTI DELETE or ALL DELETE and then press MENU SET MULTI DELETE step 3 ALL DELETE step 5 ALL DELETE EXCEPT When FAVORITE P69 is set only step 5 However this cannot be selected if none of the pictures have displayed 3 Press 2 1 to select the picture and then press 4 to set Only when selecting MULTI DE...

Page 32: ...es using ALL DELETE or ALL DELETE EXCEPT the deleting will stop halfway Do not turn off the camera while deleting When deleting pictures use batteries with sufficient battery power P21 or use the AC adaptor DMW AC6G optional It is possible to delete up to 50 pictures at one time using MULTI DELETE The greater the number of pictures the longer it takes to delete them If there are pictures that are ...

Page 33: ...ting GUIDE LINE in SETUP menu P19 You can also set whether or not to have the recording information and histogram displayed when the guide lines are displayed In playback mode H Normal display I Display with recording information and histogram J No display 3 Displayed if BIRTHDAY SET and WITH AGE were set in BABY1 BABY2 P46 or PET P47 in scene mode before taking pictures 4 The number of days that ...

Page 34: ... B When the values are distributed evenly the exposure is proper and the brightness is well balanced C When the values are concentrated on the right the picture is over exposed Example of histograms A Under Exposed B Properly Exposed C Over Exposed Histogram When you take pictures with the flash or in dark places the histogram is displayed in orange because the recorded picture and the histogram d...

Page 35: ...cond or turn the camera off High Angle mode is also cancelled if power save mode is activated Pictures are displayed on the LCD monitor with increased brightness in High angle mode Therefore some subjects may look different on the LCD monitor However this does not affect the recorded pictures You may not notice the High angle mode effect if the LCD monitor is difficult to see because of light from...

Page 36: ...icture and then activated again for the actual recording Use this when you take pictures of people in low lighting conditions Forced ON The flash is activated every time regardless of the recording conditions Use this when your subject is back lit or under fluorescent light Forced ON Red eye reduction 1 The flash setting is set to Forced ON Red eye reduction only when you set PARTY P45 or CANDLE L...

Page 37: ...mera is turned off However the scene mode flash setting is reset to the initial setting when the scene mode is changed Available flash range by ISO sensitivity The available flash range is an approximation The available focus range differs depending on the recording mode P101 2 1 2 2 ISO sensitivity P58 Available flash range AUTO Wide 50 cm to 5 4 m Tele 50 cm to 3 3 m ISO100 Wide 50 cm to 2 1 m T...

Page 38: ...es in the above shutter speeds in the following scene modes NIGHT SCENERY P45 8 seconds to 1 2000th of a second STARRY SKY P48 15 seconds 30 seconds 60 seconds FIREWORKS P48 1 4th of a second 2 seconds Do not look directly at the flash at close range when it is activated If you bring the flash too close to an object the object may be distorted or discoloured by the heat or lighting from the flash ...

Page 39: ...ess the shutter button halfway to focus B Press the shutter button fully to take the picture The self timer indicator C blinks and the shutter is activated after 10 seconds or 2 seconds If you press MENU SET while the self timer is set the self timer setting is cancelled When using a tripod etc setting the self timer to 2 seconds is a convenient way to avoid the jitter caused by pressing the shutt...

Page 40: ...pensate from j2 EV to i2 EV in steps of 1 3 EV Select 0 EV to return to the original exposure 2 Press MENU SET to finish You can also press the shutter button halfway to finish EV is an abbreviation of Exposure Value It refers to the amount of light given to the CCD by the aperture value and the shutter speed The exposure compensation value appears on the lower left of the screen The set exposure ...

Page 41: ... speed faster Noise is avoided when taking pictures indoors of a subject with no movement by decreasing the ISO sensitivity When you press the shutter button halfway A appears When you press the shutter button fully the shutter speed and the ISO sensitivity appear for a while The focus range becomes the same as macro mode 5 cm Wide 50 cm Tele to When the flash is activated the ISO sensitivity is a...

Page 42: ... tripod and the self timer P39 in macro mode When a subject is close to the camera the effective focus range depth of field is significantly narrowed Therefore if the distance between the camera and the subject is changed after focusing on the subject it may become difficult to focus on it again If the distance between the camera and the subject is beyond the focus range of the camera the picture ...

Page 43: ... displayed If you press DISPLAY again the screen returns to the SCENE MODE menu e g Displaying the information screen of BABY1 Refer to P38 for information about the shutter speed The flash setting is memorised even if the camera is turned off However it returns to the initial setting if the scene mode is changed P37 When you take a picture with a scene mode that is not adequate for the purpose th...

Page 44: ...res outdoors in the daytime If a part of the background etc is a colour close to skin colour this part is also smoothed This mode may not be effective when there is insufficient brightness ISO sensitivity is fixed to ISO100 Press to display the SCENE MODE menu and select a scene mode P43 This allows you to take pictures of a wide landscape The focus range is 5 m to The flash setting is fixed to Fo...

Page 45: ...ctures of the nightscape Technique for Night scenery mode Since the shutter speed becomes slower up to about 8 sec use a tripod We also recommend using the self timer P39 for taking pictures The focus range is 5 m to The shutter may remain closed max about 8 sec after taking the picture because of signal processing This is not a malfunction Noise may become visible when you take pictures in dark p...

Page 46: ...ing is fixed to Forced OFF The setting on the AF assist lamp is disabled ISO sensitivity is fixed to ISO100 The white balance cannot be set Press to display the SCENE MODE menu and select a scene mode P43 This takes pictures of a baby with a healthy complexion When you use the flash the light from it is weaker than usual You can set two different birthdays by using BABY1 and BABY2 You can display ...

Page 47: ... the software LUMIX Simple Viewer or PHOTOfunSTUDIO viewer in the CD ROM supplied For information about printing refer to the separate operating instructions for PC connection Refer to BABY1 BABY2 P46 for information about age display setting and birthday setting The initial setting for the AF assist lamp is OFF P62 Refer to BABY1 BABY2 for other information about this mode Press to display the SC...

Page 48: ...39 The LCD monitor automatically becomes darker Histograms are always displayed in orange P34 The flash setting is fixed to Forced OFF ISO sensitivity is fixed to ISO100 The following functions cannot be used EXPOSURE W BALANCE STABILIZER BURST SLOW SHUTTER Press to display the SCENE MODE menu and select a scene mode P43 This mode allows you to take beautiful pictures of fireworks exploding in the...

Page 49: ...ing off or landing When using the camera follow all instructions from the cabin crew Be careful about the reflection from the window The flash setting is fixed to Forced OFF The setting on the AF assist lamp is disabled The white balance cannot be set Motion Picture Mode 1 Press the shutter button halfway to focus and then press it fully to start recording A Audio recording The available recording...

Page 50: ...lso press the shutter button halfway to close the menu The focus range becomes the same as macro mode 5 cm Wide 50 cm Tele to Refer to P100 for information about the available recording time The available recording time displayed on the screen may not decrease regularly This unit does not support recording motion pictures on MultiMediaCards When you set the picture quality to 30fpsVGA or 30fps16 9...

Page 51: ...play the the number of days that have passed when playing back the pictures and stamp it on the recorded pictures with DATE STAMP P71 A The number of days that have passed since the departure date The number of days that have passed since the departure date can be printed on each picture by using the software LUMIX Simple Viewer or PHOTOfunSTUDIO viewer in the CD ROM supplied For information about...

Page 52: ...sing the date in the clock setting P15 and the departure date you set If you set WORLD TIME P53 to the travel destination the travel date is calculated using the date in the clock setting and the travel destination setting The travel date setting is memorised even if the camera is turned off If you set a departure date and then take a picture on a date before this departure date minus is displayed...

Page 53: ...home area from the screen shown in step 2 in Setting the home area HOME Setting the home area HOME Perform steps 1 2 and 3 1 Press 4 to select HOME and then press MENU SET to set 2 Press 2 1 to select your home area and then press MENU SET to set The current time is displayed on the top left of the screen and the time difference from GMT Greenwich Mean Time is displayed on the bottom left of the s...

Page 54: ... the travel destination is in and then press MENU SET to set The current time at the selected travel destination area is displayed on the top right of the screen and the time difference from the home area is displayed at the bottom left of the screen If daylight saving time is used at the travel destination press 3 The time advances by one hour Press 3 again to return to the original time 3 Press ...

Page 55: ... easily set the following items when recording Recording in normal picture mode Optical image stabilizer Burst White balance ISO sensitivity Picture size Quality 1 Press and hold FUNC when recording 2 Press 3 4 2 1 to select the menu item and the setting and then press MENU SET to close the menu You can also close the menu by pressing FUNC Menu Screen Item 1 3 W BALANCE P56 SENSITIVITY P58 ASPECT ...

Page 56: ...ise and sunset 10 Candlelight KlKelvin Colour Temperature Auto white balance The available white balance range is shown in the illustration above When you take a picture beyond the available white balance range the picture may appear reddish or bluish Even within the confines of the range the auto white balance may not operate properly if there are many light sources or there is no colour close to...

Page 57: ... or blue The white balance setting or the white balance fine adjustment setting is memorised even if the camera is turned off However the white balance setting in scene mode returns to AWB and the white balance fine adjustment setting returns to 0 if the scene mode is changed About the white balance When you take a picture with the flash the white balance may not be properly adjusted if the flash ...

Page 58: ...ensitivity cannot be set in the following cases Simple mode Motion picture mode Scene mode Press to display the REC mode menu and select the item to set P55 By changing the aspect ratio you can select an angle of view that matches the subject In motion picture mode you cannot select P49 The ends of the recorded pictures may be cut at printing P96 SENSITIVITY Setting the light sensitivity ISO sensi...

Page 59: ...mber of pixels that can be selected differs depending on the aspect ratio If you change the aspect ratio set the picture size EZ is an abbreviation of Extra optical Zoom P26 The extra optical zoom does not work in HIGH SENS in scene mode so the picture size for EZ is not displayed Pictures may appear mosaic depending on the subject and the recording conditions Refer to P98 for information about th...

Page 60: ...the time of focusing If you want to determine the focus position to take pictures switch the AF mode to or If the AF mode is set to or the AF area is not displayed until the picture is brought into focus Switch the AF mode to or if it is difficult to focus using The AF mode cannot be set in simple mode AF MODE Setting the focus method 5 area focusing The camera focuses on any of 5 focus areas This...

Page 61: ...places Be careful of camera jitter when you press the shutter button In simple mode the setting is fixed to MODE1 and in STARRY SKY P48 in scene mode it is fixed to OFF In motion picture mode MODE2 cannot be set Press to display the REC mode menu and select the item to set P55 When burst is set to ON it is activated while the shutter button is pressed You can only take one picture when the flash i...

Page 62: ...when recording in low light conditions that make focusing difficult If the AF assist lamp is set to ON an AF area with a size wider than usual is displayed and the AF assist lamp A turns on when you press the shutter button halfway in dark places etc Be careful about the following when using the AF assist lamp Do not look at the AF assist lamp from close up Do not cover the AF assist lamp with you...

Page 63: ...ures You cannot set the slow shutter in Intelligent ISO sensitivity mode and simple mode and SPORTS NIGHT SCENERY BABY1 BABY2 PET STARRY SKY and FIREWORKS in scene mode Press to display the REC mode menu and select the item to set P55 Select a colour mode that matches the recording conditions and your image of the recording When you take pictures in dark places noise may become visible To avoid no...

Page 64: ...r Favourites Motion picture BABY1 BABY2 in scene mode PET in scene mode Travel date Travel destination Pictures stamped with DATE STAMP Examples of 25 screens To return to normal playback Rotate towards T or press MENU SET The picture that was selected will appear To delete a picture during multi playback 1 Press 3 4 2 1 to select a picture and then press 2 Press 3 to select YES 3 Press MENU SET T...

Page 65: ...ture is displayed on the 1 screen playback screen To return to the 1 screen playback screen After the calendar screen is displayed rotate the zoom lever towards T to display 25 screens 9 screens and the 1 screen P64 The pictures are displayed without being rotated even if you set ROTATE DISP to ON P69 You can display the calendar between January 2000 and December 2099 If the recording date of the ...

Page 66: ...or press MENU SET To delete a picture during the playback zoom 1 Press 2 Press 3 to select YES 3 Press MENU SET You can also delete the recording information etc on the LCD monitor during playback zoom by pressing DISPLAY The more a picture is enlarged the more its quality deteriorates If you want to save the enlarged picture use the trimming function P76 The playback zoom may not operate if pictu...

Page 67: ...ded by a PC or other equipment may not be played back on the camera If you play back motion pictures that have been recorded with other equipment the picture quality may deteriorate or the pictures may not be played back When using a high capacity card it is possible that fast rewinding may be slower than usual The following functions cannot be used with motion pictures Playback zoom While playing...

Page 68: ...w Press 3 again to cancel pause Press 2 1 while paused to display the previous or next picture 3 Press 4 to finish Setting the duration Select DURATION on the screen shown in step 2 and set You can only select MANUAL when has been selected in step 1 Press 2 1 to display the previous or next picture when MANUAL is selected Menu screen Item 1 3 SLIDE SHOW P68 FAVORITE P69 ROTATE DISP P69 ROTATE P69 ...

Page 69: ...isplayed is cleared and the favourites setting is cancelled You can set up to 999 pictures as favourites Deleting all favourites 1 Select CANCEL on the screen shown in step 1 and then press MENU SET 2 Press 3 to select YES and then press MENU SET 3 Press MENU SET to close the menu When printing pictures at a photo printing store ALL DELETE EXCEPT P31 is useful so only the pictures you want to be p...

Page 70: ...ly blurred when the camera is connected to the TV with the AV cable supplied and played back vertically When you play back pictures on a PC they cannot be displayed in the rotated direction unless the OS or software is compatible with Exif Exif is a file format for still pictures which allows recording information etc to be added It was established by JEITA Japan Electronics and Information Techno...

Page 71: ...N the age is stamped on pictures taken when the age was set TRAVEL DATE P51 If you set this to ON the travel date is stamped on pictures taken when the travel date was set 3 Press MENU SET If you set DATE STAMP for a picture with a picture size larger than the picture size will become smaller as shown below 4 Press 3 4 to select YES or NO and then press MENU SET The screen shown appears when you s...

Page 72: ... performing step 2 perform steps 2 onwards in Single setting We recommend imprinting the date when the card or the built in memory has sufficient free space You can set up to 50 pictures at one time in MULTI If you select YES in step 4 when the pictures selected in MULTI include protected pictures the message appears and the protected pictures only cannot be imprinted with date stamp Depending on ...

Page 73: ...ts The number of prints icon A appears The number of prints can be set from 0 to 999 The DPOF print setting is cancelled when the number of prints is set to 0 2 Press MENU SET twice to close the menu Multi setting 1 Press 2 1 to select the picture to print then press 3 4 to set the number of prints The number of prints icon B appears Repeat the above procedure You cannot set all the pictures at on...

Page 74: ...to write print information to media and then use the information on a DPOF compliant system DPOF print setting is a convenient function when printing pictures with a printer that supports PictBridge The date printing setting on the printer may take priority over the date printing setting on the camera Check the date printing setting on the printer also P82 It is necessary to delete all previous DP...

Page 75: ...d or an SDHC Memory Card they cannot be deleted when the card s Write Protect switch B is set to LOCK Protected pictures cannot be rotated Press to display the PLAY mode menu and select the item to set P67 This function is useful if you want to reduce the file size of a picture to attach it to an e mail or upload it to a website 1 Press 2 1 to select the picture and then press 4 The following pict...

Page 76: ...ures stamped with DATE STAMP 2 Enlarge or reduce the parts to be trimmed with the zoom lever 3 Press 3 4 2 1 to move the position of the part to be trimmed 4 Press shutter button The message DELETE ORIGINAL PICTURE appears 5 Press 3 4 to select YES or NO and then press MENU SET The picture is overwritten when you select YES The trimmed pictures cannot be restored when they are overwritten A trimme...

Page 77: ...rd to the built in memory If you press MENU SET while copying pictures from the built in memory to the card the copying will stop halfway Do not turn the camera off or perform any other operations before copying is finished The data on the built in memory or the card may be damaged or lost 4 Press MENU SET several times to close the menu If you copy picture data from the built in memory to a card ...

Page 78: ...mat the card If you press MENU SET while formatting the built in memory the formatting will stop halfway However all the pictures will be deleted Formatting irretrievably deletes all the data including any protected pictures Check the data carefully before formatting If the card has been formatted on a PC or other equipment format it on the camera again Use batteries with sufficient power P21 or t...

Page 79: ...W AC6G optional Set the camera to a mode other than mode 1 Turn on the camera and the PC 2 Connect the camera to a PC via the USB connection cable A supplied Connect the USB connection cable with the mark facing the 1 mark on the DIGITAL socket Hold the USB connection cable at C and insert straight in or take straight out If you forcibly insert the USB connection cable at a slant or upside down yo...

Page 80: ...mple P1000999 JPG 2 When the card just recorded to contains for example a folder with the number 100 100_PANA in it and that card is removed and replaced with a card that has a folder with the number 100 in it recorded by a camera from a different maker 100XXXXX with XXXXX being the name of the maker and then a picture is recorded 3 When recording after selecting NO RESET P20 from the SETUP menu P...

Page 81: ...C are connected The information on the card may be damaged Use Safely Remove Hardware in the task tray on your PC when replacing the card Pictures edited or rotated with a PC may be displayed in black in playback mode P30 multi playback P64 and calendar playback P65 Read the operating instruction for the PC If a card is not inserted when the camera is connected to the PC you can edit or access the...

Page 82: ...ut If the mode dial is not set to when the camera is connected to the printer disconnect the USB connection cable set the mode dial to and then connect the USB connection cable again Depending on the printer it may be necessary to turn it off and then on again Do not use any other USB connection cables except the supplied one If a card is not inserted when the camera is connected to the PC you can...

Page 83: ...e displayed you cannot select it even if FAVORITE is set to ON PLEASE SELECT THE PICTURE TO PRINT PictBridge 1 3 100_0001 PRINT SELECT MENU MULTI PRINT MENU SET MENU SET 1秒 OFF SINGLE SELECT NUM OF PRINTS 1 PRINT WITH DATE PAPER SIZE PAGE LAYOUT SELECT CANCEL SET MENU PRINT START OFF MULTI SELECT Multiple pictures are printed at one time After selecting MULTI SELECT press 2 1 to select the picture...

Page 84: ...er For details refer to the operating instructions of the printer PRINT WITH DATE If the printer does not support date printing the date cannot be printed on the picture NUM OF PRINTS Set the number of prints You can set up to 999 prints PAPER SIZE Paper sizes that can be set with this unit The paper sizes are displayed on pages 1 2 and 2 2 Press 4 to select These items cannot be displayed when th...

Page 85: ...f this happens during printing press MENU SET and stop printing at once If not printing disconnect the USB connection cable The camera is receiving an error message from the printer when the indication lights orange during printing After finishing printing make sure there are no problems with the printer If the total number of DPOF prints or the number of DPOF pictures printed is high pictures may...

Page 86: ...e aspect setting black bands may be displayed on the top and bottom or the left and right of the pictures Do not use any other AV cables except the supplied one Audio playback is monaural Read the operating instructions for the TV When you play back a picture vertically it may be blurry You can view pictures on TVs in other countries regions which use the NTSC or PAL system when you set VIDEO OUT ...

Page 87: ...y P58 ISO limit P41 17 Colour mode P63 18 Picture mode P49 4 3 16 9 19 Available recording time P49 20 Histogram P34 21 Age P46 This is displayed for about 5 seconds when this unit is turned on in BABY1 BABY2 or PET in scene mode Number of days that have passed since the departure date P51 22 Travel date P51 23 Elapsed recording time P49 24 Current date and time Travel destination setting P53 This...

Page 88: ...a is turned on after setting the clock and after switching from playback mode to simple mode Zoom Extra optical zoom P26 Easy zoom P27 12 Number of days that have passed since the departure date P51 13 Backlight compensation P26 14 Self timer mode P39 15 AF assist lamp P62 C In playback 1 Playback mode P30 2 Number of DPOF prints P73 3 Protected picture P74 4 Motion pictures P66 5 Picture size P59...

Page 89: ...netic equipment such as microwave ovens TVs video games etc If you use the camera on top of or near a TV the pictures and sound on the camera may be disrupted by electromagnetic wave radiation Do not use the camera near cell phones because doing so may result in noise adversely affecting the pictures and sound Recorded data may be damaged or pictures may be distorted by strong magnetic fields crea...

Page 90: ... are damaged Inserting damaged batteries in the camera will damage the camera Bring charged spare batteries when going out Be aware that the operating time of the batteries becomes shorter in low temperature conditions such as at a ski resort Dispose of unusable batteries Batteries have a limited life Do not throw batteries into fire because they may cause an explosion Do not allow battery termina...

Page 91: ...back to unlock it P14 75 78 NO VALID PICTURE TO PLAY Record a picture or insert a card with a recorded picture and then play it THIS PICTURE IS PROTECTED Delete or overwrite the picture after cancelling the protect setting P74 THIS PICTURE CANNOT BE DELETED SOME PICTURES CANNOT BE DELETED Pictures not based on the DCF standard cannot be deleted If you want to delete some pictures format the card a...

Page 92: ...camera is turned off before removing or inserting the card to avoid damage MOTION RECORDING WAS CANCELLED DUE TO THE LIMITATION OF THE WRITING SPEED OF THE CARD When you set the picture quality to 30fpsVGA or 30fps16 9 we recommend using a High Speed SD Memory Card with 10MB s or greater displayed on the package Depending on the type of SD Memory Card or SDHC Memory Card motion picture recording m...

Page 93: ... using Ni MH batteries 3 The LCD monitor turns off while the camera is turned on Is power save mode P19 or economy mode P19 activated Press the shutter button halfway to cancel these modes Are the batteries exhausted Replace them with batteries which have sufficient capacity When you use Ni MH batteries charge them 4 The camera turns off immediately after it is turned on Are the batteries exhauste...

Page 94: ...ightness or the hue may change slightly when the shutter speed becomes fast This occurs due to the characteristics of fluorescent light It is not a malfunction 9 A vertical reddish line appears on the LCD monitor while the shutter button is pressed halfway or recording motion pictures This is a phenomenon called smear It is a characteristic of CCD and appears when the subject has a bright part Bla...

Page 95: ...cture being played back is rotated and displayed in an unexpected direction The camera has a function that automatically rotates the display of pictures recorded holding the camera vertically If you take pictures when pointing the camera up or down the camera may recognise that it is being held vertically You can display the pictures without being rotated when ROTATE DISP P69 is set to OFF You can...

Page 96: ...amera to the TV with the AV cable supplied and then play back the pictures on the camera 4 The picture is not displayed fully on the TV Set the aspect of the TV on the camera P20 5 The picture cannot be transferred when the camera is connected to a PC Is the camera connected to the PC correctly Is the camera recognised by the PC correctly 6 The card is not recognised by the PC The built in memory ...

Page 97: ... the clock 0 00 0 0 0 is recorded 8 The displayed picture is slightly distorted Depending on the zoom magnification the recorded picture is slightly distorted This is called distortion aberration The closer you get to the subject to take pictures of in wide angle the more distorted the picture you take is However this is not a malfunction 9 Colours appear on the picture which were not found in the...

Page 98: ...ixels Quality Built in Memory Approx 27 MB 7 14 10 21 16 33 Card 16 MB 3 7 5 10 8 16 32 MB 7 16 11 23 18 36 64 MB 16 34 24 48 38 75 128 MB 35 69 50 99 78 150 256 MB 68 135 98 190 150 290 512 MB 135 270 195 380 300 590 1 GB 270 540 390 770 600 1180 2 GB 550 1090 790 1530 1220 2360 4 GB 1090 2150 1560 3010 2410 4640 Aspect ratio Picture size 2M EZ 1600k1200 pixels 1M EZ 1280k960 pixels 0 3M EZ 640k4...

Page 99: ...7 150 170 330 512 MB 150 300 340 650 1 GB 300 600 680 1310 2 GB 620 1220 1360 2560 4 GB 1230 2410 2680 5020 Aspect ratio Picture size 5 5M 3072k1728 pixels 2M EZ 1920k1080 pixels Quality Built in Memory Approx 27 MB 9 19 25 48 Card 16 MB 4 10 12 25 32 MB 10 21 27 53 64 MB 22 45 57 105 128 MB 46 92 115 220 256 MB 91 180 230 430 512 MB 180 350 450 860 1 GB 360 710 910 1720 2 GB 730 1420 1800 3410 4 ...

Page 100: ...isplayed Aspect ratio Picture quality setting 30fps VGA 10fps VGA 30fps QVGA 10fps QVGA 30fps 16 9 10fps 16 9 Built in Memory Approx 27 MB j j 53 s 2 min 40 s j j Card 16 MB 6 s 26 s 26 s 1 min 23 s 5 s 22 s 32 MB 17 s 59 s 59 s 2 min 55 s 14 s 50 s 64 MB 39 s 2 min 2 min 6 min 33 s 1 min 46 s 128 MB 1 min 23 s 4 min 10 s 4 min 10 s 12 min 20 s 1 min 11 s 3 min 35 s 256 MB 2 min 45 s 8 min 10 s 8 ...

Page 101: ... pixels When the aspect ratio setting is 848k480 pixels Only when using a card 30 or 10 frames second with audio Burst recording Burst speed Changes depending on the type of card picture size and quality Number of recordable pictures Depends on the remaining capacity of the built in memory or the card Performance in burst recording is only with SD Memory Card SDHC Memory Card MultiMediaCard perfor...

Page 102: ...xels Motion pictures When the aspect ratio setting is 640k480 pixels only when using card 320k240 pixels When the aspect ratio setting is 848k480 pixels only when using card Quality Fine Standard Recording file format Still Picture JPEG based on Design rule for Camera File system based on Exif 2 21 standard DPOF corresponding Motion pictures QuickTime Motion JPEG Audio recording is available Inter...

Page 103: ...103 VQT1C60 MEMO ...

Page 104: ...ushita Electric Industrial Co Ltd Web Site http panasonic net A VQT1C60 F0107Km0 QuickTime and the QuickTime logo are trademarks or registered trademarks of Apple Computer Inc used under license therefrom A ...

Reviews: