background image

- 25 -

VQT3T39

Setting the menu


The menu types and items that are displayed vary according to the mode.


The setting methods vary depending on the menu item.


In Recording Mode, the menu screen can also be exited by pressing the shutter button 
halfway.

Refer to the procedure example below when operating the [Setup] menu, [Rec] menu and 
[Playback] menu.

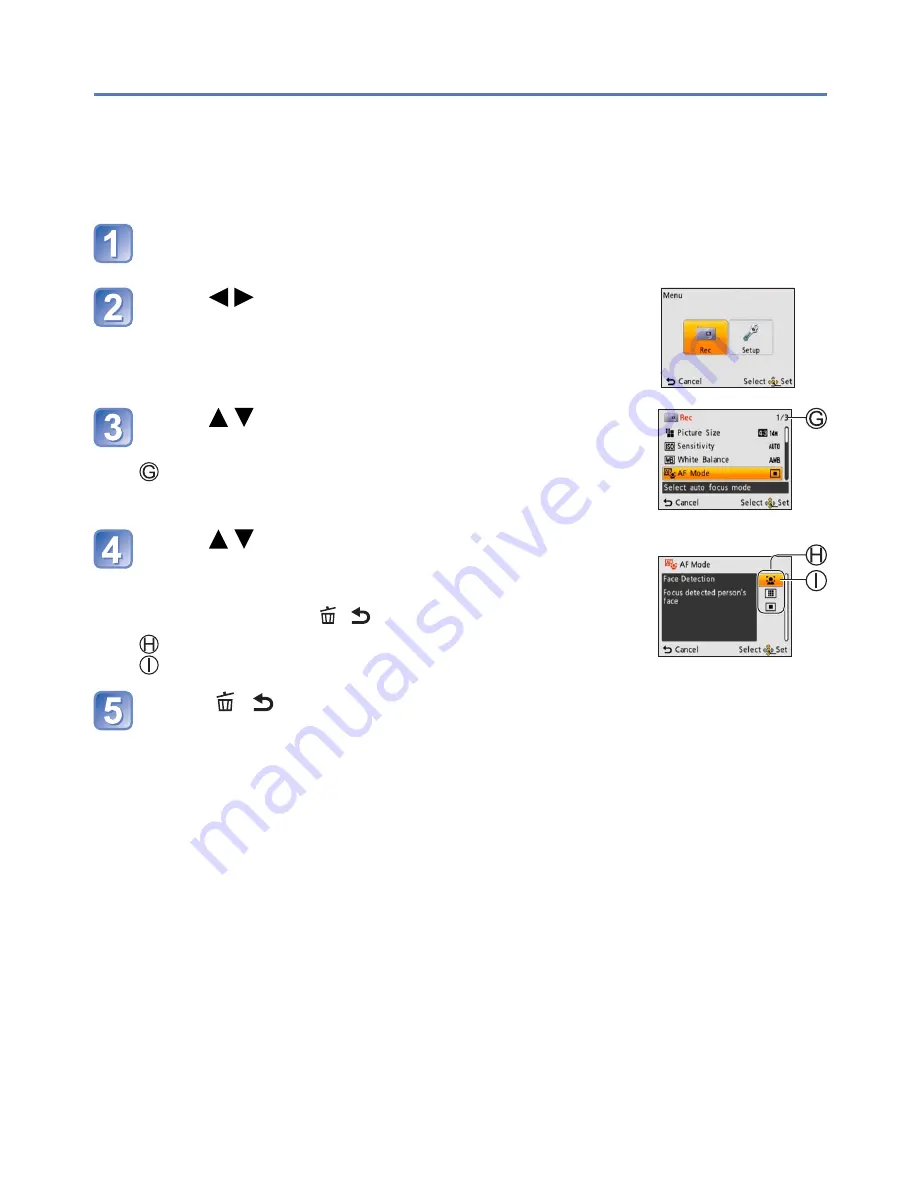
Example:  Changing [AF Mode] in the [Rec] menu in [Normal Picture] Mode

Press [MENU/SET]

The menu options screen is displayed.

Press     to select [Rec], and then press 

[MENU/SET]

Press     to select [AF Mode], and then 

press [MENU/SET]

:  Pages

Press     to select a setting, and then 

press [MENU/SET]

The selected setting is set.


• To cancel 

 Press [  /  ]

: Settings
: Selected setting

Press [  /  ] several times

The menu closes and the monitor returns to the previous screen.

Summary of Contents for Lumix DMC-LS5

Page 1: ...VQT3T39 Operating Instructions for advanced features Digital Camera Model No DMC LS5 Before use please read these instructions completely...

Page 2: ...lt in memory 12 Recording capacity guidelines pictures recording time 13 Setting the clock 14 Basics Taking pictures with automatic settings Intelligent Auto Mode 16 Using zoom 18 Taking motion pictur...

Page 3: ...ns 40 Fireworks 41 Beach 41 Snow 41 Using the Rec menu 42 Picture Size 42 Rec Quality 43 Sensitivity 43 White Balance 44 AF Mode 45 Digital Zoom 46 Burst 46 Red Eye Removal 47 Stabilizer 47 Clock Set...

Page 4: ...e dust or sand or where water can come into contact with the camera Avoid using the camera under the following conditions which present a risk that sand water or foreign material may enter the camera...

Page 5: ...compensation for missed shots We cannot compensate for missed shots if technical problems with the camera or card prevent recording Carefully observe copyright laws Unauthorized use of recordings whi...

Page 6: ...atteries or HR6 AA rechargeable Ni MH nickel metal hydride batteries is indicated as battery or batteries in the text Please dispose of all packaging appropriately Keep small parts in a safe place out...

Page 7: ...trap eyelet We recommend using the supplied hand strap to avoid dropping the camera DIGITAL socket 55 58 MENU SET menu display set 24 Left cursor button Self timer 34 Down cursor button Changing infor...

Page 8: ...ures may be reduced if flash zoom or other functions are used frequently or in colder climates Supplied batteries or optional Panasonic alkaline batteries Fully charged Panasonic Ni MH batteries optio...

Page 9: ...y reduced even when fully charged Ni MH batteries are used the batteries have reached the end of their life Please purchase new batteries Do not use a damaged or dented battery especially connectors e...

Page 10: ...es and card making sure that their orientation is correct Batteries Insert the batteries all the way with correct orientation of and poles Card Insert all the way firmly until it clicks Battery check...

Page 11: ...careful not to drop them To remove card Press the centre of the card and pull the card straight toward you Be sure not to drop the batteries Be sure to remove the batteries if you are not using the ca...

Page 12: ...ed to a card if one is inserted or to the built in memory if not Built in memory Approx 10 MB Pictures may be copied between cards and the built in memory 54 The access time for the built in memory ma...

Page 13: ...ecording time The number of pictures you can take and the recording time varies in proportion to card capacity and depending on recording conditions and type of card Recording picture capacity still p...

Page 14: ...MENU SET Press to select the items year month day hour minute display order or time display format and press to set Select the setting item Change the values and settings Select either 24hrs or AM PM...

Page 15: ...digital photo centre After the time has been set the date can be printed correctly even if the date is not displayed on the camera screen Select Clock Set from Setup or Rec menu perform and If approx...

Page 16: ...us is not aligned flashing The type of scene detected is indicated by a blue icon for two seconds Holding the camera Speaker Flash Microphone To avoid camera shake hold it with both hands keeping your...

Page 17: ...cene types may be determined for the same subject If undesired scene type is selected we recommend manually selecting the appropriate Recording Mode We recommend using a tripod and the self timer with...

Page 18: ...ntre of the CCD are used in recording enabling higher magnification The zoom ratio and the zoom bar displayed on the screen are estimates Extra Optical Zoom cannot be used in the following cases Motio...

Page 19: ...is no space left to store the motion picture recording automatically ends Additionally recording in progress may be stopped depending on the card used Display the screen for Recording Mode selection...

Page 20: ...zoom position displayed for 1 sec Each time the T side of the zoom button is pressed the magnification increases It moves through four levels after 1x 2x 4x 8x and 16x The picture quality displayed b...

Page 21: ...0s Operations during Motion Picture Playback Pause Play MENU SET Stop Fast rewind 2 steps Single frame rewind while paused Fast forward 2 steps Single frame forward while paused Press during fast rewi...

Page 22: ...reen display to single screen display Select picture with and press MENU SET Pictures taken without clock settings are displayed with the date 1st January 2011 Pictures displayed with cannot be played...

Page 23: ...deletion Use batteries with sufficient power Pictures cannot be deleted in the following cases Protected pictures Card switch is in LOCK position Pictures not of DCF standard 20 To delete multiple up...

Page 24: ...Changing the settings Exiting the menu screen Menu type Setup menu Making the camera more convenient to use Enables you to specify clock settings sound volume and so on to make the camera easier to us...

Page 25: ...low when operating the Setup menu Rec menu and Playback menu Example Changing AF Mode in the Rec menu in Normal Picture Mode Press MENU SET The menu options screen is displayed Press to select Rec and...

Page 26: ...ted to computer printer during motion picture recording playback during Slide Shows Specific periods apply in the following situations Intelligent Auto Mode 5 MIN and when a Slide Show is paused 10 MI...

Page 27: ...in Burst mode or Panorama Assist in Scene Mode regardless of settings Motion pictures cannot be automatically reviewed Reset Reset to the default settings Reset Rec settings Reset setup parameters Whe...

Page 28: ...built in memory remove the cards Only inserted card will be formatted if present built in memory will be formatted if no card is inserted Always format cards with this camera All protected pictures an...

Page 29: ...Jitter alert display Using the Rec menu to change settings and set up your own recording environment Shutter button Display the screen for Recording Mode selection Select Normal Picture Mode Take a p...

Page 30: ...h no colour contrast Taking pictures through glass or near objects emitting light In the dark or with significant jitter When too close to object or when taking pictures of both distant and close obje...

Page 31: ...such as recording information For motion picture or Slide Show playback the operational guidance information is either displayed or not displayed on the LCD monitor In Recording Mode Recording inform...

Page 32: ...res with backlight or under bright lighting e g fluorescent Forced On Red Eye Always flash reduce red eye Slow Sync Red Eye Automatically judges whether or not to flash reduce red eye slow shutter spe...

Page 33: ...uction varies depending on the subject and is affected by factors such as distance to the subject whether the subject is looking at the camera during preliminary flash and so on In some cases the effe...

Page 34: ...Focus will be automatically adjusted immediately before recording if shutter button is pressed fully In Self Portrait Scene Mode 10sec is unavailable Display Selftimer Select time duration Can also b...

Page 35: ...object and background Depending on the brightness this may be impossible in some cases Under exposed Optimum exposure Over exposed Plus direction Minus direction After exposure adjustment the adjustm...

Page 36: ...etc for given scenes Selecting a Scene Mode inappropriate for the actual scene may affect the colouring of your picture You cannot set the Sensitivity setting because it is automatically adjusted by...

Page 37: ...zoom is positioned to the T telephoto edge and the closer the camera is brought to the subject the greater the effect will be Self Portrait Take pictures of yourself Tips Use of the 2 second self tim...

Page 38: ...t Next and repeat steps and Section of picture that was taken last time After you finish taking pictures select Exit and press MENU SET to set Tips Use a tripod When it is dark use the self timer to r...

Page 39: ...ips Tripod self timer recommended Notes Shutter speed may slow down up to 8 seconds After recording the shutter may stay closed up to 8 seconds to process the signal This is not a malfunction Food Tak...

Page 40: ...MENU SET Tips Make sure Age is ON before taking a picture Notes You can perform print settings on your computer using the software PHOTOfunSTUDIO on the supplied CD ROM when you print Age on a still...

Page 41: ...es Shutter speed is fixed to 1 4 Setting of shutter speed changes if exposure compensation is operated Beach Brings out the clear blues of the sky and the sea without darkening subject Notes Do not to...

Page 42: ...80 12 5 M 4320 2880 10 5 M 4320 2432 This setting is not available in Intelligent Auto Mode represent the aspect ratios of the still pictures Extra Optical Zoom can be used for picture sizes indicated...

Page 43: ...ng motion pictures it is recommended to use batteries with sufficient power If you attempt to play motion pictures recorded with the camera on other devices playback may not be possible or the picture...

Page 44: ...light sources present Under fluorescent lighting LED lighting fixture etc the appropriate White Balance will vary depending on the lighting type so use AWB or White Balance setting is fixed to AWB in...

Page 45: ...the yellow AF area are also focused Subject not centred in picture AF area displayed only when focused 9 area focusing Automatically focuses on any of 9 points Determined position for focus 1 area foc...

Page 46: ...is fixed to OFF in High Sens Scene Mode Cannot change the setting in Motion Picture Mode The setting in other Recording Mode is applied Burst Enables a rapid succession of still pictures to be taken S...

Page 47: ...d eye effect may not be corrected under certain conditions When ON is selected is displayed in the flash icon Stabilizer Automatically detects and prevents jitter Mode Settings ON OFF The setting is f...

Page 48: ...l Play 20 Slide Show 49 Category Selection 50 When no card is inserted pictures are played back from the built in memory After you switch from Recording Mode to Playback Mode the Playback Mode automat...

Page 49: ...ENU SET 50 Make sure Start is selected and press MENU SET Operations during Slide Show Pause Play While paused Previous While paused Next Stop Changing settings such as playback duration Select Setup...

Page 50: ...Selection You can narrow down the pictures displayed to view only a selected category Select a category and press MENU SET Category Recording information such as Scene Modes Portrait Self Portrait Ni...

Page 51: ...ed to facilitate e mail attachment and use in webpages etc Still pictures recorded at the smallest recording pixel level cannot be further reduced Set up Press MENU SET Playback menu Select Resize SIN...

Page 52: ...in step on the previous page Select size Select still picture up to 50 pictures Resize setting To cancel Press MENU SET again Select OK Select Yes Picture quality is reduced after resizing May not be...

Page 53: ...make setting SINGLE MULTI Picture protected Picture protected To cancel Press MENU SET again After confirmation press to return to the menu screen To clear all Select CANCEL in step and select Yes To...

Page 54: ...a picture and then press MENU SET Select Yes To cancel Press MENU SET After confirmation press to return to the menu screen Copying pictures may take several minutes Do not turn off power or perform o...

Page 55: ...ith sufficient power When importing pictures from the built in memory remove any memory cards To cancel connection Click Safely Remove Hardware in the Windows System Tray disconnect USB connection cab...

Page 56: ...It may not be possible to import if there are 1000 or more pictures on the card Windows Drives are displayed in My Computer or Computer folder Mac Drives are displayed on the desktop Displayed as LUM...

Page 57: ...ecorded still pictures or motion pictures to a computer Backing up still pictures or motion pictures that have been copied to a computer to media such as a DVD Editing still pictures on a computer Sti...

Page 58: ...as needed Connect camera to printer Make sure you use the supplied USB connection cable Use of cables other than the supplied USB connection cable may cause malfunction Select PictBridge PTP on the c...

Page 59: ...ower Printing multiple pictures Select Multi Print in step on the previous page Select item Multi Select Scroll between pictures with select pictures with MENU SET to print Press MENU SET again to rel...

Page 60: ...ctures of 16 9 Aspect Ratio check in advance that the store can accept this size Using computer Print settings for recording date and text information can be made using the supplied CD ROM PHOTOfunSTU...

Page 61: ...8 10 203 2 254 mm LETTER 216 279 4 mm CARD SIZE 54 85 6 mm Page Layout printer takes priority 1 picture no border 1 picture with border 2 pictures 4 pictures Items only compatible with the printer ma...

Page 62: ...Mode 34 Focus range Zoom 18 46 9 ISO Sensitivity 43 Aperture value Shutter speed 29 10 Exposure Compensation 35 11 Current date time 12 Age in years months 40 13 Elapsed recording time 19 14 Save des...

Page 63: ...y capacity 12 5 Picture number Total pictures 20 Elapsed playback time 21 6 Recorded date and time Age in years months 40 ISO Sensitivity 43 Aperture value Shutter speed 29 7 Recording Mode 16 19 29 3...

Page 64: ...not be copied in the following cases Picture of same name already exists in built in memory when copying from card File is not of DCF standard Picture taken or edited on a different device Not enough...

Page 65: ...ent card Motion recording was cancelled due to the limitation of the writing speed of the card When recording motion picture use a card rated with an SD speed class of Class 6 or higher SD speed class...

Page 66: ...pended Camera is set to Auto Power Off 26 Turn on the power again Recording Cannot record pictures Built in memory card is full Free space by deleting unwanted pictures 23 Recorded pictures look white...

Page 67: ...r part or the entire screen may have a reddish tint when recording or pressing the shutter button halfway This is a characteristic of CCD and may appear if subject contains brighter areas Some blurrin...

Page 68: ...ed to worry Date age is not displayed The current date and Age are displayed for about 5 seconds in instances such as when the camera is turned on when you switch from Playback Mode to Recording Mode...

Page 69: ...red eye correction is operating if a subject is recorded that has skin coloured areas with red areas inside the digital red eye correction function may blacken the red areas We recommend setting the...

Page 70: ...DXC html When you insert a card a message will be displayed requesting you to format the card but do not format it If Access remains displayed on the LCD monitor turn off the camera and then disconnec...

Page 71: ...being made Does not affect recording Clock is incorrect Camera has been left for a long period Reset the clock 14 When using zoom picture becomes slightly warped and the edges of the subject become c...

Page 72: ...is unit near radio transmitters or high voltage lines If you record near radio transmitters or high voltage lines the recorded pictures and or sound may be adversely affected Do not extend the supplie...

Page 73: ...once the internal components have warmed up Batteries Be sure to remove the batteries from the camera if you are not using it for a long period of time If the batteries are left in the camera a small...

Page 74: ...es You can use Ni MH batteries after charging them with a dedicated battery charger However improper handling of the batteries may cause leakage heat generation fire or an explosion Observe the follow...

Page 75: ...r lost due to malfunction static electricity accidents breakdowns repairs or other operations Panasonic will not be liable for any damage that occurs direct or indirect as a result of the alteration o...

Page 76: ...hen the picture size is set to 3 million pixels 3M or less Focus Face Detection 9 area focusing 1 area focusing Focus range Normal 15 cm 0 49 feet Wide 0 6 m 1 97 feet Tele to Scene Mode There may be...

Page 77: ...ly when using an SD Memory Card Recording file format Still picture JPEG based on Design rule for Camera File system based on Exif 2 3 standard Motion pictures QuickTime Motion JPEG motion pictures wi...

Page 78: ...e and the QuickTime logo are trademarks or registered trademarks of Apple Inc used under license therefrom Other names company names and product names printed in these instructions are trademarks or r...

Reviews: