background image

Playback (advanced)

75

4

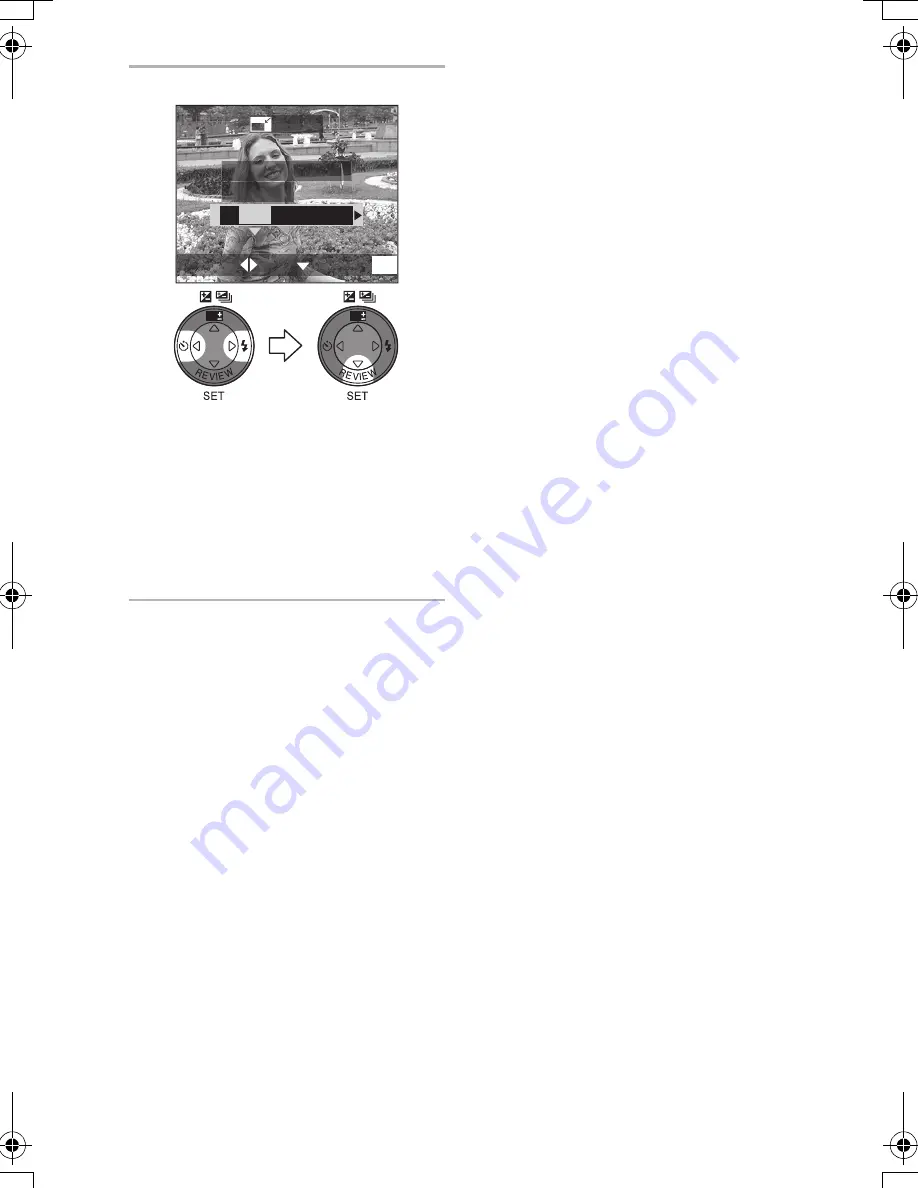
Select [YES] or [NO] and set it.

• When you select [YES], the picture 

is overwritten.

• When the original picture is 

protected, you cannot overwrite the 
resized picture.

• Close the menu by pressing the 

[MENU] button 2 times after 
finishing the resizing.

¬

Suggestions/Tips 

¬

• The following pictures cannot be 

resized.
– Pictures not over 640

k

480 pixels

– Pictures recorded after setting the 

picture size to [HDTV]

– Motion images
– Flip animation (DMC-LC80/

DMC-LC70)

– Pictures with audio (DMC-LC80/

DMC-LC70)

– Rotated pictures (You can resize 

them if you turn them back.)

• It may not be possible to resize 

pictures recorded with other 
equipment.

DELETE ORIGINAL
PICTURE?

YES

NO

RESIZE

CANCEL

SET

SELECT

MENU

WB

WB

LC80GN.book  75 ページ  2004年6月17日 木曜日 午前10時18分

Summary of Contents for Lumix DMC-LC50GN

Page 1: ...Operating Instructions Digital Camera Model No DMC LC80GN DMC LC70GN DMC LC50GN Before use please read these instructions completely VQT0M82...

Page 2: ...ademark Other names company names and product names printed in these instructions are trademarks or registered trademarks of the companies concerned The screens in these instructions are displayed as...

Page 3: ...technology is employed to produce the LCD monitor screen The result is more than 99 99 effective pixels with a mere 0 01 of the pixels inactive or always lit However this is not a malfunction and does...

Page 4: ...tures using Burst Mode 39 Playback basic Playing Back Pictures 40 9 Pictures Multi Playback 41 Using the Playback Zoom 42 Deleting Pictures 43 Recording pictures advanced Using the Mode Dial 45 Taking...

Page 5: ...Back with Slide Show 71 Adding Audio to Recorded Pictures Audio Dubbing DMC LC80 DMC LC70 73 Resizing the Pictures 74 Trimming the Pictures 76 Formatting the Card 78 Playing Back Pictures with a TV S...

Page 6: ...Memory Card 16 MB RP SD016B In the text it is indicated as Card Batteries AA Ni MH nickel metal hydride Battery Charger DE 894A AC Cable K2CJ2DA00002 or K2CJ2DA00011 AV Cable DMC LC80 DMC LC70 K1HB08C...

Page 7: ...39 12 Cursor buttons 2 Self timer Button P38 4 REVIEW SET Button P32 1 Flash Mode Button P34 3 Exposure Compensation P36 Auto Bracket P37 White Balance Fine Adjustment P52 Button 13 MENU Button P20 14...

Page 8: ...connected to the camera 25 Tripod Receptacle 26 Battery Door P16 21 24 A 25 26 DMC LC50 DMC LC70 DMC LC50 A DMC LC80 DMC LC70 DMC LC50 23 22 The Mode Dial Select the desired recording mode for the sc...

Page 9: ...18 Read page 11 for the batteries 2 Turn the camera on The power indicator 1 blinks When the card is not inserted When there is no remaining capacity and time on the card When the remaining power is l...

Page 10: ...ger from the electrical outlet after the charging is completed Use Panasonic AA Ni MH batteries nickel metal hydride supplied Environment charge error Charge in a place with a surrounding temperature...

Page 11: ...nd using new Alkaline batteries If you will be using the camera for a long period of time using rechargeable Ni MH batteries is more practical The exhausted batteries may recover the performance when...

Page 12: ...es that appear mechanically damaged swollen or show signs of leakage Do not store batteries in high humidity or high temperature environments Keep batteries away from small children Do not install bat...

Page 13: ...Read the Operating Instructions for the battery charger Ni MH batteries have a limited life The battery power decreases gradually over time If available time seems much shorter purchase new batteries...

Page 14: ...e to Wide and vice versa in every recording Turning the camera off per 10 recordings Leave the camera until the battery is cooled down Recordable number under low temperature Temperature 0 C Other rec...

Page 15: ...le number playback time varies depending on the batteries used We recommend turning the camera off frequently while recording to maintain the power of the battery for a long time CIPA is an abbreviati...

Page 16: ...ions Tips If you will not be using the camera for a long time remove the batteries After the fully charged batteries or new batteries have been inserted for more than 3 hours the clock setting is stor...

Page 17: ...and MultiMediaCard are small lightweight removable external memory cards The reading writing speed of an SD Memory Card is fast The SD Memory Card is equipped with a Write Protect switch that can inh...

Page 18: ...til it clicks Insert the card pressing gently until it locks in place If the card will not insert freely it may be reversed Do not force the card Do not touch the connection terminals on the back side...

Page 19: ...he camera off and on You can set the year from 2000 to 2099 The 24 hour system is used Date Printing You can set the date printing in DPOF print setting on this camera P68 Using the supplied software...

Page 20: ...esired value Close the menu by pressing the MENU button after finishing the setting 1 2 REC 1 3 SETUP PICT SIZE W BALANCE QUALITY AUTO 1600 EXIT SET SELECT MENU SENSITIVITY AUTO REC SETUP 1 3 MONITOR...

Page 21: ...s not enlarged When using pictures with audio the auto review function works while recording the audio or the data into the card regardless of the setting on the auto review function The picture is no...

Page 22: ...ears If you select YES on the screen the folder number is also reset to 100 The file number reset is also reflected on Simple mode RESET Recording mode only The camera is reset to the initial settings...

Page 23: ...D monitor or not In recording mode P25 A Display B Display with histogram DMC LC80 DMC LC70 C Non display Recording guide line D Non display E LCD monitor is turned off Histogram In playback mode P40...

Page 24: ...e distributed as B the exposure is adequate and the brightness is well balanced When the values are concentrated to the right as C the picture is over exposed Example of histogram A Under Exposed B Pr...

Page 25: ...to take the picture A Press the shutter button halfway to focus B Press the shutter button fully to take the picture The focus indication 2 turns on the AF area 1 turns from white to green and then t...

Page 26: ...Hold the lower left of the camera with your left hand Do not cover the microphone with your fingers or other items DMC LC80 DMC LC70 Do not touch the lens barrel Power Indicator A Lit When turning the...

Page 27: ...aperture value and the shutter speed do not turn red when the flash is activated The brightness of the screen may differ from that of recorded pictures In particular when taking pictures in dark plac...

Page 28: ...caused by automatic adjustment of the aperture It is not a malfunction When pressing the shutter button the screen may become bright or whitish for a moment However the recorded picture will not be i...

Page 29: ...ints E MAIL This selection favours a smaller file size optimized for home page and e mail use 2 Close the menu by pressing the MENU button after finishing the setting 3 Take the picture Settings in Si...

Page 30: ...N indication appears and the backlight compensation function is activated This function compensates the brightness of the subject darkened by the backlight by brightening the whole of the screen If yo...

Page 31: ...Simple mode NO RESET RESET USB MODE VIDEO OUT LANGUAGE However the setting on NO RESET and LANGUAGE in setup menu is reflected to the Simple mode The settings on the Simple mode are not applied to oth...

Page 32: ...nsate the exposure P36 2 Enlarge and shift the picture 1k 4k 8k 8k 4k 1k When you change the magnification or the position to be displayed the zoom position indication A appears for about 1 second to...

Page 33: ...s appear further away Wide To make subjects appear closer Tele Suggestions Tips The picture may be slightly distorted according to the lens The distortion will increase as you make subjects wider and...

Page 34: ...u take pictures of people in low lighting conditions Forced ON The flash is activated every time regardless of the recording condition Use this when your subject is back lit or under fluorescent light...

Page 35: ...y flash activated The flash icon turns red when activating the flash and pressing the shutter button halfway When the flash is being charged the status indicator and the flash icon blink red and you c...

Page 36: ...mpensate the exposure You can compensate from j2 EV to i2 EV in steps of 1 3 EV Suggestions Tips EV is an abbreviation of Exposure Value and it is the amount of light given to the CCD by the aperture...

Page 37: ...en Once you take a picture auto bracket will be cancelled automatically When taking pictures using auto bracket after the exposure compensation the pictures are based on the compensated exposure When...

Page 38: ...tripod or in other cases setting the self timer to 2 seconds is a convenient way to stabilize the jitter caused by pressing the shutter button The self timer indicator 1 blinks and the shutter is act...

Page 39: ...ng writing speed of a MultiMediaCard is slower than that of an SD Memory Card In the following cases the burst speed becomes slow due to the signal processing however this is not a malfunction a When...

Page 40: ...y holding down 2 1 once release 2 1 before reaching the picture to be played back then press 2 1 to forward rewind pictures until the desired picture appears In review playback in the recording mode o...

Page 41: ...ate the zoom lever towards The picture with the number coloured in yellow appears To delete a picture during a 9 pictures multi playback Press the button When the confirmation screen appears press 2 t...

Page 42: ...mation screen appears press 2 to select YES and press 4 P43 Suggestions Tips The more the picture is enlarged the more its quality deteriorates The playback zoom may not operate if pictures have been...

Page 43: ...ULTI DELETE The button illustrated is from the DMC LC80 DMC LC70 2 Select the pictures to be deleted The selected pictures appear with When 4 is pressed again the setting is cancelled The icon blinks...

Page 44: ...vered Please double check before deleting pictures Pictures that are protected P69 or not of DCF standards P40 are not deleted Do not turn off the camera or remove the card while deleting Use the batt...

Page 45: ...t the mode dial to P8 Conditions Operation When 15 seconds passed without any operation When ECONOMY on the SETUP menu is set to LEVEL1 or LEVEL2 P20 The message MONITOR OFF blinks for 2 seconds The L...

Page 46: ...he lens at a distance of 10 cm Wide from the subject Preparation Set the mode dial to P8 Normal Macro mode Suggestions Tips In Macro mode we recommend using a tripod When the camera lens is at a dista...

Page 47: ...ording outdoors in the daytime When using indoors the hue may change You can change the white balance setting P51 When you want to change the exposure or the hue compensate the exposure P36 or adjust...

Page 48: ...ing picture of a landscape at night When flash is set to Forced OFF you can capture the night illumination scenery itself with slower shutter speed Max about 8 seconds The focus range is about 3 m Sug...

Page 49: ...second Close the menu by pressing the MENU button after finishing the setting 2 Press the shutter button halfway When the subject is focused the focus indication 1 lights 3 Press the shutter button fu...

Page 50: ...ess indication may appear for a while but this is not a malfunction After recording starts the auto focus zoom aperture values are fixed with the first frame Recording could suddenly stop depending on...

Page 51: ...he manual White Balance feature you can achieve a more accurate reproduction of the colour white Preparation Set the mode dial except for P8 Setting items AUTO for setting the white balance automatica...

Page 52: ...adjustment Suggestions Tips About the White Balance setting The setting of the white balance is applied to the other recording modes In Simple mode the white balance is fixed to AUTO When taking a pic...

Page 53: ...icture Size The smaller the picture size you select the more pictures you can store on the card In addition a small file size allows you to attach the picture to an e mail or post it on a website more...

Page 54: ...on the subject The number of remaining pictures may not correspond with recorded pictures Refer to P94 for the number of recordable pictures Taking Pictures using Spot Mode When using Spot mode the si...

Page 55: ...to auto bracket burst mode it is not possible to take pictures with audio Using the AF Trigger DMC LC80 DMC LC70 When taking a picture with prefocus set the button for starting AF Auto focus to FOCUS...

Page 56: ...tton again When you press the shutter button halfway indication disappears and then the aperture value and the shutter speed are displayed When you press the shutter button halfway without pressing th...

Page 57: ...l zoom ON Entering the digital zoom range When you rotate the zoom lever to the extreme Tele position the on screen zoom indication may momentarily pause This is not a malfunction You can enter the di...

Page 58: ...ting items NATURAL The picture quality becomes softer VIVID The picture quality becomes sharper In Simple mode Motion image mode you cannot adjust the picture quality When you take pictures in dark pl...

Page 59: ...tures 4 Check the image You can check the previous or following image with 2 1 Delete unnecessary images with button REC 3 3 SETUP PICT ADJ COL EFFECT OFF FLIP ANIM EXIT SET SELECT MENU STANDARD WB WB...

Page 60: ...button 3 times after finishing the setting Playing back a created flip animation Follow the same procedure as you play back motion images P63 Deleting all the still images used for flip animation Whe...

Page 61: ...o not appear in normal review P32 Flip animations may not be played back by other equipment The flip animations recorded with setting FRAME RATE to 5fps cannot be played back on the camera which does...

Page 62: ...with audio icon 2 Play back the audio Suggestions Tips Audio cannot be played back from this camera Connect to a television P79 or PC P82 to play back audio Audio cannot be played back with DMC LC50 T...

Page 63: ...ons Tips Audio cannot be played back from this camera Connect to a television P79 or PC P82 to play back audio Audio cannot be played back with DMC LC50 You cannot use the zoom function while playing...

Page 64: ...Still pictures can only be rotated in normal playback When playing back rotated pictures in zoom playback or multi playback pictures appear in original angle The recording date of the picture is chang...

Page 65: ...Single setting 1 Select DPOF PRINT 2 Select SINGLE 3 Select the picture and set the number of prints The number of prints can be set from 0 to 999 The number of prints icon appears When the number of...

Page 66: ...the menu by pressing the MENU button 2 times after finishing the setting To cancel all settings 1 Select DPOF PRINT PLAY 1 2 SETUP PROTECT ROTATE DPOF PRINT SLIDE SHOW AUDIO DUB EXIT SET SELECT MENU...

Page 67: ...X PLAY 1 2 SETUP PROTECT ROTATE DPOF PRINT SLIDE SHOW AUDIO DUB SINGLE MULTI CANCEL INDEX EXIT SET SELECT MENU WB WB CANCEL ALL DPOF YES NO CANCEL ALL DPOF PRINT SETTINGS SELECT SET WB WB PLAY 1 2 SET...

Page 68: ...a convenient function when you print pictures with printers supporting DPOF printing DPOF is the abbreviation for Digital Print Order Format This feature allows you to designate which pictures will b...

Page 69: ...SET The protect icon appears CANCEL The protect icon disappears Close the menu by pressing the MENU button 2 times after finishing the setting PLAY 1 2 SETUP PROTECT ROTATE DPOF PRINT SLIDE SHOW AUDI...

Page 70: ...cts the pictures from accidental erasure formatting the card will permanently delete all data P78 If you want to delete protected pictures cancel the protect setting first The protect setting may not...

Page 71: ...MC LC70 By setting it to ON the audio of the pictures with audio can be played back during Slide Show DPOF SET Only when setting to DPOF You can select the pictures you want to set to the Slide Show C...

Page 72: ...rinting is set on the picture the DPOF icon 1 and the number of prints appear in white In motion image playback Slide Show is not available The DPOF setting of Slide Show will not be applied to the DP...

Page 73: ...audio recording The original audio is overwritten The audio dubbing cannot be used with motion images or protected pictures 3 Stop audio recording Even if you do not press 4 after about 10 seconds th...

Page 74: ...bsite Preparation Set the mode dial to P8 1 Select RESIZE 2 Select the picture and set it 3 Select the size and set it 2048 2048k1536 pixels DMC LC80 1600 1600k1200 pixels 1280 1280k960 pixels 640 640...

Page 75: ...the resizing Suggestions Tips The following pictures cannot be resized Pictures not over 640k480 pixels Pictures recorded after setting the picture size to HDTV Motion images Flip animation DMC LC80...

Page 76: ...mode dial to P8 1 Select TRIMMING 2 Select the picture to trim 3 Enlarge or decrease the picture PLAY 2 2 SETUP TRIMMING RESIZE FORMAT EXIT SET SELECT MENU WB WB SET SELECT EXIT MENU TRIMMING 1600 100...

Page 77: ...han 640k480 pixels Pictures recorded after setting the picture size to HDTV Motion images Flip animation DMC LC80 DMC LC70 Pictures with audio DMC LC80 DMC LC70 Rotated pictures You can trim them if y...

Page 78: ...nnot be recovered If the card is formatted all images and data will be permanently erased They cannot be reclaimed If any important pictures are on the card please copy them to your PC before proceedi...

Page 79: ...0 Connect the video cable to video input socket of the TV DMC LC50 A Yellow to the video input socket B White to the audio input socket DMC LC80 DMC LC70 3 Turn the TV on and select external input 4 T...

Page 80: ...rage or PTP REC SETUP 2 3 USB MODE NO RESET RESET CLOCK SET EXIT SET SELECT MENU WB WB WB USB SET SELECT Mass Storage PTP USB MODE USB Direct Print PictBridge WB WB USB mode PC to be connected Printer...

Page 81: ...hen the camera is shipped Mass Storage is selected When connecting to a PC which includes the above mentioned OS and setting the USB MODE to PTP the messages shown on the right appear on the LCD monit...

Page 82: ...ection cable 1 Turn the camera on and set the USB MODE according to the OS you use Set to PTP or Mass Storage Refer to Before Connecting with USB Connection Cable on page 80 Do not set to PTP if you u...

Page 83: ...s In this case stop the communication because the data may be destroyed Then turn the camera off and use the following power source P13 New batteries Charged batteries AC adaptor optional DMW AC2 Refe...

Page 84: ...unication the power indicator blinks and the alarm beeps In this case stop the communication because the data may be destroyed Then turn the camera off and use the following power source New batteries...

Page 85: ...print When PTP is set the screen shown above appears 2 Select the picture to print 3 Select YES and print Press 3 and then press 2 1 to set the number of prints Press 4 to print pictures Press the ME...

Page 86: ...date printing Suggestions Tips When the total number of pictures exceeds the following numbers the number of remaining pictures does not appear on the screen PictBridge Print 1000 or more USB Direct P...

Page 87: ...e DPOF print P65 in advance After selecting DPOF and starting the prints the recorded date is printed When you start printing you do not need to press DISPLAY button Follow the procedure above in thes...

Page 88: ...DMC LC80 DMC LC70 P24 15 AF area P25 16 AF Trigger DMC LC80 DMC LC70 P55 17 Shutter speed indication P25 18 Aperture indication P25 19 Exposure compensation P36 20 Current date and time P19 This is di...

Page 89: ...Self timer P38 10 Card access indication P17 11 AF area P25 12 Backlight compensation indication P30 13 Current date and time P19 This is displayed for about 5 seconds when turning the camera on setti...

Page 90: ...ry indication P13 8 Folder File number 9 Page number Total pictures 10 Histogram DMC LC80 DMC LC70 P24 It will be displayed when the DISPLAY button is pressed 11 Recording information P23 Recording mo...

Page 91: ...or sounds may be adversely affected Do not spray insecticides or volatile chemicals onto the camera If the camera is sprayed with such chemicals the camera body may be damaged and the surface finish...

Page 92: ...the batteries accidentally check to see if the battery body and terminals are deformed Inserting deformed battery to the camera may damage the camera Be sure to remove the batteries after use If they...

Page 93: ...ck to the normal brightness Folder Composition When a Memory Card with data recorded on it is inserted into a PC the folders shown below will appear In the 100_PANA folder it is possible to record up...

Page 94: ...MB 6 13 8 16 10 20 17 34 32 MB 14 27 17 34 22 43 36 72 64 MB 29 56 35 70 45 88 74 149 128 MB 58 115 72 142 91 178 150 301 256 MB 117 229 144 283 181 354 300 600 512 MB 236 462 291 571 365 714 604 1209...

Page 95: ...AN T BE DELETED SOME PICTURES CAN T BE DELETED The pictures not based on the DCF standard cannot be deleted CAN T BE SET ON THIS PICTURE CAN T BE SET ON SOME PICTURES If the pictures are not based on...

Page 96: ...to insufficient battery power not a malfunction Replace the batteries 2 5 The Power Save is set before shipment Therefore the camera is turned off in 2 minutes if you do not operate it This is not a m...

Page 97: ...These pixels do not affect the recorded pictures 15 Noise appears on the LCD monitor 15 In dark places noise may appear to maintain the brightness of the LCD monitor This does not affect the pictures...

Page 98: ...res second high speed 2 pictures second low speed Max 8 pictures standard Max 5 pictures fine for 2048k1536 pixels Performance is only with SD Memory Card MultiMediaCard performance will be less Motio...

Page 99: ...2 2 standard i640k480 pixels QuickTime picture with audio DMC LC80 DMC LC70 Motion images QuickTime Motion JPEG motion images with audio Motion images are recorded with audio in DMC LC80 DMC LC70 In...

Page 100: ...VQT0M82 A Matsushita Electric Industrial Co Ltd Web Site http www panasonic co jp global...

Reviews: