background image

26   

VQT2X53 (ENG)

 (ENG) VQT2X53

   27

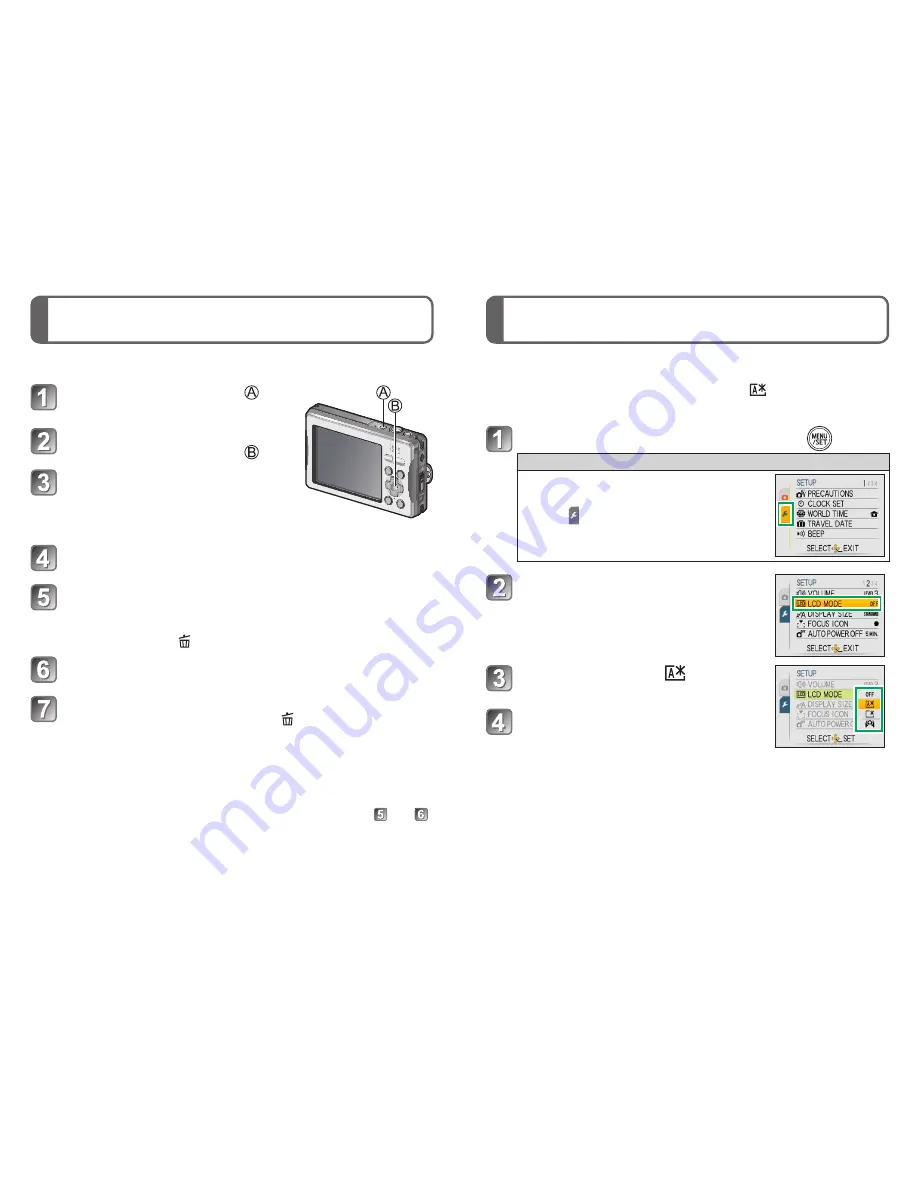
Setting the menu

Setting the Clock

Refer to the procedure example below when operating the [SETUP] 

menu, [REC] menu and [PLAYBACK] menu.

Example:  Setting [LCD MODE] from [OFF] to   in the [NORMAL 

PICTURE] Mode

Press [MENU/SET] to display the menu 

Switching to the [SETUP] menu

1 Press ◄.

2  Press ▼ to select the [SETUP] menu 

icon [   ].

3 Press ►.

• Select a menu item next and set it.

Press ▲▼ to select [LCD MODE] 

and then press ►

 •Depending on the item, its setting may not 

appear or it may be displayed in a different 

way.

Press ▲▼ to select   and then 

press [MENU/SET] to set
Press [MENU/SET] to close the 

menu

The Clock is not set when the camera is shipped.

Press the Power button ( )

[PRECAUTIONS] is displayed.

Press 

 to select [YES], and 

then press [MENU/SET] ( )
Press 

◄►

 to check the 

waterproof precautions, and at 

the final screen (11/11), press 

[MENU/SET]
Press [MENU/SET]

Press 

◄►

 to select the items (year, month, 

day, hour, minute, display order or time display 

format), and press ▲▼ to set

 •To cancel → Press  .

Press [MENU/SET]

Confirm the setting and press [MENU/SET]

 •To return to the previous screen, press  .

 •Turn on the power again and check the time display.


To change time setting

Select [CLOCK SET] from [REC] or [SETUP] menu, perform   and  . 

Summary of Contents for Lumix DMC-FT10

Page 1: ...e read these instructions completely Please also refer to the Operating Instructions PDF format contained on the CD ROM supplied You can learn about advanced operation methods and check the Troubleshooting EB Model number suffix EB denotes UK model Web Site http www panasonic europe com ...

Page 2: ...ampere fuse is fitted in this plug Should the fuse need to be replaced please ensure that the replacement fuse has a rating of 5 ampere and that it is approved by ASTA or BSI to BS1362 Check for the ASTA mark or the BSI mark on the body of the fuse If the plug contains a removable fuse cover you must ensure that it is refitted when the fuse is replaced If you lose the fuse cover the plug must not ...

Page 3: ...nd on the camera may be disrupted by electromagnetic wave radiation Do not use the camera near cell phones because doing so may result in noise adversely affecting the pictures and sound Recorded data may be damaged or pictures may be distorted by strong magnetic fields created by speakers or large motors Electromagnetic wave radiation generated by microprocessors may adversely affect the camera d...

Page 4: ...rmation Information on Disposal in other Countries outside the European Union These symbols are only valid in the European Union If you wish to discard these items please contact your local authorities or dealer and ask for the correct method of disposal Cd Note for the battery symbol bottom two symbol examples This symbol might be used in combination with a chemical symbol In this case it complie...

Page 5: ...or customers within the Republic of Ireland 01 289 8333 Visit our website for product information www panasonic co uk E mail customer care panasonic co uk Technical Support for AV Software For customers within the UK 0844 844 3869 For customers within the Republic of Ireland 01 289 8333 Direct Sales at Panasonic UK For customers 0844 844 3856 Order accessory and consumable items for your product w...

Page 6: ...to have the camera inspected subject to a fee for its waterproof performance Any malfunction caused by the customer s mishandling such as water entering the camera is not covered by the warranty Handling the camera Do not leave the camera for a long time in a cold environment where the temperature is very low such as a ski resort or very high at 40 C or higher in particular locations such as under...

Page 7: ...ject to strong water flows such as in rapids or under waterfalls The strong water pressure may cause a malfunction The camera sinks in water Attach the camera securely to yourself such as by wearing the hand strap around your wrist to prevent you from dropping and losing the camera If the camera is splashed by substances such as detergent soap hot spring water bath powder sun oil sunscreen or chem...

Page 8: ...ontact area Card Battery door A gap forms and allows water to enter Cleaning the rubber seals When a foreign object such as hair sand dust or liquid adheres to the rubber seal or rubber seal contact area water may enter within a few seconds and cause a malfunction When cleaning make sure that no foreign objects get inside the camera Be especially careful when removing very small or wet sand partic...

Page 9: ...s are adhered to it After using the brush clean it by removing any adhered foreign objects Example of foreign objects on the inner side of the card battery door Rubber seal contact area around the card battery compartment Rubber seal area around the card battery door Example of foreign objects on the inner side of the terminal cover Rubber seal contact area around the connection socket Rubber seal...

Page 10: ...button or zoom button flows to the outside For this reason bubbles may appear when the camera is soaked in water but this is not a malfunction Water may accumulate around the card battery compartment or the connection sockets after using the camera underwater or soaking it in fresh water If the card battery door is opened while the camera is not completely dry water droplets may adhere to the card...

Page 11: ...or button Macro mode Up cursor button Exposure Compensation Right cursor button Flash In this manual the button that is used is shaded or indicated by Always use a genuine Panasonic AC adaptor DMW AC5E optional If while recording motion pictures using the AC adaptor the power supply is cut off due to a power cut or if the AC adaptor is disconnected etc the motion picture being recorded will not be...

Page 12: ...companies and are not genuine Panasonic products The battery is not charged when the camera is shipped Charge the battery and set the clock before use Charge the battery with the charger indoors 10 C to 30 C Connect the charger to the electrical outlet Charging light CHARGE On Charging in progress approx 110 min if fully depleted Off Charging complete Detach the battery after charging is completed...

Page 13: ... card http panasonic net avc sdcard information SDXC html Cards in capacities not listed at left are not supported SDHC Memory Cards 4 GB 32 GB SDXC Memory Cards 48 GB 64 GB Latest information http panasonic jp support global cs dsc This Site is English only Keep the Memory Card out of reach of children to prevent swallowing Check that no foreign objects have adhered to the camera Turn off the pow...

Page 14: ...ed in a different way Press to select and then press MENU SET to set Press MENU SET to close the menu The Clock is not set when the camera is shipped Press the Power button PRECAUTIONS is displayed Press to select YES and then press MENU SET Press to check the waterproof precautions and at the final screen 11 11 press MENU SET Press MENU SET Press to select the items year month day hour minute dis...

Page 15: ...ction In other cases it is displayed at the point on the subject which is in focus Focus Max W 10 cm 0 33 feet Max T 50 cm 1 64 feet and above Automatic Scene Detection Camera identifies scene when pointed at subject and makes optimum settings automatically The type of scene detected is indicated by a blue icon for two seconds i PORTRAIT People are detected i NIGHT PORTRAIT People and night scener...

Page 16: ...tely release the shutter button after pressing it all the way When there is no space left to store the motion picture recording automatically ends Motion pictures can be recorded continuously for up to 15 minutes Also continuous recording exceeding 2 GB is not possible To record more than 15 minutes or 2 GB press the shutter button again Remaining time for continuous recording is displayed on the ...

Page 17: ...ssistant Deleted pictures cannot be recovered Press the Delete button to delete the displayed picture Press to select YES and then press MENU SET You have practiced the basic operations introduced in these Operating Instructions and want to progress to advanced operations You want to check the Troubleshooting In these kinds of situations refer to the Operating Instructions PDF format contained on ...

Page 18: ...e displayed click the Show the contents of this folder to display them For Macintosh Turn the PC on and insert the CD ROM containing the Operating Instructions supplied Open the Manual folder in the CD ROM and then copy the PDF file with the desired language inside the folder Double click the PDF file to open it Digital Camera Information for your safety Power Source DC 5 1 V Power Consumption Whe...

Page 19: ...5 W x 2 50 H x 0 85 D excluding the projection part Mass With card and battery Approx 172 0 38 lb Excluding card and battery Approx 152 0 34 lb Operating temperature 10 C 1 to 40 C 1 The performance of the battery number of recordable pictures operating time and the LCD monitor ghost images appearance etc may drop temporarily when using the camera between 10 C and 0 C in cold environments such as ...

Page 20: ...Recommended recharging temperature 10 C to 30 C The battery cannot be recharged when the temperature is below 0 C The charging light blinks when the battery cannot be recharged Battery pack lithium ion Panasonic DMW BCH7E Information for your safety Voltage capacity 3 7 V 695 mAh Operating temperature 10 C to 40 C When using the camera 10 C to 30 C Recommended recharging temperature MEMO ...

Page 21: ... names company names and product names printed in these instructions are trademarks or registered trademarks of the companies concerned EU VQT2X53 M0810KZ0 B Web Site http panasonic net Panasonic Corporation 2010 Pursuant to at the directive 2004 108 EC article 9 2 Panasonic Testing Centre Panasonic Marketing Europe GmbH Winsbergring 15 22525 Hamburg Germany ...

Reviews: