Panasonic Lumix DMC-3D1 Owner'S Manual Download Page 19

- 19 -

Preparation

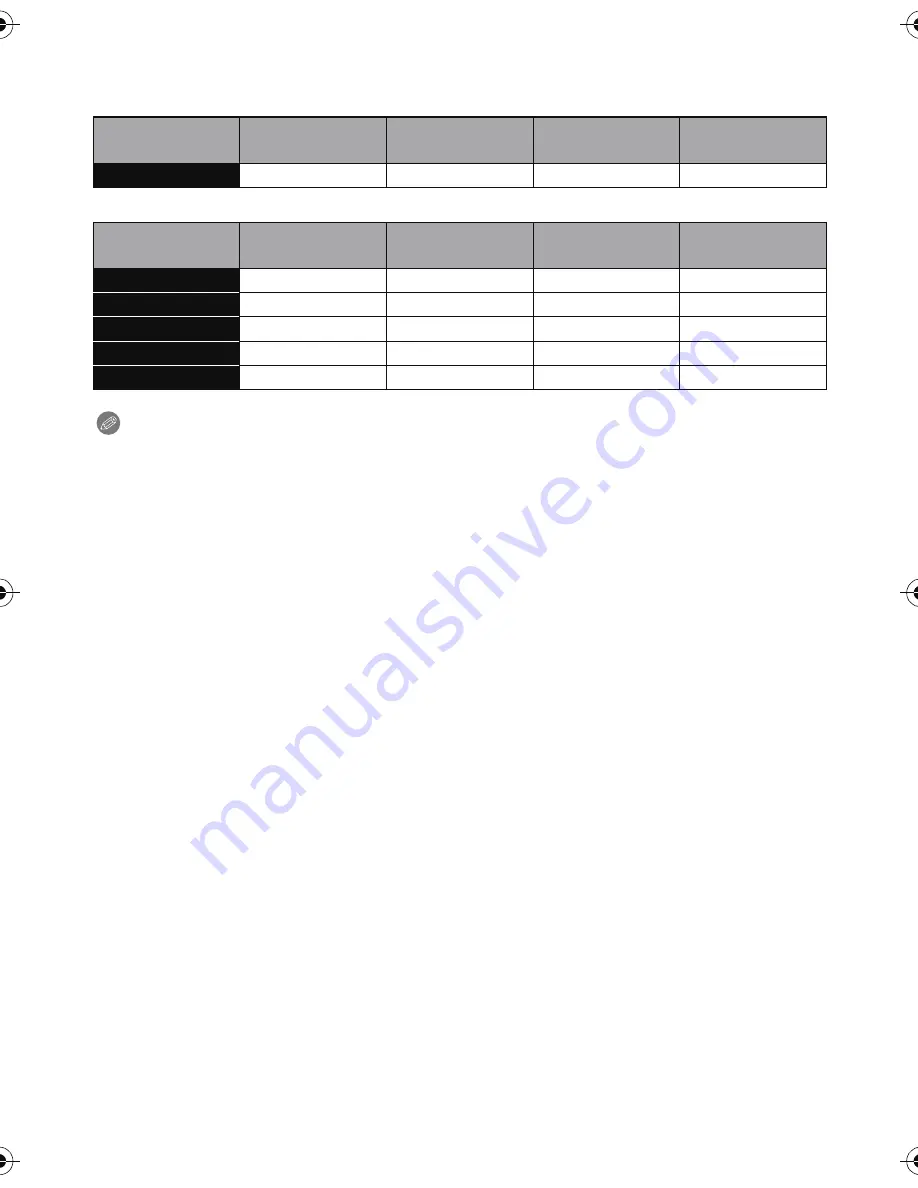
Available recording time (when recording motion pictures)

“h” is an abbreviation for hour, “m” for minute and “s” for second.

When recording in 3D

When recording in 2D

Note

Number of recordable pictures/available recording time for the card may decrease when 
[Upload Set] is performed.

The maximum time for continuous recording of 3D motion pictures is 29 minutes 59 seconds.

Maximum time to record motion pictures continuously with [FSH] in [AVCHD] is 29 minutes 
59 seconds.

Maximum time to record motion pictures continuously with [MP4] is 29 minutes 59 seconds or 
up to 4 GB.
The maximum available recording time continuously is displayed on the screen.

Recording 

quality setting

Built-in Memory

(Approx. 70 MB)

2 GB

32 GB

64 GB

1920

k

1080

j

14m00s

4h10m

8h27m

Recording 

quality setting

Built-in Memory

(Approx. 70 MB)

2 GB

32 GB

64 GB

FSH (AVCHD)

j

14m00s

4h10m

8h27m

SH (AVCHD)

j

14m00s

4h10m

8h27m

FHD (MP4)

j

12m15s

3h23m10s

6h51m9s

HD (MP4)

j

23m24s

6h27m53s

13h4m56s

VGA (MP4)

1m41s

51m30s

14h13m41s

28h47m30s

DMC-3D1PDF-VQT3U43_mst.book  19 ページ  2011年10月24日 月曜日 午後1時9分

Summary of Contents for Lumix DMC-3D1

Page 1: ...Owner s Manual for advanced features Digital Camera Model No DMC 3D1 VQT3U43 Before connecting operating or adjusting this product please read the instructions completely...

Page 2: ...ording still pictures while recording motion pictures 41 Playing Back Pictures Normal Play 42 Forward or rewind the image 42 Displaying Multiple Screens Multi Playback 43 Using the Playback Zoom 43 Pl...

Page 3: ...Stamp 105 3D Adjustment 106 Clock Set 106 Using the Motion Picture Mode Menu 107 Rec Mode 107 Rec Quality 108 Continuous AF 110 Wind Cut 110 Playback Editing Various methods to playback 111 Slide Sho...

Page 4: ...tes 139 Printing the Pictures 140 Selecting a single picture and printing it 141 Selecting multiple pictures and printing them 141 Print Settings 142 Others Screen Display 144 Cautions for Use 146 Mes...

Page 5: ...pictures P26 28 When you connect this unit to a television that supports 3D you can view the 3D images you have recorded using the unit P30 On the unit 3D images are played back in 2D When the 3D 2D...

Page 6: ...with a lot of dust water sand etc Liquids sand and other foreign material may get into the space around the lens buttons etc Be particularly careful since it may not just cause malfunctions but it may...

Page 7: ...e text Battery Charger is indicated as battery charger or charger in the text SD Memory Card SDHC Memory Card and SDXC Memory Card are indicated as card in the text The card is optional You can record...

Page 8: ...Zoom lever P65 11 Motion picture button P28 38 12 3D 2D switch P26 30 34 13 Touch panel LCD monitor P9 61 144 14 Strap eyelet Be sure to attach the strap when using the camera to ensure that you will...

Page 9: ...ied stylus pen Do not operate with your fingernails Do not scratch or press the LCD monitor too hard Wipe the LCD monitor with dry soft cloth when it gets dirty with finger prints and others For infor...

Page 10: ...supplied for detailed operation or if it is hard to operate with your fingers Do not place it where small children can reach Do not place the stylus pen on the LCD monitor when storing LCD monitor may...

Page 11: ...y packs are not adequately protected with internal protection to meet the requirements of appropriate safety standards There is a possibility that these battery packs may lead to fire or explosion Ple...

Page 12: ...on how the battery has been used The charging time for the battery in hot cold environments or a battery that has not been used for long time may be longer than normal Battery indication The battery...

Page 13: ...pictures given above based upon one picture taken every 30 seconds Recording motion pictures These times are for an ambient temperature of 23 oC 73 4 oF and a humidity of 50 RH Please be aware that th...

Page 14: ...erating times shorten and the number of recordable pictures is reduced In low temperature environments such as on ski slopes When using LCD Mode When operations such as flash and zoom are used repeate...

Page 15: ...e arrow to remove the battery Card Push it securely all the way until you hear a click while being careful about the direction in which you insert it To remove the card push the card until it clicks t...

Page 16: ...d on the built in memory and played back When a card has been inserted Pictures can be recorded on the card and played back When using the built in memory k access indication When using the card acces...

Page 17: ...rform the operation again Write Protect switch A provided When this switch is set to the LOCK position no further data writing deletion or formatting is possible The ability to write delete and format...

Page 18: ...able pictures and available recording time A Number of recordable pictures B Available recording time The number of recordable pictures and the available recording time are an approximation These vary...

Page 19: ...ord motion pictures continuously with FSH in AVCHD is 29 minutes 59 seconds Maximum time to record motion pictures continuously with MP4 is 29 minutes 59 seconds or up to 4 GB The maximum available re...

Page 20: ...n the raised state a message will appear Please lower the lens cover If the power is off when the lens cover is in the lowered state press and hold down the power button to turn on the power Turn the...

Page 21: ...area B Time at the travel destination You can continue to switch the settings by continuously touching 3 4 Touch to cancel the date and time settings without setting a date and time To set the displa...

Page 22: ...ry Leave the charged battery in the unit for 24 hours to charge the built in battery Note If the clock is not set the correct date cannot be printed when you order a photo studio to print the picture...

Page 23: ...mera is held vertically and tilted up and down to record pictures the Direction Detection function may not work correctly Motion pictures taken with the camera held vertically are not displayed vertic...

Page 24: ...the zoom The focus range is displayed in red when it is not focused after pressing the shutter button halfway The focus range may change gradually depending on the zoom position e g Focus range during...

Page 25: ...while moving the camera as you compose the picture You can repeatedly retry the actions in step 1 before pressing the shutter button fully Subjects and recording conditions which are difficult to focu...

Page 26: ...e C Shutter speed Be careful not to get too close to the subject If the distance to the subject is too close the 3D alert indication will appear The recommended range for 3D recording may differ depen...

Page 27: ...of view when the shutter button is pressed halfway The recommended ranges for 3D recording are target ranges Note You cannot record 3D pictures in vertical orientation Following menus can be set For...

Page 28: ...at the edges of the image Approx 90 cm 2 96 feet Wide Approx 3 4 m 11 2 feet Tele to Set the 3D 2D switch to 3D Start recording by pressing the motion picture button A Available recording time B Elaps...

Page 29: ...ing time displayed on the screen may not decrease regularly Depending on the type of the card the card access indication may appear for a while after recording motion pictures This is not a malfunctio...

Page 30: ...porting VIERA Link input of the TV will be switched automatically and playback screen will be displayed Refer to P131 for details For the images recorded in 3D will appear on the thumbnail display at...

Page 31: ...the television using an HDMI mini cable optional When inserting a card into a television with an SD card slot Type of television 3D 2D switch Display on television 3D compatible television 3D 3D 2D 2D...

Page 32: ...umbnail it may take a few seconds for playback to start After playback the thumbnail display may take a few seconds to reappear Depending on the 3D compatible television you are using it may take some...

Page 33: ...Mode touch to switch to Recording Mode and then touch Touch the Recording Mode icon Normal Picture Mode P34 The subjects are recorded using your own settings Intelligent Auto Mode P35 The subjects are...

Page 34: ...o 2D In Recording Mode touch Touch Aim the AF area at the point you want to focus on Press the shutter button halfway to focus and then press it fully to take the picture A ISO sensitivity B Aperture...

Page 35: ...n Intelligent ISO sensitivity control Auto White Balance Face Detection Quick AF i Exposure i Resolution i Zoom AF Assist Lamp Red Eye Removal Stabilizer Continuous AF Image quality is fixed to A Set...

Page 36: ...hen iHandheld Nite Shot is set to On and is detected while taking handheld night shots pictures of the night scenery will be taken at a high burst speed and composed into a single picture This mode is...

Page 37: ...e identified for the same subject Subject conditions When the face is bright or dark the size of the subject the color of the subject the distance to the subject the contrast of the subject when the s...

Page 38: ...ing time A 2D image is recorded using the left lens You can record motion pictures fitting each Recording Mode Release the motion picture button right after you press it The recording state indicator...

Page 39: ...focus If you operate the zoom etc while recording motion pictures the sound of the operation may be recorded Zoom speed may be slower than normal in recording motion pictures If the Extended Optical...

Page 40: ...sed when extensive editing is needed or when uploading videos to the internet About the compatibility of the recorded motion pictures Motion pictures recorded in AVCHD or MP4 may be played back with p...

Page 41: ...recording Simultaneously recorded still pictures will be recorded in an aspect ratio of W and picture size of 9M Because the motion pictures and still pictures are recorded with separate left and rig...

Page 42: ...with other camera may not be able to playback on this unit In Recording Mode touch The display switches to normal playback Forward or rewind the image Drag P9 the screen horizontally Forward drag from...

Page 43: ...witched gradually by dragging the screen up or down P9 Pictures displayed using cannot be played back Using the Playback Zoom Touch the part to enlarge firmly 1k 2k 4k 8k 16k You can also enlarge redu...

Page 44: ...ictures recorded with this unit In Playback Mode select a picture with the motion picture icon such as and touch in the middle of the screen A Motion picture icon B The motion picture recording time A...

Page 45: ...ded motion picture Touch during Motion Picture playback Touch Confirmation screen is displayed It is executed when Yes is selected Note Pictures cannot be created from 3D motion pictures The picture i...

Page 46: ...card that are being played back will be deleted Pictures that are not in the DCF standard or those that are protected cannot be deleted To delete a single picture In Playback Mode select the picture t...

Page 47: ...Multi or Delete All Delete All Confirmation screen is displayed Picture is deleted by selecting Yes It is possible to delete all pictures except the ones set as favorite when All Delete Except is sele...

Page 48: ...Setting menu items Touch Touch the menu icon Menu Description of settings Rec P85 to 106 Rec Mode only This menu lets you set the Coloring Sensitivity Aspect Ratio Number of pixels and other aspects...

Page 49: ...the menu item The page can be changed by touching Touch the Settings Depending on the menu item its setting may not appear or it may be displayed in a different way Description of the icon is displaye...

Page 50: ...registered The items will be replaced In Step 2 drag registered items out of the shortcut setting area Registration is canceled leaving an empty item Note Settings in the Setup Menu cannot be set You...

Page 51: ...e time difference from the home area Clock Set World Time Set the time in your home area and travel destination You can display the local times at the travel destinations and record them on the pictur...

Page 52: ...ing of other Recording Mode will be reflected When you connect the camera to a TV the volume of the TV speakers does not change Travel Date Departure date and return date of the travel as well as the...

Page 53: ...ration The number of recordable pictures decreases in LCD Mode LCD Display Adjust the brightness and contrast or red or blue tint of the LCD monitor Brightness Adjust the brightness Contrast Saturatio...

Page 54: ...e following cases Intelligent Auto Mode Multi Playback When recording motion pictures Playback Zoom Photo Frame in Scene Mode When HDMI mini cable is connected Calendar Dual Play Motion picture record...

Page 55: ...Flash Burst in Scene Mode When using Auto Bracket During the Burst Mode In Intelligent Auto Mode or Photo Frame in Scene Mode the Auto Review function is fixed to 2 sec Auto Review does not work when...

Page 56: ...ected during recording the operation that resets the lens is also performed at the same time You will hear the sound of the lens operating but this is normal and not indicative of malfunctioning When...

Page 57: ...r PC or PictBridge PTP if you connected the camera to a PC or a printer supporting PictBridge PictBridge PTP Set after or before connecting to a printer supporting PictBridge PC Set after or before co...

Page 58: ...not rotated during Multi Playback 3D images cannot be rotated VIERA Link Setup so this unit can be controlled by the remote control of the VIERA by automatically coupling this unit with the VIERA Link...

Page 59: ...ent easier If you set a different language by mistake select from the menu icons to set the desired language Format The built in memory or card is formatted Formatting irretrievably deletes all the da...

Page 60: ...r Demo Stabilizer Demo is an approximation Auto Demo is not output to the television Demo Mode Displays the amount of jitter the camera has detected Stabilizer Demo The camera s features are displayed...

Page 61: ...the Histogram in Setup menu is set to On histogram will be displayed 2 When operation ceases for a certain amount of time only the icons shown below are displayed In Recording Mode In Playback Mode 3...

Page 62: ...ble Touch Shutter enabled Touch Shutter disabled Touch the subject you wish to focus on and then take a picture AF area is displayed at the position you touch and a picture is taken It cannot be set t...

Page 63: ...g during Intelligent Auto Mode and the most appropriate scene will be determined for the touched subject Touch to go back to the original Focus Mode Press the shutter button halfway to focus and then...

Page 64: ...s When recording in 3D In Panorama Assist Pin Hole Film Grain or High Dynamic in Scene Mode In B W Sepia Cool or Warm in Color Mode The lock may fail in cases with the following recording conditions W...

Page 65: ...s appear even closer maximum of 7 8k do not set the picture size to the highest setting for each aspect ratio X Y W Using the Optical Zoom Using the Extended Optical zoom EZ Using the Intelligent Zoom...

Page 66: ...one Picture Size with P89 is selected Screen display A is displayed Feature Intelligent Zoom Digital Zoom Maximum magnification Approximately 1 3 times the Optical Zoom or Extended Optical Zoom Approx...

Page 67: ...D In Motion Deblur in Intelligent Auto Mode In Macro Zoom Mode In Transform High Sens Flash Burst Pin Hole or Photo Frame in Scene Mode When recording motion pictures Digital Zoom cannot be used in th...

Page 68: ...Mode touch Touch Touch either the left or the right image The touched image is displayed enlarged and in a selected state Adjust the angle of view using the zoom lever Adjust the left and right image...

Page 69: ...set the Auto Review will start from the left image and proceed to the right image Press the motion picture button as described in step 6 to start recording the left image as a motion picture Press th...

Page 70: ...en you move your finger to the position where there is no icon and then release your finger Note Scene Modes can be changed by touching from the menu screen The following items cannot be set in Scene...

Page 71: ...ched and at the same time skin can be recorded smoothly Setting the level of transform Select the level of transform Note The picture size is fixed to 3M 4 3 2 5M 3 2 2M 16 9 or 2 5M 1 1 Do not use th...

Page 72: ...ntally or vertically so the transparent image overlaps When taking the third and later pictures repeat steps 4 and 5 6 Touch Exit Note The focus zoom exposure White Balance shutter speed and ISO sensi...

Page 73: ...unction Noise may become visible when you take pictures in dark places This allows you to take vivid pictures of the nightscape Note We recommend using a tripod and the self timer for taking pictures...

Page 74: ...for Party Mode Use the flash You can set to or We recommend using a tripod and the self timer for taking pictures We recommend rotating the zoom lever to Wide 1k and being about 1 5 m 4 92 feet from t...

Page 75: ...t Age or Name is automatically set to ON If ON is selected when the birthday or name has not been registered the setting screen appears automatically 4 Touch Exit to finish To cancel Age and Name Sele...

Page 76: ...by1 Baby2 on P75 Select this mode when you want to take pictures of a sunset view This allows you to take vivid pictures of the red color of the sun This mode minimizes the jitter of the subjects and...

Page 77: ...Press the shutter button fully to display the countdown screen Do not move the camera after this screen is displayed When countdown finishes Please wait is displayed for the same length of time as the...

Page 78: ...to take pictures through an airplane window Technique for Aerial Photo Mode We recommend using this technique if it is difficult to focus when taking pictures of clouds etc Aim the camera at something...

Page 79: ...may remain closed max about 8 sec after taking the picture because of signal processing This is not a malfunction LCD screen noise may be more visible than during normal recording due to brightness co...

Page 80: ...mation can be attached to only the first picture Face Recog does not guarantee secure recognition of a person Face Recognition may take more time to select and recognize distinctive facial features th...

Page 81: ...layed It is executed when Yes is selected Face Settings Point of recording when registering the face images Face front with eyes open and mouth closed making sure the outline of the face the eyes or t...

Page 82: ...Text section on P84 Age It is possible to register the birthday 1 Select SET 2 Set the Year Month Day by touching 3 4 for each item and touch Set Focus Icon Change the displayed focus icon when the s...

Page 83: ...te 4 Set the item Exit the menu after it is set Change or delete the information for a registered person Item Description of settings Info Edit Changing the information of an already registered person...

Page 84: ...ters Touch to switch text between A capitals a small case 1 numbers and special characters Touching will move the position of the text input cursor left and right Touch to enter a blank or Delete to d...

Page 85: ...the red eye phenomenon eyes of the subject appearing red in the picture and then activated again for the actual recording Use this when you take pictures of people in low lighting conditions Forced F...

Page 86: ...e flash setting may change if the Recording Mode is changed Set the flash setting again if necessary The flash setting is memorized even if the camera is turned off However the Scene Mode flash settin...

Page 87: ...ble flash range the exposure may not be adjusted properly and the picture may become too bright or too dark When the flash is being charged the flash icon blinks red and you cannot take a picture even...

Page 88: ...elf timer Self timer cannot be set to 10 seconds in Self Portrait in Scene Mode Setting of the self timer cannot be performed in following conditions When recording motion pictures Applicable modes Fo...

Page 89: ...annot be used and the picture size for is not displayed For details regarding modes in which Extended Optical Zoom cannot be used refer to P67 Pictures may appear in mosaic depending on the subject an...

Page 90: ...The setting is fixed to in Transform High Sens or Flash Burst in Scene Mode In 3D recording MPO images and fine JPEG images are simultaneously recorded Quality A Fine when giving priority to the pictu...

Page 91: ...changing to match the movement of the subject until the shutter button is pressed fully Note For the focus range of flash when Auto is set refer to P87 The setting is fixed to in the following cases...

Page 92: ...rty Candle Light Sunset Flash Burst Starry Sky Fireworks Beach Snow Aerial Photo or Film Grain in Scene Mode Auto White Balance Depending on the conditions prevailing when pictures are taken the pictu...

Page 93: ...alance 2 Touch 3 Drag the slide bar to make fine adjustments Select 0 to return to the original White Balance 4 Touch Set Exit the menu after it is set Note The White Balance icon on the screen turns...

Page 94: ...and cannot be set AF Mode Face Detection The camera automatically detects the person s face The focus and exposure can then be adjusted to fit the face no matter what portion of the picture it is in...

Page 95: ...ases the face detection function may fail to work making it impossible to detect faces AF Mode is switched to while motion pictures are taken When the face is not facing the camera When the face is at...

Page 96: ...ecome difficult to focus on it again Macro Mode gives priority to a subject close to the camera Therefore if the distance between the camera and the subject is far it takes longer to focus on it When...

Page 97: ...l when you do not want to miss a picture taking opportunity On Off Note The battery will be consumed faster than usual Press the shutter button halfway again when it is difficult to focus on the subje...

Page 98: ...the shutter speed The set exposure value is memorized even if the camera is turned off The compensation range of the exposure will be limited depending on the brightness of the subject Exposure Compe...

Page 99: ...posure may not be compensated with Auto Bracket depending on the brightness of the subject is set for the flash when Auto Bracket is set Setting of the Auto Bracket cannot be performed in following co...

Page 100: ...er Also you can set it faster to reduce the blur of the subject Auto 1 125 1 60 1 30 1 15 1 8 1 4 1 2 1 Note This should usually be set to Auto to take pictures When you select a minimum shutter speed...

Page 101: ...he setting is fixed to On Applicable modes For details on Rec Mode menu settings refer to P48 This can enlarge subjects even more than the Optical Zoom Extended Optical Zoom or i Zoom On Off Note Refe...

Page 102: ...e is fixed to 3 The burst speed pictures second may become slower depending on the recording environment such as in dark places if the ISO sensitivity is high etc Burst Mode is not canceled when the c...

Page 103: ...only when Intelligent Auto Mode is set 2 This can be set only during Normal Picture Mode Note For 3D recording the setting is fixed to Standard Color Mode Standard This is the standard setting Happy 1...

Page 104: ...atically detects red eye and corrects the picture On Off Note Only available when AF Mode is set to and Face Detection is active Under certain circumstances red eye cannot be corrected This setting is...

Page 105: ...Scene Mode Applicable modes For details on Rec Mode menu settings refer to P48 You can take a picture with date and time of recording Note Date information for pictures recorded with the Date Stamp s...

Page 106: ...rding refer to P27 3D photography may not capture distant objects with apparent 3D effect The closer this setting is to Maximum the more subjects in the foreground will seem to extend towards the view...

Page 107: ...ctures Note When recording in Wide Zoom Dual Shooting the camera may make use of settings made for other Recording Modes This setting is not available for 3D recording Rec Mode AVCHD Select this forma...

Page 108: ...d as follows When MP4 is selected Rec Quality Item Picture size Bit rate fps Aspect ratio FSH 1920k1080 pixels Approx 17 Mbps 60i Sensor output is 30 fps 16 9 SH 1280k720 pixels Approx 17 Mbps 60p Sen...

Page 109: ...ally depending on the subject to record Therefore the recording time is shortened when a subject with fast movement is recorded When recording in Wide Zoom Dual Shooting the camera may make use of set...

Page 110: ...rted the motion picture recording In Starry Sky and Fireworks in Scene Mode this setting is fixed to Off For 3D recording the setting is fixed to On Applicable modes For details on Motion Picture Mode...

Page 111: ...th music and you can do this in sequence while leaving a fixed interval between each of the pictures You can also put together a slide show composed of only still pictures only motion pictures only 3D...

Page 112: ...e show Effect is fixed to OFF Some Effect will not operate when playing back pictures displayed vertically Setup Duration or Repeat can be set Duration can be set only when OFF has been selected as th...

Page 113: ...ait Scenery or Night Scenery and sort the pictures into each of the categories You can then play back the pictures in each category Touch the category to play back Only the category for which pictures...

Page 114: ...multiple pictures with the same recording date the first picture recorded on that day is displayed You can display the calendar between January 2000 and December 2099 If the date is not set in the ca...

Page 115: ...es to Facebook This cannot be done to the images in the built in memory Copy the images to a card P127 and then perform the Upload Set Select Upload Set on the Playback Mode menu P48 Upload to the ima...

Page 116: ...48 Touch Single or Multi Enter the text P84 Exit the menu after it is set Note To delete the title erase all the text in the text input screen You can print out texts comments using the PHOTOfunSTUDIO...

Page 117: ...ck Mode menu P48 Touch Single or Multi Touch Set Text Stamp Select an image you wish to stamp with text is displayed on pictures already with date or text stamped Single setting 1 Drag the screen hori...

Page 118: ...s stamped onto the images smaller than 0 3 M it is difficult to read it Text and dates cannot be stamped on the pictures in the following cases 3D images Motion pictures Pictures recorded without sett...

Page 119: ...e motion pictures by using Calendar or Video Only in the Filtering Play Motion pictures with a short recording time cannot be divided Video Divide Select Video Divide on the Playback Mode menu P48 Dra...

Page 120: ...3D images Motion pictures Pictures with date or text stamped Resize Touch Single or Multi Select the picture and size Single setting 1 Drag the screen horizontally to select an image and then touch Se...

Page 121: ...ropped picture will deteriorate It may not be possible to crop pictures recorded with other equipment You cannot use Cropping for the following types of pictures 3D images Motion pictures Pictures wit...

Page 122: ...n the Playback Mode menu 2 Touch Cancel Confirmation screen is displayed It is executed when Yes is selected Exit the menu after it is executed Note You can set up to 999 pictures as favorites You may...

Page 123: ...he built in memory copy them to a card P127 and then set the print setting For more information visit http panasonic jp dc dpof_110 white_e htm Select Print Set on the Playback Mode menu P48 Touch 3 4...

Page 124: ...if you set to print the date For further information ask at your photo printing store or refer to the operating instructions for the printer The date cannot be printed on pictures with date or text s...

Page 125: ...quipment Even if you protect pictures in the built in memory or a card they will be deleted if the built in memory or the card is formatted Even if you do not protect pictures on a card they cannot be...

Page 126: ...been canceled the picture will not be categorized using Face Recognition in Category Selection in Filtering Play You cannot edit the Face Recognition information of protected pictures Face Rec Edit To...

Page 127: ...opy destination when is selected a new folder is created and the picture is copied If a picture exists with the same name folder number file number as the picture to be copied in the copy destination...

Page 128: ...erminal if it is plugged in obliquely or in wrong direction Preparations Turn this unit and the TV off To connect using an HDMI mini cable optional Always use a genuine Panasonic HDMI mini cable RP CD...

Page 129: ...w to the video input socket F White to the audio input socket Turn on the TV and select the input to match the terminal in use Turn the camera on and set to the Playback Mode To connect with an AV cab...

Page 130: ...ct the USB connection cable simultaneously with the HDMI mini cable When you play back a picture vertically it may be blurry When pictures are displayed they may not be displayed properly depending on...

Page 131: ...i cable optional for automatic linked operations Not all operations are possible VIERA Link is a unique Panasonic function built on a HDMI control function using the standard HDMI CEC Consumer Electro...

Page 132: ...the TV automatically switches to this unit s screen If the TV s power is in standby status it will turn on automatically if Set has been selected for the TV s Power on link setting Depending on the H...

Page 133: ...tures and motion pictures recorded by this unit into a Panasonic Blu ray Disc Recorder or DVD Recorder See the instruction manual for the recorder about the details of copying and playing back Note th...

Page 134: ...ing on the recording equipment When ending the recording copying stop the playback on this unit after stopping the recording of the recording equipment Note When you play back motion pictures on 4 3 a...

Page 135: ...or create a slide show by adding audio and or music These pictures can then be stored onto a DVD 1 Install PHOTOfunSTUDIO to the PC Read the separate Basic Owner s Manual for more information about th...

Page 136: ...CD ROM supplied is a convenient way of doing this PC that can be used PC with Windows 98 98SE or older or Mac OS 8 x or older cannot be connected via USB but it can acquire the pictures if an SD memor...

Page 137: ...camera to a PC via the USB connection cable A supplied Do not use any other USB connection cables except the supplied one Use of cables other than the supplied USB connection cable may cause malfunct...

Page 138: ...er with the same folder number has been inserted Such as when pictures were taken using another maker of camera When there is a picture with file number 999 inside the folder For Windows A drive Remov...

Page 139: ...mpatible with a PC with Windows XP Windows Vista Windows 7 For details refer to the operating instructions of LUMIX Image Uploader PDF Preparations Setup the images to upload with Upload Set P115 Conn...

Page 140: ...ht out Otherwise the connectors may be bent out of shape which may cause malfunction B Align the marks and insert Use a battery with sufficient battery power If the remaining battery power becomes low...

Page 141: ...ure you wish to print Touch the same picture again to cancel the selection After the pictures have been selected touch OK Select All Prints all the stored pictures Print Set DPOF Prints the pictures s...

Page 142: ...t displayed If the printer does not support date printing the date cannot be printed on the picture Depending on the printer the date print settings of the printer may take precedence so check if this...

Page 143: ...from the printer when the indication lights orange during printing After finishing printing make sure there are no problems with the printer If the number of prints is high the pictures may be printe...

Page 144: ...LCD Mode P53 LCD power save P55 24 Touch shutter P62 25 Date Stamp P105 26 Histogram P54 27 Self timer Mode P88 28 Shutter speed P34 Minimum shutter speed P100 29 Aperture value P34 30 ISO sensitivit...

Page 145: ...e selection P33 17 Playback Mode selection P111 18 Delete P46 19 Multi Playback P43 20 Location P52 Recording information P61 Name P75 82 Age P75 Title P116 21 Number of days that have passed since th...

Page 146: ...sound If this unit is adversely affected by electromagnetic equipment and stops functioning properly turn this unit off and remove the battery Then reinsert the battery and turn this unit on Do not us...

Page 147: ...hen you turn it on the picture on the LCD monitor will be slightly darker than usual at first However the picture will return to normal brightness when the internal temperature of the camera increases...

Page 148: ...ring the battery charger supplied so that you can charge the battery in the country that you are traveling in Dispose of unusable battery The battery has a limited life Do not throw the battery into f...

Page 149: ...ewing 3D images Doing may have an adverse affect on such medical conditions If you feel tired uncomfortable or otherwise strange when viewing 3D images stop viewing at once Continuing to view may caus...

Page 150: ...is set for Baby1 Baby2 Face Recognition function this personal information is kept in the camera and recorded in the image Disclaimer Information including personal information may be altered or vani...

Page 151: ...a closet or a cabinet Recorded data may be damaged or lost if the camera breaks down due to inappropriate handling Panasonic will not be liable for any damage suffered due to loss of recorded data Whe...

Page 152: ...ull Some pictures cannot be copied Copy could not be completed The following pictures cannot be copied When a picture with the same name as the picture to be copied exists in the copy destination Only...

Page 153: ...Depending on the type of the card motion picture recording may stop in the middle Cannot record due to incompatible format NTSC PAL data on this card If you want to delete some pictures format the ca...

Page 154: ...e power ON when using a large capacity card The picture can become whitish if there is dirt e g fingerprints on the lens If the lens is dirty lightly wipe the surface with a soft dry cloth After wipin...

Page 155: ...es slightly because of high sensitivity processing but this is not a malfunction When recording under fluorescent or LED lighting fixture etc increasing the shutter speed may introduce slight changes...

Page 156: ...matted on a PC or other equipment the data writing speed is lower In such cases we recommend that you make a backup of the data and then format P59 the card in this unit If the subject contains sectio...

Page 157: ...ctive P53 This is not a malfunction These pixels do not affect the recorded pictures In dark places noise may appear to maintain the brightness of the LCD monitor This does not affect the pictures you...

Page 158: ...ng a PC or pictures taken by other equipment are searched they may be displayed on dates differing from the actual dates on which the pictures were taken When Digital Red Eye Correction is in operatio...

Page 159: ...le optional and then play back the motion pictures on the camera P128 Check TV Aspect setting P57 Is it connected properly with the HDMI mini cable optional P128 Confirm that the HDMI mini cable optio...

Page 160: ...l address password is correct Confirm that the PC is connected to the Internet Confirm that resident software such as virus protection software or firewall is not blocking access to YouTube or Faceboo...

Page 161: ...to On P104 The AF Assist Lamp does not turn on in bright places The surface of the camera may become warm during use This does not affect the performance or quality of the camera When the brightness c...

Page 162: ...file numbers for the pictures taken will not be stored in the memory When the power is then turned back on and pictures are taken they may be stored under file numbers which should have been assigned...

Page 163: ...trademarks of Microsoft Corporation in the United States and or other countries YouTube is a trademark of Google Inc This product uses DynaFont from DynaComware Corporation DynaFont is a registered tr...

Reviews: