175
Using Menu Functions
Menu list
●
In Intelligent Auto Plus Mode:
– Only [Standard] or [Monochrome] can be set.
– The setting resets to [Standard] when the camera is switched to another recording mode or
turned on/off.
– Picture quality cannot be adjusted.
●
Only picture quality adjustment can be set in the Scene Guide Mode.
■
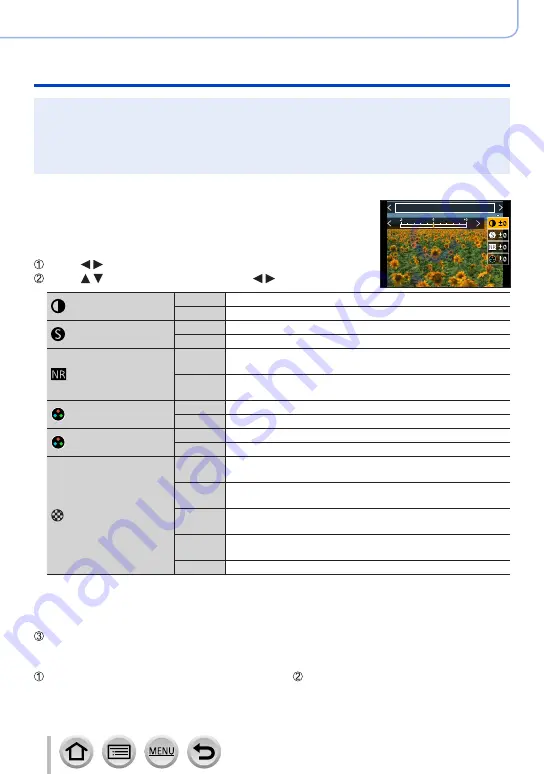
Adjusting the picture quality
Standard
Press to select the type of Photo Style
Press to select an item and press to adjust
[Contrast]
[+]
Increases the contrast in a picture.
[–]
Decreases the contrast in a picture.
[Sharpness]
[+]
Enhances the outlines in a picture.
[–]
Softens the outlines in a picture.
[Noise Reduction]
[+]
Increases the noise reduction effect to reduce noise. This
setting may slightly lower the resolution.
[–]
Lowers the noise reduction effect to achieve a picture
quality with clearer resolution.
[Saturation]
*
1
[+]
Gaudy colouring
[–]
Subdued colouring
[Color Tone]
*
1
[+]
Bluish colouring
[–]
Yellowish colouring
[Filter Effect]
*
2
[Yellow] Enhances the contrast of a subject. (Effect: Low)
Records a blue sky clearly.
[Orange] Enhances the contrast of a subject. (Effect: Medium)
Records a blue sky with vibrant colours.
[Red]
Enhances the contrast of a subject. (Effect: High)
Records a blue sky with even more vibrant colours.
[Green] Applies subdued colouring for the skin and lips of a person.
Emphasises green leaves and makes them brighter.
[Off]
—
*
1
[Color Tone] is displayed only when [Monochrome] is selected. Otherwise, [Saturation] is
displayed.
*
2
Displayed only when [Monochrome] is selected.
•When the picture quality is adjusted, [+] will be displayed in the [Photo Style] icon.
Press [MENU/SET]
■
Registering the setting for the adjusted picture quality to [Custom]
Perform the picture quality adjustment in Step of “Adjusting the picture quality” and
press the [DISP.] button


