Installation of this unit
Preparatory work for installation
15
4
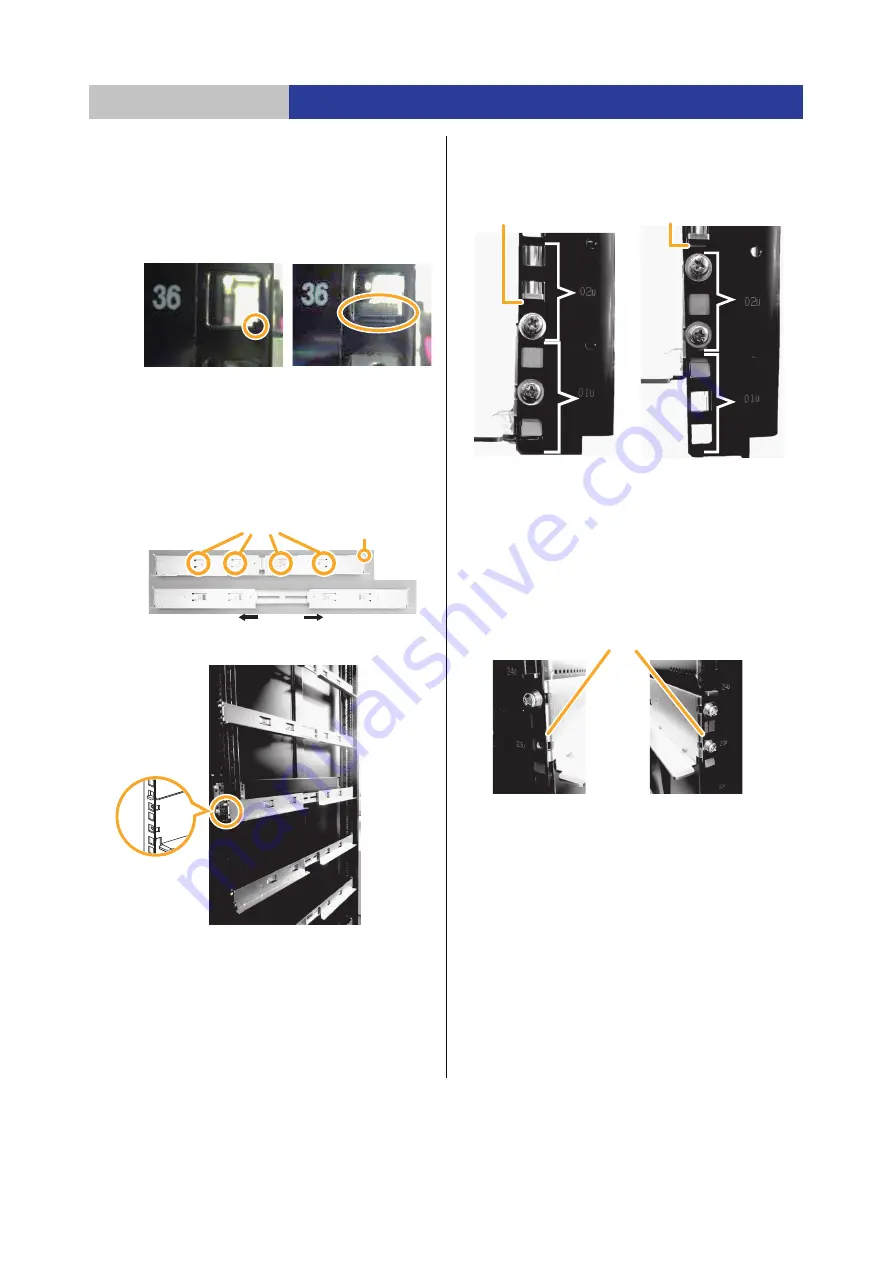
Check for burrs in the square holes on the
panel mount frame.
≥
If there appear to be burrs that may interfere with the
installation of the module, use a file to remove them.
Remove the filings that result from using the file.
≥
Note:
Metal filings result when you use the file, so
make sure you obtain the permission of the person
responsible for the installation location.
5
Attach the supplied support angle.
≥
Check the direction of the support angle.
≥
Loosen the 4 screws and extend the support angle.
≥
After placing one side on the support angle hook,
attach the hooking position on the mount frame so that
the other side is positioned parallel with the other side.
≥
Attach the support angle so that no gap is found under
each of the L-shaped hooks. If the support angle is
attached to wrong square holes, gaps will be created,
causing the support angle to tilt.
6
Secure the support angle to the panel mount
frame.
≥
When securing the support angle on the drawer side,
fasten only the top screws. On the other hand, when
securing the support angle on the interface side,
fasten both the top and bottom screws.
≥
Fasten the bottom screws on the drawer side when
mounting the unit.
≥
Tighten the 4 screws that have been loosened in Step 5.
7
Attach the rack ground.
≥
By attaching a rack ground, static electricity that
occurs within the rack, such as when a worker charged
with static electricity touches a device, can as far as
possible be efficiently allowed to pass out to the
exterior without passing through the electronic circuits
within the rack.
Grounding wires used
≥
If a grounding wire is included with the rack:
Follow the instructions in the operating instructions for
the rack.
≥
If a grounding wire is not included with the rack:
Use electrical wire with a flame resistance grade of
VW-1 or better and a gauge of 16 AWG or better. As
this is not a safety grounding wire, do not use green or
green and yellow wire.
The support angle cannot be properly attached if
these kinds of burrs are present.
Support angle
Hooking position
Support angle hook
attaching side
Screws
Loosen the screws and extend the support angle.
Incorrectly attached
Correctly attached
Without a gap
With a gap
Panel mount frames
Drawer side
Interface side


