background image

10.3.6 Network (KX-MB2000/KX-MB2010/KX-MB2030, LAN connection only)

Problem

Cause & Solution

I cannot operate the following
functions.

PC printing

Scanning

Remote Control

PC FAX (KX-MB2030 only)

Device Monitor

R

Confirm the LED via the LAN port of the main board. If the LED is glowing
or blinking, network access is working correctly.
If the LED is not glowing or blinking, confirm the LAN cable (category 5
straight cable) is connected to the LAN port of the main board correctly.

R

If the LED is blinking and you cannot perform the desired operation, the IP
address of the unit may have changed.
To detect the IP address, proceed as follows.

[Start]


A


[All Programs]

 or 

[Programs]


A


[Panasonic]


A

 the unit’s

name 

A


[IP Address Checker]

R

The IP address for the unit will be detected.

Note:

R

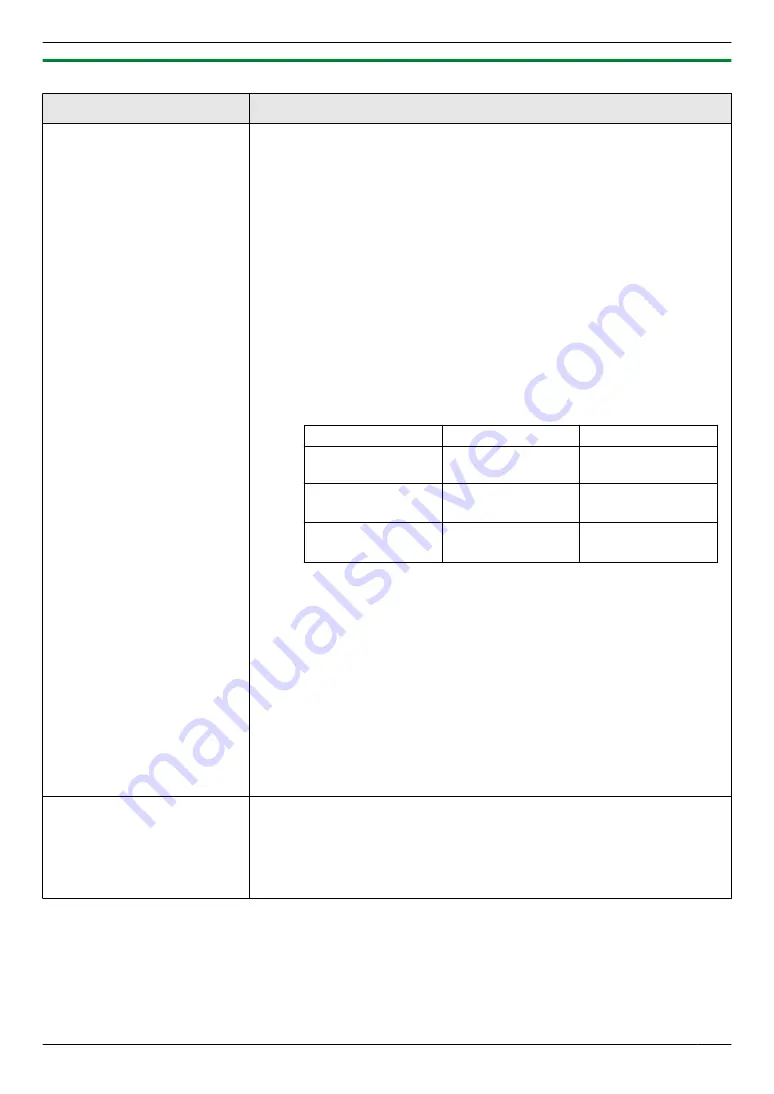
If the IP address cannot be detected, enter it manually (feature #501 on
page 69). The IP address of the computer and the unit must be in the
same local IP address class as shown below. Set the IP address in the
range of the number specified in the class corresponding to your local
network scale.

Class

Subnet mask

IP address

Class A

255.0.0.0

10.0.0.1 -
10.255.255.254

Class B

255.255.0.0

172.xx.0.1 -
172.xx.255.254

*1

Class C

255.255.255.0

192.168.xx.1 -
192.168.xx.254

*2

*1 “xx” should be the same value for the unit and for the computer,

as shown in the following example.
Example: 172.16.0.1 - 172.16.255.254
(The available range of “xx” is 16 - 31)

*2 “xx” should be the same value for the unit and for the computer,

as shown in the following example.
Example: 192.168.0.1 - 192.168.0.254
(The available range of “xx” is 0 - 255)

R

Your firewall software is blocking the connection. Disable the firewall
software or change the firewall settings to make the Multi-Function Station
work properly.

R

LAN features can be used when the unit and the computer are connected
in same network segment only. Make sure the network is configured
correctly. Consult your network administrator.

The unit does not appear in
the [Select a Network Device]
dialogue box when installing
Multi-Function Station.

R

Your firewall software is blocking the connection and the setup program may
not list any units. Consult your network administrator and temporarily disable
the firewall software.

R

The unit is connected to another network segment and the setup program
may not list any units. Make sure the network is configured correctly. Consult
your network administrator.

85

10. Help

Summary of Contents for KXMB2000E

Page 1: ...odel is KX MB2030 Do NOT connect the unit to a computer with the USB cable until prompted to do so during the setup of Multi Function Station CD ROM 1 2 KX MB2025 KX MB2030 only R This unit is compatible with Caller ID You must subscribe to the appropriate service offered by your service provider telephone company ...

Page 2: ...e based on a KX MB2030 Trademarks R Microsoft Windows Windows Vista Internet Explorer and PowerPoint are either registered trademarks or trademarks of Microsoft Corporation in the United States and or other countries R Pentium is a trademark of Intel Corporation in the U S and other countries R Screen shots reprinted with permission from Microsoft Corporation R Adobe and Reader are either register...

Page 3: ...ontact with the drum This may affect print quality R For optimal performance genuine Panasonic toner cartridges and drum cartridges are recommended We cannot be responsible for problems that may be caused by a non Panasonic toner cartridge or drum cartridge Damage to the unit Poor print quality Improper operation Toner cartridge R Do not leave the toner cartridge out of the protective bag for a lo...

Page 4: ...chine to produce an odour during and shortly after printing Be sure to use this unit in an area with proper ventilation R Do not cover slots or openings on the unit Inspect the air circulation vents regularly and remove any dust build up with a vacuum cleaner A A A Routine care R Wipe the outer surface of the unit with a soft cloth Do not use benzine thinner or any abrasive powder Moving the unit ...

Page 5: ...Storing items for the one touch dial feature and phonebook 42 6 3 Sending a fax using one touch dial feature and phonebook 43 6 4 Broadcast transmission 44 6 5 Sending an electronic document as a fax message from your computer 46 Receiving Faxes 6 6 Selecting the way to use your unit 46 6 7 Receiving a fax automatically Auto answer ON 47 6 8 Receiving a fax manually Auto answer OFF 48 6 9 Using th...

Page 6: ...t feeder KX MB2010 KX MB2025 KX MB2030 only 93 12 Cleaning Cleaning 12 1 Cleaning the white plates and glass 95 12 2 Cleaning the document feeder rollers KX MB2010 KX MB2025 KX MB2030 only 98 13 General Information Printed Reports 13 1 Reference lists and reports 99 Specifications 13 2 Specifications 99 Copyrights 13 3 Information of copyrights and licences KX MB2000 KX MB2010 KX MB2030 only 102 1...

Page 7: ...3867 for MFP R For customers within the Republic of Ireland 01 6130082 for fax machine 01 2898255 for MFP R Visit our website for product information R E mail customer care panasonic co uk Direct Sales at Panasonic UK R Order accessory and consumable items for your product with ease and confidence by phoning our Customer Care Centre Monday Thursday 9 00am 5 30pm Friday 9 30am 5 30pm Excluding publ...

Page 8: ...5 KX MB2030 only R To select station 4 6 for the one touch dial feature page 42 43 MFax Auto AnswerN KX MB2025 KX MB2030 only R To turn the auto answer setting ON OFF page 47 MFaxN KX MB2025 KX MB2030 only R To switch to the fax mode page 18 41 MCopyN R To switch to the copy mode page 18 34 MRedialNMPauseN KX MB2025 KX MB2030 only R To redial the last number dialled If the line is busy when you se...

Page 9: ...B2010 KX MB2025 KX MB2030 only Paper input tray Recording paper exit Document exit KX MB2010 KX MB2025 KX MB2030 only Speaker KX MB2025 KX MB2030 only 1 4 2 Rear view A E G D F H C B Recording paper guides LED KX MB2000 KX MB2010 KX MB2030 only LAN interface connector KX MB2000 KX MB2010 KX MB2030 only R 10Base T 100Base TX AC in socket Manual input tray Rear cover External telephone socket KX MB2...

Page 10: ... of the protective bag for a long time It will decrease the toner life R We cannot be responsible for any damage to the unit or degradation of print quality which may occur from the use of a non Panasonic toner and drum cartridges R Do not add toner to the toner cartridge 1 Before opening the protective bag of the new toner cartridge shake it vertically more than 5 times 2 Remove the toner cartrid...

Page 11: ... R Do not touch the transfer roller J R If the lower glass K is dirty clean it with a soft and dry cloth K 7 Install the drum and toner cartridge L by holding the tabs L R Make sure that the arrows M match to install the drum and toner cartridge correctly M 11 1 Introduction and Installation ...

Page 12: ... R To ensure that the unit operates properly we recommend the use of Panasonic toner and drum cartridges See page 7 for accessory information R To maintain print quality and machine life we recommend you to clean slots and openings page 4 and the inside of the unit page 95 page 98 when replacing the toner cartridge and or drum cartridge R See page 101 for information on toner life and drum life Wa...

Page 13: ...pproximately 100 sheets of printed paper the number of sheets may vary depending on the usage environment Remove the printed paper before the output tray becomes full If the top part of the extender is detached 1 With the top part of the extender in the open position insert the tab A into the left hole B of the extender B A 2 Slide the other tab C into the right hole D of the extender from below u...

Page 14: ...um paper These materials may transfer onto the fusing roller and cause damage Moist paper Inkjet paper R Some paper is designed to be printed on only one side Try printing on the other side of the paper if you are not happy with the print quality or if misfeeding occurs R For proper paper feeding and best print quality we recommend using long grained paper R Do not use paper of different types or ...

Page 15: ... tray Caution for the paper input tray R Do not drop the paper input tray R Hold the paper input tray with both hands when removing or installing The paper input tray weighs approximately 2 kg when fully loaded with recording paper Approx 2 kg 1 7 1 Manual input tray You can use the manual input tray for printing with the computer and for copying It can hold one page at a time When printing or cop...

Page 16: ...ies when making a copy set the copy input tray setting to 2 beforehand feature 460 on page 65 If these settings are not changed when printing or copying multiple pages the 1st page will be printed from the manual input tray but the rest of the pages will be printed from the paper input tray R If the paper is not inserted correctly re adjust the paper or the paper may jam 16 1 Introduction and Inst...

Page 17: ...KX MB2025 KX MB2030 only 2 KX MB2000 KX MB2010 KX MB2030 only IMPORTANT NOTICE FOR THE USB CONNECTION R DO NOT CONNECT THE UNIT TO A COMPUTER WITH THE USB CABLE UNTIL PROMPTED TO DO SO DURING THE SETUP OF MULTI FUNCTION STATION page 24 Note R Do not place any objects within 10 cm of the right left and back sides of the unit R If any other device is connected to the same telephone line this unit ma...

Page 18: ...ScanN Select this mode when using the unit as a scanner page 30 MCopyN Select this mode when using the unit as a copier page 34 MFaxN KX MB2025 KX MB2030 only Select this mode when using the unit as a fax machine page 41 Note R The default operation mode is the copy mode R You can change the default operation mode feature 463 on page 59 and the timer before returning to the default operation mode ...

Page 19: ...there are no documents on the scanner glass R Confirm that any ink paste or correction fluid has dried completely R Remove clips staples or other fasteners R Do not insert the following types of documents Make a copy of the document using the scanner glass and set the copy instead Chemically treated paper such as carbon or carbonless duplicating paper Electrostatically charged paper Badly curled c...

Page 20: ...d paper size Document weight R Single sheet 60 g m2 to 80 g m2 R Multiple sheets 60 g m2 to 80 g m2 2 5 Help function KX MB2025 KX MB2030 only The unit contains helpful information which can be printed for reference BASIC SETTINGS FEATURE LIST PHONEBOOK FAX RECEIVING COPIER REPORTS CALLER ID MFNMEN MSetN MMenuN 1 Press MMenuN repeatedly to display HELP 2 Press MFN or MEN repeatedly to display the ...

Page 21: ...NM0N M1NM5N 2 Press MGN repeatedly to select PM Press MGN repeatedly to select AM or PM or 24 hour time entry 4 MSetN 5 Press MMenuN to exit Note R To check the current date and time setting press MFaxN to temporarily change the unit to the fax mode KX MB2025 KX MB2030 only R Your unit s date and time will be used as the header information for the following When sending as an attached file to an e...

Page 22: ... on the top of each page sent MFNMEN MSetN MStopN MMenuN 1 MMenuN A MBNM1NM0NM2N A MSetN 2 Enter your logo up to 30 characters see page 73 for character entry A MSetN 3 Press MMenuN to exit To correct a mistake Press MFN or MEN to move the cursor to the incorrect character and make the correction R To erase all characters press and hold MStopN 22 2 Preparation ...

Page 23: ... When only one unit is connected to the LAN If your network administrator manages the network with a DHCP Dynamic Host Configuration Protocol server it will automatically assign an IP Internet Protocol address subnet mask and default gateway to the unit 1 After connecting the LAN cable to the unit and the computer turn the power switch ON R The IP address subnet mask and default gateway will be se...

Page 24: ...abels Previewing documents and changing printer settings before printing Easy Print Utility Scanning documents and converting an image into text with Readiris OCR software Scanning from other applications for Microsoft Windows that support TWAIN scanning and WIA scanning Windows XP Windows Vista USB connection only Storing editing or erasing items in directories using your computer KX MB2025 KX MB...

Page 25: ... 74 will also be installed 5 The Connect Type dialogue box appears For USB connection 1 Connect directly with a USB cable A Next R The Connect Device dialogue box will appear 2 Connect the unit to a computer with the USB cable A then click Next A R If the unit is connected to your computer the model name will be automatically detected R You can change the name of the unit if necessary 3 Click Inst...

Page 26: ... Station Start A All Programs or Programs A Panasonic A the unit s name A Uninstall Then follow the on screen instructions 2 12 Starting Multi Function Station Start A All Programs or Programs A Panasonic A the unit s name A Multi Function Station R Multi Function Station will appear Scan page 33 R To scan and display the scanned images R To scan and create an image file R To scan and send by emai...

Page 27: ...unit PC name KX MB2000 KX MB2010 KX MB2030 LAN connection only The computer name that will be displayed on the unit Scan Save to To select the folder where the scanned image will be saved Viewer File Email OCR Custom To change scanning settings for Multi Function scan application Note R Assign a unique name for the PC name to avoid errors or the scanned image may be sent to the incorrect computer ...

Page 28: ...es and types of paper on the unit before purchasing large quantities You can change or display the settings on the following tabs Basic Paper size media type pages per sheet etc Output Number of prints collate etc Quality Quality contrast toner save feature etc Effects Watermark overlay Profile Saving the desired settings selecting the saved settings etc Support Version information Note R Select t...

Page 29: ... the print image without test print Printer settings You can change or display the settings on the following tabs in step 5 Basic Paper size layout printing Output Number of prints paper source media type Quality Colour mode toner save Effects Header watermark footer Combining multiple documents You can display multiple pages created in various applications and handle it as a single document 1 Per...

Page 30: ...o select the computer to which you want to send the scanned image A MSetN 5 If necessary change the scanning settings Press MEN press MCN or MDN repeatedly to select the desired setting A MSetN 6 MStartN R The scanned image will be displayed in the Multi Function Viewer window after scanning However when you select PDF as a file format the software that is associated to open PDF files will start N...

Page 31: ...G or BMP formats R For detailed instructions about OCR select Help R The scanned image will be automatically saved in the folder selected in the Settings window page 27 4 1 5 Scan to email address KX MB2000 KX MB2010 KX MB2030 LAN connection only You can send the scanned image as an attachment without using email software Important R Program the email server SMTP server settings page 67 and the em...

Page 32: ...anning see page 75 R You can save the images in TIFF JPEG or PDF formats R To display the scanned image download the data to your computer beforehand 4 1 7 Scan to SMB folder KX MB2000 KX MB2010 KX MB2030 LAN connection only You can send the scanned image to a folder on the network Important R Program the SMB folder settings beforehand page 68 1 Set the original page 19 2 MScanN 3 Press MCN or MDN...

Page 33: ...canned image using the automatic document feeder in step 5 set the document again and click Scan KX MB2010 KX MB2025 KX MB2030 only R The scanned image will be displayed in the Multi Function Viewer window after scanning R To save the scanned image select Save As from the File menu R To cancel scanning while the documents are being scanned click Cancel Note R You can display images in applications...

Page 34: ...ax Auto AnswerN light is ON the unit can receive faxes automatically even when in the copy mode KX MB2025 KX MB2030 only To select the copy size 1 Press MCopy SizeN repeatedly to select ORIGINAL SIZE 2 Press MCN or MDN repeatedly to select the size of your original document A MSetN 3 Press MCN or MDN repeatedly to select the size of recording paper size R When 2 is selected you can change the reco...

Page 35: ...m rate that fits the size of your document and recording paper ZOOM 100 1 50 200 1 Press MCN or MDN repeatedly to change the zoom rate by 1 at a time from 25 to 400 You can also enter the desired percentage specifically by using the dial keys 3 MSetN 4 If necessary enter the number of copies up to 99 A MStartN 5 After you finish copying press MStopN to reset this feature Note R Zoom copy is not av...

Page 36: ... After you finish copying press MStopN to reset this feature Example Making 2 copies of a 4 page original document 4 3 2 1 4 3 2 1 4 4 3 3 2 2 1 1 Collated pages Uncollated pages Note R The unit will store the documents into memory while collating the copies If the memory becomes full while storing the unit will only print out the stored pages R You can hold the previous collate setting feature 46...

Page 37: ...o to step 6 5 Press MCN or MDN repeatedly to select the page layout from LANDSCAPE or PORTRAIT A MSetN 6 If necessary enter the number of copies up to 99 7 Quick ID copy feature 1 MStartN R The unit will scan 1 page 2 Place the next document on the scanner glass and press MSetN Repeat this until all the documents are scanned R The unit will start copying R You can press MStartN anytime to start co...

Page 38: ...iginal page 19 R To make a portrait copy set the original in portrait direction To make a landscape copy set the original in landscape direction 2 Press MPage LayoutN repeatedly to select PAGE LAYOUT 3 Press MCN or MDN repeatedly to select N in 1 A MSetN 4 Press MCN or MDN repeatedly to select the number of original documents from 2 in 1 4 in 1 or 8 in 1 A MSetN 5 Press MCN or MDN repeatedly to se...

Page 39: ...th of long edge using the dial keypad A MSetN 6 Press MCN or MDN repeatedly to select SHORT EDGE A MSetN 7 Enter the desired edge width of short edge using the dial keypad A MSetN 8 MStartN 9 After you finish copying press MStopN to reset this feature Note R You can hold the previous edge setting feature 473 on page 65 5 2 7 Margin feature You can set the unit not to copy a particular edge of the ...

Page 40: ...MB2025 KX MB2030 only is displayed press MCopyN 3 Make necessary settings such as number of copies resolution zoom features and page layout features A MStartN R COPY RESERVED will be displayed The unit will start copying after the current printing job 40 5 Copier ...

Page 41: ...ocument 5 levels low to high are available Press MContrastN repeatedly A MSetN Note R You can save the previous contrast setting feature 462 on page 59 To redial the last number MRedialN R If the line is busy the unit will automatically redial the number up to 5 times Note R To stop sending see page 75 Reserving the fax transmission Dual Access You can reserve a fax transmission even when the unit...

Page 42: ... be used alternatively as broadcast keys page 44 R Make sure that the MFaxN light is ON MCNMDNMEN MSetN MFaxN MStopN MPhonebookN MLowerN Station keys MMenuN 6 2 1 Storing one touch dial item 1 Press MMenuN repeatedly to display PHONEBOOK SET 2 Select the desired station key For station 1 2 1 Press one of the station keys 2 Press MCN or MDN repeatedly to select DIAL MODE A MSetN For station 3 Press...

Page 43: ...ation key Using phonebook Press MPhonebookN then press MCN or MDN repeatedly to display the desired item R To send a single page go to step 6 R To send multiple pages go to the next step 4 Press MQuick ScanN to scan the document into memory 5 Place the next page A MSetN R To send more pages repeat this step 6 MStartN To search for a name by initial Example LISA 1 MPhonebookN 2 Press MCN or MDN to ...

Page 44: ...MMenuN repeatedly to display PHONEBOOK SET 2 Select the desired broadcast key For BROADCAST 1 MBroadcastN 2 Press MCN or MDN repeatedly to select BROADCAST For MANUAL BROADCAST 1 MManual BroadN 2 Press MCN or MDN repeatedly to select M BROADCAST 3 MSetN 4 Program items Using station 1 3 Press the desired station key Using station 4 6 Press MLowerN then press the desired station key Using phonebook...

Page 45: ...arties To send the same document using the scanner glass 1 Set the original page 19 2 If necessary change the resolution page 41 and the contrast page 41 3 Press MBroadcastN or MManual BroadN R To send a single page go to step 5 R To send multiple pages go to the next step 4 Place the next page A MSetN R To send more pages repeat this step 5 MStartN Note R To stop sending see page 75 R If you sele...

Page 46: ...ti Function Station R Click Select to change the active unit 6 6 Selecting the way to use your unit Depending on your situation select the way you prefer to use your unit Use only as a fax FAX ONLY mode Use mostly as a telephone TEL mode Use as a telephone and or fax TEL FAX mode Use with answering machine 6 6 1 Use only as a fax FAX ONLY mode Your situation You have a separate telephone line just...

Page 47: ...inging 6 6 4 Use with answering machine Your situation You want to use the unit with an answering machine Setup Connect an external telephone answering machine and set the ring count of the answering machine to less than 4 R Set the ring count in FAX ONLY mode of the unit to more than 4 if you use with auto answer ON How to receive calls When receiving phone calls the answering machine will record...

Page 48: ... To receive fax documents using the extension telephone make sure remote fax activation is turned ON feature 434 on page 62 beforehand The default setting is ON 6 8 2 Activating TEL FAX mode 1 Make sure feature 404 is set to TEL FAX beforehand page 60 2 Press MFax Auto AnswerN repeatedly to display TEL FAX MODE R The MFax Auto AnswerN light turns OFF 3 The ringer volume setting should be ON page 2...

Page 49: ...ne is detected 6 9 Using the unit with an answering machine 6 9 1 Setting up the unit and an answering machine 1 Connect the answering machine A R Answering machine is not supplied R Please purchase an extension telephone adaptor R Remove the stopper B if attached Extension telephone adaptor not supplied A B 2 Set the number of rings on the answering machine to 4 rings or less R This will allow th...

Page 50: ...are fed into your unit and that the other party s machine is ready for your call 1 Press MMenuN repeatedly to display POLLING A MSetN 2 Dial the fax number A MStartN 6 11 Junk fax prohibitor preventing fax reception from undesired callers If you subscribe to Caller ID service page 53 this feature prevents fax reception from calls that do not show caller information Additionally the unit will not a...

Page 51: ...y to turn the auto answer setting ON page 47 2 Start Multi Function Station A PC FAX 3 When a fax call is received your computer will receive a document through the unit Note R You can view print or transfer the received document using your computer Viewing a received document 1 Select PC FAX from Multi Function Station 2 Select Received Log in Communication Log 3 Click the item you want to view 4...

Page 52: ...nk the web fax preview feature will not be activated 6 13 3 Displaying a received fax document on the web browser Important R Make sure that the unit is idle 1 Start Multi Function Station 2 Utilities A Configuration Web Page A Device Configuration 3 Type root as the user name then enter the password feature 155 on page 56 A OK 4 Select the WEB FAX PREVIEW tab 5 Enter the web fax preview access co...

Page 53: ...lowing will be displayed OUT OF AREA The caller dialled from an area which does not provide Caller ID service PRIVATE CALLER The caller requested not to send caller information LONG DISTANCE The caller made a long distance call To confirm caller information by printing the Caller ID list To print manually see page 99 To print automatically after every 30 new calls activate feature 216 page 58 7 2 ...

Page 54: ... 5 1 Into the one touch dial feature and phonebook R Make sure that the MFaxN light is ON 1 MCaller IDN 2 Press MCN or MDN repeatedly to display the desired item 3 MMenuN 4 Select the station key or phonebook For station 1 2 1 Press the desired station key 2 Press MCN or MDN repeatedly to select DIAL MODE A MSetN A MSetN For station 3 Press the station key A MSetN For station 4 6 Press MLowerN the...

Page 55: ...on Web Page R You can also access the unit by entering its IP address on the web browser 2 Select the desired category from the menu bar Device Configuration features of the unit Network Configuration network features 3 Type root as the user name then enter the password feature 155 on page 56 A OK 4 Select the desired feature tab at the top of the right frame 5 Change the settings or edit the info...

Page 56: ...t is connected via a PBX PBX functions transferring a call etc might not work correctly Consult your PBX supplier for the correct setting Changing the LCD display contrast MBNM1NM4NM5N M1N NORMAL default M2N DARKER Selecting the scale MBNM1NM4NM7N M1N MILLIMETRES default M2N INCHES Note R The selected scale will be used when measurements are shown on the unit s display Changing the password for fe...

Page 57: ...formation and fax transmission data journal report and faxes received in memory will be deleted M0N NO default M1N YES R Disconnect the telephone line cord KX MB2025 KX MB2030 only USB cable and LAN cable KX MB2000 KX MB2010 KX MB2030 only before activating this feature To reset all features 1 MMenuN A MBNM1NM5NM9N 2 Press M1N to select YES A MSetN 3 Press M1N to select YES A MSetN Setting the rin...

Page 58: ... input tray MBNM3NM8NM1N M1N LETTER Letter size paper M2N A4 default A4 size paper M3N LEGAL Legal size paper M4N B5 ISO B5 ISO size paper M5N B5 JIS B5 JIS size paper M6N 16K 16K size paper M7N 216X330 M8N 216X340 Note R When you set feature 147 to INCHES the numbers are displayed in inches Setting the recording paper type for paper input tray MBNM3NM8NM3N M1N PLAIN PAPER default 75 g m2 to 90 g ...

Page 59: ... Fax mode is selected as default Note R You cannot select the scan mode using this feature Setting the default operation mode timer MBNM4NM6NM4N KX MB2025 KX MB2030 only To set the timer before returning to the default operation mode feature 463 M0N OFF Deactivates this feature M1N 30s 30 seconds M2N 1min default 1 minute M3N 2min 2 minutes M4N 5min 5 minutes Setting toner save feature MBNM4NM8NM2...

Page 60: ...ls Setting the journal report to print automatically MBNM4NM0NM2N M0N OFF The unit will not print a journal report but will keep a record of the last 30 fax transmissions and receptions M1N ON default The unit will print a journal report automatically after every 30 new fax transmissions and receptions page 41 Changing the receiving mode in the manual answer setting MBNM4NM0NM4N M1N TEL default Te...

Page 61: ...other fax transmission until the former sending is completed Note R To cancel this setting after programming press MStopN while the unit is idle and then press MSetN Setting the Error Correction Mode ECM MBNM4NM1NM3N This feature is available when the sending receiving fax machines are ECM compatible M0N OFF Deactivates this feature M1N ON default Fax transmission reception will be carried out so ...

Page 62: ...you with a beeping sound when a received fax document is stored into memory M0N OFF Deactivates this feature M1N ON default You will hear a beeping sound Note R If documents are stored into memory due to some printing problem the beeps will continue until you solve the problem If a message is displayed see page 77 to page 79 for directions on printing out the stored documents Make sure the unit is...

Page 63: ...ll be used for receiving a fax See page 24 for details Setting the fax preview mode MBNM4NM4NM8N KX MB2030 only See page 52 for details Setting the web fax preview access code MBNM4NM5NM0N KX MB2030 only See page 52 for details Setting notification of fax reception MBNM4NM5NM1N M0N OFF default Deactivates this feature M1N ON The computer connected to your unit using USB LAN will receive a notifica...

Page 64: ...n notification message to up to 6 destinations 1 Start Multi Function Station 2 Utilities A Configuration Web Page A Device Configuration 3 Type root as the user name then enter the password feature 155 on page 56 A OK 4 Select the FAX FEATURE tab 5 Click Edit next to RECEIVE PC LIST 6 Click List next to the desired destination 7 Click the desired PC from the list A Submit 8 Close the web browser ...

Page 65: ... MBNM4NM6NM7N M0N DISABLED default Deactivates this feature M1N ENABLED The unit will hold the previous setting Holding the previous zoom setting MBNM4NM6NM8N M0N DISABLED default Deactivates this feature M1N ENABLED The unit will hold the previous setting Holding the previous collate setting MBNM4NM6NM9N M0N DISABLED default Deactivates this feature M1N ENABLED The unit will hold the previous set...

Page 66: ...4N A MSetN 2 Enter the desired data timeout setting from 005 seconds to 600 seconds using the dial keypad R The default setting is 060 seconds 3 MSetN A MMenuN Setting mutual A4 letter print MBNM7NM7NM6N This feature allows printing in A4 size even if letter size recording paper is loaded in the paper input tray and vice versa M0N OFF Deactivates this feature M1N ON default Printing is possible be...

Page 67: ...ERVER will be displayed when the FTP server setting is programmed page 68 SMB FOLDER will be displayed when the SMB folder setting is programmed page 68 Holding the previous scanning parameter for Push Scan MBNM4NM9NM4N M0N DISABLED default Deactivates this feature M1N ENABLED The unit will hold the previous scan settings for each mode of push scan Setting the information for scan to email address...

Page 68: ...ons up to 6 destinations to the unit through the web browser interface 1 Start Multi Function Station 2 Utilities A Configuration Web Page A Device Configuration 3 Type root as the user name then enter the password feature 155 on page 56 A OK 4 Select the SCAN FEATURE tab 5 Click Edit next to FTP SERVER 6 Click Edit next to the desired FTP server 7 Enter the server name IP address folder directory...

Page 69: ...network on the LAN using the dial keypad A MSetN A MMenuN Setting the primary DNS server for the LAN connection MBNM5NM0NM4N This feature is available when feature 500 is deactivated 1 MMenuN A MBNM5NM0NM4N A MSetN 2 Enter the primary DNS server of the network on the LAN using the dial keypad A MSetN A MMenuN Setting the secondary DNS server for the LAN connection MBNM5NM0NM5N This feature is avai...

Page 70: ...llocated automatically without using a DHCP Dynamic Host Configuration Protocol server Setting HTTPD for the LAN connection MBNM5NM3NM4N M0N DISABLED Denies access to the web browser M1N ENABLED default Allows access to the web browser IPv6 protocol MBNM5NM3NM5N M0N DISABLED default Deactivates this feature M1N ENABLED IPv6 protocol can be used After installing the printer driver be sure to change...

Page 71: ... 1 MMenuN A MBNM5NM7NM8N 2 Press M1N to select YES A MSetN 3 Press M1N to select YES A MSetN A MMenuN To erase FTP destinations 1 MMenuN A MBNM5NM7NM8N 2 Press M1N to select YES A MSetN 3 Press M0N to select NO A MSetN 4 Press M1N to select YES A MSetN A MMenuN To erase SMB folder destinations 1 MMenuN A MBNM5NM7NM8N 2 Press M1N to select YES A MSetN 3 Press M0N to select NO A MSetN 4 Press M0N to...

Page 72: ... the information for scan to SMB SMB FEATURE Enter the SMB folder information to send scanned images from the unit to an SMB folder See page 68 for details Setting the information for scan to email address EMAIL FEATURE Enter the email server and SMTP server information to send scanned images from the unit via an email See page 67 for details Registering the scan to email address destinations EMAI...

Page 73: ...X Y Z 9 w x y z 9 M0N 0 I MGN To switch between uppercase or lowercase letters MRecallN KX MB2025 KX MB2030 only Hyphen MZoomN To insert a space MStopN To delete a character To select characters using MCN or MDN Instead of pressing the dial keys you can select characters using MCN or MDN 1 Press MCN repeatedly to display the desired character Characters will be displayed in the following order A U...

Page 74: ...ritten Make sure the unit is not currently being used for the same function 9 2 2 Using Device Monitor You can confirm the setting information and current status of the unit from your computer 1 Start Multi Function Station 2 Utilities A Device Monitor R The Device Monitor window will appear 3 Confirm the status of the unit Status Current status of the unit Note R Additional information toner and ...

Page 75: ...l scanning KX MB2025 KX MB2030 only Press MStopN repeatedly to display STOP SCANNING To cancel copying Press MStopN repeatedly to display STOP COPYING To cancel sending or receiving faxes KX MB2025 KX MB2030 only Press MStopN repeatedly to display STOP FAX To cancel broadcast transmission KX MB2025 KX MB2030 only Press MStopN repeatedly to display BROAD CANCELLED To cancel fax redialling KX MB2025...

Page 76: ...ocuments due to a lack of recording paper or a recording paper jam Load paper page 14 or remove the jammed paper page 88 R If the PC fax setting feature 442 on page 63 is set to ALWAYS check the connection between the computer and the unit R If your unit is connected to the computer via the LAN and the fax preview mode feature 448 on page 52 is set to ON view print or save the documents on the web...

Page 77: ...of the size that is shown on the display R If this message is often displayed also change the recording paper size setting feature 380 on page 58 R The recording paper size setting feature 380 on page 58 is set to B5 ISO B5 JIS or 16K so received faxes have been stored into memory Change the recording paper size setting and load the appropriate recording paper Note R 1 Check the paper input tray T...

Page 78: ... R When making a copy the document being stored exceeded the memory capacity of the unit Press MStopN to clear the message Divide the document into sections MODEM ERROR R There is something wrong with the unit s modem Contact our service personnel NO FAX REPLY R The other party s fax machine is busy or has run out of recording paper Try again OUT OF PAPER INPUT TRAY 2 R Recording paper is not load...

Page 79: ...eck that the computer is turned ON R If your unit is connected to the computer via the LAN and the fax preview mode feature 448 on page 52 is set to ON view print or save the received fax documents and then erase the unnecessary documents page 52 turn the setting to OFF The fax documents stored in memory will be printed automatically SCANNER POSITION ERROR R There is something wrong with the scann...

Page 80: ...e for the version of Windows installed on your computer See the Microsoft web site for details R If you have any other multifunction software installed on your computer uninstall it R Check that your computer has enough memory and hard disk space If your computer warns that there is insufficient memory close other applications If there is not enough space on the hard disk delete unnecessary files ...

Page 81: ... A blank sheet is ejected R You placed the document facing the wrong way when using the copier R The other party placed the document in their fax machine the wrong way Check with the other party KX MB2025 KX MB2030 only Coloured and grey objects are printed in black instead of greyscale when printing from Microsoft PowerPoint or other applications R Select Color or remove the check next to Graysca...

Page 82: ... paper is not loaded or the unit has run out of paper Load paper page 14 Letters on the copied documents are not clear R The original document is too dark or too light Change the contrast page 34 and try again The copied documents are too dark and cannot be read R You used a coloured paper as a document Change the contrast page 34 and make a lighter copy of the document using TEXT resolution page ...

Page 83: ...de page 47 or TEL FAX mode page 48 R The time taken to answer the call is too long Decrease the number of rings before the unit answers a call feature 210 on page 57 The display shows CONNECTING but faxes are not received R The incoming call is not a fax Change the receiving mode to TEL mode page 48 or TEL FAX mode page 47 The printing quality of the received documents is poor R If documents can b...

Page 84: ...it through a computer modem connect the unit directly to a telephone line socket The unit does not ring R The ringer volume is turned OFF Adjust it page 21 The other party complains they only hear a fax tone and cannot talk R FAX ONLY mode is set page 47 Tell the other party the number is only used for faxes The MRedialN or MPauseN button does not function properly R If this button is pressed duri...

Page 85: ...s A 255 0 0 0 10 0 0 1 10 255 255 254 Class B 255 255 0 0 172 xx 0 1 172 xx 255 254 1 Class C 255 255 255 0 192 168 xx 1 192 168 xx 254 2 1 xx should be the same value for the unit and for the computer as shown in the following example Example 172 16 0 1 172 16 255 254 The available range of xx is 16 31 2 xx should be the same value for the unit and for the computer as shown in the following examp...

Page 86: ...in that they cannot send a document R There is no room left in the memory of your answering machine to record voice messages See the operating instructions of the answering machine and erase unnecessary messages R You set the answering machine to only give a greeting message 10 3 8 If a power failure occurs R The unit will not function R If any documents are stored in the memory i e during copying...

Page 87: ...rol dialogue box will appear 4 Continue 5 Click the Exceptions tab 6 Confirm that Panasonic Trap Monitor Service Panasonic LPD Manager and Panasonic LPD are displayed and checked on the Program or port list 10 3 10 Notice for KX MB200 KX MB700 KX FLB880 series users If you have already installed KX MB200 KX MB700 KX FLB880 series Multi Function Station on your computer use the following instructio...

Page 88: ... recording paper has jammed inside of the unit The display will show the following PAPER JAMMED L OPEN TOP COVER CHECK REAR COVER Case 1 When the recording paper has jammed near the manual input tray 1 Pull open the paper input tray A A 2 Open the manual input tray B and remove the jammed paper C carefully by pulling it upwards Then close the manual input tray C B 88 11 Paper Jams 11 Paper Jams ...

Page 89: ...he recording paper has jammed near the drum and toner cartridge 1 Pull open the paper input tray A A 2 Open the top cover B by holding the indentations C on both sides of the unit D B C C E Caution R The fuser unit D gets hot Do not touch it Note R Do not touch the transfer roller E 89 11 Paper Jams ...

Page 90: ...arefully by pulling it upwards F Remove the jammed paper G carefully by pulling it toward you G 4 Close the paper input tray 5 Close the top cover by holding the indentations on both sides of the unit until locked 90 11 Paper Jams ...

Page 91: ... B on both sides of the unit A B B C D Caution R The fuser unit C gets hot Do not touch it Note R Do not touch the transfer roller D 2 Lift both green levers E until they stop E 3 Remove the jammed paper F carefully by pulling it upwards F 4 Push back the green levers G to the original position G 91 11 Paper Jams ...

Page 92: ...ecording paper and straighten 2 Re load the recording paper 3 Insert the paper input tray into the unit lifting the front part of the tray Then push it completely into the unit Note R If the message is still displayed check the recording paper specifications and load the recording paper again See page 14 for details 11 1 3 When the recording paper in the manual input tray is not fed into the unit ...

Page 93: ...install recording paper See page 15 for details 11 2 Document jams Automatic document feeder KX MB2010 KX MB2025 KX MB2030 only Caution R Do not pull out the jammed document forcibly before lifting the ADF cover 1 Open the ADF cover A while holding the document cover B A B 93 11 Paper Jams ...

Page 94: ...2 Remove the jammed document C carefully When the document has jammed near the document entrance C When the document has jammed near the document exit C 3 Close the ADF cover 94 11 Paper Jams ...

Page 95: ...party KX MB2025 KX MB2030 only Caution R Be careful when handling the drum and toner cartridge See the caution for the drum cartridge on page 10 for details R Do not use paper products such as paper towels or tissues for cleaning 12 1 1 White plates and scanner glass 1 Open the document cover A A 2 Hold the document cover while cleaning the white plates B and the scanner glass C B C 3 Close the do...

Page 96: ...ng the indentations B on both sides of the unit D A B B C Caution The fuser unit C gets hot Do not touch it Note R Do not touch the transfer roller D 3 Remove the drum and toner cartridge E by holding the tabs E 4 Clean the lower glass F with a soft and dry cloth F 96 12 Cleaning ...

Page 97: ...the arrows H match to install the drum and toner cartridge correctly H 6 Close the top cover by holding the indentations on both sides of the unit until locked Caution R To prevent injuries be careful not to put your hands under the top cover 7 Turn the power switch ON 97 12 Cleaning ...

Page 98: ...on R Do not use paper products such as paper towels or tissues for cleaning 1 Turn the power switch OFF 2 Open the ADF cover A while holding the document cover B A B 3 Clean the document feeder rollers C with a cloth moistened with water and let all parts dry thoroughly C 4 Close the ADF cover 5 Turn the power switch ON 98 12 Cleaning ...

Page 99: ...on 4 n Scanning density Scanning resolution Up to 600 1 200 dpi Optical Up to 9 600 9 600 dpi Interpolated Copy resolution Up to 600 600 dpi Fax resolution 1 Horizontal 8 pels mm Vertical 3 85 lines mm in standard resolution 7 7 lines mm in fine photo resolution 15 4 lines mm in super fine resolution n Photo resolution 64 level n Scanner type Colour Contact Image Sensor n Printer type Laser Printe...

Page 100: ...h Red 630 nm typ Green 520 nm typ Blue 465 nm typ Emission duration Continuous 1 KX MB2025 KX MB2030 only 2 KX MB2000 KX MB2010 KX MB2030 only 3 Transmission speed depends on the contents of the pages resolution telephone line conditions and capability of the other party s machine 4 Transmission speed is based on the ITU T No 1 Test Chart with original mode If the capability of the other party s m...

Page 101: ...amming 2 5 Dialing mode 2 6 Date and time 2 7 Your logo 2 8 Your fax number Thank you for purchasing a Panasonic fax machine Things you should keep a record of Attach your sales receipt here For your future reference Date of purchase Serial number found on the rear of the unit Example 3 Approx 650 pages can be printed Table of Contents1 1 Table of Contents Introduction and Installation Accessories...

Page 102: ... TO PROCUREMENT OF SUBSTITUTE GOODS OR SERVICES LOSS OF USE DATA OR PROFITS OR BUSINESS INTERRUPTION HOWEVER CAUSED AND ON ANY THEORY OF LIABILITY WHETHER IN CONTRACT STRICT LIABILITY OR TORT INCLUDING NEGLIGENCE OR OTHERWISE ARISING IN ANY WAY OUT OF THE USE OF THIS SOFTWARE EVEN IF ADVISED OF THE POSSIBILITY OF SUCH DAMAGE However parts of the NetBSD Kernel are provided with the following copyri...

Page 103: ...reserved Copyright c 1988 Stephen Deering Copyright c 1988 University of Utah Copyright c 1988 1989 1993 The Regents of the University of California All rights reserved Copyright c 1988 1991 1993 The Regents of the University of California All rights reserved Copyright c 1988 1992 1993 The Regents of the University of California All rights reserved Copyright c 1988 1993 The Regents of the Universi...

Page 104: ...nc All rights reserved Copyright c 1999 2001 The NetBSD Foundation Inc All rights reserved Copyright c 2000 The NetBSD Foundation Inc All rights reserved Copyright c 2000 2001 The NetBSD Foundation Inc All rights reserved Copyright c 2000 2001 2002 The NetBSD Foundation Inc All rights reserved Copyright c 2001 The NetBSD Foundation Inc All rights reserved Copyright c 2002 The NetBSD Foundation Inc...

Page 105: ...es Technology Inc copyright notice BSD Copyright c 2001 2003 Networks Associates Technology Inc All rights reserved Redistribution and use in source and binary forms with or without modification are permitted provided that the following conditions are met Redistributions of source code must retain the above copyright notice this list of conditions and the following disclaimer Redistributions in bi...

Page 106: ...INCLUDING NEGLIGENCE OR OTHERWISE ARISING IN ANY WAY OUT OF THE USE OF THIS SOFTWARE EVEN IF ADVISED OF THE POSSIBILITY OF SUCH DAMAGE Part 4 Sun Microsystems Inc copyright notice BSD Copyright 2003 Sun Microsystems Inc 4150 Network Circle Santa Clara California 95054 U S A All rights reserved Use is subject to licence terms below This distribution may include materials developed by third parties ...

Page 107: ...R PERFORMANCE OF THIS SOFTWARE R This product contains NetBSD software and is using it based on the following licence conditions Copyright c 1990 The Regents of the University of California All rights reserved This code is derived from software contributed to Berkeley by Chris Torek Redistribution and use in source and binary forms with or without modification are permitted provided that the follo...

Page 108: ... PROFITS OR BUSINESS INTERRUPTION HOWEVER CAUSED AND ON ANY THEORY OF LIABILITY WHETHER IN CONTRACT STRICT LIABILITY OR TORT INCLUDING NEGLIGENCE OR OTHERWISE ARISING IN ANY WAY OUT OF THE USE OF THIS SOFTWARE EVEN IF ADVISED OF THE POSSIBILITY OF SUCH DAMAGE R This product contains NetBSD software and is using it based on the following licence conditions Copyright c 1987 1993 1994 The Regents of ...

Page 109: ...UDING BUT NOT LIMITED TO PROCUREMENT OF SUBSTITUTE GOODS OR SERVICES LOSS OF USE DATA OR PROFITS OR BUSINESS INTERRUPTION HOWEVER CAUSED AND ON ANY THEORY OF LIABILITY WHETHER IN CONTRACT STRICT LIABILITY OR TORT INCLUDING NEGLIGENCE OR OTHERWISE ARISING IN ANY WAY OUT OF THE USE OF THIS SOFTWARE EVEN IF ADVISED OF THE POSSIBILITY OF SUCH DAMAGE R This product contains thttpd software that ACMELab...

Page 110: ...Y WAY OUT OF THE USE OF THIS SOFTWARE EVEN IF ADVISED OF THE POSSIBILITY OF SUCH DAMAGE R This product contains NetBSD software and is using it based on the following licence conditions Copyright c 1990 The Regents of the University of California All rights reserved This code is derived from software contributed to Berkeley by Chris Torek Redistribution and use in source and binary forms with or w...

Page 111: ...NCLUDING BUT NOT LIMITED TO THE IMPLIED WARRANTIES OF MERCHANTABILITY AND FITNESS FOR A PARTICULAR PURPOSE ARE DISCLAIMED IN NO EVENT SHALL THE REGENTS OR CONTRIBUTORS BE LIABLE FOR ANY DIRECT INDIRECT INCIDENTAL SPECIAL EXEMPLARY OR CONSEQUENTIAL DAMAGES INCLUDING BUT NOT LIMITED TO PROCUREMENT OF SUBSTITUTE GOODS OR SERVICES LOSS OF USE DATA OR PROFITS OR BUSINESS INTERRUPTION HOWEVER CAUSED AND...

Page 112: ...udes software developed by the OpenSSL Project for use in the OpenSSL Toolkit http www openssl org THIS SOFTWARE IS PROVIDED BY THE OpenSSL PROJECT AS IS AND ANY EXPRESSED OR IMPLIED WARRANTIES INCLUDING BUT NOT LIMITED TO THE IMPLIED WARRANTIES OF MERCHANTABILITY AND FITNESS FOR A PARTICULAR PURPOSE ARE DISCLAIMED IN NO EVENT SHALL THE OpenSSL PROJECT OR ITS CONTRIBUTORS BE LIABLE FOR ANY DIRECT ...

Page 113: ...display the following acknowledgement This product includes cryptographic software written by Eric Young eay cryptsoft com The word cryptographic can be left out if the rouines from the library being used are not cryptographic related 4 If you include any Windows specific code or a derivative thereof from the apps directory application code you must include an acknowledgement This product includes...

Page 114: ... copy resolution 65 462 Contrast hold 59 463 Default operation mode 59 464 Mode timer 59 467 Page layout hold 65 468 Zoom hold 65 469 Collate hold 65 473 Edge hold 65 474 Frame margin 65 475 Margin hold 65 482 Toner save 12 59 493 Scan mode 67 494 Scan parameter hold 67 500 DHCP mode 69 501 IP address 69 502 Subnet mask 69 503 Default gateway 69 504 DNS server 1 69 505 DNS server 2 69 507 Machine ...

Page 115: ...6 protocol Feature 535 70 J Jams Document 93 Recording paper 88 Journal report Feature 402 41 60 99 Junk fax prohibitor 50 L Label 28 LAN features 69 Logo Feature 102 22 M MAC address Feature 508 69 Machine name Feature 507 69 Maintenance time Feature 158 57 Manual answer mode Feature 404 60 Manual input tray 15 Margin hold Feature 475 65 Maximum fax speed Feature 418 61 Memory reception alert Fea...

Page 116: ... fax Feature 436 62 TEL FAX Feature 212 60 Ringer pattern Feature 161 57 S Scale selection Feature 147 56 Scan features 67 Scan mode Feature 493 67 Scan parameter hold Feature 494 67 Scanner glass 19 34 41 Sending faxes Broadcast 45 Computer document 46 From memory 42 Manually 41 One touch dial 43 Phonebook 43 Sending report Feature 401 41 60 Set fax default Feature 459 63 Setup list 99 Storing Br...

Page 117: ...117 Notes ...

Page 118: ...118 Notes ...

Page 119: ...119 Notes ...

Page 120: ... MB2000E MB2000E PNQX2626ZA CM1209SY0 CD ...

Reviews: