
Panasonic
KX-TPA60
Before you start
Wireless Handset package content: Wireless
handset, Power supply station, Rechargeable
batteries AAA and Belt clip. Base Station
package content: Base station and Ethernet
cable.
Insert both batteries into the handset. Attach
the power adaptor to the Power supply station
and plug it in. Attach the Ethernet cable to the
socket behind and attach the other end of this
cable to an internet modem, router or switch
socket designed for IP Telephones. If your
switch does not support PoE (Power on
Ethernet), it is necessary attach the power
adaptor to the Power supply station and plug
it in. Both adaptors are sold as an optional
accessory and will be added to the Wireless
handset and Base Station packages.
ATTENTION: Base Unit and Power Supply
Station have different power adaptors (6,5V
Base Unit, 5,5V Power Supply Station). The first
launch of the phone can take several minutes,
during which the phone is updated, and
eventually reboots itself. Please do not
disconnect it from the power. The handset can
be registered up to 4 Base Units. Up to 8
handsets can be registered to a single Base
Unit. To add a new handset press and hold the
location button (on the right side) on the Base
unit for about 3 seconds. The STATUS
indicator will flash red. On a not registered
handset, press and hold “OK” until “Please
Wait …..” displays. After “Registered” is
displayed on the LCD, the registration is
completed. If the telephone is already
registered to a Base station, do the
registration using the telephone menu. After
the phone is registered to the network, the
date and time appears. Everything is ready
and you can start making calls. Right in the
telephone a list of telephone contacts has
been made ready for you to use, which is
updated once a day. For additional settings
use the web page portal-uc.gtsce.com. To sing
in, use the username and password you
received at the handover.
1.
Making a Call
To make a call dial the required number and
press “Talk”. To end the call, press “Cancel”.
2.
Speed Dial
To set up the speed dialling, press and hold (0-
9) button. Press "Menu" and select "Edit",
enter the contact name and těhen the phone
number. Then it is possible to select "Auto
Call“, the phone number is dialled on
prolonged holding, or "Manual", the phone
number is dialled while pressing the „Talk“
button.
3.
Telephone Directory
Within the Virtual PBX service there are three
different telephone directories: Enterprise,
Enterprise-Common and Personal.
Enterprise directory contains all active users of
the company, external numbers cannot be
saved here (e.g. employee mobile numbers or
external partner telephone numbers). All users
have it read-only Into the Enterprise-Common
directory any number can be saved. For its
administration it is necessary to log in to the
portal-uc.gtsce.com portal as an administrator
of a company or branch. All other users have it
read-only.
Personal directory is intended for user private
contacts and is available on all devices and
UC-One applications. Administration (adding,
editing or deleting items) can be done via the
portal-uc.gtsce.com portal.
4.
Searching in Telephone Directory
An item in the telephone directory can be
searched by entering a name: Press the status
button „Tel. Directory“, and then select the
type of the directory and confirm by „OK“.
Enter the name or the first letters of that name
and confirm „OK“. In T9 mode just press the
key once, the phone searches for all the items
corresponding the letters below the key. This
method is significantly faster. Select the
required item and press „OK“. Select the
required telephone number and press the
„Talk“ button to make a call. Switching
between the insert modes can be done by
clicking the right status button.
5.
Call Register
Press the “Outgoing log” soft key. Then a list
of outgoing calls will appear. To display a list
of incoming calls, press the “Incoming log”
soft key. Scrolling through the list is done
using the navigation buttons. Select an item
from the list to delete it. Press the “Menu” soft
key. Select “Delete” and confirm “OK”. Then
select “Yes” and again confirm “OK”. To
delete all items, select “Delete all” instead. To
make a call press “Talk”.
6.
Redial
The last phone number dialled is stored in the
redial list (each 32 digits max.) If the Redial key
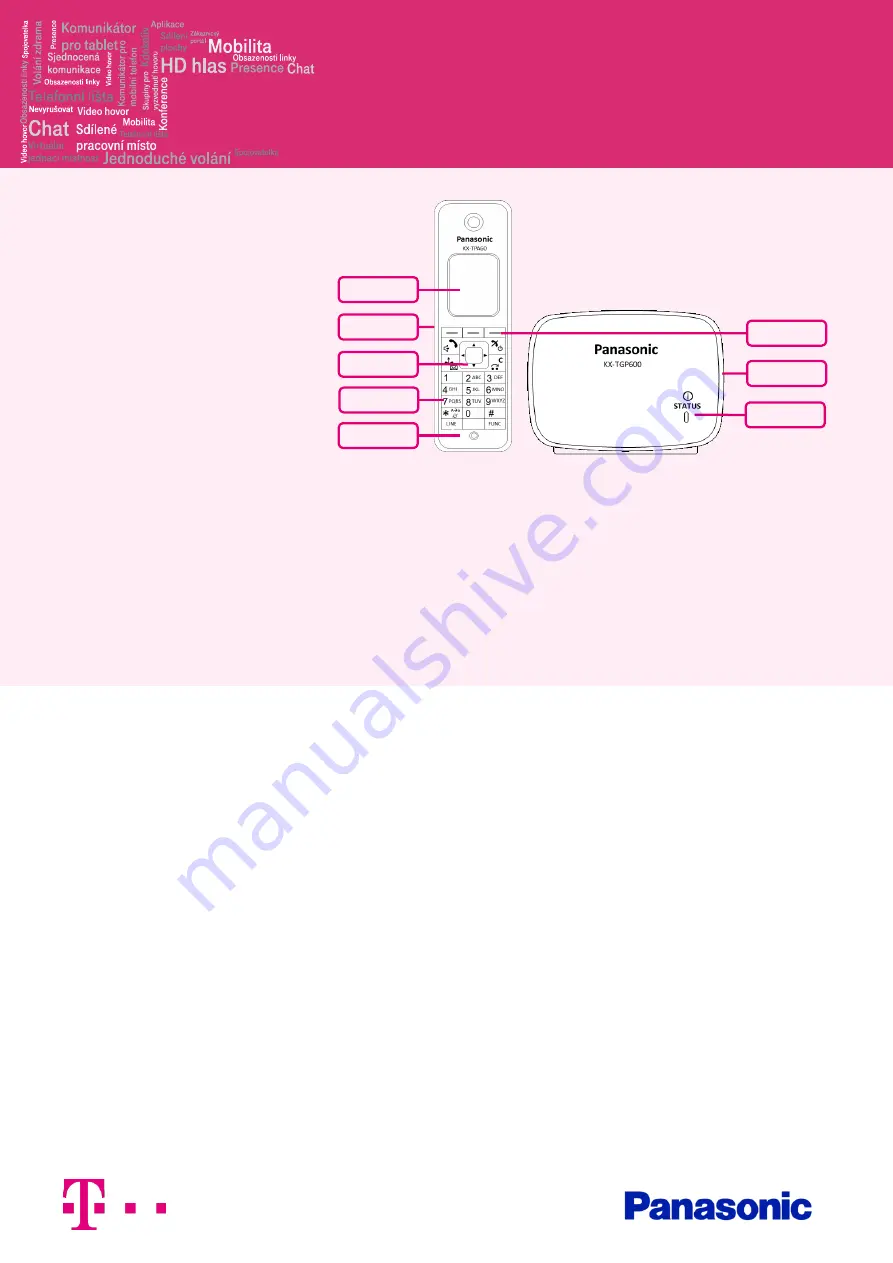
Color Display
Headset Socket
Handset Locator
Button
Status Indicator
Microphone
Soft keys
Navigator Key
Keypad