background image

1. With the base station powered on and 

connected to the internet, from a web 
browser on a computer on the same 
network, enter the IP Address found earlier                         
(e.g., http://192.168.1.10)  
 

2. Login is "admin“ / password is "adminpass“ 


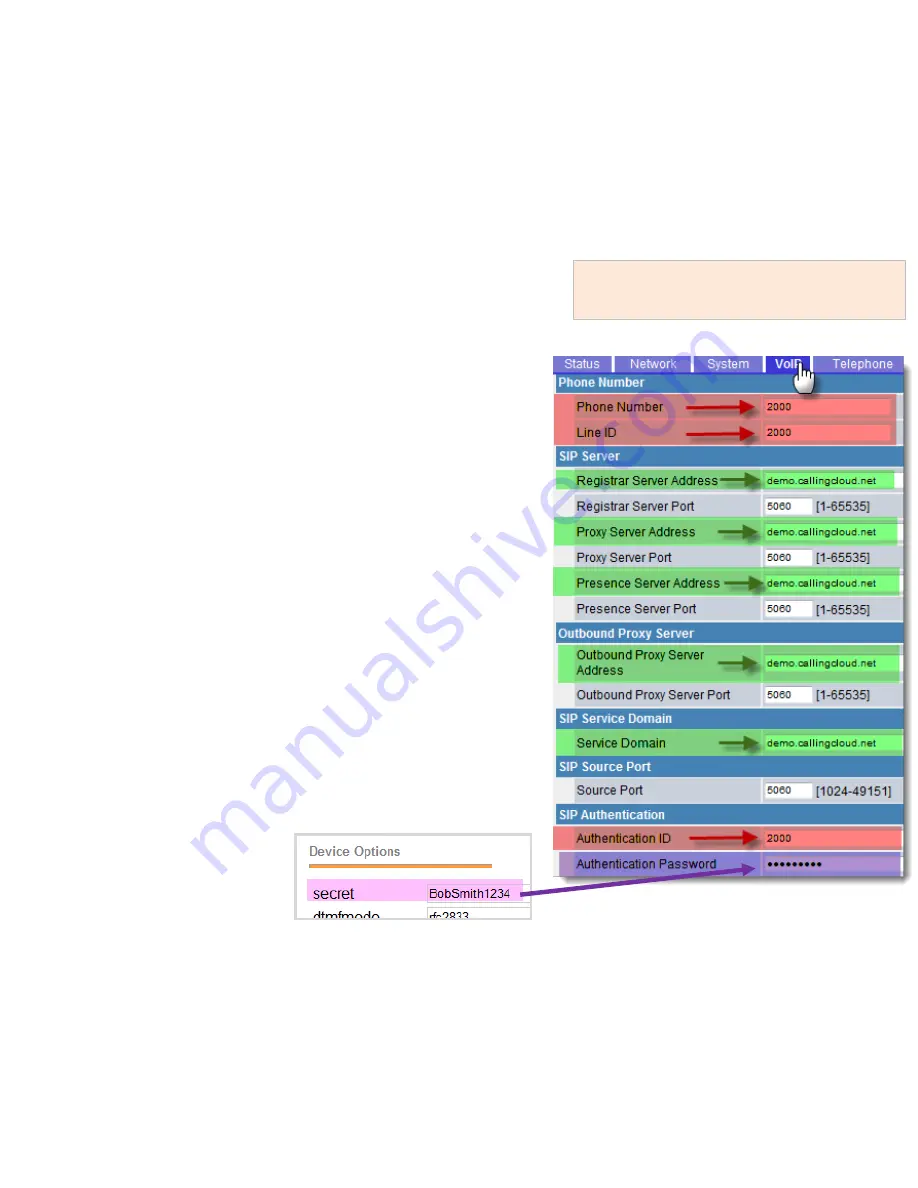
3. In the web interface select "VoIP“ 

Enter your 

Voice Carrier PBX URL 

in the 5 

green

 fields (e.g., demo.callingcloud.net)  

Enter 

extension #

 in the 3 

red


fields


Enter the 

password

 for that particular 

extension in the 1 

purple

 field (extension’s 

password is found in your Admin PBX)  


4. Scroll to the bottom                                                       

and click "Save“ 

5.  In web portal, configure to extension


Note: 

this step not necessary if you 

ordered the phone from Voice Carrier. 

Summary of Contents for KX-TGP500

Page 1: ...e Set up and Usage Instructions Before you begin setting up the phone make sure you have created a Voice Carrier extension in your PBX for this device From our Knowledge Base you ll find Adding a New...

Page 2: ...ed from Voice Carrier as we pre configure the device before shipment If you are provisioning your own purchased phones the following pages provides instructions for four additional steps 3 Identify th...

Page 3: ...n Important Use only the supplied Panasonic AC adaptor PQLV219 or PQLV219 03 KX TGP550 only Do not connect the Ethernet cable connected to the PoE hub to the PC port of the unit Doing so may cause sev...

Page 4: ...and 2 are all that s needed with phones ordered from Voice Carrier as we pre configure the device before shipment If you are provisioning your own purchased phones the following pages provides instru...

Page 5: ...gle down to Embedded web and press Select 4 Toggle up to the On line under Embedded web and press Select You will hear a short beep 5 After pressing On you will return to the Network Settings menu 6 S...

Page 6: ...s obtained earlier example http 192 168 1 10 Click the Maintenance tab select Local Firmware Update Click Browse upload the firmware files saved earlier 3 The base station will flash red for 5 seconds...

Page 7: ...In the web interface select VoIP Enter your Voice Carrier PBX URL in the 5 green fields e g demo callingcloud net Enter extension in the 3 red fields Enter the password for that particular extension i...

Page 8: ...ow ready for use 5 In web portal Add VM Access Note this step not necessary if you ordered the phone from Voice Carrier Note One base station supports up to six handsets If using more than one handset...

Page 9: ...How to Use the Handset 1 Making a Call 2 Answering a Call 3 Transferring a Call 9...

Page 10: ...1 Making a Phone Call 10...

Page 11: ...2 Answering a Call 3 Transferring a Call 11...

Page 12: ...12...

Reviews: