background image

2

Thank you for purchasing your new Panasonic cordless 
telephone.

Please read the IMPORTANT SAFETY INSTRUCTIONS on 

page 50 before use. Read and understand all instructions.
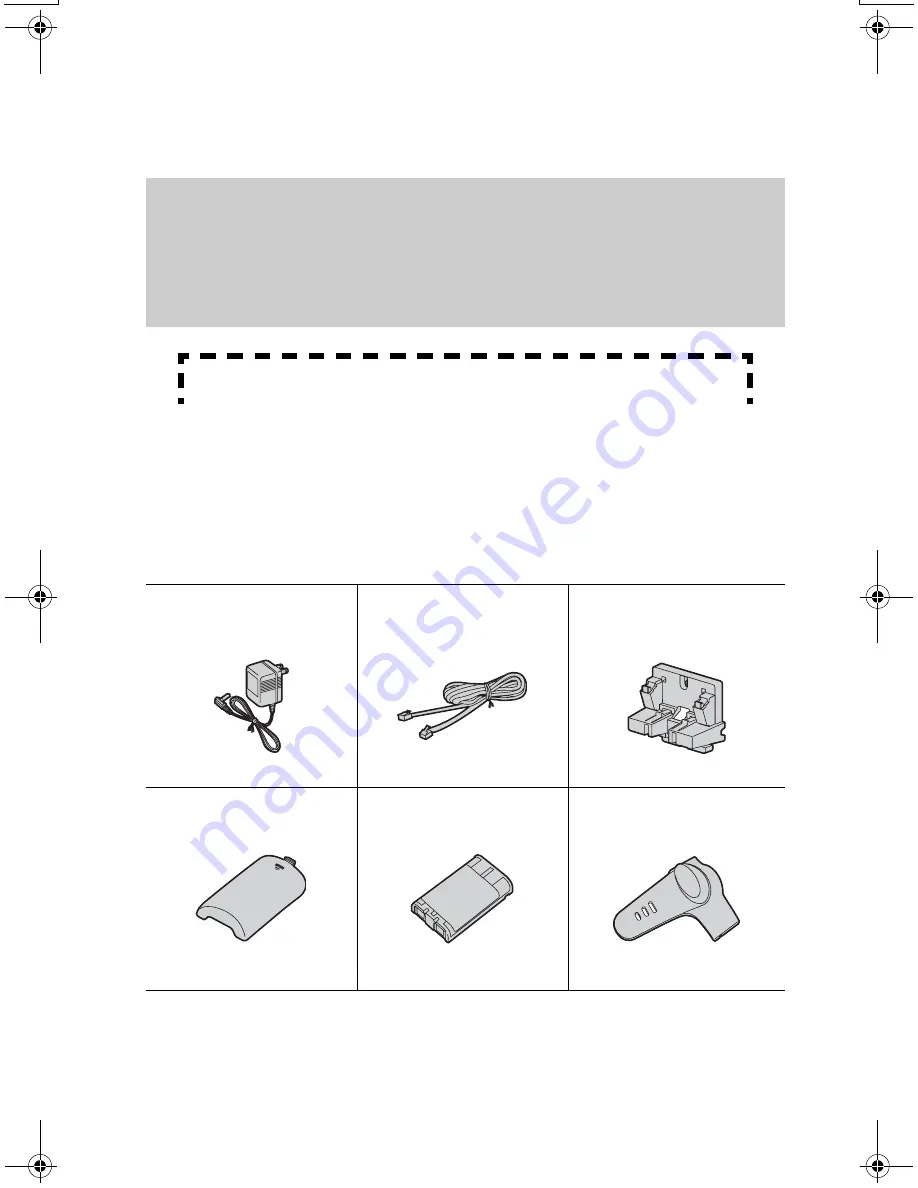
Accessories


(included)


For extra orders, call 1-800-332-5368.
For hearing or speech impaired TTY users, call 1-866-605-1277.

Caller ID, Call Waiting and Voice Mail Service, where available, are telephone 

company services. After subscribing to Caller ID this phone will display a caller’s 

name and phone number. Call Waiting Caller ID, which displays a second 

caller’s name and phone number while the user is on another call, requires a 

subscription to both Caller ID and Call Waiting with Caller ID Services (CWID).

After subscribing to Voice Mail Service, this unit will give you visual indication to 
let you know when there are messages in the mailbox.

A

AC Adaptor (p. 9)
Order No. PQLV1Z
(PQLV1)

one

A

Telephone Line Cord
 (p. 9)
 Order No. PQJA10075Z

one

A

Wall Mounting
Adaptor (p. 42)
Order No. PQKL10063Z1

one

A

Handset Cover (p. 10)
Order No. PQKK10142Z2

one

A

Battery (p. 10)
Order No. HHR-P104

one

A

Belt Clip (p. 41)
Order No. PQKE10377Z2

one

Attach your purchase receipt here.

TG5055.fm.fm  Page 2  Tuesday, January 20, 2004  5:29 PM

Summary of Contents for KX-TG5055

Page 1: ...ility The unit is Caller ID compatible To display the Caller s name and phone number you must subscribe to Caller ID service PLEASE READ BEFORE USE AND SAVE Panasonic World Wide Web address http www panasonic com for customers in the USA or Puerto Rico Charge the battery for 6 hours before initial use ...

Page 2: ... and phone number Call Waiting Caller ID which displays a second caller s name and phone number while the user is on another call requires a subscription to both Caller ID and Call Waiting with Caller ID Services CWID After subscribing to Voice Mail Service this unit will give you visual indication to let you know when there are messages in the mailbox AAC Adaptor p 9 Order No PQLV1Z PQLV1 one ATe...

Page 3: ...ration the recommended base unit location is Note If you use the handset near a microwave oven which is being used noise may be heard from the receiver or the speaker Move away from the microwave oven and closer to the base unit If you use the handset near another cordless phone s base unit noise may be heard Move away from the other cordless phone s base unit and closer to your base unit Away fro...

Page 4: ...ID Number Auto Edit 27 Storing Caller Information in the Phone Book 28 Erasing Caller Information 28 Phone Book 29 Storing Names and Numbers 29 Dialing from the Phone Book 31 Chain Dial 32 Editing an Item in the Phone Book 33 Erasing an Item in the Phone Book 33 Voice Mail Service 34 Storing a Voice Mail Access Number 34 Setting Voice Mail VM Tone Detection 35 Listening to Voice Mail Messages 36 S...

Page 5: ... Display 46 Important Safety Instructions 50 FCC and Other Information 52 Index 55 Warranty 57 Specifications 59 Useful Information Troubleshooting 47 Important Throughout these Operating Instructions and are used to indicate with which unit an operation can be performed Perform with the handset Perform with the base unit Perform with the handset and base unit together Handset Base Unit Handset Ba...

Page 6: ...TOR Button p 37 Headset Jack p 41 TALK Button p 19 Speakerphone Button p 19 MENU Button p 12 Microphone p 19 Charge Contacts p 11 Antenna Display p 8 OFF Button p 12 19 HOLD Button p 20 REDIAL Button p 20 Soft Keys p 7 Receiver FLASH CALL WAIT Button p 38 39 Navigator Key d B p 7 Ringer Message Alert Indicator p 18 22 TONE Button p 37 Back side Speaker ...

Page 7: ... Operating Instructions the handset navigator key is indicated by the arrows d or B How to use the soft keys navigator key Handset soft keys Three soft keys are used to select functions displayed directly above each key Functions displayed above each key will change depending on the state of use On this sample display and C are displayed above the soft keys Pressing the right soft key selects the ...

Page 8: ...e book items Caller ID information etc 6 The icons on the bottom line indicate the functions of the corresponding soft keys which are located directly below the display p 7 Ex The soft key below C phone book icon is used when storing or viewing phone book items p 29 31 Off invisible The line is free On The line is in use Flashing A call is on hold Flashing rapidly A call is being received SPIPRIVA...

Page 9: ...uring use If your unit is connected to a PBX which does not support Caller ID and voice mail services you cannot access those services This unit will not function during a power failure We recommend connecting a standard telephone to the same telephone line or to the same telephone jack using the Panasonic KX J66 T adaptor Telephone Line Cord Single Line Telephone Jack RJ11C AC Adaptor Power Outle...

Page 10: ...ttery Charge Place the handset on the base unit for 6 hours before initial use The unit beeps once the CHARGE indicator lights and Charging is displayed When the battery is fully charged Charge completed is displayed if there are no new calls in the Caller List Battery strength You can confirm the battery strength on the handset display Battery strength is indicated by the icons shown in the chart...

Page 11: ...ndset off of the base unit the time you can actually talk on the handset will be shortened Actual battery performance depends on a combination of how often the handset is in TALK mode and how often it is in Standby mode Clean the charge contacts of the handset and the base unit with a soft dry cloth once a month Clean more often if the unit is subject to grease dust or high humidity Otherwise the ...

Page 12: ...e will be displayed p 46 and or error beeps will sound Make sure the handset and base unit are not being used The handset must be operated near the base unit and while off the base unit 1 Press MENU The main menu is displayed p 13 2 Scroll to the desired item by pressing d or B 3 Press the soft key to select the desired item 4 If the item has a sub menu select the menu item p 13 Repeat steps 2 and...

Page 13: ... pressing MENU you can also program menu items directly by pressing 0 to 9 and instead of using the soft keys p 45 Handset Ringer volume Ringer tone Voice Mail LCD contrast Key tone Auto talk Message alert Change language Main menu Sub menu I Initial setting Sub menu II Voice enhancer Ringer setting Store VM access VM tone detect Caller ID edit Set tel line Set flash time Set line mode Set dial mo...

Page 14: ...panish press the soft key To change from Spanish to English press the soft key The display changes to the selected language You can also select the display language by pressing d or B 5 When Spanish is selected press the soft key then press OFF When English is selected press the soft key then press OFF 1 Press MENU 2 Scroll to Initial setting by pressing d or B then press the soft key 3 Scroll to ...

Page 15: ...set to answer a call leave the Auto Talk feature turned off 1 Press MENU 2 Scroll to Initial setting by pressing d or B then press the soft key 3 Scroll to Set tel line by pressing d or B then press the soft key 4 Scroll to Set line mode by pressing d or B then press the soft key 5 Select A or B by pressing d or B 6 Press the soft key then press OFF 1 Press MENU 2 Scroll to Initial setting by pres...

Page 16: ... while the handset is ringing Temporary ringer off While the handset is ringing for an outside call you can turn the ringer off temporarily by pressing OFF The handset will ring again as normal the next time a call is received 1 Press MENU 2 Press the soft key at Ringer setting 3 Press the soft key at Ringer volume 4 Select the desired volume by pressing d or B The volume will change and ring The ...

Page 17: ...l not be able to distinguish lines by their ringers If you select one of the melody ringer patterns the ringer will continue to sound for several seconds if the caller hangs up before you answer the call or another person answers the call using another phone connected on the same line 1 Press MENU 2 Press the soft key at Ringer setting 3 Scroll to Ringer tone by pressing d or B then press the soft...

Page 18: ...n or off Battery operating time may be shortened when using this feature p 11 1 Press MENU 2 Scroll to Initial setting by pressing d or B then press the soft key 3 Scroll to LCD contrast by pressing d or B then press the soft key 4 Select the desired contrast by pressing d or B The contrast will change The number of steps indicates the contrast level 5 Press the soft key then press OFF 1 Press MEN...

Page 19: ...hone number The dialed number is displayed After a few seconds the display will show the length of the call 3 When the other party answers talk into the microphone 4 To hang up press OFF or place the handset on the base unit Hands free Digital Duplex Speakerphone For best performance please note the following Talk alternately with the other party in a quiet room If you or the other party has diffi...

Page 20: ... To redial using the redial list Memory Redial The last 5 phone numbers dialed are stored in the redial list 1 Press REDIAL The last number dialed is displayed 2 Scroll to the desired number by pressing d or B You can also scroll down through the list by pressing REDIAL To exit the list press OFF 3 Press C or s To erase an item scroll to the item then press the soft key If No items stored is displ...

Page 21: ... by pressing d or B 4 Press the soft key then press OFF Clarity Booster This feature can improve sound clarity when the handset is used in an area where there may be interference During an outside call this feature will be turned on automatically when necessary This feature will turn off when you hang up or put a call on hold It will not turn off automatically during a call You can also turn this ...

Page 22: ...ly lifting the handset off the base unit Temporary ringer off While the handset is ringing for an outside call you can turn the ringer off temporarily by pressing OFF The handset will ring again as normal the next time a call is received If the ringer volume is turned off the unit will not ring p 16 1 Press C or s You can also answer a call by pressing any button except d B or OFF 2 To hang up pre...

Page 23: ...formation one of the following will be displayed Depending on radio communications with the base unit the handset may not display Caller ID information immediately after the first ring If your unit is connected to a PBX which does not support Caller ID you cannot access Caller ID service Name display service may not be available in some areas For further information please contact your telephone c...

Page 24: ... press any buttons for 60 seconds the unit will exit the Caller List 1 The display will show the number of calls you missed 2 Press the soft key d or B to review other calls logged in the Caller List If there are no items in the Caller List will not be displayed After viewing the missed call entries missed calls will disappear from the display 1 Press the soft key d or B to enter the Caller List 2...

Page 25: ... time of the most recent call will be recorded After viewing a caller s information 2 to 9 will be replaced with Calling Back from the Caller List In some cases you may have to edit the number before dialing p 26 Ex You may have to delete 1 and the area code If a phone number is not displayed in the caller information you cannot call that caller back from the Caller List 1 Press the soft key d or ...

Page 26: ... 3 patterns F G H 1 The order in which patterns F H are displayed depends on how the telephone number is displayed in step 2 4 To call the edited number press C or s If Caller ID Number Auto Edit feature is turned on factory preset is on phone numbers with the same area code as the number you edited will now be edited in the Caller List and each time you receive a call You can press OFF immediatel...

Page 27: ...s are reset to pattern H Phone numbers from the 4 most recently edited area codes will be automatically edited You can turn this feature on or off using the handset The factory preset is ON To turn on or off Caller ID Number Auto Edit feature If you fail to reach your destination when making a call the phone number you dialed might have an incorrect pattern Edit the phone number with another patte...

Page 28: ... the following steps 1 enter the name p 30 2 press d and 3 press the soft key If a name is not required press d then press the soft key To continue storing other items repeat from step 2 To exit programming mode press OFF Handset C I D SAVE SAVE SAVE Handset 1 Press the soft key d or B to enter the Caller List 2 Scroll to the desired caller by pressing d or B 3 Press the soft key Erased is display...

Page 29: ...ress the soft key C The display will show the number of stored items 2 Press the soft key 3 Enter a name of up to 16 characters with the dialing buttons 0 to 9 p 30 then press d To move the cursor press the soft key or If a name is not required press d then go to step 4 4 Enter a phone number of up to 32 digits To delete a digit press the soft key To erase all of the digits press and hold the soft...

Page 30: ... soft key or to move the cursor to the incorrect character 2 Press the soft key to delete the character Each time you press the soft key a character is erased To erase all characters press and hold the soft key 3 Enter the correct character Keys Characters Keys Characters 1 1 6 m n o M N O 6 2 a b c A B C 2 7 p q r s P Q R S 7 3 d e f D E F 3 8 t u v T U V 8 4 g h i G H I 4 9 w x y z W X Y Z 9 5 j...

Page 31: ...e character you selected the first item in the next alphabetical index will be displayed 3 Press d repeatedly until the desired name is displayed Index table 1 Press the soft key C The display shows the number of stored items You can press the soft key to view the first item 2 Scroll to the desired item To scroll down press d To scroll up press B 3 Press C s or the soft key The phone number is dia...

Page 32: ... 1 Search and dial from the phone book 1 800 012 3456 Calling card access number The voice guidance will be announced 2 Search and dial from the phone book 1234 Calling card PIN 3 Search and dial from the phone book 1 555 012 3456 Destination Number If you have rotary or pulse service you need to press before pressing MENU in step 1 to change the dialing mode temporarily to tone 1 While you are on...

Page 33: ...phone number then press d If you do not need to change the number press d then go to step 6 To delete a digit press the soft key To delete all of the digits press and hold the soft key 6 Press the soft key To continue editing other items repeat from step 2 7 Press OFF 1 Press the soft key C 2 Scroll to the desired item by pressing d or B To search for the item by initial see page 31 3 Press the so...

Page 34: ...ial setting by pressing d or B then press the soft key 3 Press the soft key at Voice Mail 4 Press the soft key at Store VM access 5 Enter your access number up to 32 digits If a pause is required for dialing press the soft key Each time you press the soft key a digit is erased To erase all of the digits press and hold the soft key 6 Press the soft key then press OFF is displayed To prevent misdial...

Page 35: ...ephone company Voice Mail will be displayed on the handset the Ringer Message Alert indicator on the handset will flash slowly if Message Alert is turned on p 18 and the VM indicator will flash on the base unit Turn off this programming when you do not subscribe to a voice mail service your telephone company does not send a series of tones followed by a continuous tone to indicate you have new voi...

Page 36: ... handset beeps Voice Mail will disappear and stops flashing but remains on the handset and the Ringer Message Alert indicator on the handset and the VM indicator on the base unit will go out If your voice mail service uses a voice mail tone and the recorded message is over 3 minutes long the handset and base unit may not indicate you have new messages If your voice mail service uses a voice mail t...

Page 37: ...to switch between the receiver and speaker the mute will be released Temporary Tone Dialing For Rotary or Pulse Service Users Press TONE before entering access numbers which require tone dialing The dialing mode changes to tone You can enter numbers to access an answering service electronic banking service etc When you hang up the dialing mode will return to pulse 1 Press LOCATOR to page the hands...

Page 38: ...s the caller s name with the phone number and Waiting Contact your telephone company for details about availability in your area and to verify that CWID service is activated on your telephone line Using the PAUSE Button For PBX Line Long Distance Calls We recommend you press the soft key if a pause is required for dialing with a PBX or to make a long distance call is displayed on the handset only ...

Page 39: ...nds on your telephone exchange or host PBX You can select the following flash times 700 600 400 300 250 110 100 or 90 ms milliseconds The factory preset is 700 ms If PBX functions do not work correctly consult your PBX supplier for the correct settings 1 Press MENU 2 Scroll to Initial setting by pressing d or B then press the soft key 3 Scroll to Set tel line by pressing d or B then press the soft...

Page 40: ...times and Error is displayed an error occurred Try again from step 1 You can stop registration by pressing OFF on the handset and pressing LOCATOR on the base unit 1 Press MENU 2 Scroll to Initial setting by pressing d or B then press the soft key 3 Scroll to Key tone by pressing d or B then press the soft key 4 Select Off or On by pressing d or B 5 Press the soft key then press OFF 1 Base unit Pr...

Page 41: ...sation Please use only a Panasonic KX TCA60 KX TCA86 KX TCA88 KX TCA88HA KX TCA91 KX TCA92 or KX TCA98 headset To order call the accessories telephone number on page 2 Connecting an optional headset Open the headset jack cover and insert the headset plug into the headset jack as shown below Headset sold separately Model shown here is KX TCA88 To switch to the speakerphone while using the headset P...

Page 42: ... phone plate 1 Connect the AC adaptor 2 Tuck the telephone line cord inside the wall mounting adaptor A Connect the telephone line cord B 3 Insert the hooks on the wall mounting adaptor into the holes A and B on the base unit To Power Outlet 1 2 A B A B ...

Page 43: ...ystem 4 Adjust the adaptor to hold the base unit then push it in the direction of the arrow until it clicks into place 5 Connect the telephone line cord Mount the unit then slide it down Raise the antennas 6 To charge the handset battery Place the handset on the base unit The unit beeps once and the CHARGE indicator lights ...

Page 44: ...Wall Mounting 44 To remove the wall mounting adaptor While pushing down the RELEASE LEVERS A remove the adaptor B 2 1 1 RELEASE LEVERS ...

Page 45: ...e corresponding pages Menu item Command Selection items Page Ringer volume 1 1 0 Off 1 Low 2 Medium 3 High p 16 Ringer tone 1 2 1 3 Tone pattern 1 3 4 7 Melody pattern 1 4 p 17 Voice enhancer 5 1 On 0 Off p 21 LCD contrast 0 1 1 6 Level 1 6 p 18 Key tone 0 2 1 On 0 Off p 40 Auto talk 0 3 1 On 0 Off p 15 Caller ID Number Auto Edit 0 4 1 On 0 Off p 27 Set dial mode 0 5 1 1 Pulse 2 Tone p 14 Set flas...

Page 46: ...s Please lift up and try again A handset button was pressed while the handset was on the base unit Lift the handset and press the button again Error When you tried to re register the handset the handset and base unit could not link for some reason such as interference from electrical appliances Move the handset and base unit away from any electrical appliances and try again Phone book full When yo...

Page 47: ...tery p 10 Clean the charge contacts and charge again p 11 Check battery installation p 10 Unplug the base unit s AC adaptor to reset it Plug in and try again Re install the battery p 10 and fully charge it Static sound cuts in out fades Interference from other electrical units Move the handset and base unit away from other electrical appliances p 3 Walk closer to the base unit Raise the base unit ...

Page 48: ...nnect the Caller ID box or plug the unit directly into the wall jack The handset cannot automatically edit the Caller List incoming phone numbers The Caller ID Number Auto Edit feature is turned off Turn it on p 27 and try again You need to press C or s after editing the number The handset display exits the Caller List or phone book Do not pause for over 60 seconds while searching Recharge battery...

Page 49: ... turned on and new messages in your voice mailbox have been recorded Turn the Message Alert off p 18 or listen to the new messages p 36 You cannot have a conversation using the headset Make sure the optional headset is connected properly p 41 If SP phone is displayed on the handset press C to switch to the headset If you cannot solve your problem Visit our website http www panasonic com support Co...

Page 50: ...t in the risk of fire or electric shock 10 Never push any objects through slots in this unit This may result in the risk of fire or electric shock Never spill any liquid on the unit 11 To reduce the risk of electric shock do not disassemble this unit Take the unit to an authorized servicenter when service is required Opening or removing covers may expose you to dangerous voltages or other risks In...

Page 51: ...sive and may cause burns or injury to the eyes or skin The electrolyte may be toxic if swallowed 4 Exercise care in handling batteries in order not to short the battery to conductive materials such as rings bracelets and keys The battery and or conductor may overheat and cause burns 5 Charge the battery ies provided with or identified for use with this product only in accordance with the instructi...

Page 52: ...will notify the customer as soon as possible Also you will be advised of your right to file a complaint with the FCC if you believe it is necessary The telephone company may make changes in its facilities equipment operations or procedures that could affect the operation of the equipment If this happens the telephone company will provide advance notice in order for you to make necessary modificati...

Page 53: ...one should not be placed near or on top of a TV or VCR If interference is experienced move the cordless telephone further away from the TV or VCR This will often reduce or eliminate interference Operating near 5 8GHz electrical appliances may cause interference Move away from the electrical appliances FCC RF Exposure Warning This product complies with FCC radiation exposure limits set forth for an...

Page 54: ... range 0 25 to 0 5 watts Do not use the unit in health care facilities if any regulations posted in the area instruct you not to do so Hospitals or health care facilities may be using equipment that could be sensitive to external RF radio frequency energy Routine care wipe the unit with a soft cloth Do not use benzine thinner or any abrasive powder When you leave the unit unused for a long period ...

Page 55: ...n dial 32 CID Caller ID 23 Clarity booster 21 D Dialing mode 14 Direct commands 45 Display 8 Display language 14 E Error messages 46 F FCC and other information 52 FLASH button 39 Flash time 39 Function menu Direct commands 45 Function menu selection 12 Function menu table 13 H Handset locator 37 Headset optional 41 Hold 20 I Installation AC adaptor 9 Installation battery 10 Installation telephone...

Page 56: ...g 37 S Safety instructions 50 Shipping product for service Back cover Soft keys 7 Specifications 59 SP phone 19 T Troubleshooting 47 TTY 2 58 Back Cover V VE Voice Enhancer 21 VM Voice Mail 34 Voice enhancer technology 21 Volume control 20 W Wall mounting 42 Warranty 57 indicates important information and frequently used features ...

Page 57: ...57 ...

Page 58: ...58 ...

Page 59: ...sumption Standby Approx 2 3 W Maximum Approx 5 5 W Frequency 5 76 GHz 5 84 GHz Dimensions H x W x D Approx 107 mm x 214 mm x 135 mm 4 7 32 x 8 7 16 x 5 5 16 Mass Weight Approx 340 g 0 75 lb N Dialing Mode Tone DTMF Pulse N Operating Environment 5 C 40 C 41 F 104 F Specifications are subject to change without notice For your future reference Serial No Date of purchase found on the bottom of the uni...

Page 60: ...umer Electronics Company listed below or to executive or regional sales offices These locations do not repair consumer products Panasonic Consumer Electronics Company Division of Matsushita Electric Corporation of America One Panasonic Way Secaucus New Jersey 07094 Panasonic Sales Company Division of Matsushita Electric of Puerto Rico Inc Ave 65 de Infantería Km 9 5 San Gabriel Industrial Park Car...

Reviews: