background image

One-Touch Dialer

For assistance, please visit http://www.panasonic.com/consumersupport

25

Storing an item in the 
phonebook to the one-
touch dialer using the 
handset

Caller names and phone numbers that are 
in the phonebook can be assigned to the 
dialing buttons (

{

0

}

 to 

{

9

}

) for easy dialing.

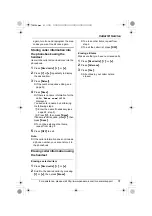
1

Press 

{

Phone book

}

 (right soft key).

L

Phone book

” is announced.

2

Press 

{

Search

}

.

3

Scroll to the desired item by pressing 

{V}

 or 

{^}

, then press 

{

MENU

}

.

L

The displayed name or phone 
number is announced, each time you 
scroll an item by pressing 

{V}

 or 

{^}

.

L

To search for the item by initial, see 
(page 23).

4

Press


{

1

}

.

L

2=Volume

” will not be displayed 

when the Name Announcement is 
turned off.

5

Scroll to the desired registration 
number by pressing 

{V}

 or 

{^}

.

L

The empty registration number is 
selected automatically. (For example 
The empty number is “5”.)

L

You can also select the desired 
registration number by pressing 
dialing buttons (

{

0

}

 to 

{

9

}

).

6

Press 

{

Save

}

.

L

To continue storing other items, 
repeat from step 3.

If the registration number selected 
manually is occupied, the display below 
will be shown.

To overwrite, press 

{

Yes

}

.

To select other empty registration 
number, press 

{

No

}

, then repeat steps 

5 and 6.

7

Press 

{

OFF

}

.

Note:

L

If the phonebook item stored in the one-
touch dialer is deleted from the 
phonebook or edited, the item in the 
one-touch dialer is also deleted or 
edited.

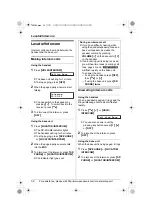
Dialing a stored number using 
the handset

1

Press and hold the desired dialing 
button (

{

0

}

 to 

{

9

}

) until the item is 

displayed.

L

If no item is stored in the button you 
pressed, the unit will not enter the 
one-touch dialer.

L

You can also search the desired item 
by pressing 

{V}

 or 

{^}

.

2

Press 

{C}

 or 

{s}

.

L

The displayed phone number is dialed.

Note:

L

If the Answering System is in use when 
the Name Announcement is turned on 
(page 44), the handset will not 
announce.

Name announcement

Name Announcement (page 44) is a 
feature that announces names or phone 
numbers shown on the display while you 
are using the handset to search the 
phonebook, caller list, redial list, and one-
touch dialer, allowing you to confirm 

1=1-touch dial
2=Volume

Select 1-touch #
5:(No data)

Overwrite?

TG2388.book  25 ページ  2006年8月31日 木曜日 午前9時40分

Summary of Contents for KX-TG2388

Page 1: ...hese Operating Instructions before using the unit and save for future reference For assistance visit our website http www panasonic com for customers in the U S A or Puerto Rico Charge the battery for 6 hours before initial use 2 4 GHz Digital Cordless Answering System Model No KX TG2388 Operating Instructions TG2388 book 1 ページ 2006年8月31日 木曜日 午前9時40分 ...

Page 2: ...ne touch dialer using the handset 25 Dialing a stored number using the handset 25 Erasing items using the handset 26 Caller ID Service Using Caller ID service 27 Talking Caller ID 27 Caller list 28 Viewing the caller list using the handset 28 Editing a caller s phone number before calling back using the handset 30 Storing caller information into the phonebook using the handset 31 Erasing caller in...

Page 3: ... the handset Remote Operation 49 Recording a memo message 51 Memory capacity 52 Remote operation 52 Using the answering system remotely 52 Answering system settings 54 Remote code 54 Caller s recording time 54 Number of rings 54 Recording mode 55 Message alert 55 Useful Information Wall mounting 56 Charger unit 58 Belt clip 58 Shoulder Rest Attachment 59 Headset optional 59 If the Following Appear...

Page 4: ...nt accessories Serial No Date of purchase found on the bottom of the unit Name and address of dealer No Accessory items Order number Quantity 1 AC adaptor for base unit PQLV1W 1 2 Telephone line cord PQJA10075Z 1 3 Battery HHR P104 1 4 Handset cover PQYNTG2388BR 1 5 Belt clip PQKE10375Z2 1 6 Shoulder rest attachment PQKE10364Z1 1 7 Charger unit Charger PQLV30023NB 1 AC adaptor KX TCA1 2 1 1 2 3 4 ...

Page 5: ...id on the product 11 To reduce the risk of electric shock do not disassemble the product Take the product to an authorized service center when service is required Opening or removing covers may expose you to dangerous voltages or other risks Incorrect reassembly can cause electric shock when the product is subsequently used 12 Unplug the product from power outlets and refer servicing to an authori...

Page 6: ...o overheat and cause burns L Charge the battery ies provided with or identified for use with the product only in accordance with the instructions and limitations specified in this manual WARNING L To prevent the risk of fire or electrical shock do not expose this product to rain or any type of moisture L Unplug the product from power outlets if it emits smoke an abnormal smell or makes an unusual ...

Page 7: ...electrical noise generating devices such as fluorescent lamps and motors L The product should be kept free from excessive smoke dust high temperature and vibration L The product should not be exposed to direct sunlight L Do not place heavy objects on top of the product L When you leave the product unused for a long period of time unplug the product from the power outlet L The product should be kep...

Page 8: ...aptor may cause it to become disconnected L If your unit is connected to a PBX which does not support Caller ID you cannot access Caller ID services L The unit will not work during a power failure We recommend connecting a standard telephone to the same telephone line or to the same telephone jack using the Panasonic KX J66 T adaptor Emergency power can be supplied to the unit by connecting a Pana...

Page 9: ... Make sure to place the handset with the keypad facing up to charge the handset battery If the keypad is not facing up the handset battery can not be charged L The unit will beep once the CHARGE indicator will light and Charging will be displayed L Charge completed is displayed when the battery has been fully charged The CHARGE indicator will remain lit L If you attach the shoulder rest attachment...

Page 10: ...Handset is off the base unit or charger but not in use Note L Battery power is consumed whenever the handset is off the base unit or charger even when the handset is not in use The longer you leave the handset off the base unit or charger the shorter you can actually talk on the handset Actual battery performance depends on a combination of how often the handset is in use and how often it is not i...

Page 11: ...ear your telephone conversations For proper operation press the bone conduction earpiece against a bone near the ear Normally sound enters the ear canal and vibrates the eardrum People feel the vibration within the inner ear and comprehend it as it is received by the auditory nerve Place the bone conduction earpiece against your head not your ear Try different locations to find which location work...

Page 12: ... MESSAGE SLOW TALK F SKIP G REPEAT H ERASE I GREETING CHECK J GREETING REC Recording K MEMO L Hook M Speaker N Antenna O LOCATOR INTERCOM P FLASH CALL WAIT Q MUTE R HOLD CONF Conference S SP PHONE Speakerphone SP PHONE indicator T MIC Microphone U VOLUME V CHARGE indicator W REDIAL X TONE Y Charge contacts A B C D E F G H I J K L M N O P Q R S T U V W X Y TG2388 book 12 ページ 2006年8月31日 木曜日 午前9時40分 ...

Page 13: ...onduction earpiece K Soft keys L OFF M MENU N Navigator key V O REDIAL P FLASH CALL WAIT Q Microphone R Charge contacts Charger unit A Charge contacts B Charge indicator Using the navigator key Scrolls up and down V the function menu the caller list and the phonebook Increases or decreases V the handset ringer and receiver speaker volumes B C D E F G R H I K J L M N O P Q A A B TG2388 book 13 ページ ...

Page 14: ... call is being received Setting the unit before use Handset display language You can select either English or Español as the display language 1 Press MENU 2 Scroll to Initial setting by pressing V or then press Select 3 Scroll to Change language by pressing V or then press Select 4 To change from English to Spanish press Español To change from Spanish to English press English Displayed item Meanin...

Page 15: ...electing 2 digits for each Example June 15 2005 Press 0 6 1 5 0 5 2 Enter the current hour and minute 12 hour clock format by selecting 2 digits for each Example 9 30 PM Press 0 9 3 0 4 Select AM or PM by pressing AM PM 5 Press Save L When the date and time are set E disappears from the base unit display L If the handset beeps 3 times the date and time were not set correctly Enter the correct digi...

Page 16: ...er press C To dial after confirming the entered number Pre dial 1 Enter the phone number L The handset announces each button you press including 1 to 0 Star Pound FLASH CALL WAIT Flash and Pause L The announcement is heard at the speaker volume To increase or decrease volume press or V L If you misdial press Clear Enter the correct number L If a pause is required when dialing press Pause where nee...

Page 17: ... redial the last number dialed 1 Press C or s 2 Press REDIAL To redial using the redial list Memory Redial The last 5 phone numbers dialed are stored in the redial list 1 Press REDIAL L The last number dialed is displayed L Redial and the displayed name or phone number are announced 2 Scroll to the desired number by pressing V or L The displayed name or phone number is announced each time you pres...

Page 18: ...unit 1 Press SP PHONE L The SP PHONE indicator lights L BC displays 2 Dial a phone number L The base unit announces each button you press including 1 to 0 Star Pound and FLASH CALL WAIT Flash 3 When the other party answers talk into the MIC microphone 4 To hang up press SP PHONE L The indicator light goes out Note L To switch to the handset while using the base unit speakerphone If the handset is ...

Page 19: ...rsation L The SP PHONE indicator flashes To return to the call press SP PHONE L The handset user can also take the call by pressing C or s L If another phone is connected on the same line page 8 you can also take the call by lifting its handset L If a call is kept on hold for 6 minutes an alarm tone will start to sound After 4 additional minutes on hold the call will be disconnected The base unit ...

Page 20: ...43 Temporary ringer off While the handset is ringing for an outside call you can turn the ringer off temporarily by pressing OFF The handset will ring the next time a call is received Using the base unit 1 Press SP PHONE 2 Talk into the MIC 3 To hang up press SP PHONE Useful features during a call MUTE button You can mute your voice during a conversation While mute is turned on you will be able to...

Page 21: ...f this function does not operate properly consult your telephone company for details Note L Please contact your telephone company for details and availability of this service in your area Call Waiting Caller ID display If you subscribe to both Caller ID and Call Waiting with Caller ID services CWID when a second call is received while talking using the handset the second caller s information will ...

Page 22: ...ress Save L To add other items repeat from step 2 7 Press OFF Note L To store numbers for calling card access see Chain Dial on page 24 we recommend you add pauses after each item Storing pauses with numbers will prevent misdialing page 17 The delay time necessary will depend on your telephone company Character table The dial keys can be used to enter characters To enter a character press the appr...

Page 23: ...itial is displayed Ex To find Frank press 3 repeatedly until the first item under F is displayed L If there are no items beginning with the character you selected the first item in the next alphabetical index will be displayed 4 Press V repeatedly until the desired name is displayed Name Announcement Name Announcement page 44 is a feature that announces names or phone numbers shown on the display ...

Page 24: ...d your PIN in the phonebook as one phonebook item press P to add pauses after the number and PIN as necessary page 17 L If you have rotary or pulse service you need to press before pressing MENU in step 1 to change the dialing mode temporarily to tone Editing items in the phonebook 1 Press Phone book right soft key 2 Press V or repeatedly to display the desired item 3 Press Edit 4 Edit the name if...

Page 25: ...tep 3 If the registration number selected manually is occupied the display below will be shown To overwrite press Yes To select other empty registration number press No then repeat steps 5 and 6 7 Press OFF Note L If the phonebook item stored in the one touch dialer is deleted from the phonebook or edited the item in the one touch dialer is also deleted or edited Dialing a stored number using the ...

Page 26: ...V or then repeat from step 2 4 Press OFF L To cancel erasing press No after step 2 L If the phonebook item stored in one touch dial is deleted from the phonebook or edited the item in the one touch dialer is also deleted or edited L Even if the item in the one touch dialer is deleted the corresponding item in the phonebook will not be deleted Operation Announcement When you press and hold a requir...

Page 27: ...ller ID information immediately after the first ring L Name display service may not be available in some areas For further information please contact your telephone company L If you subscribe to both Caller ID and Call Waiting with Caller ID services CWID when a second call is received while talking a call waiting tone will be heard and the second caller s information will be displayed on the hand...

Page 28: ...ngs to 2 page 54 the unit will not announce the caller s name If Toll saver is selected and there is a new message the unit will not announce the caller s name Caller list Caller information for the last 50 different callers will be logged in the caller list You can use this list to return missed calls L Caller information includes caller names and phone numbers the date and time of calls and the ...

Page 29: ... Private caller or Long distance L The announcement is heard at the speaker volume page 17 To increase or decrease volume press MENU after you enter the list then press or V L If the Name Announcement is turned off page 44 the handset will not announce the name or phone number displayed on the handset Displayed symbols L If the same caller calls more than once it will be displayed with the number ...

Page 30: ...nd each time you receive a call L You can press OFF immediately after pressing C or s if you wish to activate the Auto Edit feature without actually dialing the number you just edited Caller ID number auto edit feature using the handset Once you call back an edited number see Editing a caller s phone number before calling back using the handset the unit can automatically edit other incoming phone ...

Page 31: ... following steps 1 Enter the name if necessary see page 22 step 3 2 Press V then press Save If a name is not required press V then press Save L To continue storing other items repeat from step 2 5 Press OFF to exit Note L If the caller information does not include a phone number you cannot store it in the phonebook Erasing caller information using the handset Erasing a selected item 1 Press Rcvd c...

Page 32: ... goes out Answering intercom calls Using the handset When a handset is paged it rings and the Ringer Message Alert indicator flashes rapidly 1 Press C s or HOLD INTERCOM L You can also answer a call by pressing any button except V or OFF 2 To disconnect the intercom press OFF Using the base unit When the base unit is being paged it rings 1 Press SP PHONE or LOCATOR INTERCOM 2 To disconnect the int...

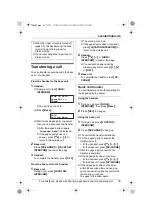
Page 33: ...ressing any button except V or OFF 3 Base unit To complete the transfer press SP PHONE Quick call transfer You can transfer a call without waiting for the paged party to answer Using the handset 1 During a call press HOLD INTERCOM then press Base 2 Press OFF to hang up Using the base unit 1 During a call press LOCATOR INTERCOM 2 Press SP PHONE to hang up L The call will be transferred directly L F...

Page 34: ...ATOR INTERCOM L The call is put on hold 2 When the paged party answers press HOLD CONF on your unit to make a conference call Note L To leave the conference press OFF on the handset or press SP PHONE on the base unit The two other parties can continue the conversation L During a conference the outside call can be placed on hold by pressing HOLD INTERCOM on the handset or HOLD CONF on the base unit...

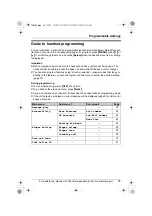
Page 35: ...also program features using direct commands special codes that take you directly to the feature you wish to program and allow you to select the desired setting page 37 During programming L To exit programming press OFF at any time L To go back to the previous menu press Back L If you do not press any buttons for 60 seconds the handset will exit programming mode L If the unit detects a problem an e...

Page 36: ...nd while off the base unit or charger 1 Press MENU 2 Enter the desired feature code page 37 3 Enter the desired setting code page 37 L This step may vary depending on the feature being programmed 4 Press Save 5 Press OFF to exit programming mode Note L If you make a mistake or enter the wrong code press OFF then start again by pressing MENU Initial setting Set answering Number of rings 54 Recordin...

Page 37: ... 1 On 0 Off 44 Talking Keypad for handset 8 2 1 1 On 0 Off 44 Name announcement 8 2 2 1 On 0 Off 44 Hearing aid mode 8 3 1 Telecoil 0 Off 44 Talking Caller ID for handset 9 1 On 0 Off 41 LCD contrast 0 1 1 6 Level 1 6 Default Level 3 41 Key tone 0 2 1 On 0 Off 42 Auto talk 0 3 1 On 0 Off 43 Caller ID number auto edit 0 4 1 On 0 Off 42 Dialing mode 0 5 1 1 Pulse 2 Tone 15 Flash time 0 5 2 1 700 ms ...

Page 38: ...ndard recording 2 Enhanced recording 55 Change language 0 8 1 English 2 Spanish 14 Message alert 0 1 On 0 Off 55 Ringer tone for base unit 0 1 1 3 Tone pattern 1 3 4 7 Melody pattern 1 4 40 Incoming call tone for base unit 0 2 1 On 2 2 0 Off 40 Talking Caller ID for base unit 0 4 1 On 0 Off 41 Feature Feature code Setting code Page TG2388 book 38 ページ 2006年8月31日 木曜日 午前9時40分 ...

Page 39: ...de call you can turn the ringer off temporarily by pressing OFF The handset will ring again as normal the next time a call is received Base unit ringer volume To set the ringer volume to high preset medium or low press VOLUME or L To increase volume press VOLUME To decrease volume press VOLUME L To stop ringing press STOP To turn the ringer off press and hold VOLUME until 2 beeps sound L O is disp...

Page 40: ...sing the handset 1 Press MENU 2 Scroll to Initial setting by pressing V or then press Select 3 Scroll to Set base unit by pressing V or then press Select 4 Press Select at Ringer tone 5 Select the desired ringer tone by pressing V or L The base unit will ring and the ringer tone will change If the base unit ringer volume has been turned off the base unit will not ring page 39 L You can also select...

Page 41: ...then press Select 3 Scroll to LCD contrast by pressing V or then press Select 4 Select the desired contrast by pressing V or L The contrast will change 5 Press Save then press OFF Functions Handset Talking Caller ID You can turn the Talking Caller ID feature page 27 on or off for the handset 1 Press MENU 2 Scroll to Talk Caller ID by pressing V or then press Select 3 Select Off or On by pressing V...

Page 42: ...oll to Caller ID edit by pressing V or then press Select 4 Select Off or On by pressing V or 5 Press Save then press OFF L If you fail to reach your destination when making a call the phone number you dialed might have an incorrect pattern Edit the phone number with another pattern page 30 L When this feature is turned off the unit will still be able to display Caller ID but incoming Caller ID num...

Page 43: ...s milliseconds 100ms 110ms 250ms 300ms 400ms 600ms or 700ms 1 Press MENU 2 Scroll to Initial setting by pressing V or then press Select 3 Scroll to Set tel line by pressing V or then press Select 4 Scroll to Set flash time by pressing V or then press Select 5 Select the desired time by pressing V or 6 Press Save then press OFF Note L The setting should stay at 700 ms unless pressing FLASH CALL WAI...

Page 44: ... Select at Pre Dial number 5 Select Off or On by pressing V or 6 Press Save then press OFF Base unit Talking Keypad 1 Press MENU 2 Scroll to Accessibility by pressing V or then press Select 3 Press Select at Base Announce 4 Press Select at Dial number 5 Select Off or On by pressing V or 6 Press Save then press OFF Handset Name Announcement Name Announcement is a feature that announces names or pho...

Page 45: ...d to re register the handset to the base unit Important L Make sure the base unit is not being used L Have the handset and base unit near each other when re registering the handset L Follow steps 1 and 2 listed below You have about 1 minute to complete them 1 Base unit Press and hold LOCATOR INTERCOM until a beep sounds L The CHARGE indicator flashes 2 Handset Press and hold FLASH CALL WAIT until ...

Page 46: ...54 Recording your greeting message You can record your own greeting message max 2 minutes that will be played when the answering system answers a call If you do not record a greeting message a pre recorded greeting message will be used Sample greeting message Hello this is your name and or number Sorry I cannot take your call Please leave a message after the beep Thank you 1 Press GREETING REC L T...

Page 47: ...when a call is received depending on the caller s recording time page 54 When the recording time is set to 1min 2min or 3min Hello we are not available now Please leave your name and phone number after the beep We will return your call If recording time runs out the unit will automatically switch to the Greeting only mode and no new messages will be recorded When the recording time is set to Greet...

Page 48: ...le playing back messages or using the speakerphone the speaker volume for monitoring will be turned on again To turn the speaker volume off see To turn off the call screening feature of above step Listening to messages When new messages have been recorded The NEW MESSAGE indicator on the base unit will flash The Ringer Message Alert indicator on the handset will flash slowly if the message alert f...

Page 49: ...ange to slow normal L Playback speed will return to normal after you finish listening to messages Repeating a message Press REPEAT while listening to the message L If pressed within the first 5 seconds of a message the previous message will be played Skipping a message Press SKIP to play the next message Stopping message playback Press STOP L To resume playback press MESSAGE SLOW TALK L If you do ...

Page 50: ...ge is heard The unit will announce the remaining recording time if it is less than 3 minutes L If you hear Memory full after playback erase unnecessary messages page 49 L When memo messages are played p 51 MEMO is displayed To slow down the playback speed Slow Talk Message Playback Press 3 during playback L To return to normal speed press 3 on the handset L Each time you press the button during pl...

Page 51: ...g a memo message You can record a voice memo message of up to 3 minutes in memory 1 Press MEMO 2 After the long beep talk clearly about 20 cm 8 inches away from the MIC L The base unit display shows the elapsed recording time L If the elapsed recording time exceeds 99 seconds the counter continues from 00 to indicate 100 seconds 3 When finished press MEMO or STOP L The NEW MESSAGE indicator flashe...

Page 52: ...recorded your own greeting message that same greeting message will be announced to callers even though their messages will not be recorded If you have not recorded your own greeting message the pre recorded message used for Greeting only mode will be announced to callers page 47 Remote operation Using a touch tone phone you can call your phone number from outside and access the unit to listen to m...

Page 53: ...ages Remote commands You can press dial keys to access certain answering system functions without waiting for the voice guidance to prompt you 1 If pushed within the first 5 seconds of a message the previous message will be played 2 To resume operation enter a remote command within 15 seconds or the voice guidance will start Turning on the answering system remotely If the answering system is off y...

Page 54: ...ller s recording time You can change the maximum message recording time 1min 2min or 3min Caller messages are limited to 1 minute to 3 minutes Greeting only The unit plays the greeting message but does not record caller messages 1 Press MENU 2 Scroll to Initial setting by pressing V or then press Select 3 Press Select at Set answering 4 Scroll to Recording time by pressing V or then press Select 5...

Page 55: ...ger Message Alert indicator on the handset will flash when new messages have been recorded page 48 1 Press MENU 2 Scroll to Initial setting by pressing V or then press Select 3 Scroll to Message alert by pressing V or then press Select 4 Select On or Off by pressing V or 5 Press Save then press OFF Note L The Ringer Message Alert indicator will not flash for new messages while the handset is in us...

Page 56: ...heard 2 Press the tabs in the direction of the arrows 1 then remove the wall mounting adaptor 2 3 Connect the AC adaptor Tuck the telephone line cord inside the wall mounting adaptor then push the adaptor in the direction of the arrows 1 and 2 L The word UP WALL should face upward L Fasten the AC adaptor cord to prevent it from being disconnected 2 1 1 1 2 To Power Outlet Hook TG2388 book 56 ページ 2...

Page 57: ...nt the unit then slide it down L Raise the antenna 5 To charge the handset battery Rest the handset on the charge contacts 1 then push the top of the handset so the hook snaps into the slot at the top of the handset 2 L The CHARGE indicator lights and the unit beeps once 2 1 Hook Slot TG2388 book 57 ページ 2006年8月31日 木曜日 午前9時40分 ...

Page 58: ...3 Mount the charger 1 4 Slide it down 2 and to the right 3 until it is secured L If the charger is wall mounted remove the shoulder rest attachment to place the handset into the charger Belt clip You can hang the handset on your belt or pocket using the included belt clip To attach the belt clip To remove the belt clip 2 3 1 To Power Outlet Screws 2 45 cm 31 32 Wall mount template for the charger ...

Page 59: ...r rest attachment to the belt clip as shown below You will hear a click when the shoulder rest attachment is in place To remove the shoulder rest attachment Slide the base of the attachment in the direction of the arrow as shown below Headset optional Connecting an optional headset to the handset allows hands free phone conversations Please use only a Panasonic headset See page 4 for compatible he...

Page 60: ... or charger Lift the handset and press the button again Busy L The base unit is in use Try again later Error L When you tried to re register the handset the handset and base unit could not link for some reason such as interference from electrical appliances Move the handset and base unit away from any electrical appliances and try again Phone book full L When you tried to store an item in the phon...

Page 61: ...Raise the base unit antenna L If your unit is connected to a telephone line with DSL service we recommend connecting a noise filter between the base unit and the telephone line jack Contact your DSL provider for details The handset and or base unit does not ring L The ringer volume is turned off Set to high medium or low page 39 The handset display is blank L If the handset display is blank fully ...

Page 62: ... Caller ID L Telephone line noise may be affecting Caller ID L The caller requested not to send his her Caller ID information page 27 L If a call is being transferred to you the Caller ID information will not be displayed L If a separate Caller ID box is connected between the unit and the telephone wall jack disconnect the Caller ID box or plug the unit directly into the wall jack L If your unit i...

Page 63: ...r in the caller list phonebook redial list or one touch dialer L Name Announcement is turned off Turn it on page 44 When Talking Keypad is turned on the phone number you dialed is not announced correctly L If you dial a phone number quickly the handset and base unit may not announce the dialed phone number correctly For best results dial each digit one at a time and wait for the unit to announce e...

Page 64: ... inserting a space between each letter page 22 While the handset is announcing name or phone numbers static sound cuts in out or fades occur L Announcement is transmitted between the base unit and handset using wireless radio waves Move the handset and base unit away from other electrical appliances to prevent interference page 7 The talk time on the handset has been shortened L Fully charge the b...

Page 65: ...e Answering System is handling a call you cannot operate the Answering System Try again later L When the unit is announcing a list item name or phone number or a dialed number you cannot operate the Answering System Try again later You cannot operate the Answering System from a touch tone phone L Make sure you entered the correct remote code page 54 L The Answering System may not respond if the to...

Page 66: ...ge 9 Charge for 6h and 8 are displayed and the handset does not work L The battery has been discharged Fully charge the battery page 9 L Check battery installation page 9 You charged the battery fully but Recharge battery is still displayed and or 7 continues to flash or Charge for 6h and 8 are displayed L Clean the charge contacts and charge again page 10 L The battery may need to be replaced If ...

Page 67: ...ance that temporary discontinuance of service may be required But if advance notice isn t practical the telephone company will notify the customer as soon as possible Also you will be advised of your right to file a complaint with the FCC if you believe it is necessary The telephone company may make changes in its facilities equipment operations or procedures that could affect the operation of the...

Page 68: ... user s authority to operate this device NOTE This equipment has been tested and found to comply with the limits for a Class B digital device pursuant to Part 15 of the FCC Rules These limits are designed to provide reasonable protection against harmful interference in a residential installation This equipment generates uses and can radiate radio frequency energy and if not installed and used in a...

Page 69: ...installed and operated with its antenna located 20 cm or more between antenna and all person s body excluding extremities of hands wrist and feet The handset may be carried and operated with only the specific provided belt clip Other non tested belt clips or similar body worn accessories may not comply and must be avoided The base and handset units must not be colocated or operated in conjunction ...

Page 70: ...Hz 2 48 GHz Dimensions Approx height 208 mm x width 52 mm x depth 49 mm 8 3 16 x 2 1 16 x 1 15 16 Mass Weight Approx 195 g 0 43 lb Power supply Ni MH battery 3 6 V 830 mAh TX power 125 mW max Security codes 1 000 000 Charger unit Operating environment 5 C 40 C 41 F 104 F Dimensions Approx height 69 mm x width 74 mm x depth 99 mm 2 23 32 x 2 29 32 x 3 29 32 Mass Weight Approx 110 g 0 24 lb Power co...

Page 71: ... the Limited Warranty period This Limited Warranty excludes both parts and labor for batteries antennas and cosmetic parts cabinet This Limited Warranty only applies to products purchased and serviced in the United States or Puerto Rico This Limited Warranty is extended only to the original purchaser and only covers products purchased as new Mail In Service For assistance in the continental U S A ...

Page 72: ...OT LIABLE FOR INCIDENTAL OR CONSEQUENTIAL DAMAGES RESULTING FROM THE USE OF THIS PRODUCT OR ARISING OUT OF ANY BREACH OF THIS LIMITED WARRANTY As examples this excludes damages for lost time lost calls or messages cost of having someone remove or re install an installed unit if applicable travel to and from the servicer The items listed are not exclusive but are for illustration only ALL EXPRESS A...

Page 73: ...ired users can call 1 877 833 8855 TTY users hearing or speech impaired users can call 1 866 605 1277 Purchase Parts Accessories and Instruction Books online for all Panasonic Products by visiting our Web Site at http www pasc panasonic com or send your request by E mail to npcparts us panasonic com You may also contact us directly at 1 800 332 5368 Phone 1 800 237 9080 Fax Only Monday Friday 9 am...

Page 74: ...Telephone line cord 8 Controls Base unit 12 Charger unit 13 Handset 13 D Date and time 15 Dialing mode 15 Display Base unit 14 Display language 14 E Erasing a message 49 51 53 Erasing all messages 49 51 53 Error messages 60 F FCC and other information 67 FLASH button 21 FLASH time 43 Function menu Direct commands 37 Table 35 G Greeting message 46 H Headset optional 59 Hearing Aid 44 Hold 18 19 I I...

Page 75: ...t 40 Handset 39 Ringer volume Base unit 39 Handset 39 Rotary service tone dialing 21 S Safety instructions 5 Shoulder rest attachment 59 Slow Talk message playback 49 50 51 53 Soft keys 14 Specifications 70 SP phone base unit 18 SP phone handset 16 T Talking Caller ID Base unit 41 Handset 41 Talking Keypad base unit 44 Talking Keypad handset 44 Toll saver 55 Transferring a call 33 Troubleshooting ...

Page 76: ... to Panasonic Consumer Electronics Company listed below or to executive or regional sales offices These locations do not repair consumer products Copyright This material is copyrighted by Panasonic Communications Co Ltd and may be reproduced for internal use only All other reproduction in whole or in part is prohibited without the written consent of Panasonic Communications Co Ltd 2005 Panasonic C...

Reviews: