background image

68

3.3

Operator Service Features

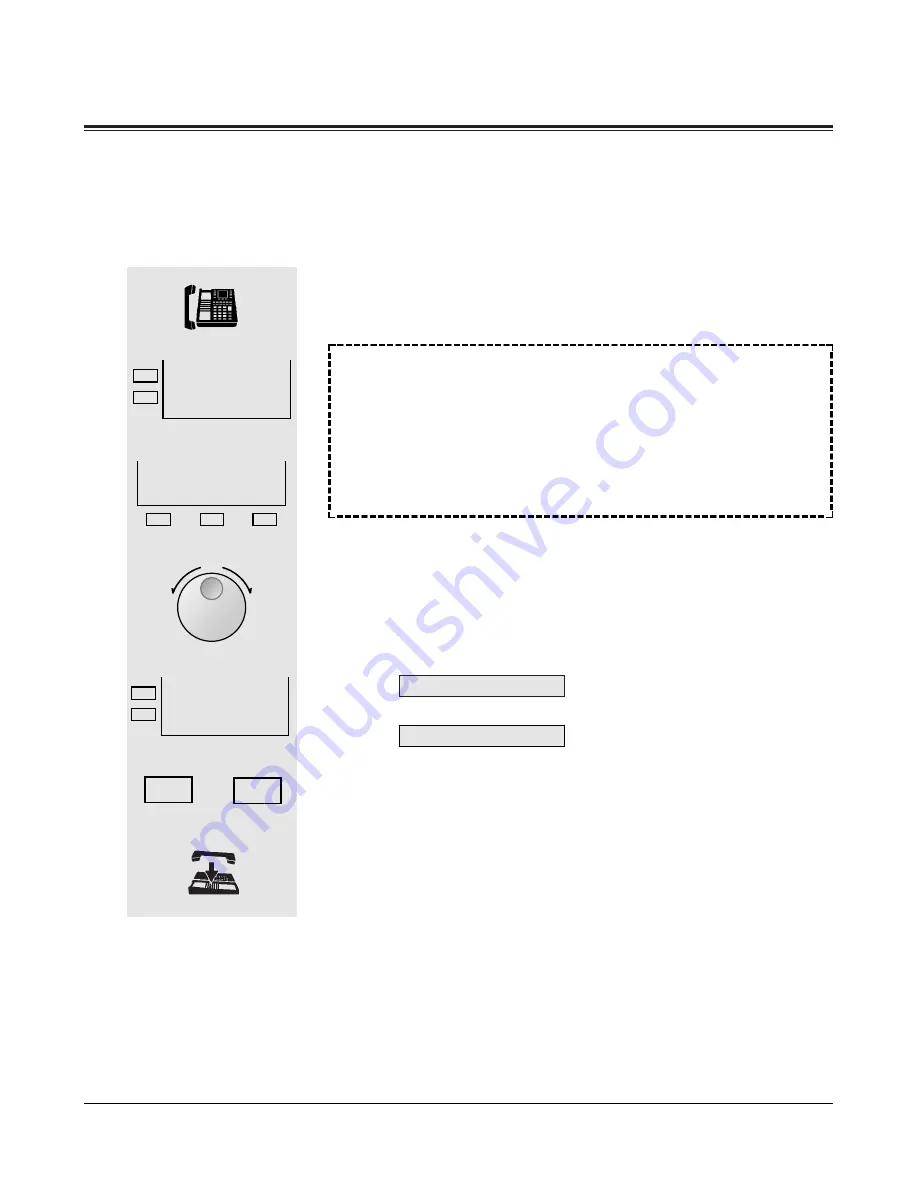
Night Service On/Off

Display Operation (KX-T7235 / KX-T7436 / KX-T7536)

Switching modes

1. Lift the handset or press the SP-PHONE button.

2. Press the Features (F4) button.

3. Press the NEXT (S3) button repeatedly or rotate the Jog Dial until

“Night On/Off” is displayed.

– NEXT (S3) button: for KX-T7235 users

– Jog Dial: for KX-T7436 and KX-T7536 users

4. Press the Function button which is next to “Night On/Off”.

5. Dial or 0.

-1: from Day mode to Night mode

-0: from Night mode to Day mode

• You hear a confirmation tone.

• The display shows either of the following depending on whether

the service is in Day or Night mode:  

or

6. Hang up or press the SP-PHONE button.

2

3

F4

F5

Features

S 1

S 2

S 3

NEXT

4

F

F

Night On/Off  (

1/0)

5

or

6

1

Night Mode

Day Mode

Changed

1

0

or

SELECT / VOLUME

Summary of Contents for KX-TD816CE

Page 1: ...System KX TD816CE KX TD1232CE Added and Changed Features for User Manual Vol 5 In this manual the last letter CE of each model number is omitted ROM Version KX TD816CE P341E P342E or later KX TD1232CE...

Page 2: ...2 DPT Features Calling Connected Line Identification Presentation CLIP COLP 30 Handset Microphone Mute 32 Off Hook Monitor 33 Whisper OHCA 34 Section 3 4 Special Display Features 36 Call Forwarding Do...

Page 3: ...on 3 2 DPT Features Call Transfer to Extension 61 Direct Inward System Access DISA 61 Off Hook Call Announcement OHCA 61 63 Section 3 3 Operator Service Features Background Music BGM External 61 65 Ni...

Page 4: ......

Page 5: ...Added Features...

Page 6: ...Fixed Feature Buttons Refer to the Fixed Buttons in this section KX T7520 None Yes 12 KX T7531 16 char line 1 line LCD Yes 12 KX T7533 Tilt up 16 char line 3 line LCD Yes 12 Soft Buttons and Function...

Page 7: ...DIAL STORE Button RINGER Volume Selector Used to adjust the ringer volume AUTO ANSWER MUTE Button FLASH Button Jog Dial REDIAL Button HOLD Button SP PHONE Button Microphone PROGRAM Button FWD DND Butt...

Page 8: ...NTERCOM Button MESSAGE Button PAUSE Button TRANSFER Button Soft Buttons S1 through S3 SHIFT Button Display Liquid Crystal Display With 16 character 3 line readout Shows the date time dialed number or...

Page 9: ...USE Button TRANSFER Button Soft Buttons S1 through S3 Function Buttons F6 through F10 SHIFT Button Display Liquid Crystal Display With 24 character 6 line readout Shows the date time dialed number or...

Page 10: ...tor Used to adjust the ringer volume VOICE CALL MUTE Button FLASH Button Jog Dial REDIAL Button HOLD Button MONITOR Button PROGRAM Button FWD DND Button CONF Button INTERCOM Button Flexible CO Buttons...

Page 11: ...t the ringer volume AUTO ANSWER MUTE Button Jog Dial REDIAL Button HOLD Button SP PHONE Button FLASH Button TRANSFER Button Microphone PROGRAM Button INTERCOM Button CONF Button PAUSE Button FWD DND B...

Page 12: ...AM Button INTERCOM Button CONF Button PAUSE Button FWD DND Button MESSAGE Button MODE Button Display Liquid Crystal Display With 16 character 1 line readout Shows the date time dialed number or name c...

Page 13: ...Crystal Display With 16 character 3 line readout Shows the date time dialed number or name call duration time etc In Programming mode it shows the programming messages Soft Buttons S1 through S3 Flex...

Page 14: ...ystal Display With 24 character 6 line readout Shows the date time dialed number or name call duration time etc In Programming mode it shows the programming messages Soft Buttons S1 through S3 Functio...

Page 15: ...TRANSFER Button PROGRAM Button INTERCOM Button CONF Button PAUSE Button FWD DND Button MESSAGE Button Flexible CO Buttons Outside lines 01 through 12 AUTO DIAL STORE Button RINGER Volume Selector Use...

Page 16: ...d Back View XDP eXtra Device Port expands the number of telephones available in the system by allowing an extension port to contain two telephones For more details please consult with your dealer KX T...

Page 17: ...lt function assignments cannot be changed The following table lists the fixed buttons located on each DPT model indicates the button is available Feature Button AUTO ANSWER MUTE AUTO DIAL STORE CONF F...

Page 18: ...m the Call Directory and the System Feature Access Menu MODE Button Used to shift the display in order to access various features SELECT Button Used to select the displayed function or to call the dis...

Page 19: ...T7536 users are used to adjust the display contrast The contrast level is indicated on the display by the number of asterisks KX T7531 While on hook 1 Press the MODE button six times The display show...

Page 20: ...ation Programming Section 2 in main User Manual Volume Control Handset Receiver Headset Ringer Speaker Allows you to adjust the following volumes as required Handset Receiver volume levels 1 through 4...

Page 21: ...he telephone is idle and on hook 1 Press the RING S2 button The telephone will ring 2 Rotate the Jog Dial in the desired direction The telephone will stop ringing in about 4 seconds When the volume le...

Page 22: ...2 Rotate the Jog Dial in the desired direction The display shows Example volume level 12 You may also adjust the speaker volume while listening to background music BGM On mode receiving a voice call o...

Page 23: ...The display shows the current status Example The CO call 431 2111 is now programmed 2 Enter the desired number up to sixteen digits 0 through 9 FLASH PAUSE INTERCOM or secret and CONF hyphen can be us...

Page 24: ...play shows the current status Example The name is now programmed 3 Enter the name 10 characters max Refer to the Combination Table on pages 27 and 28 on how to enter each character 4 Press the STORE b...

Page 25: ...ASH PAUSE INTERCOM or secret and CONF hyphen can be used To store the telephone number of an outside party the line access code 9 or 81 through 88 must be the leading digit To erase the entry press th...

Page 26: ...r MODE button to store a name NEXT S3 button for KX T7433 and KX T7533 users MODE button for KX T7531 users 4 Enter the name 10 characters max Refer to the Combination Table on the next page on how to...

Page 27: ...ough S3 instead of the SELECT button Combination Table 2 shows the combination of keys and the number of pulses to move the Jog Dial click tones to the right To enter a character find the key and numb...

Page 28: ...tion Table 1 1 Press 6 and then press the SELECT button once to enter M 2 Press 4 and then press the SELECT button six times to enter i 3 Press 5 and then press the SELECT button four times to enter k...

Page 29: ...until e appears Notes Pressing the SHIFT button alternates between capital and lower case letters Once this button is pressed that letter SHIFT mode remains until SHIFT is pressed again To erase the...

Page 30: ...a CLIP COLP number for an outside line 1 Lift the handset or press the SP PHONE MONITOR button 2 Dial the feature number 711 and 1 You will hear a confirmation tone The display shows 3 Hang up or pre...

Page 31: ...for Installation Manual and Programming Tables 418 ISDN Line Number Assignment 419 ISDN Outgoing CLIR Service Assignment Added and Changed Features for Installation Manual and Programming Tables Vol...

Page 32: ...AUTO ANSWER MUTE or VOICE CALL MUTE button The AUTO ANSWER MUTE or VOICE CALL MUTE indicator light flashes red slowly Cancelling When handset microphone mute is established 1 Press the AUTO ANSWER MUT...

Page 33: ...The SP PHONE indicator light turns on and the other party s voice is heard through the built in speaker Cancelling When the off hook monitor mode is established 1 Press the SP PHONE button The SP PHO...

Page 34: ...dial tone 4 Hang up or press the SP PHONE button Executing the Whisper OHCA If you make an intercom call and hear a busy tone 1 Enter 1 You can talk after you hear a confirmation tone To talk to the t...

Page 35: ...e If the user selects 3 Whisper OHCA mode If using a KX T7536 handset Whisper OHCA If using a KX T7536 SP PHONE Call Waiting Other Call Waiting The Whisper OHCA sender will receive a ringback tone in...

Page 36: ...otel Application System Feature Access Menu KX T7230 KX T7235 KX T7433 KX T7436 KX T7531 KX T7533 KX T7536 indicates the features is available indicates the features mentioned here Please refer to the...

Page 37: ...Do Not Disturb FWD All Calls ext FWD Busy ext FWD No Answer ext Do Not Disturb DND Rejects incoming calls Press the NEXT S3 button to go to the next display Call Forwarding Sets to forward incoming ca...

Page 38: ...sion Call Forwarding Busy No Answer Sets to forward an incoming calls to another extension when busy or you do not answer Call Forwarding to Outside Line Sets to forward all incoming calls to an exter...

Page 39: ...oming Call Information Log 3 Call Directory Extension Dialling Station Speed Dialling System Speed Dialling 4 System Feature Access Menu The System Feature Access Menu provides a display of the system...

Page 40: ...ample To select Panasonic Example To select Beth Example To select Jack NEXT MENU AB LMN CD OPQ EF RST GHI UVW JK XYZ MENU Harry Jack Henry Janny Hiroshi Jimmy Isaac John Ivy s shop Johes PREV NEXT St...

Page 41: ...es on the First Display First Display PREV NEXT MENU Absent MSG Off Absent MSG On 1 9 C Pickup Group Call Park 0 9 Extrn BGM On Off See the next page RING BGM CONT Extension STA Speed Features SYS Spe...

Page 42: ...Enter password 000 through 999 twice On hook Dial 1 or 0 1 Log In On 0 Log Out Off On hook Second Display PREV NEXT MENU LCS Password abcabc Login Logout 1 0 Message Off ext Message On ext Night On Of...

Page 43: ...Page GRP Answer Paging External 0 4 A page sent to a external pager Paging External A page sent to a built in speaker Paging Group Paging Answer Answers a page sent to a built in speaker or a particu...

Page 44: ...ng Group Pages to all or particular extension group Dial the extension group number 1 through 8 or 0 0 All extension groups Paralleled Telephone Connection Sets the paralleled telephone connection on...

Page 45: ...ming Call Information Display 2 CO Incoming Call Information Log 3 Call Directory Extension Dialling Station Speed Dialling System Speed Dialling 4 System Feature Access Menu The System Feature Access...

Page 46: ...531 While idle the display changes as follows by pressing the MODE button The Jog Dial operation is available in the second through seventh displays Initial Display MODE Seventh Display MODE Second Di...

Page 47: ...pressing the SHIFT button as follows Conditions The sixth and seventh displays of the KX T7531 are used for the ringer volume and display contrast adjustments For details refer to the Initial Setting...

Page 48: ...ng Name Set 003 Extension Number Set 004 Extension Name Set System Programming Added and Changed Features for Installation Manual and Programming Tables Vol 2 012 ISDN Extension Number Set 013 ISDN Ex...

Page 49: ...on Dialling 1 Rotate the Jog Dial until the desired item is displayed 2 Press the SELECT button or go off hook Note You can lift the handset or press the SP PHONE button instead of the SELECT button P...

Page 50: ...Extension Dialling before rotating the Jog Dial you can press the corresponding alphabet key to select the desired letter Example Press 2 two times to display B items System Speed Dialling 1 Rotate t...

Page 51: ...ling or Extension Dialling Station Speed Dialling System Speed Dialling 1 Press the Extension F3 STA Speed F8 or SYS Speed F9 button 2 Rotate the Jog Dial until the desired item is at the arrow 3 Pres...

Page 52: ...ote You can press the Function button F1 through F10 on the same line of the desired item instead of the CALL S3 button For System Speed Dialling and Extension Dialling before rotating the Jog Dial yo...

Page 53: ...ture Access Night Mode 1 0 If a parameter is required the parameter will flash If a parameter is required the parameter will flash Enter a parameter if required Third Display EXT FEAT STA Jan 01 03 00...

Page 54: ...at the arrow 3 Press the SEL S3 button 4 Enter the parameter if required Note When using a KX T7436 or KX T7536 you can press the Function button F1 through F10 on the same line of the desired item i...

Page 55: ...9 Ext BGM On Off LCS abcabc Login out 1 0 MSG Off ext MSG On ext Night Mode 1 0 OGM Play 1 4 OGM Record 1 4 Page E ANS 1 4 Page GRP ANS Page Extrn 0 4 Page GRP 0 8 Parallel 1 0 Cancel the absent mess...

Page 56: ...56 4 1 Configuration Location of Controls KX T7440 KX T7441 DSS Buttons with Busy Lamp Field BLF 01 through 48 DSS Buttons with Busy Lamp Field BLF 01 through 66...

Page 57: ...1 22 23 24 25 26 27 28 29 30 31 32 33 34 35 36 37 38 39 40 41 42 43 44 45 46 47 48 49 50 51 52 53 54 55 56 57 58 59 60 61 62 63 64 65 66 KX T7540 1 2 3 4 5 6 7 8 9 10 11 12 13 14 15 16 17 18 19 20 21...

Page 58: ...dle status of each extension in the system These buttons can also be changed to other function buttons ANSWER Button Used to answer an incoming call RELEASE Button Used to disconnect the line Connecti...

Page 59: ...or handsfree mode 1 Press the TRANSFER button on the paired telephone 2 Press the desired DSS button on the console or dial the desired number at the paired telephone 3 Press the RELEASE button after...

Page 60: ...t to return to the held call flash the hookswitch Execution of this feature is determined by the Class of Service assigned to the extension If a call between two external parties is established an ala...

Page 61: ...This feature has been changed as shown on pages 63 to 64 CO Line Numbers All sections If the Primary Rate Interface ISDN Expansion unit KX TD290 is installed to your system the available CO line numbe...

Page 62: ...240 only The following table outlines the features that can be assigned to the Flexible Buttons indicates that the feature is available Available when the Digital Super Hybrid System is connected to a...

Page 63: ...HCA 1 Lift the handset or press the SP PHONE MONITOR button 2 Enter the feature number 731 3 Dial 2 or 0 2 to set 0 to cancel You hear a confirmation tone and then a dial tone 4 Hang up or press the S...

Page 64: ...1 Press the HOLD button The current call is placed on hold The INTERCOM indicator light flashes green slowly Conditions Class of Service programming determines which extensions can perform this This...

Page 65: ...displayed NEXT S3 button for KX T7235 users Jog Dial for KX T7436 and KX T7536 users 4 Press the Function button which is next to Extrn BGM On Off Pressing this button alternates between the On and O...

Page 66: ...ayed 3 Rotate the Jog Dial until Ext BGM On Off is displayed 4 Press the SELECT button Pressing this button alternates between the On and Off modes The display shows either of the following depending...

Page 67: ...button 4 Rotate the Jog Dial until Ext BGM On Off is at the arrow 5 Press the SEL S3 button Pressing this button alternates between the On and Off modes The display shows either of the following depe...

Page 68: ...T S3 button for KX T7235 users Jog Dial for KX T7436 and KX T7536 users 4 Press the Function button which is next to Night On Off 5 Dial 1 or 0 1 from Day mode to Night mode 0 from Night mode to Day m...

Page 69: ...Rotate the Jog Dial until Night Mode 1 0 is displayed 4 Press the SELECT button 5 Dial 1 or 0 1 from Day mode to Night mode 0 from Night mode to Day mode You hear a confirmation tone The display shows...

Page 70: ...4 Rotate the Jog Dial until Night Mode 1 0 is at the arrow 5 Press the SEL S3 button 6 Dial 1 or 0 1 from Day mode to Night mode 0 from Night mode to Day mode You hear a confirmation tone The display...

Page 71: ...number 1 through 4 1 for DISA Message 1 2 for DISA Message 2 3 for Timed Reminder Message 4 Not assigned The display shows Time counter seconds OGM number selected 1 through 4 The STORE indicator lig...

Page 72: ...g Dial for KX T7436 and KX T7536 users 4 Press the Function button which is next to OGM Playback 5 Dial the OGM number 1 through 4 You hear a confirmation tone The STORE indicator lights The message i...

Page 73: ...med Reminder Message 4 Not assigned The display shows Time counter seconds OGM number selected 1 through 4 The STORE indicator light flashes red slowly and the recording starts after the confirmation...

Page 74: ...til OGM Play 1 4 is displayed 4 Press the SELECT button 5 Dial the OGM number 1 through 4 You hear a confirmation tone The STORE indicator lights The message is played back the counter starts The disp...

Page 75: ...eminder Message 4 Not assigned The display shows Time counter seconds OGM number selected 1 through 4 The STORE indicator light flashes red slowly and the recording starts after the confirmation tone...

Page 76: ...ess the SEL S3 button 6 Dial the OGM number 1 through 4 You hear a confirmation tone The STORE indicator lights The message is played back the counter starts The display shows Example Time counter sec...

Reviews: