background image

During a Conversation

24

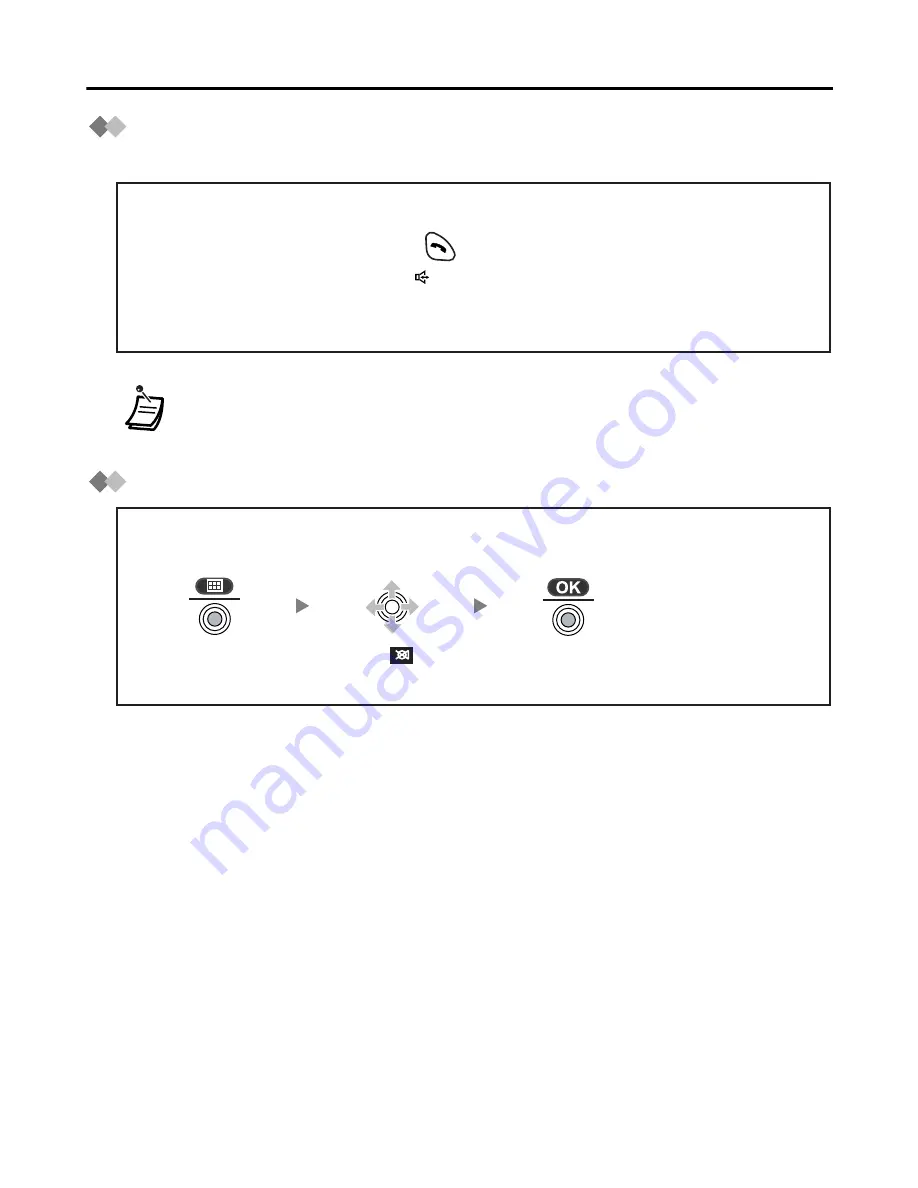
Hands-free Conversation

You can talk with the calling party alternately through the speaker without holding the PS.

Turning the Microphone On/Off

• If you put the PS on the charger during a conversation, the call will be 

disconnected.

During a conversation

Press 

TALK 

to toggle between the two conversation modes 

(Hands-free/Receiver).

During a conversation

Press the

Joystick

.

Select “      

Mute

”.

Press the

Joystick

.

Summary of Contents for KX-TCA255

Page 1: ...ease read this manual carefully before using this product and save this manual for future use This manual is designed to be used with the KX TCA255 DECT Portable Station and a Panasonic KX TDA series KX TD816 KX TD1232 Business Telephone System Please use only Panasonic battery and charge the battery for about 5 hours before initial use ...

Page 2: ...ay Language 14 Making Calls 15 Calling Another Extension 15 Calling an Outside Party 15 Using the Call Log 16 Using the Phonebook 18 Hot Key Dial 19 Receiving Calls 20 Intercom Calls Outside Calls Group Calls 20 Temporary Ringer Volume Adjustment 20 Caller ID 21 During a Conversation 22 Transferring a Call 22 Holding 22 Hands free Conversation 24 Turning the Microphone On Off 24 Using the Phoneboo...

Page 3: ...Table of Contents 3 Walkie Talkie 48 Using the Belt Clip 49 Wall Mounting 50 Troubleshooting 51 Troubleshooting 51 Important Information 52 Battery Information 52 Safety Instructions 53 ...

Page 4: ...For the KX TCA255CE users KX TCA1CE One j Charger One j Belt Clip One For the KX TCA255E users KX TCA1E One j Battery Cover One j Battery N4HHGMB00007 One j CD ROM One j Quick Guide One In this manual the suffix of each model number is omitted The following features described in this manual are not available when the PS is used with a Panasonic KX TD816 KX TD1232 Business Telephone System Incoming...

Page 5: ...k view Speaker Open the cover Ringing Charge Indicator Headset Jack The headset is an option Please use only the Panasonic KX TCA89 headset TALK MESSAGE Charge Contact RECALL Receiver Display Soft Buttons CANCEL POWER CLEAR TRANSFER Joystick INTERCOM Charge Contact Microphone ...

Page 6: ...nd make another call without hanging up or answer Call Waiting from the telephone company INTERCOM Button Used to make or receive intercom calls CLEAR TRANSFER Button Used to clear digits or characters or transfer a call to another party CANCEL POWER Button Used to end calls exit the Phonebook or Function mode or turn on off the PS Soft Buttons Used to select the function displayed directly above ...

Page 7: ... shipment the battery is not charged Please charge the battery for about 5 hours before initial use When the battery has been completely charged the charge indicator will change from red to green Refer to Battery Information on page 52 It is normal for the PS and charger to feel warm while the battery is charging Keep devices sensitive to magnetic fields away from the charger 1 2 ...

Page 8: ... and is awaiting calls Within range of a Cell Station Out of range No registration Intercom Indicator Off hook Status Message Waiting Phonebook Mode Battery Strength Hot Line ON Ringer Volume OFF Vibration ON Meeting Mode Call Forwarding Do Not Disturb Press POWER for about 2 seconds Press POWER for about 2 seconds The display will go blank Power On Power Off 3 Jul 10 08 301 Paul ...

Page 9: ...the guidance display is shown or not See page 43 1 Single Line 2 Trunk Group 3 Loop Line 4 Single Line 5 Single Line 02 JUL 14 59 James Smith 0123456789 David Baker 9876543210 Anne 103 01 JUL 15 03 David Baker 9876543210 Main menu PBX Feature menu Flexible key display Outgoing call log Incoming call log Handset Phonebook Incoming call log group Guidance display In standby mode Normal display 301 P...

Page 10: ...ion Accesses to the Ringer Option New Phonebook Stores a new item in the Handset Phonebook Setting Handset Accesses to the Setting Handset PBX Program Enters the PBX programming mode Walkie Talkie Sets or turns on off the Walkie Talkie mode See page 48 Phone book Accesses to the Handset Phonebook Caller ID Displays the incoming call log Redial Displays the outgoing call log Mute Turns the micropho...

Page 11: ...st radio signal coming from the Cell Station PBX Program Enters the PBX programming mode The meanings of these icons vary depending on the status of the CO line For further information refer to LED Indication in the KX TDA series KX TD816 KX TD1232 Business Telephone System Feature Guide To select a key press its key number or move the Joystick to select the desired key then press To assign a func...

Page 12: ...creen Used to set the time for memo alarm Displays the caller information stored in the Handset Phonebook while receiving a call Displays the caller information stored in the system while receiving a call Used to clear the memo alarm display setting or enter an X when storing the Line Access CD Used to select an item when in setting mode Displayed when in Alphabetic character entry mode Displayed ...

Page 13: ...e while receiving a call Press the Joystick Select Ringer Option Press the Joystick Select Ringer Volume Select the desired setting 6 levels Meeting Mode Off Press the Joystick Press the Joystick Select Ringer Option Select Vibration Select the desired setting On Vib Ring Off During a conversation Move the Joystick UP or DOWN to adjust the volume Receiver Volume 3 levels Speaker Volume 6 levels ...

Page 14: ...System can be selected and both should be set to the same language Refer to the Business Telephone System User manual for more details Press the Joystick for more than 2 seconds to lock unlock Unlocked Display icon Locked Press the Joystick Select Setting Handset Press the Joystick Press the Joystick Select Display Option Select Select Language Press the Joystick Press the Joystick Select the desi...

Page 15: ...then pressing To clear an entire number while predialling press and hold If flashes move closer to the Cell Station and dial again To cancel dialling press extension no Dial the extension number Press CANCEL Press TALK Talk Dial the outside phone number phone no outside phone no Press CANCEL Press TALK OR Enter the line access number 8 CO line group no 0 Talk 9 Press CANCEL Move the Joystick RIGHT...

Page 16: ...a call using the phone numbers of calls you have received Outgoing Call Log Incoming Call Log You can make a call using the phone numbers of calls that incoming call distribution groups have received Incoming Call Log Group To make a call to the last dialling number Select the desired item Press TALK Press TALK Press the Right Soft Key Press CANCEL OR Talk Select the desired item Press TALK Press ...

Page 17: ... PBX System Phonebook the called party s name is not stored in the Outgoing Call Log To log the name as well as the number copy the item into the Handset Phonebook before dialling it See page 27 Enter the desired incoming call log group no Press TALK Press the Right Soft Key Press CANCEL Press the Right Soft Key Press the Right Soft Key Select the desired item Press the Joystick Talk group no ...

Page 18: ...a call using the numbers stored in the Handset Phonebook You can make a call using the numbers stored in the Business Telephone System name Press the Left Soft Key Enter the first letter of the desired name Select the desired item Press TALK name Press the Left Soft Key Press the Left Soft Key Enter the first letter of the desired name Select the desired item Press TALK name Press the Left Soft Ke...

Page 19: ...s see page 29 To assign a phone number as hot key see page 29 Index Search PBX System Phonebook first letter Index Search Handset Phonebook first letter Select Index Search Category Search Handset Phonebook Select Category Index Search PBX Extension Phonebook first letter Select the desired category number or All Press and hold the dialling button assigned as a hot key Press TALK X ...

Page 20: ...ystick RIGHT Press the CO key number 0 9 OR Intercom Calls Outside Calls Group Calls Intercom Calls Outside Calls While receiving a call Select a CO line with a flashing icon To answer a call when the PS is ringing To answer a call on a specific line To answer a call when the PS is ringing Select the CO key Select a CO line with a flashing icon Press the Joystick Talk Talk Talk X Press the Joystic...

Page 21: ...ame Phone No Access to the Incoming Call Log Group group no Select the desired item Press the Joystick Select Save Phonebook Press the Joystick Press the Joystick Press the Joystick Select the desired item Select the desired item Select Delete Press the Joystick Select Yes Calling back to the caller Saving the Caller Information in the Handset Phonebook Deleting Press TALK Press CANCEL 301 Paul Ne...

Page 22: ...ea Consult your dealer for more details To return to the call before the transfer destination answers press extension no Dial the extension number During a conversation Press CANCEL Press CLEAR TRANSFER Talk C outside phone no Dial the outside phone number During a conversation Enter the line access number OR Press CANCEL Press CLEAR TRANSFER 8 CO line group no 9 0 Talk C C Press the Left Soft Key...

Page 23: ... the current mode is When you hold several outside line calls you need to assign the CO keys Single Line Group Line Loop Line ICD Group to a flexible key as necessary beforehand Press the Left Soft Key again Press the Left Soft Key During a conversation Move the Joystick RIGHT Select the CO key Select a CO line with a flashing icon Select a CO line with a flashing icon OR Press INTERCOM Intercom C...

Page 24: ...eaker without holding the PS Turning the Microphone On Off If you put the PS on the charger during a conversation the call will be disconnected During a conversation Press TALK to toggle between the two conversation modes Hands free Receiver During a conversation Press the Joystick Select Mute Press the Joystick ...

Page 25: ...ED colour pattern assigned to the category Storing a new item Item Setting Ringer pattern 15 ringer type See page 42 LED colour pattern 3 patterns See page 42 To enter characters refer to page 29 The valid digits are 0 through 9 PAUSE When storing numbers for outside parties you should store a line access number with each number Press the Joystick Press the Joystick Press the Joystick name Press t...

Page 26: ...or right press or respectively name phone no Select the desired category number or Off Edit the phone number max 24 digits Edit the name max 16 characters Select the desired item Press the Left Soft Key Press the Joystick Press the Joystick Press the Joystick Press the Joystick Press the Joystick Press the Joystick Select Edit Name Phone Number Private Category C C Press the Left Soft Key Select Y...

Page 27: ... number and select the category number or Off Press the Right Soft Key Select the desired item Press the Joystick Press the Joystick Select Save Phonebook Press the Joystick name phone no category no Enter a name phone number and select the category number or Off Select the desired item Press the Joystick Press the Joystick Select Save Phonebook Press the Joystick ...

Page 28: ...ss the Right Soft Key Move the Joystick UP or DOWN Enter the incoming call log group no Press the Joystick Press the Joystick Select Save Phonebook group no name phone no category no Enter a name phone number and select the category number or Off Select the desired item Press the Joystick Select Save Phonebook Press the Left Soft Key Press the Left Soft Key Press the Joystick Select the desired it...

Page 29: ...ft key displays the current character mode See Character Mode Table page 31 for available characters A will be displayed next to hot key numbers which have a phonebook item registered to them Press the Left Soft Key Press the Joystick Press the Joystick Select the desired item Select a blank hot key number 1 9 Select Reg to Hot Key Press the Joystick Press the Joystick A a B b C c 2 Normal Numeric...

Page 30: ...revious character move the cursor by moving the Joystick then enter the desired character If you enter a different character by mistake move the Joystick to highlight the character press to delete it then enter the correct character To clear an entire line press and hold To move the cursor move the Joystick 6 6 2 3 3 6 6 C C ...

Page 31: ...Using the Phonebook 31 Character Mode Table ...

Page 32: ... To dial PIN Personal Identification Number R B Tone Ringback Tone ICD Group Incoming Call Distribution Group 2 desired phone no To set cancel To store Set Cancel 0 2 4 7 1 0 KX TDA100 200 KX TD816 1232 Check the type of your Main Unit 2 4 7 0 4 7 KX TDA100 200 KX TD816 1232 4 7 Check the type of your Main Unit system speed dial no KX TDA100 200 KX TD816 1232 Check the type of your Main Unit Makin...

Page 33: ...side phone no R B Tone KX TDA100 200 KX TD816 1232 Check the type of your Main Unit To set To cancel While hearing a busy tone 6 4 6 4 6 During a Conversation Making Calls Multiple Party Conversation desired phone no To leave a conference To add another party during a conversation Talk to the new party Talk with multiple parties KX TDA100 200 KX TD816 1232 Check the type of your Main Unit ...

Page 34: ... answer CO line access no All calls extension no outside phone no Follow Me your extension no Cancel Follow Me All Calls Outside Calls Intercom Calls OR 0 1 2 0 2 3 4 5 7 8 1 7 0 1 7 Busy Cancel No answer Busy No answer CO line access no All calls extension no outside phone no Follow Me your extension no Cancel Follow Me 0 2 3 4 5 7 8 To an outside line 6 ...

Page 35: ...usy tone Wait for an answer 1 KX TDA100 200 KX TD816 1232 Check the type of your Main Unit Group Directed extension no group no 2 digits 1 4 0 4 extension no 1 4 0 4 4 Directed Group Outside Line KX TDA100 200 KX TD816 1232 Check the type of your Main Unit 0 1 7 All Calls Outside Calls Intercom Calls Set Cancel 0 2 0 1 1 1 7 ...

Page 36: ...ing To talk to the second party While hearing a call waiting tone OR KX TDA100 200 KX TD816 1232 Check the type of your Main Unit Set To set cancel for outside calls To set cancel for intercom calls No call No tone Tone 1 0 1 0 1 3 7 3 7 2 1 3 7 Cancel Set 1 0 ...

Page 37: ...ernal speakers Specific external speaker All extensions external speakers 3 4 4 2 external speaker no KX TDA100 200 KX TD816 1232 Check the type of your Main Unit Through a telephone speaker Through an external speaker KX TDA100 200 KX TD816 1232 Check the type of your Main Unit message no 1 9 To set To cancel parameter if required 0 5 7 0 5 0 7 0 5 7 message no 1 9 parameter if required KX TDA100...

Page 38: ...in For Log out ICD Group extension no All Specified 1 3 6 7 7 3 6 0 KX TDA100 200 KX TD816 1232 Check the type of your Main Unit For Log in For Log out 1 0 5 5 4 4 KX TDA100 200 KX TD816 1232 Check the type of your Main Unit 9 0 7 9 0 7 KX TDA100 200 KX TD816 1232 Check the type of your Main Unit To cancel a message waiting indication extension no 0 0 7 0 0 7 OR 4 OR 0 7 2 KX TDA100 200 KX TD816 1...

Page 39: ... cannot be locked Refer to the Business Telephone System User Manual For further information refer to the Business Telephone System User Manual or consult your dealer Feature Operation Useful Features Extension Lock 2 KX TDA100 200 KX TD816 1232 Check the type of your Main Unit To lock To unlock 1 0 7 7 7 7 7 7 extension PIN extension PIN extension PIN 7 7 extension PIN KX TDA100 200 KX TD816 1232...

Page 40: ... list as follows To return to the previous menu press To cancel press at any time The unit will beep to indicate that the new settings have been saved Press the Joystick Press the Joystick Select Setting Handset Select the desired main item Select the desired sub item Press the Joystick Follow the setting setting Press the Joystick Press the Joystick ...

Page 41: ...ect Language LED Colour Private Colour Category Name Hot Line Mode Line Access CD Registration Select Base Register H set Cancel Base Caller ID Disp Other Option Change H S PIN Auto Talk Reset Handset Any Key Answer Auto Answer Auto Ans Delay Flex Key Edit Private Ring Memo Alarm Charger Vibration LCD Contrast Guidance Setting Handset EXT Ringer Type INT Ringer Type ...

Page 42: ...evels Meeting Mode Off On Off Auto 16 Languages Call Type Ext Ring Int Ring Group Ring Colour Green Red Orange 4 Display Type Base Number Handset Number Handset Name Base H S No Off 15 Ringer Types Adjusts the ringer volume Turns the key tone off or on Selects the display in standby mode Selects the display language Selects the LED colour for each type of call intercom call outside call group call...

Page 43: ...2 No 3 Not stored Not stored Caller ID Disp Register H set Display Option Call Option Registration Hot Line Mode Line Access CD H S Phonebook PBX Setting Stores a phone number to make a call by pressing TALK Not stored Hot Line No Enter Phone no Base no Base PIN Personal Identification Number Select a number Enter the code On Off Registers a handset with a base unit Cancel Base H set PIN Default 0...

Page 44: ...a call is automatically answered when Auto Answer is turned on Auto Answer 2 Call Types Internal Only Int External Off Selects the type of calls to be answered by AUTO ANSWER Flex Key Edit See page 46 Allows you to assign a function to a flexible key and use the key as a shortcut key Select Base Auto Base no 0000 Auto Change H S PIN Other Option Enter Old PIN Enter New PIN Verify New PIN Changes t...

Page 45: ...ck Press the Joystick Select Memo Alarm Press the Joystick Press the Joystick Select the Alarm mode Off Once Daily Select Setting Handset Select the alarm number 1 3 Press the Joystick date time Press the Joystick Press the Joystick Enter memo Once Enter date and time Daily Enter time When Once Daily is selected memo Press the Joystick Press the Joystick Select the ringer type 1 15 Press the Joyst...

Page 46: ... has already been used first set the key to Not stored as shown below Press the Joystick Press the Joystick Select Other Option Select Flex Key Edit Press the Joystick Select the desired flexible key Press the Joystick Press the Right Soft Key Select the desired item Select Setting Handset Press the Joystick Press the Joystick OR Select PBX Program Select a Flexible Key 2 ...

Page 47: ...Volume Vibration EXT Ringer Type INT Ringer Type Group Ring Type Private Ring Charger Display Option Standby Display Select Language LED Colour Private Colour Category Name Caller ID Disp LCD Contrast Guidance Other Option Change H S PIN Auto Talk Reset Handset Any Key Answer Auto Answer Auto Ans Delay Flex Key Edit Call Option Hot Line No Hot Line Mode Line Access CD Select Base PBX setting Ringe...

Page 48: ...de and have the same Walkie Talkie group number In Walkie Talkie mode you cannot make or receive a call through the PBX Turning the Walkie Talkie mode on Turning the Walkie Talkie mode off To exit the operation press any time When the Walkie Talkie mode is ON the handset number is displayed followed by Walkie Talkie Press the Joystick Press the Joystick Select Walkie Talkie Select On Press the Joy...

Page 49: ...own unique number To exit the operation press any time A caller can press to call all handsets in the same Walkie Talkie mode group no Press the Joystick Press the Joystick Select Setting Enter the group number 3 digits Press the Joystick handset no Enter the handset number 1 9 Press the Joystick Select Walkie Talkie Press the Joystick Press the Joystick Press INTERCOM Enter the desired handset nu...

Page 50: ...unting 1 Connect the AC adaptor to the charger 2 Drive the screws into the wall using the wall template below 3 Mount the charger securely on the screws Cord holder To AC Outlet AC adaptor Charger Screws 24 5 mm 24 5 mm ...

Page 51: ...ater You cannot dial The number which you dialled is restricted by the Business Telephone System Consult your dealer The key lock mode is ON To cancel the mode press the Joystick for about 2 seconds See Key Lock on page 14 The radio channel is busy or a radio communication error occurred Try again later Noise is frequently heard Set the PS and CS away from other electrical appliances Move closer t...

Page 52: ...telephone calls even when the battery has been fully charged it is time to replace the battery with new one Before replacing the battery turn the power off to prevent memory loss Replace the battery Charge the new battery for at least 5 hours If you replace the battery before the low battery warning appears the battery strength icon may display an incorrect reading In this case use the PS as norma...

Page 53: ...n the manual After the memory effect has occurred it is possible to achieve almost complete capacity of the Ni MH batteries by charging and discharging several times one after another Ni MH batteries can also self discharge This self discharge depends on the ambient temperature At temperatures under 0 C the self discharge will be the lowest High humidity and high temperatures support the self disc...

Page 54: ...se signals are transmitted between the Cell Station CS and the PS by radio waves 2 Normally you get greater range outdoors than indoors If there are obstacles such as walls noise may interfere with your telephone calls In particular high metal shelves or reinforced concrete walls will restrict your operating range 3 A PS may not work when it is too far from the CS depending on the structure of the...

Page 55: ...from the original device Item Description Radio Access Method Multi Carrier TDMA TDD Frequency Band 1880 MHz 1900 MHz Number of Carriers 10 Carrier Spacing 1728 kHz Bit Rate 1152 kbps Carrier Multiplex TDMA 24 T 12 R 12 slots per frame Frame Length 10 ms Modulation GFSK Voice Coding 32 kbps ADPCM CCITT G 721 Transmission Output Max 250 mW ...

Page 56: ...opy of the original Declaration of Conformity of our products which relates to the R TTE please contact to our web address http doc panasonic tc de Copyright This manual is copyrighted by Panasonic Communications Co Ltd PCC You may print out this manual solely for internal use with this model Except above you may not reproduce this manual in any form in whole or part without the prior written cons...

Reviews: