background image

3

FOR YOUR SAFETY PLEASE READ THE FOLLOWING TEXT CAREFULLY.

This appliance is supplied with a moulded three pin mains plug for your safety and convenience.
A 5 amp fuse is fitted in this plug.
Should the fuse need to be replaced please ensure that the replacement fuse has a rating of
5 amps and that it is approved by ASTA or BSI to BS1362.

Check for the ASTA mark           or the BSI mark          on the body of the fuse.

If the plug contains a removable fuse cover you must ensure that it is refitted when the fuse is
replaced. 
If you lose the fuse cover the plug must not be used until a replacement cover is obtained. 
A replacement fuse cover can be purchased from your local Panasonic Dealer.

IF THE FITTED MOULDED PLUG IS UNSUITABLE FOR THE SOCKET OUTLET IN
YOUR HOME THEN THE FUSE SHOULD BE REMOVED AND THE PLUG CUT OFF
AND DISPOSED OF SAFELY.  
THERE IS A DANGER OF SEVERE ELECTRICAL SHOCK IF THE CUT OFF PLUG IS
INSERTED INTO ANY 13 AMP SOCKET.

If a new plug is to be fitted please observe the wiring code as shown below. 
If in any doubt please consult a qualified electrician.

WARNING : THIS APPLIANCE MUST BE EARTHED.

IMPORTANT : The wires in this mains leads are coloured in accordance with the following
code:

Green-and-yellow: Earth
Blue:

Neutral

Brown:

Live

As the colours of the wires in the mains lead of this appliance may not correspond with the
coloured markings identifying the terminals in your plug, proceed as follows.

The wire which is coloured GREEN-AND-YELLOW must be connected to the terminal in the
plug which is marked with the letter E or by the safety earth symbol       or coloured GREEN or
GREEN-AND-YELLOW.

The wire which is coloured BLUE must be connected to the terminal in the plug which is
marked with the letter N or coloured BLACK.

The wire which is coloured BROWN must be connected to the terminal in the plug which is
marked with the letter L or coloured RED.

How to replace the fuse : Open the-fuse compartment with a screwdriver and replace the fuse
and fuse cover.                         

Important Information

Summary of Contents for KX-T206E

Page 1: ...Electronic Modular Switching System MODEL KX T206E Please read this manual before connecting the Electronic Modular Switching System ELECTRONIC MODULAR SWITCHING SYSTEM POWER ...

Page 2: ...y telephone is abbreviated as PT A single line telephone is abbreviated as SLT Service Unit Telephone Optional Equipment APPROVED for connection to telecommunication systems specified in the instructions for use subject to the conditions set out in them The serial number of this product may be found on the label affixed to the bottom of the unit You should note the serial number of this unit in th...

Page 3: ...G IS INSERTED INTO ANY 13 AMP SOCKET If a new plug is to be fitted please observe the wiring code as shown below If in any doubt please consult a qualified electrician WARNING THIS APPLIANCE MUST BE EARTHED IMPORTANT The wires in this mains leads are coloured in accordance with the following code Green and yellow Earth Blue Neutral Brown Live As the colours of the wires in the mains lead of this a...

Page 4: ...g calls to the BT emergency 999 and 112 service During dialling this apparatus may tinkle the bells of other telephones using the same line This is not a fault and we advise you not to call Fault Repair Service Prevention of access by user This apparatus is intended to be accessible only to authorized personnel This apparatus must be installed in a locked room or similar environment such that user...

Page 5: ...he trouble is in the telephone system and not in the unit Do not use benzine thinner or the like or any abrasive powder to clean the cabinet Wipe it with a soft cloth WARNING THIS UNIT MAY ONLY BE INSTALLED AND SERVICED BY QUALIFIED SERVICE PERSONNEL WHEN A FAILURE OCCURS WHICH RESULTS IN THE INTERNAL PARTS BE COMING ACCESSIBLE DISCONNECT THE POWER SUPPLY CORD IMMEDIATELY AND RETURN THIS UNIT TO Y...

Page 6: ...utgoing Permitted CO1 Assignment Day Night 21 Outgoing Permitted CO2 Assignment Day Night 22 CO1 Ringing Assignment Day Night 22 CO2 Ringing Assignment Day Night 22 Doorphone Assignment Day Night 23 Toll Restriction TRS Class Assignment Day Night 23 TRS Denied Code CLASS 2 3 24 TRS Denied Code CLASS 3 24 OGM Recording 24 OGM Play 25 Fax Connection 25 CO1 Delayed Ringing Assignment 25 CO2 Delayed R...

Page 7: ... pin connector Extension 4 pin connector Doorphone 4 pin connector 7 EXT Connection Cable 1 pair wire single line telephone 2 pair wire proprietary telephone 8 Intercom paths 2 including the doorphone path Characteristics 1 Station Loop Limit Proprietary telephone 40 ohms Single line telephone 600 ohms including set Doorphone 20 ohms 2 Minimum Leak Resistance 15000 ohms 3 Maximum Number of Station...

Page 8: ...proprietary telephone 8 Do not obstruct area around the main unit for reasons of maintenance and inspection be especially careful to allow space for cooling above and at the sides of the main unit Wiring Precautions Make sure to keep the following instructions when wiring 1 Do not wire the telephone cable in parallel with an AC power source computer telex etc If the cables are run near those wires...

Page 9: ...f the Main Unit Ground Terminal Overview of the Main Unit Name and Location Doorphone Jack CO 4 pin Jack Extension 4 pin Jacks Door Opener Connector Cable Holders Notes Doorphone Jack and Door Opener Connector are at SELV CO Line 4 pin Jack and Extension 4 pin Jacks are at TNV GROUND EXTN 5 EXTN 3 EXTN 1 CO 2 CO 1 EXTN 6 EXTN 4 EXTN 2 DPH DOOR OPENER SYSTEM ...

Page 10: ...o Earth POWER ELECTRONIC MODULAR SWITCHING SYSTEM IMPORTANT Connect the frame of the main unit to earth Templet Wall Mounting 1 Place the templet on page 39 on the wall to mark the three screw positions 2 Install the three screws and washers included into the wall 3 Hook the main unit on the screw heads screw POWER ELECTRONIC MODULAR SWITCHING SYSTEM ...

Page 11: ...aso nic Panasonic Panasonic ELECTRONIC MODULAR SWITCHING SYSTEM 2 CO Lines Doorphone KX T30865 Doorphone 6 Extensions one pair two pair two pair two pair one pair one pair KX T7130 KX T7050 Single Line Telephone Cordless Phone Telephone Answering Machine with Facsimile KX T7020 to CO1 and CO2 Door Opener ...

Page 12: ...es Use twisted pair cable 1 Lift the transparent part 2 Insert the required telephone wires into the holes of the plug Then press the transparent part back into the black part Note Do not strip the wires Insert the wires all the way into the plug GROUND SYSTEM EXTN 5 EXTN 3 EXTN 1 CO 2 CO 1 EXTN 6 EXTN 4 EXTN 2 DPH DOOR OPENER A A B B CO 2 CO 1 CO 2 CO 1 To Modular Jacks from the Central Office A ...

Page 13: ... Insert the wires all the way into the plug H A B L A B For a proprietary telephone For single line telephones GROUND SYSTEM EXTN 5 EXTN 3 EXTN 1 CO 2 CO 1 EXTN 6 EXTN 4 EXTN 2 DPH H B A L EXTN 1 DOOR OPENER To extensions Notes A facsimile must be connected to EXTN 6 jack if an optional DISA FAX Detect card KX T20691 is installed See page 16 to install the card System programming is also required ...

Page 14: ... SWITCHING SYSTEM POWER Paralleled Telephone Connection Notes The following features are not available for SLT connected in parallel Call Splitting External Feature Access Conference 4 conductor wiring cord Connect pins H A B and L 2 conductor wiring cord Connect pins A and B Master socket Secondary socket ...

Page 15: ...ystem GROUND EXTN 5 EXTN 3 EXTN 1 CO 2 CO 1 EXTN 6 EXTN 4 EXTN 2 DPH DOOR OPENER SYSTEM 3 Wind and fix the cables of the door opener round the upper cable holder 1 Loosen the screws 2 Insert the wires coming from the door opener into holes and tighten the screws DOOR OPENER Notes For wiring it is recommended to use UL1015 twisted wire or the equivalent The wire should be between 1 2 and 2 4 mm in ...

Page 16: ...on on page 28 Keep the following conditions in mind When a caller enters the second digit of an extension number 1 through 6 during the mes sage he she can reach the extension directly If the call is not received the assigned extensions will ring See 04 74 CO1 Ringing Assignment Day Night 05 75 CO2 Ringing Assignment Day Night on page 22 and 60 DISA Ringing Time on page 29 If the caller enters 0 t...

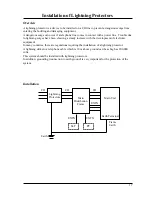
Page 17: ...increase with the development of electronic equipment In many countries there are regulations requiring the installation of a lightning protector A lightning strike to a telephone cable which is 10 m above ground can be as high as 200 000 volts This system should be installed with lightning protectors In addition grounding connection to earth ground is very important for the protection of the syst...

Page 18: ... 2 Check obstructions None 3 Composition of the earth rod Metal 4 Depth of the earth rod More than 50 cm 5 Size of the earth wire Thickness is greater than 1 6 mm Notes The above figures are recommendations only The length of earth rod and the required depth depend on the composition of the soil Installation of Lightning Protectors Outside Earth SLT PT EXTN EXTN EXTN EXTN CO CO CO Protectors Anoth...

Page 19: ...ure CO2 is connected to extension 22 automatically Note The system programmed data is protected by the factory provided lithium battery Starting the System Plug the AC power cord into the system and an AC outlet The power indicator of the system will light ...

Page 20: ...not have display panels so you cannot check the setting you have made Therefore please use KX T7130 to check the programming Extensions Used for System programming can only be performed from extension 21 Programming To Check the Use KX T7130 When you check the assignment set the Programmed Data MEMORY switch on PT to PROGRAM Enter and the program address You cannot check programs 60 62 63 65 67 84...

Page 21: ...ou store a pause press Input Format Explanation AA Speed dial number 00 through 39 Phone number 32 digits max Default Not stored Dial Type Selection Description Assigns the Dial Type tone or pulse to CO line Input Format Explanation A 1 CO1 2 CO2 B 0 PULSE 1 TONE Default Both COs 1 TONE Outgoing Permitted CO1 Assignment Day Night Description Determines the extensions which can have access to CO li...

Page 22: ...ging Assignment Day Night Description Assigns the extensions which will ring when a call from CO line 1 is received in both day and modes Input Format Explanation A 1 through 6 corresponding to extension no 21 through 26 B 0 DISABLE not ring 1 ENABLE ring Default extension 21 1 ENABLE other extensions 0 DISABLE CO2 Ringing Assignment Day Night Description Assigns the extensions which will ring whe...

Page 23: ...e system Input Format Explanation A 1 through 6 corresponding to extension no 21 through 26 B 0 DISABLE 1 ENABLE Default extension 21 1 ENABLE other extensions 0 DISABLE Toll Restriction TRS Class Assignment Day Night Description Assigns a Toll Restriction Class to each extension in both day and night modes The Toll Restriction feature can prohibit certain extension users from placing unauthorized...

Page 24: ...for TRS Class 3 Condition The character can be any number Input Format Explanation A Code No 0 through 9 1 digit Denied code number 7 digits Default All codes Not stored OGM Recording Description Used to record an outgoing message for Direct Inward System Access DISA Condition The recording time is a maximum of 16 seconds If you perform programming with a PT the message RECORDING will be displayed...

Page 25: ...signed as DISA Extension 26 should be assigned as DISABLE in the 04 74 CO1 Ringing Assignment Day Night 05 75 CO2 Ringing Assignment Day Night and 06 76 Doorphone Assignment Day Night programs Input Format Explanation A 0 DISABLE not detect 1 ENABLE detect Default 0 DISABLE CO1 Delayed Ringing Assignment Description Assigns delayed ringing to extensions when a call from CO line 1 is received Condi...

Page 26: ...elayed 1 ENABLE delayed Default All extensions 0 DISABLE Delayed Ringing Count Selection Description Assigns the number of delayed rings that will be sent to the assigned extensions from the CO lines Input Format Explanation A 1 After 1 ring 2 After 2 rings 3 After 3 rings 4 After 4 rings Default 2 After 2 rings TRS Excepted Code Description Assigns the numbers which are exceptions to the toll res...

Page 27: ... Day Night Starting Time Input Format Explanation A 0 Manual 1 Automatic Default 0 Manual Day Night Starting Time Description Sets the starting time when automatic day night mode is programmed in the 70 Day Night Switching Mode program Input Format Explanation A 1 Day start time 2 Night start time BB Hour 01 12 CC Minute 00 59 D 0 AM 1 PM Default Day 9 00 AM Night 5 30 PM System Data Clear Descrip...

Page 28: ...ng to extension no 21 through 26 B 0 TONE default 1 VOICE Paralleled Telephone Connection Assigns whether each extension will be con nected in parallel with a single line telephone or not Input Format 31 A B A 1 through 6 corresponding to extension no 21 through 26 B 0 DISABLE default 1 ENABLE Tone Waiting Time After OGM Sets the time between sending an outgoing message and sending the ringback to...

Page 29: ...E is selected in this program the telephone at the designated extension rings for 60 seconds and the call is not forwarded Input Format 60 A A 0 DISABLE 1 10 SEC 2 20 SEC default 3 35 SEC Toll Restriction Code Check Assigns whether or is to be checked or not when a user dials them in the Toll Restriction code Input Format 62 A A 0 DISABLE 1 ENABLE default CO Indicator Assignment Assigns whether an...

Page 30: ...access code BTL is selected No Yes Yes No Does the area code match the route selection code of Route 1 Does the first digit match the leading digit Does the area code match the exceptional code of Route 1 Route 1 is selected No Yes Yes No Does the area code match the route selection code of Route 2 Does the area code match the exceptional code of Route 2 Route 2 is selected No Yes Yes No Does the ...

Page 31: ... Least Cost Routing LCR Programs continued LCR Mode Allows you to turn on or off the Least Cost Routing LCR mode LCR if enabled selects the least expensive route to be used for a CO call Input Format 80 A B A 1 CO1 2 CO2 B 0 DISABLE default 1 ENABLE LCR Carrier Code Assigns each carrier s access code used for the LCR feature Input Format 81 A code A Route No 1 through 4 code 10 digits max Default ...

Page 32: ...ne 32 Tone 1 sec 15 sec Confirmation Tone 1 Confirmation Tone 2 Confirmation Tone 3 Conference Tone Dial Tone 1 Dial Tone 2 Busy Tone Reorder Tone Ringback Tone Do Not Disturb DND Tone Hold Alarm Call Waiting Tone ...

Page 33: ...om Calls Intercom Hold Recall CO Calls CO Hold Recall Doorphone Calls NOTE The dial tone 2 is heard during the system programming mode and when the following features are set Do Not Disturb Call Pickup Deny Call Forwarding Data Line Security ...

Page 34: ...gramming Tables 34 00 01 02 03 04 05 06 07 08 09 10 11 12 13 14 15 16 17 18 19 20 21 22 23 24 25 26 27 28 29 30 31 32 33 34 35 36 37 38 39 00 System Speed Dialling Number Set No Phone No 32 digits max Name ...

Page 35: ...6 0 DISABLE 1 ENABLE Default Ext 21 Default Ext 22 Ext 23 Ext 24 Ext 25 Ext 26 0 DISABLE 1 ENABLE Default Ext 21 Default Ext 22 Ext 23 Ext 24 Ext 25 Ext 26 0 DISABLE 1 ENABLE 76 Doorphone Assignment Night 75 CO 2 Ringing Assignment Night 74 CO 1 Ringing Assignment Night 06 Doorphone Assignment Day Default Ext 21 Ext 22 Ext 23 Ext 24 Ext 25 Ext 26 1 CLASS 1 2 CLASS 2 3 CLASS 3 4 CLASS 4 73 Outgoing...

Page 36: ...ax Route 2 No 00 01 02 03 04 05 06 07 08 09 10 11 12 13 14 15 16 17 18 19 20 21 22 23 24 25 26 27 28 29 30 31 32 33 34 35 36 37 38 39 No 00 01 02 03 04 05 06 07 08 09 10 11 12 13 14 15 16 17 18 19 20 21 22 23 24 25 26 27 28 29 30 31 32 33 34 35 36 37 38 39 Code 6 digits max Route 3 Code 6 digits max Route 4 Default Ext 21 Ext 22 Ext 23 Ext 24 Ext 25 Ext 26 0 DISABLE 1 ENABLE 61 Door Opener Assignm...

Page 37: ...16 17 18 19 No 00 01 02 03 04 05 06 07 08 09 10 11 12 13 14 15 16 17 18 19 Code 6 digits max Route 1 Code 6 digits max Route 2 No 00 01 02 03 04 05 06 07 08 09 10 11 12 13 14 15 16 17 18 19 No 00 01 02 03 04 05 06 07 08 09 10 11 12 13 14 15 16 17 18 19 Code 6 digits max Route 3 Code 6 digits max Route 4 ...

Page 38: ......

Page 39: ...Templet 39 39 106 mm Install a screw here Install a screw here 71 mm 77 mm Install a screw here Copy the templet and place it on the wall Up ...

Page 40: ...Panasonic Business Systems U K Panasonic House Willoughby Road Bracknell Berkshire RG12 4FP Printed in Japan PSQX1141ZB KW0397KM1097 ...

Reviews: