background image

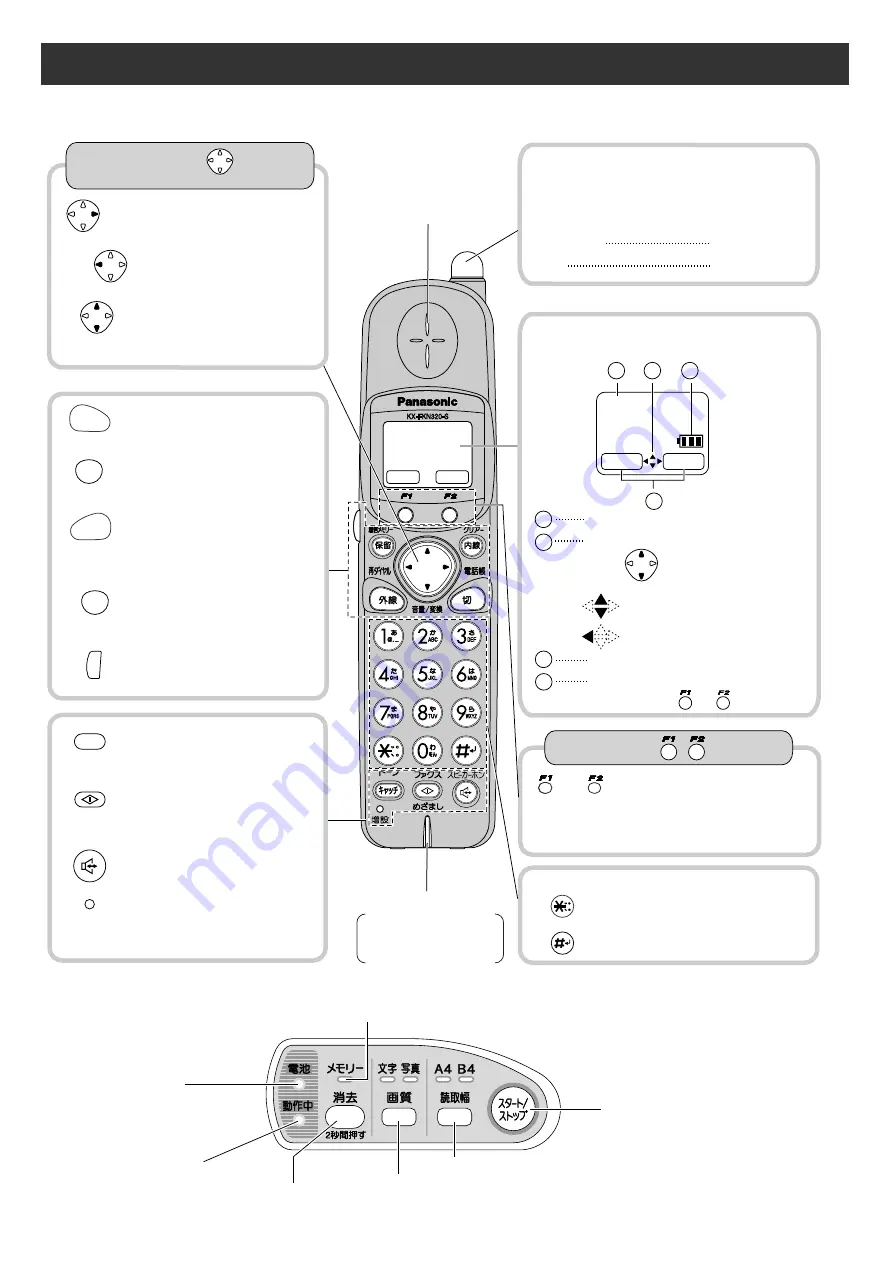
Finding the controls

3

Operation indicator 
(Shows the condition of the
 scanner) 

Battery indicator
(Shows the amount of
 battery power left) 

Memory indicator (Shows the amount of memory being used) 

Scanning width button

To start or stop scanning

Delete button 
(To delete the last page of scanned content, press for 2 seconds.) 

Resolution button

Portable handset

Hand scanner

機能

留守電

● 

To adjust the volume.

● 

To change Hiragana into 
Kanji.

● 

To redial the last number 
dialed.

Tone button

  ● 

To switch to Tone dialing mode.

● 

To make/answer calls.

● 

To page the main unit or 
another portable handset.

● 

To clear letters/numbers.

● 

To end a call.

● 

To end or exit from editing 

   or other operations.

● 

To put a call on hold.

● 

To start a search in the 
Number Display log.

● 

To talk to another portable 
handset.

● 

For call waiting service 
users.

● 

To receive faxes.

● 

To use the speakerphone.

● 

Used when installing 
additional portable 
handsets.

Sharp button

● 

To use the phonebook.  

     and      buttons refer to the function 
displayed on the bottom of the display. 
They function differently depending on 
the mode.

Call/Charge indicator

Dial buttons

Charging

Full

Apricot (Red)

Off

 LCD (with back light)

Speaker

Microphone

Do not cover the 
microphone while 
talking.

How to use              buttons

1

2

● 

Displays battery strength, telephone 
numbers etc.

● 

when receiving a call, the indicator 
will blink.

● 

when placed on a charger

Portable handset number

3

Battery strength

How to use                    key

電話帳

音量/変換

電話帳

再ダイヤル

音量/変換

外 線

クリアー

内線

着信メモリー

保留

ファクス

めざまし

スピーカーホン

キャッチ

増設

1

2

3

4

機能

子機1

留守電

Indicates which directions the

                          key can be tilted.

音量/変換

再ダイヤル

up an down

left

4

Function menu that is 
controlled by      or      .

トーン

電話帳

再ダイヤル

Summary of Contents for KX-PW102CW

Page 1: ... between portable handsets 15 Sending faxes 16 Receiving faxes 18 Operating the built in answering device 20 Using the hand scanner 21 Individual e mail services 26 Specifications Back cover Thank you for purchasing a Panasonic facsimile This guide explains some basic features and operations but not all of them For further details see the Japanese operating instructions This product is designed fo...

Page 2: ... Stop button Start Fax Copy button starts faxing or copying Resolution button selects the resolution when faxing or copying Multi operation buttons refer to the function displayed on the display panel Redial button Function button initiates programming Search button searches the directory by pressing the up and down buttons Volume button adjusts ringer speaker and handset volume by pressing the up...

Page 3: ...ber Display log To talk to another portable handset For call waiting service users To receive faxes To use the speakerphone Used when installing additional portable handsets Sharp button To use the phonebook and buttons refer to the function displayed on the bottom of the display They function differently depending on the mode Call Charge indicator Dial buttons Charging Full Apricot Red Off LCD wi...

Page 4: ...m Insert the blue core into the right slot of the main unit Insert the T shaped gear blue into the left slot of the main unit 3 Blue core 2 T shaped gear blue Right slot 2 3 4 White core T shaped gear blue Do not be slacken 2 Control panel Press here 1 Open the control panel until it locks 2 2 3 If the ink film is slack tighten it by winding the T shaped gear 5 3Close the control panel until it lo...

Page 5: ... leaning it back 4Install the recording paper cover on the recording paper tray by sliding it down from the top 2 1 Recording paper tray Slot Tab Paper entrance cover Printing side is on the back Paper entrance cover Recording paper tray Recording paper cover Fan the stack of recording paper A4 size Insert the recording paper into the recording paper tray Up to 30 sheets 2 3 2Insert the recording ...

Page 6: ...e hand scanner into the main unit Charge the battery for 10 hours after connecting the power cord to the power outlet Imaging sensor Battery cover Cord Red Connector Cord Black 読 取 枚 数 0 枚 ス キ ャ ナ ー 設 定 中 Display Bottom side 3Charge the battery in the charger for 10 hours Plug Charger AC adaptor Power outlet AC 100 V Black Red Connector Battery Click Battery cover Charge indicator lights apricot r...

Page 7: ...cord and place the handset on the main unit 3Connect the telephone line cord Supplied accessory 4Connect the power cord Power cord Telephone line cord Wall jack Power outlet AC 100V Click Click Click 電話回線へ 回線 After the Power On This unit will automatically select the dialing mode Tone Pulse ...

Page 8: ...ss Stop ストップ Setting your facsimile telephone number ストップ F3 機能 ストップ 機能 F3 画 質 3Press Set 決定 F3 Example 3Press Set 決定 F3 4Press Search button repeatedly until the following is displayed 機 能 登 録 モード 呼 出 音 とベル回 数 アアア決 定 は F3 を押 す 最 初 の設 定 日 付 時 刻 2002年 01月 01日 00 00 日 付 時 刻 2002年 02月 01日 00 00 02月 01日 115 45 用 件 録 音 アアアア00件 日 付 時 刻 2002年 02月 01日 15 45 登 録 しました 日 付 時 刻 2002年 02月 01日 15 45 2 機 能 登 録...

Page 9: ...structions 文字切替 F4 7Press Stop ストップ Setting your logo ストップ 機能 F3 F4 4Press Search button repeatedly until the following is displayed 3Press Set 決定 F3 機 能 登 録 モード 名 前 印 字 用 呼 出 音 とベル回 数 アアア決 定 は F3 を押 す 名 前 印 字 用 M 名 前 印 字 用 Mi 名 前 印 字 用 Mic 名 前 印 字 用 Mica 名 前 印 字 用 Micah 2 Press six times 3 Press six times 4 Press to move the cursor to the next space and press four times 5 Press five times Examp...

Page 10: ...nput mode Used to move the cursor to the left and right Used to delete a character Used to insert a space Command keys Main unit Portable handset Main unit Portable handset 文字切替 F4 Main unit Portable handset クリアー 内線 消去 F1 Main unit Portable handset 保留 画 質 When entering e mail address the small letters are displayed before the capital letters When entering e mail address you can not enter the follo...

Page 11: ...ame or number 2Press Search button repeatedly until the desired name is displayed 3Press Edit 修正 F2 4Edit the name see the table on page 10 for instructions then press Register If you do not need to edit the name press Register and skip to step 5 登録 F3 6Enter the correct telephone number then press Register If you do not need to edit the telephone number press Register and skip to step 7 登録 F3 7If...

Page 12: ...ions repeat steps 3 to 5 登録 F3 6Press Stop to exit the program ストップ Erasing a name and number stored in the speed dialer 3Press erase 消去 F1 短 縮 ストップ F1 2Press the memory station number to You can store up to 9 names and telephone numbers which are stored in the phonebook The dialling buttons to function as memory stations Memory station number 短 縮 1 未 登 録 短 縮 ストップ F1 スピーカーホン 1Press Speed dialer 短 ...

Page 13: ... number 1 9 8Press Register To program other items repeat steps 3 to 8 F1 登録 9Press Off to exit the program 切 Editing a stored name or number 3Press Edit F1 修正 4Edit the name see the table on page 10 for instructions then press Register If you do not need to edit the name press Register and skip to step 5 F1 登録 5Enter the correct kana then press Register If you do not need to edit the kana press R...

Page 14: ...rphone スピーカーホン 3Press Off to end the intercom call 切 番 号 子 機 1内 線 通 話 中 内 線 呼 出 内 線 通 話 中 子 機 1呼 出 中 1 For single portable handset users Lift the handset When pressing Portable handset instead of lifting the handset you can use the speakerphone Skip to step 2 Press Portable handset For multiple portable handset users Lift the handset then press Portable handset When pressing Portable handset inste...

Page 15: ...ture 1Press Intercom and the desired portable handset number to 内線 4If you want to continue the conversation repeat steps 2 and 3 5Press Off to end the intercom call 切 4If you want to continue the conversation repeat steps 2 and 3 5Press Off to end the intercom call 切 1 2Listen to the caller 3Listen to the response ト ー ク ト ー ク 3Respond to the caller 1 Press and hold Talk until a beep sounds light ...

Page 16: ... cover 画 質 スタート ファクス コピー FACE DOWN Sending a fax manually Sending a fax using the phonebook 1Open the document cover and adjust the width of the document guides to the size of the document 2Insert the document up to 5 pages FACE DOWN until a single beep is heard 3If necessary press Resolution repeatedly to select the desired setting see below 画 質 5Press Search button until the desired name is disp...

Page 17: ...o 5 pages FACE DOWN until a single beep is heard 3If necessary press Resolution repeatedly to select the desired setting 画 質 画 質 スタート ファクス コピー 短 縮 FACE DOWN Document guide Document cover 4Press Speed dialer 短 縮 5Press memory station number to 6Press Fax The unit will start fax transmission スタート ファクス コピー Sending a fax using the speed dialer ...

Page 18: ...e call If the portable handset is not set on the charger press Talk 外線 2When document reception is required a fax calling tone slow beep is heard or no sound is heard press Fax reception The main unit will start fax reception ファクス Telephone mode 電話優先 Pre selected setting Select this mode when you plan to answer the calls yourself When receiving calls you have to answer all calls manually Fax Telep...

Page 19: ... on AUTO ANSWER mode provides three types of receiving modes ファクス 留守電 Fax Answering device mode ファクス専用 Fax only mode and 留守電専用 Answering device only mode 留 守 light on F3 ストップ 機能 留 守 Fax Answering device mode ファクス 留守電 Pre selected setting Select this mode when you want to receive all voice and fax calls automatically Fax only mode ファクス専用 Select this mode when you wish to use the unit only as a fax ...

Page 20: ...s Set then press The pre recorded Japanese greeting message will be played when you receive a call 決定 F3 Preparation Programming the remote operation ID 1 Press Function 2 Press Search button repeatedly until the following is displayed 3 Press Set 4 Enter any 4 digit number remote operation ID except or 5 Press Register 6 Press Stop ストップ 登録 F3 決定 F3 機能 Operation Listening to a recorded message fro...

Page 21: ...ocument s left end Scanning position 6Press the hand scanner against the document and move it slowly towards the direction of the arrow When it is scanning properly the operation indicator will flash green For the proper scanning speed for different resolution types see Scanning speed and memory capacity on the bottom of this page 7After scanning the document press Start Stop Scanning speed and me...

Page 22: ...ed light ON Red light ON Light OFF Light OFF No beep 1 beep 3 beeps No beep The hand scanner is being moved quickly The document is being scanned The hand scanner is being moved too quickly Some parts of the document may not be scanned or the scanned contents may be too compressed The scanner memory is full The memory indicator green light will flash fast You have scanned a document that is more t...

Page 23: ...10 アアアアアア 数 字 を押 す 5Press Set 決定 F3 8Press Set Printing will start 決定 F3 2Press Set 決定 F3 3Press Set 決定 F3 1Insert the hand scanner in the main unit or press Scanner when the hand scanner is in the main unit The number of scanned pages is displayed Example 10 pages 読 取 枚 数 10枚 アアア印 字 は F3 を押 す スキャナー F2 7Press Set 決定 F3 1Insert the hand scanner in the main unit or press Scanner when the hand scanne...

Page 24: ...アアアアア 数 字 を押 す 6Enter the number of the last page that you want to send using 2 digits Example page 10 To correct a mistake press Clear 消去 F1 終 了 ページ 10 アアアアアア 数 字 を押 す 5Press Set 決定 F3 8Dial the fax number Example 09876543 09876543 9Press Fax The unit will start fax transmission スタート ファクス コピー 1Insert the hand scanner in the main unit or press Scanner when the hand scanner is in the main unit Th...

Page 25: ...xample 読 取 枚 数 ア6枚 アアア印 字 は F3 を押 す 消 去 しました 1Insert the hand scanner in the main unit or press Scanner when the hand scanner is in the main unit The number of scanned pages is displayed Example 10 pages 読 取 枚 数 10枚 アアア印 字 は F3 を押 す スキャナー F2 1Insert the hand scanner in the main unit or press Scanner when the hand scanner is in the main unit スキャナー F2 0 1 4Press Deleting will start 読 取 枚 数 アアアアア0枚 消...

Page 26: ...cation fee and call charges KME information services Registration fee 500 Information Service fee Call charge included 20 minute 8 am 11 pm 18 5 minute 11 pm 8 am Melody download service Yumekara fee 50 a melody As of February 2002 Tax not included The following services are available with your fax machine The information service fee including the call charge will be applied E mail reception and p...

Page 27: ...し込み 電話番号 NTT契約番号 お申し込み年月日 西暦 PHS 携帯電話 ポケットベルなどの番号は登録できません 年 月 日 おたっくす情報サービスのご利用条件は おたっくす情報サービス契約約款 によります お申し込みにあたっては 本約款の内容をよくお読みいただき 同内容にご同意のうえ お申し込みください 下記の太枠内に必要事項をご記入ください 太枠内をかい書にてご記入ください ご記入にあたっては 濃い鉛筆をご使用願います おたっくす情報サービス おたっくすEメール ご利用申込書 この面を裏向きにして 矢印の方向へ入れてください Eメール お申し込み前に必ずお読みください 申し込み のしかた ご利用可能なクレジッ トカー ド VISA JCB MASTER をご準備ください おたっくす情報サービス の利用申し込みをします 裏面の申し込みのしかたに従って ファクス送信してください Yo...

Page 28: ...T pdf WAV as of February 2002 6Listen to an announcement through the speaker or the handset F3 スピーカーホン Listening to a received voice e mail in an attached file 4Enter the document number with 4 digits See the example below about document number 3Press Set 決定 F3 8Press Speakerphone to finish listening or replace the handset if you are using it スピーカーホン 5Press Register 登録 F3 7Listen to the voice mess...

Page 29: ...sired e mail address is displayed 2 Press Set then press Register To store an address see page 31 登録 F3 決定 F3 登録 F3 文 字 Eメール送 信 1Open the document cover and adjust the width of the document guides to the size of the document 2Insert the document up to 5 pages FACE DOWN until a single beep is heard 3If necessary press Resolution repeatedly to select the desired setting see page 16 画 質 F3 F1 画 質 Aju...

Page 30: ...following is displayed 3Press Set 決定 F3 5Press Register The display will show the last title you entered To delete this title press Clear for 2 or more seconds 消去 F1 登録 F3 6Enter the title of your e mail up to 32 characters see the table on page 10 for instructions 4Enter the desired e mail address see the table on page 10 for instructions and press Register You can select the desired address usin...

Page 31: ...iting a stored e mail address 6Edit the name see the table on page 10 for instructions then press Register If you do not need to edit the name press Register and skip to step 7 登録 F3 9Press Register To edit other items repeat steps 4 to 9 登録 F3 4Press Search button repeatedly until the desired name is displayed 5Press Edit 修正 F2 機能 F2 F3 ストップ 3Press Set 決定 F3 1Press Function then press E mail 機能 2...

Page 32: ... time Approx 90 min Stanby time Approx 10 hours Talk time during power failure 1 When copying a 100 black document 2 If you cannot make a call due to DC resistance consult your dealer 3 Transmission speed is based on an A4 size document of 700 characters sent in standard resolution at 9 600 bps The actual transmission speed depends upon the contents of the page resolution telephone line conditions...

Reviews: