


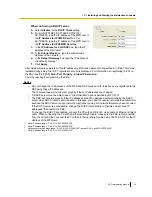


4.
a.
Enter the Installer Level Programmer Code (default:
INSTALLER
).
Note
There are 2 other Programmer Codes with limited authorisation: Administrator Level (default:
ADMIN
), and User Level (default:
USER
). (
®
1.2.2 Password Security
)
b.
Click
OK
.
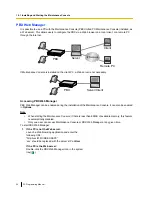
5.
Click
Connect
.
6.
a.
Select your PBX model from
PBX Model
.
b.
Select the
LAN
or
RS-232C
tab, depending on the type of PC connection with the PBX.
c.
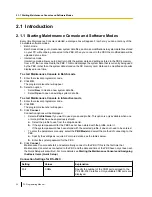
Specify the settings as required. (See
2.1.1 Starting Maintenance Console and Software
Modes
)
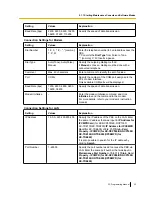
Note
When connecting to the PBX for the first time selecting
LAN
, the
IP Address
and
Port
Number
must be set to
192.168.0.101
and
35300
respectively.
d.
Enter the system password for installer (default:
1234
).
e.
Click
Connect
.
7.
When country/area data do not match:
a.
Click
OK
to replace the country/area data of the PBX. Replacement may take several minutes to
complete.
b.
Follow the procedure described in "3.13.1 Starting the PBX" (for KX-NCP500/KX-NCP1000),
"3.13.1 Starting the PBX" (for KX-TDE100/KX-TDE200), or "3.15.1 Starting the PBX" (for
KX-TDE600) in the Installation Manual and restart the PBX.
c.
Repeat step
5
to reconnect the Maintenance Console to the PBX.
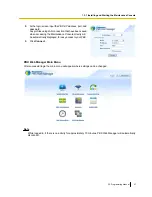
8.
Follow the instructions of the Quick Setup wizard for the basic items in Quick Setup.
9.
On the IP addressing information screen, the information for the MPR card can be assigned
automatically through a DHCP server or entered manually.
Note
If you change any information on this screen and click
Apply
, the PBX will need to be reset.
When using a DHCP server:
a.
Select
Enable
for the
DHCP Client
setting.
b.
Click
Apply
.
Note
The boxes will turn grey and the IP addresses will
be assigned automatically after the PBX is reset.
18
PC Programming Manual
1.2.1 Installing and Starting the Maintenance Console
Summary of Contents for KX-NCP1000
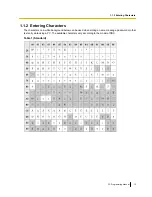
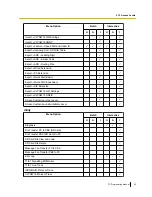
Page 14: ...Table 2 For CE model 14 PC Programming Manual 1 1 2 Entering Characters ...
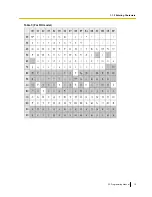
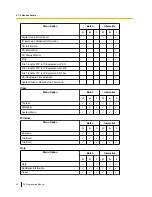
Page 15: ...Table 3 For RU model PC Programming Manual 15 1 1 2 Entering Characters ...
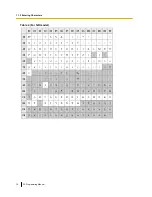
Page 16: ...Table 4 For GR model 16 PC Programming Manual 1 1 2 Entering Characters ...
Page 106: ...106 PC Programming Manual 2 7 1 Frequently Asked Questions FAQ ...
Page 107: ...Section 3 1 Configuration PC Programming Manual 107 ...
Page 461: ...Section 4 2 System PC Programming Manual 461 ...
Page 594: ...594 PC Programming Manual 4 21 2 11 2 Audio Gain Card ...
Page 595: ...Section 5 3 Group PC Programming Manual 595 ...
Page 615: ...2 2 3 Tenant Service PC Programming Manual 615 5 7 3 2 User Group ...
Page 673: ...Section 6 4 Extension PC Programming Manual 673 ...
Page 811: ...Section 7 5 Optional Device PC Programming Manual 811 ...
Page 839: ...Section 8 6 Feature PC Programming Manual 839 ...
Page 859: ...Section 9 7 TRS PC Programming Manual 859 ...
Page 867: ...Section 10 8 ARS PC Programming Manual 867 ...
Page 879: ...Section 11 9 Private Network PC Programming Manual 879 ...
Page 892: ...892 PC Programming Manual 11 4 9 4 NDSS Key Table ...
Page 893: ...Section 12 10 CO Incoming Call PC Programming Manual 893 ...
Page 922: ...922 PC Programming Manual 12 7 10 5 Miscellaneous ...
Page 923: ...Section 13 11 Maintenance PC Programming Manual 923 ...
Page 961: ...Section 14 Appendix PC Programming Manual 961 ...
Page 974: ...974 PC Programming Manual 14 1 8 KX TDE600 PGMPR Software File Version 4 1xxx ...
Page 975: ...Feature Programming References PC Programming Manual 975 ...


