1.7 Setting the original
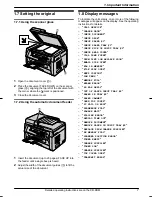
1.7.1 Using the scanner glass
A
B
1
Open the document cover (
A
).
2
Place the document FACE DOWN on the scanner
glass (
B
), aligning the top left of the document with
the corner where the mark is positioned.
3
Close the document cover.
1.7.2 Using the automatic document feeder
A
1
Insert the document (up to 20 pages) FACE UP into
the feeder until a single beep is heard.
2
Adjust the width of the document guides (
A
) to fit the
actual size of the document.
1.8 Display messages
To indicate the unit’s status, one or more of the following
messages will appear on the display. See the operating
instructions for details.
–
“
CALL SERVICE
”
–
“
CHANGE DRUM
”
–
“
CHECK DOCUMENT
”
–
“
CHECK DRUM
”
–
“
CHECK PAPER #1
”
–
“
CHECK PAPER TRAY #1
”
–
“
CHECK PICK UP INPUT TRAY #2
”
–
“
CHECK REAR COVER
”
–
“
COOL DOWN FUSER
”
–
“
DRUM LIFE LOW REPLACE SOON
”
–
“
EMAIL SIZE OVER
”
–
“
FAX IN MEMORY
”
–
“
FILE SIZE OVER
”
–
“
KEEP COPYING
”
–
“
LOW TEMP.
”
–
“
MEMORY FULL
”
–
“
MODEM ERROR
”
–
“
NO FAX REPLY
”
–
“
OUT OF PAPER INPUT TRAY #2
”
–
“
PAPER IN TRAY #2
”
–
“
PAPER JAMMED
”
“
OPEN TOP COVER
”
–
“
PC FAIL OR BUSY
”
–
“
PHONEBOOK FULL
”
–
“
PLEASE WAIT
”
–
“
POLLING ERROR
”
–
“
REDIAL TIME OUT
”
–
“
REMOVE DOCUMENT
”
–
“
REMOVE PAPER IN INPUT TRAY #2
”
–
“
REPLACE DRUM CHANGE SUPPLIES
”
–
“
RX MEMORY FULL
”
–
“
SCANNER POSITION ERROR
”
–
“
TONER EMPTY
”
“
CHANGE SUPPLIES
”
–
“
TONER LOW
”
“
CHANGE SUPPLIES
”
–
“
TOP COVER OPEN
”
–
“
TRANSMIT ERROR
”
Detailed operating instructions are on the CD-ROM.
7
1. Important Information


