background image

15

Receiving faxes 

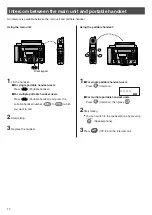
Handset

Receiving a fax manually 
(AUTO ANSWER off)

外 線

ファクス

2

When: –document reception is required, 

–a fax calling tone (slow beep) is heard, or

–no sound is heard,

press 

(Fax).

Using the main unit:

1

When you hear a ring, lift the handset 

to answer the

call.

3

Replace the handset.

The unit will start fax reception.

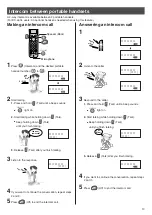
Using the portable handset:

1

When you hear a ring, lift the portable handset from

the charger to answer the call.

If the portable handset is not set on the charger, 

press 

(Talk).

外 線

2

When: –document reception is required, 

–a fax calling tone (slow beep) is heard, or

–no sound is heard,

press 

(Fax reception) until a single beep is heard.

The main unit will start fax reception.

ファクス

You can select beforehand whether to receive faxes by

“Receive in memory”

or 

“Receive on recording

paper”

.

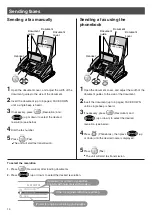
Receive in memory: 

(Default setting)

The received fax will be stored in memory. You can
check the contents on the display, then print them if
necessary.

Receive on recording paper:

The received fax will be printed on recording paper.

Setting/canceling “Receive in
memory”

Dial keypad

ファクスの印刷切替

項目を選んで


決 定  

を押す

受信したファクスの印刷方法を
設定します

見てから印刷

すぐに印刷

画面で内容を確認して
必要なものだけ印刷
できます

メモリー

残 量

フィルム

残 量

ファクス

見てから印刷

メール

着 信

06

11   1

15:30

日( 金 )

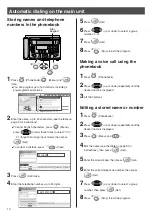
1

Press (Menu) 

and  .

2

Press 

(up or down) to select either

“Receive in memory” or “Receive on recording paper”

and press 

(Set).

3

Press (Stop).

Receive in memory

Receive on recording paper

Summary of Contents for KX-L6CL

Page 1: ...dset 12 Intercom between portable handsets 13 Sending faxes 14 Receiving faxes 15 Operating the built in answering device 19 L mode service 20 Specifications 27 Thank you for purchasing a Panasonic facsimile This guide explains some basic features and operations but not all of them For further details see the Japanese operating instructions This product is designed for use in Japan Panasonic canno...

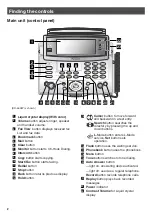
Page 2: ...ck button returns previous display Hold button Flash button uses the waiting service Phonebook button uses the phonebook Menu button Tone button switches to tone dialing Auto Answer button light on answering device activated light off used as a regular telephone Record button records telephone calls Replay button plays back recorded messages Power indicator Contrast Volume for Liquid crystal displ...

Page 3: ...ile talking Fax reception receives faxes Speakerphone button uses the speakerphone Dial buttons Tone button switches to Tone dialing mode Sharp button Off button ends a call or ends exits from editing and other operations Phonebook button uses the phonebook Intercom button pages the main unit or another portable handset Multi operation buttons refer to the function displayed on the bottom of the d...

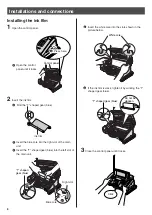
Page 4: ...Insert the blue core into the right slot of the main unit Insert the T shaped gear blue into the left slot of the main unit 3 2 3 T shaped gear blue Blue core Right slot 2 4 White core Do not be slacken T shaped gear blue Click Control panel 2 Press here 1 Open the control panel until it locks 2 If the ink film is slack tighten it by winding the T shaped gear blue 5 3Close the control panel until ...

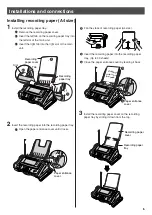
Page 5: ...over on the recording paper tray by sliding it down from the top Recording paper cover Recording paper tray 1 2 3 Tab Slot Paper entrance cover Printing side is on the back Paper entrance cover 3 4 Recording paper tray Recording paper cover Fan the stack of recording paper A4 size 2 2Insert the recording paper into the recording paper tray Open the paper entrance cover until it locks 1 Insert the ...

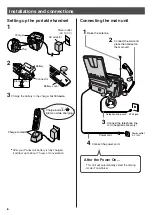
Page 6: ...tting up the portable handset 1 2 After your Panasonic battery is fully charged it will last up to about 7 hours of conversation Click Click Click 電話機 停電用 電話回線へ 回線 1Raise the antenna 2 Connect the cord and place the handset on the main unit 3 Connect the telephone line cord Supplied accessory Wall jack Power cord Power outlet AC 100V Telephone line cord 4 Connect the power cord After the Power On ...

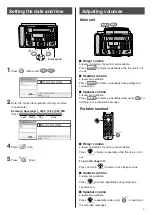
Page 7: ...t is not in use Handset volume 4 levels are available Press Volume repeatedly during telephone conversation Speaker volume 4 levels are available Press Volume repeatedly while using or listening to the recorded messages Ringer volume 4 levels including off position are available Press Volume repeatedly while the unit is not in use To turn the ringer off Press and hold Volume until a beep sounds Ha...

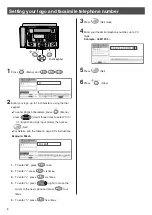
Page 8: ...press down three times to select 半角 英字 English and sign input mode then press Set For details see the table on page 9 for instructions 3Press Set twice タ イヤルホ タンで入力 あ行 か行 入力が完了したら 決定 を押す 文字切替は メニューを押す かな漢字 名 前 を 入 力 す る あなたの名前と 電話番号 変換は 押す 確定は 決定 押す タ イヤルホ タンで入力 ABC DEF 入力が完了したら 決定 を押す 文字切替は メニューを押す 半角英字 名 前 を 入 力 す る Micah あなたの名前と 電話番号 1 To enter M press once 2 To enter i press six times 3 To ent...

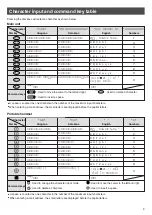
Page 9: ...er in the number of the maximum input characters When entering e mail address the small letters are displayed before the capital letters かな Hiragana 英 English カナ Katakana 数 Numbers ー ワヲンー あいうえおぁぃぅぇぉ かきくけこ さしすせそ たちつてとっ なにぬねの はひふへほ まみむめも やゆよゃゅょ らりるれろ わをんー アイウエオァィゥェォ ー D E F d e f G H I g h i J K L j k l M N O m n o P Q R S p q r s T U V t u v W X Y Z w x y z カキクケコ サシスセソ タチツテトッ ナニヌネノ ハヒフヘホ マミムメモ ヤユヨャ...

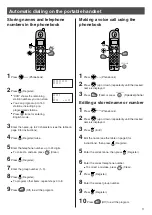
Page 10: ...4Edit the name see the table on page 9 for instructions then press Set 5Enter the correct kana then press Set 7Press up or down to select a group number then press Set Dial keypad 1Press Phonebook 1Press Phonebook 1Press Phonebook Menu and Set You can program up to 150 stations including 4 pre programmed stations 3Press Set twice 6Enter the correct telephone number then press Set 8Press Stop to ex...

Page 11: ...24 digits To correct a mistake press Clear クリアー 内線 6Press Register 登録 7Enter the group number 1 9 8Press Register To program other items repeat steps 3 to 8 登録 9Press Off to exit the program 切 Editing a stored name or number 3Press Edit 修正 4Edit the name see the table on page 9 for instructions then press Register 登録 5Enter the correct kana then press Register 登録 6Enter the correct telephone numbe...

Page 12: ...lking You can switch to the speakerphone by pressing Speakerphone スピーカーホン 3Press Off to end the intercom call 切 内 線 呼 出 1Lift the handset For single portable handset users Press Portable handset For multiple portable handset users Press Portable handset and press the portable handset number to which you want to call 1 For single portable handset users Press Intercom For multiple portable handset u...

Page 13: ...rcom call 切 1 2Listen to the caller 3Listen to the response 3Respond to the caller 1 Press and hold Talk until a beep sounds light on 2 Start talking while holding down Talk Keep holding down Talk until you finish talking 3 Release Talk after you finish talking ト ー ク ー ト ー ク ー ト ー ク ー スピーカーホン ト ー ク ー 子 機 間 通 話 子 機 間 呼 出 2Start talking 1 Press and hold Talk until a beep sounds light on 2 Start talk...

Page 14: ...ng the phonebook 1Open the document cover and adjust the width of the document guides to the size of the document 2Insert the document up to 5 pages FACE DOWN until a single beep is heard 3If necessary press Resolution and up or down to select the desired resolution see below 5Press Fax The unit will start fax transmission To select the resolution 1 Press Resolution after loading documents 2 Press...

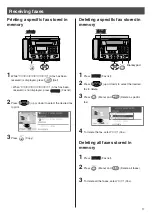
Page 15: ...rd press Fax reception until a single beep is heard The main unit will start fax reception ファクス You can select beforehand whether to receive faxes by Receive in memory or Receive on recording paper Receive in memory Default setting The received fax will be stored in memory You can check the contents on the display then print them if necessary Receive on recording paper The received fax will be pri...
Page 16: ...マツシタタロウ 02 11 1 21 00 05ページ 02 11 1 18 59 スス キヒロシ 未読 2件 コピー を押すと印刷できます shows the fax has not been viewed yet 操作 印刷 は メニュー を押す 画面の移動 は を押す 01 01ページ 3Press Set to see the fax follow the instructions on the right Up Down Right Left 1 Press Menu and 2 Press up or down to select the desired size and Set この犬を 探しています 1 Press Menu and 2 Press up or down to select the desired angle and Set To view the next...

Page 17: ...ファクスを受信しました A fax has been received is not displayed press Fax list 2Press up or down to select the desired fax to print 3Press Copy ファクス一覧 ファクス表示 は 決 定 を押す 印刷 削除 は メニュー を押す 0312345678 1 5 02 11 3 15 30 01ページ マツシタタロウ 02 11 1 21 00 05ページ 02 11 1 18 59 スス キヒロシ 未読 2件 コピー を押すと印刷できます ファクス一覧 項目を選んで 決 定 を押す 0312345678 1 5 02 11 3 15 30 01ページ マツシタタロウ 02 11 1 21 00 05ページ 02 11 1 18 59 スス キヒロシ 消去する 全て消去する 印...

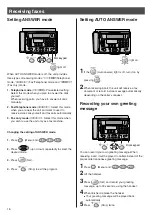
Page 18: ...provides three types of receiving modes 電話モード Telephone mode ファクス優先 Fax Telephone mode and ファクス専用 Fax only mode 1 Telephone mode 電話モード Pre selected setting Select this mode when you plan to answer the calls yourself When receiving calls you have to answer all calls manually 2 Fax Telephone mode ファクス優先 Select this mode when you are near the unit and want to use it to receive voice calls yourself ...

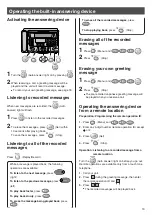
Page 19: ...ng the remote operation ID 1 Press Menu and 2 Enter any 4 digit number remote operation ID except or 3 Press Set 4 Press Stop Operation Listening to a recorded message from a remote location Turn the Auto answer light on before you go out Remote operations are available only from a touch tone telephone 1 Call your unit 2 Press during the greeting message then enter the remote operation ID and 3 Pr...

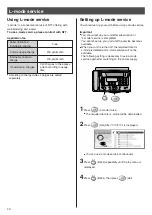
Page 20: ...e Important You should set up your unit after subscription of L mode service is completed You cannot set up your unit until the service becomes available When your unit is turned off the required data for L mode is deleted and L mode service will not be available The following setting is necessary to use L mode service again after switching on the power supply According to charged sites charges ar...

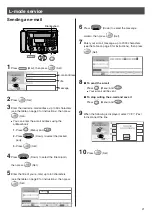
Page 21: ...e mail Press Menu and Your e mail will be sent To stop writing the e mail and save it Press Menu and 9When the following is displayed select はい Yes to disconnect the line 10Press Set Dial keypad 6Press Down to select the message column then press Set 7Enter your e mail message up to 2000 characters see the table on page 9 for instructions then press Set 項目を選んで 決定 を押す メール作成 題名 宛先 本文 送信 保存は メニュー を押す...

Page 22: ...elect the group number then press Set 7Press Stop to exit the program Editing deleting a stored e mail address Dial keypad 1Press Phonebook 2Press up or down repeatedly until the desired name is displayed 3Press Menu and 4Press Set twice 5Press Menu To edit the party Press Clear and edit the name see the table on page 9 for instructions To delete the party Press Clear 6Press Set twice 7Press Stop ...

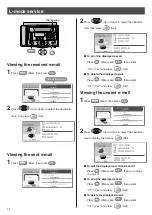
Page 23: ...le on page 9 for instructions then press Set 3 If necessary edit the title and add your message Operate the steps 4 7 on page 21 4 Press Menu and 5 Select はい Yes then press Set Dial keypad 項目を選んで 決定 を押す メールを受信する 受信メールの一覧 送信済メールの一覧 未送信メールの一覧 定型文の編集 新規メールを作成 メールメニュー 受信中 001 002 中断 00 00 15 項目を選んで 決定 を押す メールを受信する 受信メールの一覧 送信済メールの一覧 未送信メールの一覧 定型文の編集 新規メールを作成 メールメニュー 受信完了 切断しますか はい いいえ 00 00 30 全文表示 は ...

Page 24: ...い Yes and press Set To delete the displayed e mail Press Menu and then select はい Yes and press Set Viewing the unsent e mail 1Press Mail then press 全文表示 は 決定 を押す 受信メール 001 005 削除操作 は メニュー を押す 予約とれたよ 来週日曜 yurika ocn suzuki ocn suzuki ocn matsushita ocn 21 00 お礼 15 30 予約の件 11 1 遊びに行きましょう 11 1 こんにちは 操作 印刷は メニュー を押す 予約とれたよ 来週日曜 11 2 15 30 matsushita ocn お礼 受信メール 全文表示 は 決定 を押す 送信済メール 001 005 削除操作 は メニュ...

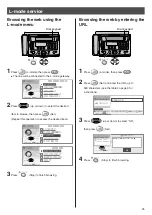
Page 25: ...n press 2Press Set and enter the URL up to 500 characters see the table on page 9 for instructions 3Press up or down to select OK then press Set Dial keypad 4Press Stop to finish browsing Lメニューリスト 選べるメニューリスト 天気予報 今日の チェック メインメニュー 00 00 30 タウンページ 操作 印刷は メニュー を押す 選べるメニューリスト 天気予報 今日の チェック メインメニュー 00 00 45 タウンページ 操作 印刷は メニュー を押す Lメニューリスト 次メール アドレス入力検索 入力が完了したら 決定 を押す 文字切替は メニューを押す ダイヤルボタンで入力 abc def 半...

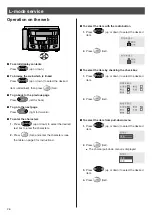
Page 26: ... to select the desired text box to enter the characters 2 Press Set and enter the characters see the table on page 9 for instructions To select the item with the radio button 1 Press up or down to select the desired item 2 Press Set To select the item by checking the check box 1 Press up or down to select the desired item 2 Press Set To select the item from pull down menu 1 Press up or down to sel...

Page 27: ...Error correction method 1 When copying a 100 black document 2 Transmission speed is based on an A4 size document sent in standard resolution at 9 600 bps The actual transmission speed depends upon the contents of the page resolution telephone line conditions and capability of the other party s machine 3 The memory capacity is based on an A4 size document of 700 characters 4 If there is a silent pa...

Page 28: ...PFQX1816ZA FK1202EK0 Kyushu Matsushita Electric Co Ltd 2002 ...

Reviews: