background image

4

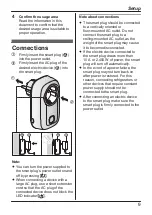
Confirm the usage area

Read the information in this
document to confirm that the
desired usage area is suitable to
proper operation.

Connections

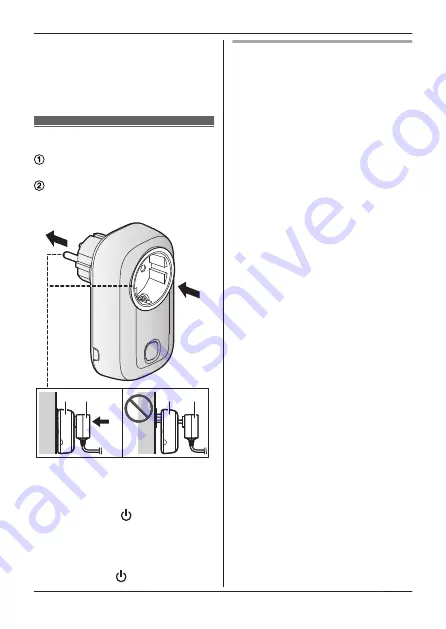
Firmly insert the smart plug (

1

)

into the power outlet.
Firmly insert the AC plug of the
desired electric device (

2

) into

the smart plug.

A

B

1 2

1

2

Note:

R

You can turn the power supplied to
the smart plug’s power outlet on and
off by pressing 

M N

.

R

When connecting a device with a
large AC plug, use a short extension
cord so that the AC plug of the
connected device does not block the
LED indicator/

M N

.

Note about connections

R

The smart plug should be connected
to a vertically oriented or
floor-mounted AC outlet. Do not
connect the smart plug to a
ceiling-mounted AC outlet, as the
weight of the smart plug may cause
it to become disconnected.

R

If the electric device connected to
the smart plug draws more than
10 A or 2,400 W of power, the smart
plug will turn off automatically.

R

In the event of a power failure, the
smart plug may not turn back on
after power is restored. For this
reason, connecting refrigerators or
other devices that require constant
power supply should not be
connected to the smart plug.

R

After connecting an electric device
to the smart plug, make sure the
smart plug is firmly connected to the
power outlet.

9

Setup

Summary of Contents for KX-HNA101FX

Page 1: ...101FX Thank you for purchasing a Panasonic product This document explains how to install the smart plug properly For details about how to use the system refer to the User s Guide page 11 Please read this document before using the unit and save it for future reference ...

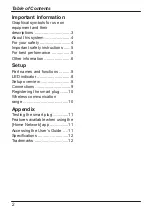
Page 2: ... For best performance 5 Other information 6 Setup Part names and functions 8 LED indicator 8 Setup overview 8 Connections 9 Registering the smart plug 10 Wireless communication range 10 Appendix Testing the smart plug 11 Features available when using the Home Network app 11 Accessing the User s Guide 11 Specifications 12 Trademarks 12 2 Table of Contents ...

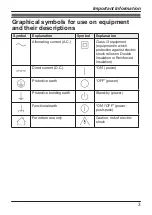
Page 3: ...s P equipment equipment in which protection against electric shock relies on Double Insulation or Reinforced Insulation Direct current D C ON power Protective earth OFF power Protective bonding earth Stand by power Functional earth ON OFF power push push For indoor use only Caution risk of electric shock 3 Important Information ...

Page 4: ...Accumulated dust may cause an insulation defect from moisture etc resulting in a fire R Unplug the product from power outlets if it emits smoke an abnormal smell or makes an unusual noise These conditions can cause fire or electric shock Confirm that smoke has stopped emitting and contact an authorised service centre R Unplug from power outlets and never touch the inside of the product if its casi...

Page 5: ...nufacturer of any personal medical devices such as pacemakers or hearing aids to determine if they are adequately shielded from external RF radio frequency energy DECT features operate between 1 88 GHz and 1 90 GHz with a peak transmission power of 250 mW R Do not use the product in health care facilities if any regulations posted in the area instruct you not to do so Hospitals or health care faci...

Page 6: ...heat sources such as radiators cookers etc It should not be placed in rooms where the temperature is less than 0 C or greater than 40 C Damp basements should also be avoided R Operating the product near electrical appliances may cause interference Move away from the electrical appliances Other information Routine care R Wipe the outer surface of the product with a soft dry cloth R Do not use benzi...

Page 7: ... your dealer or supplier for further information Information on Disposal in other Countries outside the European Union This symbol is only valid in the European Union If you wish to discard these items please contact your local authorities or dealer and ask for the correct method of disposal 7 Important Information ...

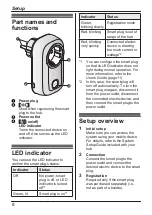
Page 8: ...current or wattage 2 1 You can configure the smart plug so that its LED indicator does not light during normal operation For more information refer to the User s Guide page 11 2 In this case the smart plug will turn off automatically To turn the smart plug on again disconnect it from the power outlet disconnect the connected electric device and then connect the smart plug to the power outlet Setup...

Page 9: ...r M N Note about connections R The smart plug should be connected to a vertically oriented or floor mounted AC outlet Do not connect the smart plug to a ceiling mounted AC outlet as the weight of the smart plug may cause it to become disconnected R If the electric device connected to the smart plug draws more than 10 A or 2 400 W of power the smart plug will turn off automatically R In the event o...

Page 10: ...g again R If registration fails the hub sounds several short beeps Using the app When you register the smart plug by using the Home Network app you can assign a name to your devices and group them by location For more information refer to the User s Guide page 11 Wireless communication range The wireless communication range of each device in the system from the hub is approximately 50 m indoors an...

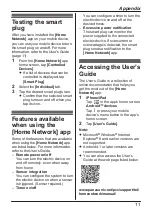
Page 11: ...or integration You can configure the system to turn the electric device on when a sensor is triggered Sensor required Timer on off You can configure a timer to turn the electric device on and off at the desired times Excessive power notification The smart plug can monitor the power supplied to the connected electric device If overcurrent or overwattage is detected the smart plug sends a notificati...

Page 12: ...excluding the pins R Mass weight Approx 174 g 1 The IP rating indicates the product s ingress protection This product is not designed to be waterproof Note R Design and specifications are subject to change without notice R The illustrations in these instructions may vary slightly from the actual product Trademarks R iPhone and iPad are trademarks of Apple Inc registered in the U S and other countr...

Page 13: ...13 Notes ...

Page 14: ...14 Notes ...

Page 15: ...15 Notes ...

Page 16: ... a record of the following information to assist with any repair under warranty Serial No Date of purchase found on the rear of the unit Name and address of dealer Attach your purchase receipt here Panasonic Corporation 2016 PNQP1278XA CC0216WK2126 ...

Reviews: