background image

4. Telephone

17

4.4.1

S

ymbols and operations for caller 

information

What “

,

” means

,

” on the display means the call has already been 

viewed or answered.

If the same person calls more than once

The number of times the same caller called (“

k

2

” to 

k

9

”) will be displayed. Only the date and time of the 

most recent call will be stored.

Example: The same person called 3 times.

SAM LEE

10:30

20 Jul.

k

3

Display while viewin

g

L

When the unit could not receive a name, the display 
will show 

NO NAME RCVD

.

L

When no calls have been received, the display will 
show 

NO ITEMS STORED

.

To stop viewin

g

Press 

{

S

TOP

}

.

4.5 Editin

g

 a caller’s telephone 

number before callin

g

 back

1

Press 

{

CALLER ID

}

.

2

Press 

{A}

 or 

{B}

 repeatedly to display the desired 

item.

3

Press 

{

CALLER ID

}

 to display the telephone 

number.

4

To insert a number in front of the telephone number, 
press the desired dial key (

{

0

}

 to 

{

9

}

).

L

You can also initiate the editing mode by pressing 

{*}

.

5

Lift the handset or press 

{

MONITOR

}

 (KX-FT9

8

2)/ 

{

DIGITAL 

S

P-PHONE

}

 (KX-FT9

88

) to call back the 

edited number.

L

The unit will start dialling automatically.

L

To send a fax, insert the document FACE DOWN 
and press 

{

FAX/

S

TART

}

.

Note:

L

The edited telephone number will not be saved as 
caller information. To store it into the phonebook, see 
page 1

8

.

To correct a mistake

1.

Press 

{

<

}

 or 

{

>

}

 to move the cursor to the incorrect 

number.

2.

Press 

{

S

TOP

}

 to delete the number.

3.

Enter the correct number.

To delete a number

Press 

{

<

}

 or 

{

>

}

 to move the cursor to the number you 

want to delete and press 

{

S

TOP

}

.

To insert a number

1.

Press 

{

<

}

 or 

{

>

}

 to move the cursor to the position 

to the right of where you want to insert the number.

2.

Enter the number.

{

STOP

}

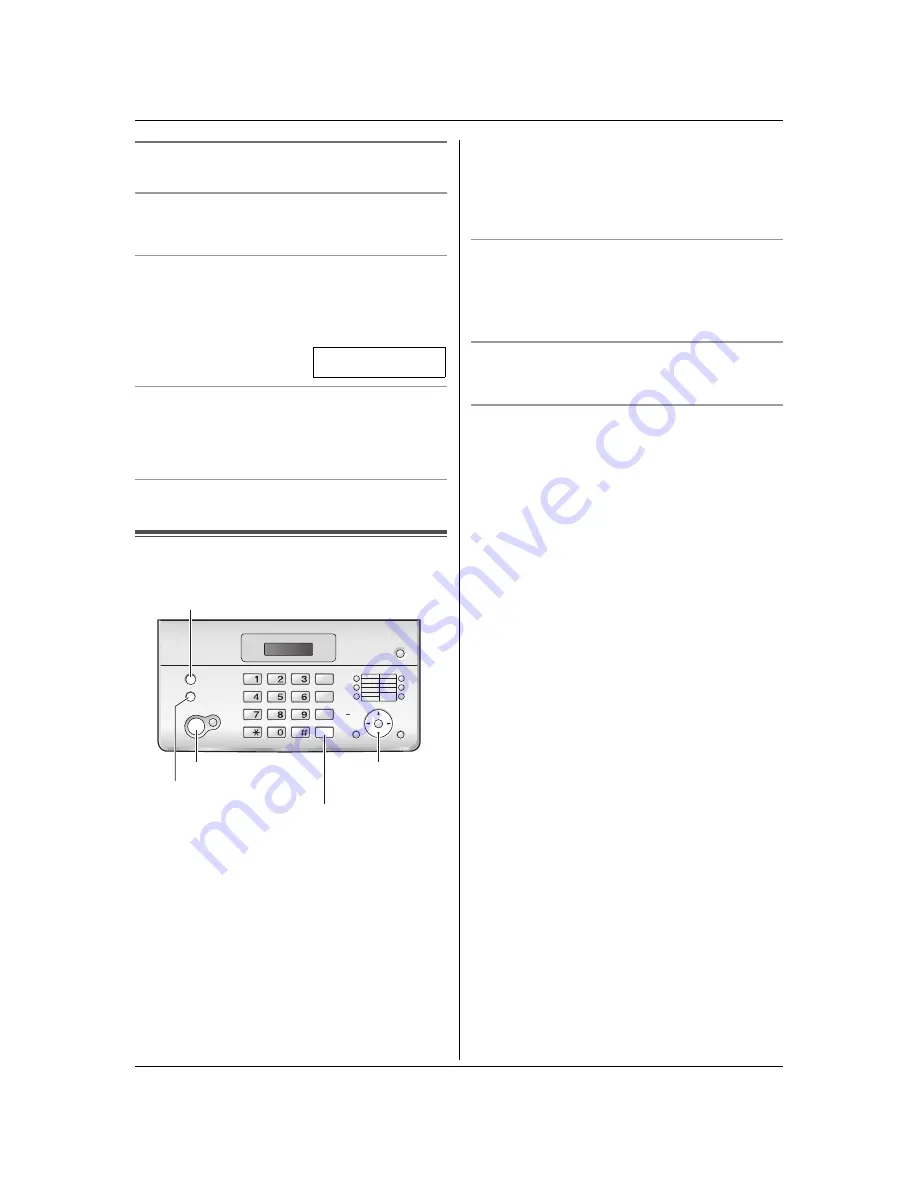
{A}{B}{

<

}{

>

}

{

CALLER ID

}

{

FAX/START

}

{

DIGITAL SP-PHONE

}

{

MONITOR

}

 (KX-FT982)

 (KX-FT988)

Summary of Contents for KX-FT988FX

Page 1: ...ce This unit is compatible with Caller ID You must subscribe to the appropriate service of your service provider telephone company To use in Czech and Slovakia change the location setting feature 74 on page 35 Operating Instructions Facsimile with Digital Answering System Model No KX FT988FX Personal Facsimile Model No KX FT982FX KX FT988 ...

Page 2: ...ne number before calling back 17 4 6 Erasing caller information 18 4 7 Storing caller information into the phonebook one touch dial 18 5 Fax Sending Faxes 5 1 Sending a fax manually 20 5 2 Documents you can send 20 5 3 Sending a fax using the phonebook one touch dial 21 5 4 Broadcast transmission 22 Receiving Faxes 5 5 Selecting the way to use your fax machine 23 5 6 Receiving a fax manually Auto ...

Page 3: ...g 44 Cleaning 10 3 Document feeder scanner glass cleaning 45 10 4 Thermal head cleaning 45 11 General Information Printed Reports 11 1 Reference lists and reports 46 Specifications 11 2 Specifications 47 Useful information 11 3 Character entry 48 11 4 Useful information 49 12 Index 12 1 Index 50 ...

Page 4: ... operate this product the power outlet should be near the product and easily accessible L Be sure to use the telephone line cord included in this unit L Do not extend the telephone line cord L Keep the unit away from walls as far as possible to prevent a recording paper jam Note L Before you can make calls the dialling mode setting may need to be changed page 11 1 Telephone line cord 2 Handset 3 H...

Page 5: ...n both sides 6 For KX FT982 Press FAX START then tear off the excess paper by pulling it towards you For KX FT988 Press FAX START to cut the paper Correct Incorrect 1 1 1 Note L If the paper is secured with glue or tape cut approximately 15 cm from the beginning of the roll before installing it L When the power cord is connected a message is printed each time the top cover is opened then closed If...

Page 6: ...e 24 L You can select how you want the unit to receive calls according to your needs page 23 1 7 Answering machine KX FT988 only 1 7 1 Recording your own greeting message 1 Press RECORD 2 Press SET 3 Speak clearly about 20 cm away from MIC for up to 16 seconds 4 To stop recording press STOP L For further details see page 29 1 7 2 Listening to recorded messages The display will show the total numbe...

Page 7: ...If the unit has been exposed to rain or water D If the unit does not work normally by following the operating instructions Adjust only controls covered by the operating instructions Improper adjustment may require extensive work by an authorised service centre E If the unit has been dropped or physically damaged F If the unit exhibits a distinct change in performance 14 During thunderstorms avoid ...

Page 8: ...ation on Disposal in other Countries outside the European Union This symbol is only valid in the European Union If you wish to discard this product please contact your local authorities or dealer and ask for the correct method of disposal 2 3 For best performance Environment L Keep the unit away from electrical noise generating devices such as fluorescent lamps and motors L The unit should be kept...

Page 9: ...CALLER I CALLER ID STO STOP HANDSET HANDSET MUT MUTE A J K N O I S U R C D B H T KX FT982 M Q MONI MONITOR OR REDIAL REDIAL PAUSE PAUSE 1 6 2 7 3 8 4 9 5 10 10 R COPY COPY MENU MENU PHONEBOOK PHONEBOOK BRO ROADCAST ADCAST TON TONE VOLUM VOLUME CALLER I CALLER ID STO STOP MUT MUTE MI MIC REDIAL REDIAL PAUSE PAUSE A J K N P M F G I S U R C D E B H T L KX FT988 Q ...

Page 10: ...age 28 L MIC KX FT988 only L The built in microphone M TONE L To change from pulse to tone temporarily during dialling when your line has rotary pulse services N HANDSET MUTE KX FT982 only MUTE KX FT988 only L To mute your voice to the other party during a conversation Press this button again to resume the conversation O MONITOR KX FT982 only L To initiate dialling without lifting the handset P DI...

Page 11: ...e dial service select TONE default For rotary pulse dial service select PULSE 1 Press MENU SYSTEM SETUP PRESS 2 Press or repeatedly to display the following DIAL MODE TONE 3 Press A or B repeatedly to display the desired setting 4 Press SET L The next feature will be displayed 5 Press MENU 3 5 Date and time You must set the date and time L The other party s fax machine will print the date and time...

Page 12: ... of each page sent from your unit The logo can be your name or the name of your company 1 Press MENU SYSTEM SETUP PRESS 2 Press or repeatedly to display the following YOUR LOGO PRESS SET 3 Press SET L The cursor will appear on the display LOGO ABC 4 Enter your logo up to 30 characters see page 48 for character entry L To enter a hyphen press R L To insert a space press HANDSET MUTE KX FT982 MUTE K...

Page 13: ... the display NO 4 Enter your fax number up to 20 digits Example NO 1234567 5 Press SET L The next feature will be displayed 6 Press MENU Note L The button enters a and the button enters a space Example 234 5678 Press 2 3 4 5 6 7 8 L To enter a hyphen in a telephone number press R To correct a mistake 1 Press or to move the cursor to the incorrect number 2 Press STOP L To erase all numbers press an...

Page 14: ...t or press MONITOR KX FT982 DIGITAL SP PHONE KX FT988 L The unit will start dialling automatically To search for a name by initial Example LISA 1 Press 2 Press A or B to enter the phonebook 3 Press 5 repeatedly to display any name with the initial L see the character table page 48 L To search for symbols not letters or numbers press 1 4 Press B repeatedly to display LISA L To stop the search press...

Page 15: ...ne numbers for the one touch dial feature page 15 1 Lift the handset or press MONITOR KX FT982 DIGITAL SP PHONE KX FT988 2 Select the desired station key For stations 1 5 Press the desired station key For stations 6 10 Press LOWER then press the desired station key L The unit will start dialling automatically 4 2 3 Editing a stored item 1 Press 2 Press A or B repeatedly to display the desired item...

Page 16: ...ation can be displayed up to 16 digits characters L When caller information is received and it matches a telephone number stored in the unit s phonebook the stored name will be displayed L If the unit is connected to a PBX Private Branch Exchange system caller information may not be received properly Consult your PBX supplier L If the unit cannot receive caller information the following will be di...

Page 17: ...lay the telephone number 4 To insert a number in front of the telephone number press the desired dial key 0 to 9 L You can also initiate the editing mode by pressing 5 Lift the handset or press MONITOR KX FT982 DIGITAL SP PHONE KX FT988 to call back the edited number L The unit will start dialling automatically L To send a fax insert the document FACE DOWN and press FAX START Note L The edited tel...

Page 18: ...er information KX FT988 only 1 Press CALLER ID 2 Press A or B repeatedly to display the desired item 3 Press ERASE L To erase other items repeat steps 2 to 3 4 Press STOP 4 7 Storing caller information into the phonebook one touch dial Important L This feature is not available if the caller information does not include a telephone number 4 7 1 Into the phonebook 1 Press CALLER ID 2 Press A or B re...

Page 19: ... Press LOWER then press the desired station key L If you do not need to edit the name skip to step 6 5 If a name is required enter up to 16 characters for the name page 48 6 Press SET L If the number requires editing see page 17 7 Press SET Note L You can confirm the stored items in the one touch dial by printing the telephone number list page 46 L To edit a name see page 14 SET MENU LOWER Station...

Page 20: ... PHOTO settings will increase transmission time L If the resolution setting is changed during feeding it will be effective from the next page To redial the last number 1 Press REDIAL PAUSE 2 Press FAX START L If the line is busy the unit will automatically redial the number up to 5 times L To cancel redialling press STOP To send more than 10 pages at a time Insert the first 10 pages of the documen...

Page 21: ...d names and telephone numbers into the phonebook page 14 or one touch dial page 15 1 Open the document feeder tray 1 then adjust the width of the document guides 2 to fit the actual size of the document 2 Insert the document up to 10 pages FACE DOWN until a single beep is heard and the unit grasps the document L If the document guides are not adjusted to fit the document re adjust them 3 If necess...

Page 22: ...ress 5 Press A or B repeatedly to display the desired item you want to add 6 Press SET L To add other items repeat steps 5 and 6 up to 20 items 7 Press STOP 5 4 3 Erasing a stored item from the broadcast memory 1 Press 2 Press A or B repeatedly to display BROADCAST 3 Press MENU 4 Press 5 Press A or B repeatedly to display the desired item you want to erase L To cancel erasing press STOP 6 Press SE...

Page 23: ...se only as a fax FAX ONLY mode j Use mostly as a telephone TEL mode j Use as a telephone and or fax TEL FAX mode 5 5 1 Use as a telephone answering machine and or fax TAM FAX mode KX FT988 only Your situation You want to answer phone calls using the telephone answering machine and receive faxes automatically Setup Set the fax machine to TAM FAX mode page 25 by pressing AUTO ANSWER repeatedly L The...

Page 24: ...to display the following TEL MODE L The AUTO ANSWER indicator turns OFF How to receive phone calls and faxes 1 Lift the handset to answer the call 2 When j document reception is required j a fax calling tone slow beep is heard or j no sound is heard press FAX START CONNECTING L The unit will start fax reception 3 Replace the handset Note L If you do not answer the call within 10 rings For KX FT982...

Page 25: ...sion telephone if connected to the same line lift the handset and press 0 default auto disconnection code while the fax machine is ringing The auto disconnection code can be changed in feature 49 on page 35 2 If you do not answer the call the unit will activate the fax function L Some fax machines do not generate fax calling tones when sending faxes therefore the unit will try to receive a fax eve...

Page 26: ...messages If you call your unit from outside to listen to new messages page 31 you will know that there are no messages when the unit rings for the 4th time You can then hang up without being charged for the call 5 7 2 Activating FAX ONLY mode 1 Make sure feature 77 is set to FAX ONLY beforehand page 35 KX FT988 only 2 Press AUTO ANSWER repeatedly to display the following FAX ONLY MODE L The AUTO A...

Page 27: ...ish to receive faxes from them 1 Press MENU repeatedly to display JUNK FAX PROH 2 Press repeatedly to display JUNK LIST SET 3 Press SET 4 Press A or B repeatedly to display the item you wish to prevent the fax reception from 5 Press SET 6 Press STOP to exit To display the junk fax prohibitor list 1 Press MENU repeatedly to display JUNK FAX PROH 2 Press repeatedly to display JUNK LIST DISP 3 Press ...

Page 28: ...ying Note L When you copy a multiple page document which is longer than A4 size paper approx 300 mm we recommend you insert one page at a time L Any document which can be sent as a fax can also be copied page 20 L The copied recording paper comes out somewhat longer than the document size To select the resolution Select the desired resolution according to the type of document j FINE For printed or...

Page 29: ...ting message will be played when a call is received To check the greeting message 1 Make sure feature 77 is set to TAM FAX beforehand page 35 2 Press AUTO ANSWER repeatedly to display TAM FAX MODE L The unit will play the TAM FAX greeting message 7 1 1 Erasing your recorded greeting message 1 Set feature 77 to TAM FAX beforehand page 35 2 Press ERASE 2 times 3 Press SET L To cancel erasing press S...

Page 30: ...nutes A maximum of 59 messages can be recorded If messages are recorded in noisy environment the actual recording time may be less To repeat a message Press while listening to the message L If you press within 5 seconds of the beginning of the message the previous message will be played L To play back a specific message press or and search for the message you want to listen to To skip a message Pr...

Page 31: ...in the first 5 seconds of a message the previous message will be played 2 To resume operation press a command key within 10 seconds otherwise the marker message recording will start Recording a marker message After playing back messages you can leave an additional message 1 Wait for 3 beeps indicating the end of the remote operation 2 Hear 1 beep 3 Wait about 10 seconds 4 Hear the voice guide and ...

Page 32: ...d 7 To exit programming press MENU To program by entering the program code number directly You can select a feature by directly entering its program code and a 2 digit number instead of using or 1 Press MENU 2 Press and the 2 digit code page 32 to page 36 3 Press A or B repeatedly to display the desired setting L This step may be slightly different depending on the feature 4 Press SET 5 To exit pr...

Page 33: ... outside calls You can select TONE 1 default TONE 2 or TONE 3 8 3 Advanced features See page 32 for how to enter advanced feature programming Code 22 Setting the journal report to print automatically AUTO JOURNAL ON ON default The unit will print a journal report automatically after every 30 new fax transmissions and receptions page 20 OFF The unit will not print a journal report but will keep a r...

Page 34: ... is too light Code 41 Changing the fax activation code FAX ACTIVATION ON If you wish to use an extension telephone page 24 to receive faxes activate this feature and program the activation code 1 Press MENU 2 Press then 4 1 3 Press A or B repeatedly to select ON 4 Press SET 5 Enter your code 2 to 4 digits using the dial keys 0 9 and L The default code is 9 6 Press SET 7 Press MENU Code 44 Setting ...

Page 35: ...de 72 Setting recall flash time SET FLASH TIME 600ms The recall flash time depends on your telephone exchange or host PBX You can select 900ms 700ms 600ms default 400ms 300ms 250ms 200ms 160ms 110ms 100ms 90ms or 80ms Note L If the unit is connected via a PBX this setting may need to be changed in order for PBX functions transferring a call etc to work correctly Consult your PBX supplier for the c...

Page 36: ...esired direct command to display the desired setting L This step may be slightly different depending on the feature 4 Press SET 5 To exit programming press MENU 8 4 1 Program code and direct command button 0 1 Date and time L Enter the date and time using the dial keypad See page 11 for details 0 2 Your logo L Enter your logo using the dial keypad See page 12 for details 0 3 Your fax number L Ente...

Page 37: ...fault j 2 CZECH j 3 SLOVAK 4 9 Auto disconnection j 0 OFF j 1 ON default 5 4 Greeting recording time KX FT988 only j 1 16s default j 2 60s 5 8 Scan contrast j 1 NORMAL default j 2 LIGHT j 3 DARKER 5 9 Print contrast j 1 NORMAL default j 2 DARKER 6 7 Incoming message monitor KX FT988 only j 0 OFF j 1 ON default 7 2 Recall flash time j 1 900ms j 2 700ms j 3 600ms default for EAST EUROPE j 4 400ms j ...

Page 38: ... rejected fax reception MEMORY FULL L The memory is full of received documents due to a lack of recording paper or a recording paper jam Install paper page 5 or clear the jammed paper page 44 NO DOCUMENT L The document was not fed into the unit properly Re insert it and try again OTHER FAX NOT RESPONDING L The other party s fax machine is busy or has run out of recording paper Try again L The othe...

Page 39: ...emory available to record voice messages Erase unnecessary messages page 30 MODEM ERROR L There is something wrong with the unit s modem Contact our service personnel NO FAX REPLY L The other party s fax machine is busy or has run out of recording paper Try again PAPER JAMMED CHECK STACKER 1 L A recording paper jam occurred Clear the jammed paper page 44 1 Make sure the paper stacker is inserted p...

Page 40: ...ling mode setting may be wrong Change the setting feature 13 on page 11 The unit does not ring L The ringer volume is turned OFF Adjust it page 11 Problem Cause Solution The other party complains they only hear a fax tone and cannot talk L FAX ONLY mode is set Tell the other party the number is only used for faxes L Change the receiving mode j KX FT982 TEL mode page 24 or TEL FAX mode page 25 j KX...

Page 41: ...s white plate or rollers are dirty with correction fluid etc Clean them page 45 Please do not insert a document before correction fluid has dried completely Problem Cause Solution I cannot receive documents L The telephone line cord is connected to the EXT jack on the unit Connect to the LINE jack page 4 L The memory is full of received documents due to a lack of recording paper or a recording pap...

Page 42: ...ect the desired mode L If you want to set TEL mode or TEL FAX mode set the desired mode using feature 73 page 35 and press AUTO ANSWER repeatedly to select the desired mode When an extension telephone is connected I cannot receive documents by pressing 9 L You must set remote fax activation to ON feature 41 on page 34 beforehand L Press 9 firmly L The memory is full of received documents due to a ...

Page 43: ...red set the date and time again page 11 Problem Cause Solution The answering machine is turned ON but caller messages are not recorded L The recording time is set to GREETING ONLY Select 1 MINUTE 2 MINUTES or 3 MINUTES feature 10 on page 33 L The message memory is full Erase unnecessary messages page 30 I cannot retrieve recorded messages from a remote location L Activate the remote operation feat...

Page 44: ...ion 5 Install the recording paper and close the top cover securely by pushing down on both sides see page 5 for details Note L Make sure the paper stacker is inserted page 4 KX FT988 only 10 2 Document jams sending 1 Open the top cover by pressing the top cover release button 1 and remove the jammed document carefully 2 2 Close the top cover securely by pushing down on both sides then press FAX ST...

Page 45: ...one line cord 5 Close the top cover securely by pushing down on both sides then press FAX START 10 4 Thermal head cleaning If smudges or black white lines appear on a copied received document check whether there is dust on the thermal head Clean it to remove the dust 1 Disconnect the power cord and the telephone line cord 2 Open the top cover by pressing the top cover release button 1 and remove t...

Page 46: ...ly after every 30 fax communications feature 22 on page 33 Broadcast programming list provides you with names and numbers which are stored in the broadcast memory page 22 Printer test allows you to check the print quality of your unit If the test print has a smudge or blurred points or lines clean the thermal head page 45 Caller ID list keeps records of the last 30 different callers after subscrib...

Page 47: ... black document Maximum Approx 110 W When copying a 100 black document Power supply 220 V 240 V AC 50 60 Hz Fax memory capacity 3 Approx 28 pages of memory reception Based on the ITU T No 1 Test Chart in standard resolution with original mode Voice memory capacity 4 KX FT988 only Approx 12 minutes of recording time including greeting message when no documents are in memory 1 Transmission speed dep...

Page 48: ...y the cursor Press and hold STOP to erase all characters or numbers Press to switch between uppercase and lowercase To enter another character located on the same dial key press to move the cursor to the next space then press the appropriate dial key 11 3 1 Character entry modes Several character entry modes can be used when entering text The characters that can be entered depend on the entry mode...

Page 49: ...les receipt here Notice for product disposal transfer or return L This product can store your private confidential information To protect your privacy confidentiality we recommend that you erase the information such as phonebook or caller information from the memory before you dispose transfer or return the product Date of purchase Serial number found on the rear of the unit Dealer s name and addr...

Page 50: ...ing setting 36 80 Set default 36 A Accessories 4 Advanced features 33 Auto answer setting 35 Auto Disconnection 35 B Basic features 32 Broadcast transmission 22 C Caller ID 16 Calling back 16 Storing 18 Caller ID list 16 34 46 Caller s recording time 33 Character entry 48 Cleaning 45 Connecting tone 35 Connections 4 Copy 28 D Date and time 11 Delayed transmission 33 Dialling mode 11 33 Display Con...

Page 51: ...ist 16 34 46 Journal 20 33 46 Power down 43 Printer test 46 Sending 20 32 Setup 46 Telephone number 46 Reset 36 40 Resolution 20 28 Ringer tone 33 Ring setting FAX ONLY 32 TAM FAX 33 TEL FAX 35 S Scan contrast 35 Sending faxes Broadcast 22 Manually 20 Phonebook 21 Sending report 20 32 Storing Broadcast 22 One touch dial 15 Phonebook 14 T TAM FAX mode 23 25 TEL FAX mode 24 25 TEL mode 23 24 V Voice...

Page 52: ... for download by visiting http www doc panasonic de Contact to Authorised Representative Panasonic Testing Centre Panasonic Marketing Europe GmbH Winsbergring 15 22525 Hamburg Germany Manufacturer Global web site http panasonic net Copyright L This material is copyrighted by Panasonic System Networks Co Ltd and may be reproduced for internal use only All other reproduction in whole or in part is p...

Reviews: