background image

48

Receiving Faxes

Distinctive ring service

This feature can only be used when you subscribe to a distinctive ring service from your telephone
company. For more information on the availability of this service, contact your telephone company
before activating this feature.

A distinctive ring service will give you up to 3 telephone numbers on a single telephone line, each having a
different ringing pattern.

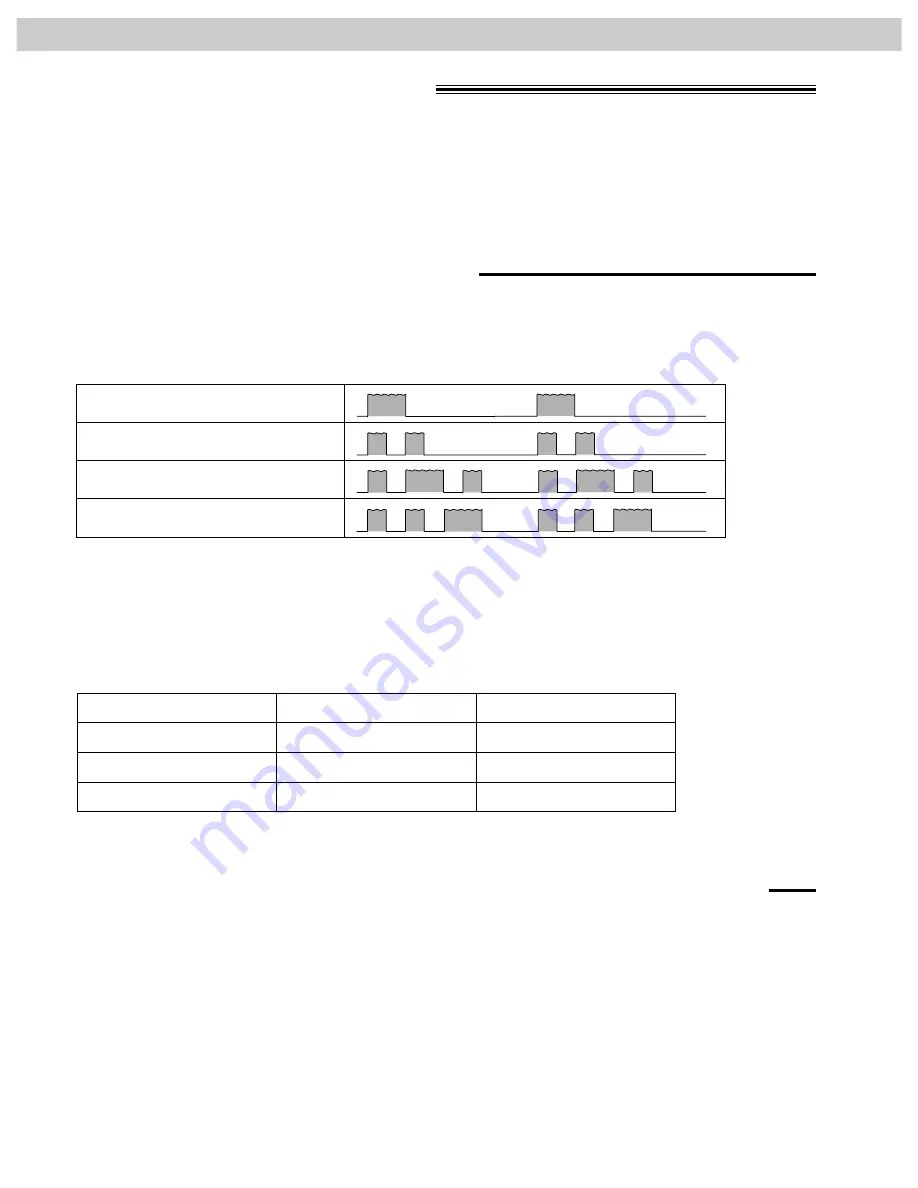
Ring patterns:

What is a distinctive ring service?

When you subscribe to a distinctive ring service, you can assign telephone numbers for personal telephone
numbers, business telephone numbers, fax telephone numbers, and so on.
When a call is received, you will know which number is being called by the ringing pattern.

Example:

Your telephone number

012 1234

012 5678

012 9876

Ring pattern

Standard ring

Double ring

Triple ring

Use

Personal

Business

Facsimile

Standard ring     (one long ring)

Double ring       (two short rings)

Triple ring          (short-long-short rings)

Other triple ring (short-short-long rings)

(ring pattern detection feature)

Program the ring pattern assigned to the facsimile number. 
When the unit detects a call matching the selected distinctive ring pattern, it will activate depending on the
receive mode setting (see the next page).

To use one of the telephone numbers as a facsimile number

Summary of Contents for KX-FT31BX

Page 1: ...ne Fax Copy Help General Information Please read these Operating Instructions before using the unit and save for future reference Personal Facsimile Model No KX FT31BX To get started please read the Quick Start section OPERATING INSTRUCTIONS ...

Page 2: ...onsent of KME and its licensee Kyushu Matsushita Electric Co Ltd 1997 Welcome to the world of Panasonic facsimiles This product combines the facsimile telephone and copier features to provide you with more efficient office or home use By utilizing these convenient features you can maximize the effectiveness of this unit For your future reference Date of purchase Serial number found on the back of ...

Page 3: ...ng or removing covers may expose you to dangerous voltages or other risks Incorrect reassembly can cause electric shock when the unit is subsequently used 13 Unplug this unit from the wall outlet and refer servicing to an authorized servicenter when the following conditions occur A When the power supply cord or plug is damaged or frayed B If liquid has been spilled into the unit C If the unit has ...

Page 4: ...andset 1 pc Handset cord 1 pc Recording paper 1 pc See the next page for replacing the recording paper If any items are missing or damaged check with the place of purchase Save the original carton and packing materials for future shipping and transporting of the unit ...

Page 5: ...re 216 mm x 30 m 8 1 2 x 98 roll with 25 mm 1 core Help function You can print a quick reference for assistance as follows 1 Select which operation you want to print out by pressing repeatedly Pressing one time two times three times four times 2 Press PRINTING START COPY SET 4 RECEIVE MODE 3 FAX OPERATION 2 EASY DIAL 1 HOW TO SET UP HELP HELP HELP START COPY SET Note When you press during programm...

Page 6: ...the EASY DIAL directory 26 Making a voice call using the EASY DIAL directory 29 Voice Contact Talking to the caller after fax transmission or reception 30 Fax Copy Sending Faxes Sending faxes manually 31 Sending faxes using the EASY DIAL directory 32 Documents you can send 33 Printing the transmission report 34 Setting the journal report to print automatically 35 Delayed transmission sending a fax...

Page 7: ... facsimiles 53 Setting the friendly reception 54 Signaling your pager when your unit receives a fax 55 Copying Making a copy 56 Help Error Messages Error messages on printed reports 57 Error messages on the LCD display 58 Operations When a function does not work check here before requesting help 59 If a power failure occurs 61 Jams Clearing a recording paper jam 62 When a document you are sending ...

Page 8: ...the cover by pressing the cover open button Install a recording paper roll Close the cover securely and tear off the excess paper correct incorrect 1 2 4 Pull the leading edge of the paper out of the unit 3 10cm 4 inches For further details see page 17 ...

Page 9: ...e telephone line To the power outlet 220 240 V 1 Connect the handset DIALING MODE PULSE TONE Dialing mode switch Set to TONE If you cannot dial set to PULSE For further details see page 18 You can print a quick reference for assistance see the Help function on page 5 To connect the unit ...

Page 10: ...make a voice call To answer a voice call 1 Lift the handset 2 Dial the number 3 When finished hang up the handset 1 When the unit rings lift the handset 2 When finished hang up the handset For further details see page 24 ...

Page 11: ...cument until a beep tone is heard Adjust the width of the document guides to the size of the document Press When a fax tone is heard press FACE DOWN up to 5 sheets START COPY SET 1 2 3 4 Dial the fax number 5 6 MONITOR For further details see page 31 Quick Start ...

Page 12: ... handset 3 Hang up the handset 2 When document reception is required a fax calling tone slow beep is heard or no sound is heard press START COPY SET For further details see page 40 You can select the desired receive mode according to your needs See pages 38 and 39 ...

Page 13: ...cument feeder tray Insert the document until a beep tone is heard Adjust the width of the document guides to the size of the document Press FACE DOWN up to 5 sheets START COPY SET 1 2 3 4 For further details see page 56 Quick Start ...

Page 14: ...edial the last number dialed p 24 31 Used to insert a pause during dialing p 25 Used as a hookswitch p 25 Used for handset muting p 24 Used as a hyphen key p 27 Used to dial without lifting the handset Used to adjust volumes p 23 Used to select feature settings during programming FLASH REDIAL PAUSE HANDSET MUTE MONITOR VOLUME RINGER HANDSET MONITOR RESOLUTION FAX AUTO RECEIVE W XYZ TUV P Q RS G HI...

Page 15: ...Used to store a parameter during programming Used to search for a stored name p 29 32 Used to select characters during programming p 21 27 Used to select the basic features during programming p 68 Used to print a quick reference p 5 Used to confirm a stored telephone number p 29 Used to initiate or exit programming DIRECTORY EDIT MENU HELP NAME TEL NO STOP START COPY SET SEARCH Finding the Control...

Page 16: ...16 Finding the Controls Overview Document feeder tray Document entrance Document exit Document guide s Cover open button ...

Page 17: ...inted Install the paper correctly 1 Open the cover by pressing the cover open button and install the recording paper roll If the paper is secured with glue or tape cut approximately 15 cm 6 inches from the beginning 2 Pull the leading edge of the paper approximately 10 cm 4 inches out of the unit Make sure that the shiny side of the paper is facing down and there is no slack 3 Close the cover secu...

Page 18: ...20 240 V Handset cord Connections Dialing mode switch Set to TONE If you cannot dial set to PULSE DIALING MODE PULSE TONE Note When you operate this product the power outlet should be near the product and easily accessible 1 Connect the handset cord 2 Connect the telephone line cord 3 Connect the power cord ...

Page 19: ...PM Example 3 15PM 1 Press 2 Press until PM is displayed 7 Press 8 Press MENU SETUP ITEM START COPY SET TIME 03 15PM TIME 03 15AM 1 5 0 3 TIME 12 00AM START COPY SET M 08 D 10 Y 98 0 0 1 8 8 9 M 01 D 01 Y 98 START COPY SET SET DATE TIME 0 1 1 SYSTEM SET UP MENU Note The key can be used to select AM or PM wherever the cursor is located The accuracy of the clock will be approximately 60 seconds a mon...

Page 20: ... 2 LOGO START COPY SET YOUR LOGO 0 2 1 SYSTEM SET UP MENU The logo can be your company division or personal name 1 2 3 4 5 6 7 8 9 0 Dial keypad MENU STOP START COPY SET AUTO RECEIVE To insert a character 1 Press or to move the cursor to the position to the right of where you want to insert the character 2 Press to insert a space and enter the character AUTO RECEIVE To correct a mistake Press or t...

Page 21: ... w x y z 9 0 Selecting characters with the dial keypad Pressing the dial keys will select a character as shown below Instead of pressing the dial keys you can select characters using the EASY DIAL 1 Rotate until the desired character is displayed 2 Press to move the cursor to the next space The character displayed in step 1 is inserted 3 Return to step 1 to enter the next character Display order o...

Page 22: ...EL NO 0 3 1 SYSTEM SET UP MENU 1 2 3 4 5 6 7 8 9 0 Dial keypad MENU STOP START COPY SET To correct a mistake Press or to move the cursor to the incorrect number then make the correction To delete a number Move the cursor to the number you want to delete and press STOP Note The button inserts a space and the button a Example 234 5678 Press 2 4 6 7 8 3 5 Setting your facsimile telephone number ...

Page 23: ...ack on press n While the ringer volume is set to off The display will show the following message When receiving a call the unit will not ring but will display the following Handset receiver volume 5 levels high to low are available Press or while using the handset Monitor speaker volume 8 levels high to low are available Press or while using the monitor INCOMING CALL RINGER OFF START COPY SET YES ...

Page 24: ...L MONITOR To redial the last number 1 Press or lift the handset 2 Press If the line is busy when using the button the unit will automatically redial the number up to 14 times While waiting for redial the following will be displayed WAITING REDIAL MONITOR REDIAL PAUSE MONITOR Muting your voice to the other party 1 Press during a telephone conversation with the handset Display The other party cannot...

Page 25: ...iting For further details contact your host exchange supplier or local telephone company FLASH FLASH FLASH Note TONE FLASH and PAUSE can be stored into a telephone number in the EASY DIAL directory Example 1 When your unit is connected to a host exchange insert a pause before the telephone number to get an outside line 9 PAUSE Line access code Telephone number Example 2 If a transmission error occ...

Page 26: ...pid access to frequently dialed numbers Note To confirm the stored names and telephone numbers print a telephone number list see page 65 You can store items during a telephone conversation After 95 items are stored the following message will be displayed in step 5 By rotating to the right stored items can be displayed The order is as follows alphabet number symbol and telephone number when a name ...

Page 27: ... r s 7 T U V t u v 8 W X Y Z w x y z 9 0 Pressing the dial keys will select a character as shown below Selecting characters with the dial keypad Instead of pressing the dial keys you can select characters using the EASY DIAL 1 Rotate until the desired character is displayed 2 Press to move the cursor to the next space The character displayed in step 1 is inserted 3 Return to the step 1 to enter th...

Page 28: ...or further details see page 26 7 Press REGISTERED START COPY SET NO 0123456 START COPY SET NAME margot EDIT DELETE DIRECTORY EDIT margot EASY DIAL DIRECTORY EDIT EASY DIAL Dial keypad START COPY SET 1 Rotate until the desired name is displayed Example 2 Press 3 Press to select DELETE If you do not want to erase the item press 4 Press The stored name and number are deleted DELETED START COPY SET ST...

Page 29: ...ntil any name is displayed Example 2 Press repeatedly until any name with the initial L is displayed see the character table on page 27 3 Rotate to the right until Lisa is displayed To stop the operation press 4 Press or lift the handset and the unit will automatically dial the number MONITOR STOP Lisa EASY DIAL Laban 5 Alain EASY DIAL Confirming a stored telephone number 1 Rotate until the desire...

Page 30: ...ting voice contact 1 Press while transmitting or receiving documents Display Your unit will call the other party with a distinctive ring When the other party answers your unit will emit a distinctive ring 2 Lift the handset to start talking VOICE STANDBY MONITOR Receiving a request for voice contact 1 Your unit will sound a distinctive ring after transmission or reception is completed 2 Lift the h...

Page 31: ...OP WAITING REDIAL REDIAL PAUSE Selecting the resolution Select the desired resolution according to the type of document MONITOR FACE DOWN Document feeder tray Document guide s REDIAL PAUSE STOP Dial keypad RESOLUTION START COPY SET Note If the other party answers your call ask them to start receiving a fax then press your START COPY SET Using the fine super fine or half tone setting will increase ...

Page 32: ...Document guide s STOP START COPY SET RESOLUTION EASY DIAL Note If the desired name has not been stored press and dial the number manually To store the name see page 26 For further details about using the EASY DIAL see page 29 STOP Before using this feature program the desired names and telephone numbers into the directory see page 26 To confirm the items stored in the directory print a telephone n...

Page 33: ... or other similar fastening objects Check that ink paste or correction fluid has dried Do not send the following types of documents Use copies for fax transmission Chemically treated paper such as carbon or carbonless duplicating paper Electrostatically charged paper Heavily curled creased or torn paper Paper with a coated surface Paper with a faint image Paper with printing on the opposite side t...

Page 34: ...ission report will not print 1 2 3 4 5 6 7 8 9 0 Dial keypad MENU START COPY SET 1 Press Display 2 Press then 3 Press 4 Press or to select the desired setting 5 Press 6 Press MENU SETUP ITEM START COPY SET MODE ERROR START COPY SET TX REPORT MODE 0 4 1 SYSTEM SET UP MENU Printing the transmission report TRANSMISSION REPORT NO 01 2345678 USAGE TIME 00 51 MODE SND PAGES 00 COMMUNICATION ERROR 65 STA...

Page 35: ...select the desired setting If this feature is not required select OFF 5 Press 6 Press MENU SETUP ITEM START COPY SET MODE ON START COPY SET AUTO JOURNAL 2 2 1 SYSTEM SET UP MENU NO 01 02 03 04 3332222 9998765 2121444 555556677 USAGE TIME 00 45 00 58 00 48 02 45 03 50 MODE SND SND RCV SND SND RCV PAGES 01 02 01 03 05 03 OK OK OK COMMUNICATION ERROR 65 OK OK START TIME JAN 25 1998 05 22PM JAN 21 02 ...

Page 36: ...MODE ON MODE OFF START COPY SET DELAYED SEND 2 5 1 SYSTEM SET UP MENU STANDARD Using a built in clock this unit can send documents automatically at a specific time This allows you to take advantage of low cost calling hours offered by your telephone company The delayed transmission can be reserved to take place up to 24 hours in advance FACE DOWN START COPY SET Dial keypad MENU sending a fax at a ...

Page 37: ...U 1 2 3 4 5 6 7 8 9 0 Dial keypad MENU START COPY SET Sending Faxes 1 Insert the document FACE DOWN Display 2 Press four times 3 Press 4 Press or to select ON If this feature is not required select OFF 5 Press POLLED ON START COPY SET MODE ON MODE OFF START COPY SET YES PRESS SET 4 POLLED MENU STANDARD This feature allows another person to call your unit to retrieve a document loaded on your unit ...

Page 38: ... will ring Voice call Fax call Receive mode TEL mode See page 40 PRE SELECTED SETTING TEL FAX mode See page 42 Change the setting from TEL mode to TEL FAX mode see page 43 AUTO RECEIVE setting Available when the FAX indicator light is turned OFF To turn the indicator light OFF press AUTO RECEIVE Operation for receiving fax and voice calls When the unit rings you must answer all calls If you hear a...

Page 39: ...ting from FAX ONLY mode to EXT TAM mode see page 46 Available when the FAX indicator light is turned ON To turn the indicator light ON press AUTO RECEIVE FAX AUTO RECEIVE ON The unit will automatically answer all calls and only receive fax documents When receiving voice calls The external telephone answering machine will record voice messages When receiving fax calls The facsimile unit will receiv...

Page 40: ...answer a call and hear a fax calling tone slow beep the unit will automatically start receiving even if you do not press If this feature is not required set to OFF see page 54 START COPY SET Note If you do not answer the call by 15 rings the unit will temporarily switch to the fax and the caller can send documents If the MANUAL RECEIVE setting is set to the TEL FAX mode reset it to the TEL mode se...

Page 41: ...NLY MODE AUTO RECEIVE FAX AUTO RECEIVE ON This setting determines the number of rings before the unit answers a call in the FAX ONLY mode You can choose from 1 to 4 rings Helpful hints To answer a call before the unit does increase the number of rings If you have difficulty receiving faxes from machines that have an automatic transmission feature decrease the number of rings 1 Press Display 2 Pres...

Page 42: ...ed to the caller If an extension telephone is connected it will only ring before the call is answered Answer the call using the handset If you do not answer the call by a preset number of rings the unit will switch to the fax This is for machines that do not send a fax calling tone Fax call Voice call The unit will start to ring While ringing the unit will emit a different ring back tone to the ca...

Page 43: ...L FAX mode ring count and silent fax recognition ring count see page 44 The unit will display the following when the extension telephone starts to ring INCOMING CALL 1 Press Display 2 Press then 3 Press 4 Press or to select TEL FAX 5 Press 6 Press 7 If the FAX indicator light is on turn it off by pressing TEL FAX MODE AUTO RECEIVE MENU SETUP ITEM START COPY SET MODE TEL FAX MODE TEL START COPY SET...

Page 44: ...6 7 8 9 0 Dial keypad MENU START COPY SET When the unit detects a voice call in the TEL FAX mode it will ring up to 3 times The number of rings can be changed up to 9 If a voice call is not answered within the selected number of rings 3 to 9 rings the unit will automatically start to receive a fax Note If the number of rings is increased you may not be able to receive documents from some older mod...

Page 45: ...machine Example This is your name business and or telephone number We are unable to answer the phone right now Please leave a message after the long beep To send a fax start transmission Thank you Note Do not pause for 4 or more seconds during the greeting message If a 4 second pause is stored in the greeting message all incoming calls will be routed to the unit from the answering machine even whi...

Page 46: ...Display EXT TAM MODE AUTO RECEIVE FAX AUTO RECEIVE ON Activating the EXT TAM mode Note If the answering machine is not turned on all incoming calls will be answered by the unit and callers cannot leave voice messages Every time the unit receives a document a silent pause or fax tone may be recorded on the answering machine Set the TEL mode under the following conditions when you wish to set the nu...

Page 47: ... their message after the greeting message 3 The caller presses pre selected fax activation code The unit will activate the fax function 4 The caller presses their start button to send a document Note The fax activation code can be changed see page 51 If the wrong fax activation code is entered the caller must wait more than 5 seconds to reenter the correct code 9 1 Press Display 2 Press then 3 Pre...

Page 48: ...ersonal telephone numbers business telephone numbers fax telephone numbers and so on When a call is received you will know which number is being called by the ringing pattern Example Your telephone number 012 1234 012 5678 012 9876 Ring pattern Standard ring Double ring Triple ring Use Personal Business Facsimile Standard ring one long ring Double ring two short rings Triple ring short long short ...

Page 49: ...s a voice call the external telephone answering machine will record the voice message if it is a fax call the unit will receive documents START COPY SET Note In the FAX ONLY and EXT TAM modes the unit automatically answers a distinctive ring call after the second ring To change the number of rings change the FAX ONLY mode ring count page 41 after setting the ring pattern 1 Press Display 2 Press th...

Page 50: ...ling tone slow beep is heard or no sound is heard press pre selected fax activation code firmly 3 Hang up the handset The unit will start reception 9 To the EXT jack or the same line Extension telephone When an extension telephone is connected to the EXT jack When the extension telephone is in use the unit will show the following Display When the extension telephone is in use and you press the but...

Page 51: ...STEM SET UP MENU Note If you subscribe to some special telephone company services all or part of the fax activation code must be different from the service access code The fax activation code should not be set to 0000 1 2 3 4 5 6 7 8 9 0 Dial keypad MENU START COPY SET Receiving Faxes Changing the fax activation code The fax activation code is used in the following cases when receiving faxes using...

Page 52: ... that the other party s machine is ready for your call Receive polling retrieving faxes placed on another party s machine 1 Press three times Display 2 Press 3 Dial the fax number Example 4 Press The unit will start reception CONNECTING START COPY SET NO 3331111 NO START COPY SET YES PRESS SET 3 POLLING MENU START COPY SET Dial keypad MENU Note You cannot use the EASY DIAL directory to enter the f...

Page 53: ...ture If you use an external telephone answering machine to give greeting messages and record incoming messages on a single cassette tape deactivate this feature 1 2 3 4 5 6 7 8 9 0 Dial keypad MENU START COPY SET 1 Press Display 2 Press then 3 Press 4 Press or to select the desired setting If this feature is not required select OFF 5 Press 6 Press MENU SETUP ITEM START COPY SET MODE ON START COPY ...

Page 54: ...d you will have to press to receive fax documents each time you answer a fax call START COPY SET START COPY SET 1 2 3 4 5 6 7 8 9 0 Dial keypad MENU START COPY SET 1 Press Display 2 Press then 3 Press 4 Press or to select the desired setting If this feature is not required select OFF 5 Press 6 Press MENU SETUP ITEM START COPY SET MODE ON START COPY SET FRIENDLY RCV 4 6 1 SYSTEM SET UP MENU ...

Page 55: ... pause s and the message Message programming methods may vary depending on the pager company Contact your pager company for details REDIAL PAUSE 1 Press Display 2 Press then 3 Press 4 Press or to select ON If this feature is not required select OFF 5 Press 6 Enter your pager number You can enter a total of 46 digits and or pauses Example 7 Press 8 Press MENU SETUP ITEM START COPY SET NO 1122333 NO...

Page 56: ...y see the bottom of page 31 5 Press The unit will start printing COPYING START COPY SET RESOLUTION STANDARD Note When you copy a multiple page document which is longer than A4 size paper approx 300 mm we recommend to insert the pages one at a time If a resolution is not set FINE resolution will automatically be selected You can make or receive a voice call while making a copy To stop copying Press...

Page 57: ...on error occurred because of a problem with the other party s machine Check with the other party The document was not fed into the unit properly Reinsert the document and try again The other party s machine was busy or ran out of recording paper Try again The document was not fed properly Reinsert the document and try again The other party s machine rings too many times To send a fax manually dial...

Page 58: ...vide the document into two or more sheets and try again Memory telephone numbers parameters etc has been erased Re program The other party s machine is busy or ran out of recording paper Try again The unit ran out of recording paper Install a recording paper roll p 17 The other party s machine does not have a polling feature Check with the other party The other party s machine is busy or ran out o...

Page 59: ...e properly contact your telephone company The ringer volume is set to off Adjust to a suitable level p 23 If this button is pressed during dialing a pause will be inserted If pressed immediately after a dial tone is obtained the last number dialed will be redialed A distinctive ringing pattern is set p 48 All or part of their numbers are the same Change the number p 47 51 Cause Remedy Problem I ca...

Page 60: ...rectly Make sure that the shiny side of the paper is facing down and re install the paper p 17 Cause Remedy Problem A dirty pattern or a black line appears on the copied documents The copied image is distorted The copied document is blank Fax transmission The telephone line cord is connected to the EXT jack on the unit Connect to the LINE jack p 18 If your line has special telephone services such ...

Page 61: ...ds while recording their voice message Your answering machine ran out of recording tape Rewind the tape to record messages You set the answering machine to only give a greeting message You paused for over 4 seconds during the conversation To resume the conversation press the button on the unit STOP Cause Remedy Problem I cannot receive documents automatically I cannot receive voice messages I cann...

Page 62: ...the leading edge of the paper approximately 10 cm 4 inches out of the unit Make sure that there is no slack in the paper roll 3 Close the cover securely by pushing down on both corners When you close the cover do not push the flaps down or a paper jam will occur Cover open button 4 Tear off the excess paper by pulling it towards you Flaps Note When the power cord is connected everytime you close t...

Page 63: ...y pushing down on both corners If no feeding or multiple feeding occurs frequently adjust the feeder pressure Cover open button Lever Right Left 1 Open the cover by pressing the cover open button 2 Shift the position of the lever by using an instrument with a pointed end like a paper clip Right When documents do not feed Center Standard position pre selected Left When documents multiple feed 3 Clo...

Page 64: ... Connect the power cord and the telephone line cord Caution Do not use paper products such as paper towels or tissues to clean the inside of the unit Cleaning the document feeder If dirty patterns or black bands appear on a copied or received document clean the thermal head Thermal head Cover open button Caution Do not push on the black cover 1 Disconnect the power cord and the telephone line cord...

Page 65: ...e number has been entered The telephone number is not printed Journal report keeps records of fax transmissions and receptions Also this report will be printed automatically after every 35 fax communications see page 35 1 Press two times Display 2 For the basic feature list press then For the advanced feature list press then For the telephone number list press then For the journal report press the...

Page 66: ... Used when the display contrast is too dark DARKER Used when the display contrast is too light 1 2 3 4 5 6 7 8 9 0 Dial keypad MENU START COPY SET 1 Press Display 2 Press then 3 Press 4 Press or to select the desired setting 5 Press 6 Press MENU SETUP ITEM START COPY SET MODE NORMAL START COPY SET LCD CONTRAST 3 9 1 SYSTEM SET UP MENU ...

Page 67: ...3 4 5 6 7 8 9 0 Dial keypad MENU START COPY SET STOP 1 Press Display 2 Press then 3 Press 4 Press or to select YES 5 Press If this feature is not required press 6 Press again for confirmation 7 Press MENU SETUP ITEM RESET COMPLETED START COPY SET STOP RESET OK START COPY SET RESET YES RESET NO START COPY SET SET DEFAULT 8 0 1 SYSTEM SET UP MENU Reset ...

Page 68: ...ing count Changing the MANUAL RECEIVE setting Setting the TEL FAX mode ring count Securing the remote operation for the external telephone answering machine REMOTE TAM ACT TEL FAX RING MANUAL RECEIVE FAX RING AUTO RECEIVE TX REPORT MODE YOUR TEL NO YOUR LOGO SET DATE TIME Available settings Meaning ERROR If transmission fails ON Activate OFF Deactivate FAX ONLY Facsimile only mode EXT TAM External...

Page 69: ...endly reception Signaling your pager when your unit receives a fax Resetting the advanced features SET DEFAULT FAX PAGER FRIENDLY RCV FAX ACTIVATION SILENT DETECT LCD CONTRAST RING DETECTION SILENT FAX RING DELAYED SEND OVERSEAS MODE AUTO JOURNAL Available settings Meaning NORMAL Normal contrast LIGHT Lighter contrast DARKER Darker contrast 3 4 5 6 7 8 9 3 to 9 rings ON CODE 9 Activate OFF Deactiv...

Page 70: ...r Type Thermal Printing Data Compression System Modified Huffman MH Modified READ MR Modem Speed 9 600 7 200 4 800 2 400 bps Automatic Fallback Operating Environment 5 35 C 41 95 F 45 85 RH Relative Humidity Dimensions H x W x D 135 x323 x229 mm 55 16 x 1223 32 x9 Mass Weight Approx 2 9 kg 6 4 lb Power Consumption Standby Approx 6 5 W Transmission Approx 17 W Reception Approx 40 W Copy Approx 40 W...

Page 71: ...ager 55 Features summary 68 69 Feeder pressure 63 FLASH button 25 Friendly reception 40 54 H HANDSET MUTE button 24 HELP button 5 Hyphen key 27 I Insert key 21 27 J Jam 62 63 Journal auto print 35 Journal report 65 L Location panel 14 15 Logo 20 M MANUAL RECEIVE mode 38 MONITOR button 29 30 31 Muting 24 O Overseas transmission mode 37 Overview 16 P Paper jam 62 63 PAUSE button 25 Polling Receiving...

Page 72: ...PFQX1185ZA KS1297AN1018 Kyushu Matsushita Electric Co Ltd 1 62 4 chome Minoshima Hakata ku Fukuoka 812 8531 Japan Printed in Japan ...

Reviews: