background image

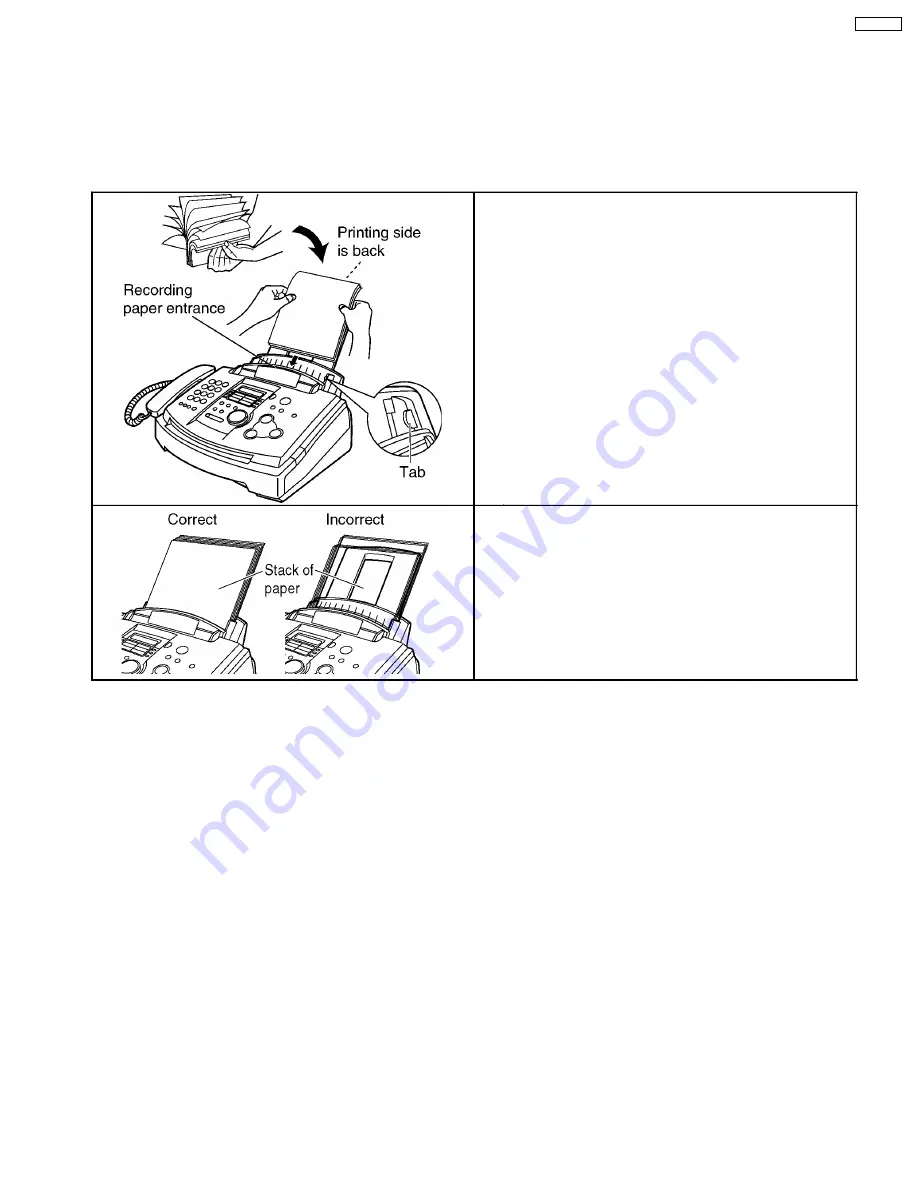
1.14.3.  INSTALLING THE RECORDING PAPER

Letter* or legal** size recording paper can be loaded. The unit can hold up to 150 sheets of 60 g/m

2

to 75 g/m

2

(16 lb. to 20lb.)

paper or 120 sheets of 90 g/m

2

(24 lb.) paper.

*Letter=216 mm × 279 mm (8 1/2” × 11”)

**Legal=216 mm × 356 mm (8 1/2" × 14")

The unit is set for letter size paper by default. If you want to use legal size paper, change the setting (feature # 16).

1. Fan the stack of paper to prevent a paper jam.

2. Insert the paper into the recording paper entrance.


·


The paper should not be over the tab.


·


If the paper is not inserted correctly, readjust the paper
or the paper may jam.

Note for recording paper:


·


Avoid using paper with a cotton and/or fiber content that is over 20%, such as letterhead paper or paper used for
resumes.


·


Do not use different types or thicknesses of paper at the same time. This may cause a paper jam.


·


Avoid extremely smooth or shiny paper that is highly textured.


·


Avoid paper that is coated, damaged or wrinkled.

Note:


·


Avoid double-sided printing


·


Do not use paper printed from this unit for double-sided printing with other copiers or printers, or the paper may jam.


·


Some paper only accepts print on one side. Try using the other side of paper if you are not happy with the print quality.

15

KX-FL501

Summary of Contents for KX-FL501

Page 1: ...2000 Kyushu Matsushita Electric Co Ltd All rights reserved Unauthorized copying and distribution is a violation of law KX FL501 for U S A Compact Laser Plain Paper FAX ORDER NO KMF0002391C1 F7...

Page 2: ...17 HOW TO REMOVE THE MOTOR BLOCK3 135 4 18 INSTALLATION POSITION OF THE LEAD 1 136 4 19 INSTALLATION POSITION OF THE LEAD 2 137 4 20 INSTALLATION POSITION OF THE LEAD 3 138 4 21 INSTALLATION POSITION...

Page 3: ...SUPPLY BOARD PARTS 231 12 8 MOTOR DRIVE BOARD PARTS 232 12 9 SENSOR BOARD PARTS 232 12 10 VARISTOR BOARD PARTS 232 12 11 FIXTURES AND TOOLS 232 13 FOR THE SCHEMATIC DIAGRAMS 233 14 PRINTED CIRCUIT BO...

Page 4: ...SERVICE TECHNICIANS ICs and LSIs are vulnerable to static electricity When repairing the following precautions will help prevent recurring malfunctions 1 Cover the plastic part s boxes with aluminum...

Page 5: ...times 1 6 PERSONAL SAFETY PRECAUTIONS 1 6 1 MOVING SECTIONS OF THE UNIT Be careful not to let your hair clothes fingers accessories etc become caught in any moving sections of the unit The moving sec...

Page 6: ...ys unplug the AC power cord before disassembling for service 1 7 SERVICE PRECAUTIONS 1 7 1 PRECAUTIONS TO PREVENT DAMAGE FROM STATIC ELECTRICITY Electrical charges accumulate on a person For instance...

Page 7: ...work utilizes the highest encryption legally allowed ensuring that your documents stay secure You get the benefits of carefree faxing with savings associated with the use of the internet It is simple...

Page 8: ...nsmission Approx 25 W Reception Approx 200 W Copy Approx 200 W Maximum Approx 560 W When the fuser unit turns on Power Supply 120 V AC 60 Hz Memory Capacity Approx 120 pages of memory transmission App...

Page 9: ...1 11 TEST CHART 1 11 1 ITU T No 1 TEST CHART 9 KX FL501...

Page 10: ...1 11 2 ITU T No 2 TEST CHART 10 KX FL501...

Page 11: ...1 12 LOCATION OF CONTROLS 1 12 1 OVERVIEW Note The document stacker and paper stacker may not be shown in all illustrations 11 KX FL501...

Page 12: ...1 12 2 CONTROL PANEL 12 KX FL501...

Page 13: ...ction we recommend the use of a surge protector The following types are available TELESPIKE BLOK MODEL TSB TRIPPE MFG CO SPIKE BLOK MODEL SK6 0 TRIPPE MFG CO SUPER MAX PANAMAX or MP1 ITW LINX The warr...

Page 14: ...nger cord may reduce the voltage or cause malfunctions Avoid direct sunlight Do not install near devices which contain magnets or generate magnetic fields Do not subject the unit to strong physical sh...

Page 15: ...b If the paper is not inserted correctly readjust the paper or the paper may jam Note for recording paper Avoid using paper with a cotton and or fiber content that is over 20 such as letterhead paper...

Page 16: ...or other similar fastening objects Check that ink paste or correction fluid has dried Do not send the following types of documents Use copies for fax transmission Chemically treated paper such as car...

Page 17: ...next space and press six times 5 Press 6 Press Note You can enter your logo by rotating To correct a mistake Press or to move the cursor to the incorrect character then make the correction To insert a...

Page 18: ...ad of pressing the dial keys you can select characters using the JOG DIAL 1 Rotate unit the desired character is displayed 2 Press to move the cursor to the next space The character displayed in step...

Page 19: ...t sunlight Do not unplug the fax machine to prevent loss of fax documents in memory Do not pour any toner into the toner cartridge 1 Remove the new toner cartridge from the protection bag Peel off the...

Page 20: ...ide the tab of the toner cartridge into the slot of the drum unit 8a Hold right side of the toner cartridge under the lip on the drum unit and 8b Turn the two levers on the toner cartridge with film p...

Page 21: ...lass is dirty clean it with a soft dry cloth 12 Close the front cover securely by pushing down on both sides Waste disposal method Waste material may be dumped or incinerated under conditions which me...

Page 22: ...ng and communication testing to determine if the problem originates from the transmitter receiver or the telephone line 4 Determine causes Determine the causes of the equipment problem by troubleshoot...

Page 23: ...1 15 2 MAINTENANCE CHECK ITEMS COMPONENT LOCATIONS 23 KX FL501...

Page 24: ...See P 23 and P 124 5 Glass If the glass is dirty clean them with a dry soft cloth Refer to P 25 6 Abnormal wear and tear or loose parts Replace the part Check if the screws are tight on all parts 1 1...

Page 25: ...g the toner drum unit Do not use paper products such as paper towels or tissues to clean the inside of the unit 1 Disconnect the power cord and the telephone line cord 2 Push the front cover open butt...

Page 26: ...r glass with a soft dry cloth 8 Reinstall the drum and toner unit by holding the tabs 9 Close the front cover securely by pushing down on both sides 10 Reconnect the power cord and the telephone line...

Page 27: ...out any slack 2 Before troubleshooting first check that the connectors and cables are connected correctly not loose If the problem occurs randomly check it very carefully 3 When connecting the AC powe...

Page 28: ...OVERABLE ERRORS If the unit detects a problem one or more of the following messages will appear on the display Note The explanations given in the are for servicemen only CROSS REFERENCE P 7 P 30 P 120...

Page 29: ...CROSS REFERENCE P 30 P 31 Note The explanations given in the are for servicemen only 29 KX FL501...

Page 30: ...t cover open button then open the front cover 2 Pull down the middle guide while holding the front cover 3 Remove the jammed document carefully 4 Life the middle guide firmly 5 Close the front cover s...

Page 31: ...rtridge Display Remove the jammed paper as follows 1 Push the front cover open button then open the front cover 2 When the recording paper has jammed near the drum and toner unit Remove the jammed pap...

Page 32: ...4 Remove the recording paper Straighten and reinsert it into the recording paper entrance 32 KX FL501...

Page 33: ...The claim tag from a customer or dealer may use different expressions for the same problem as they are not a technician or engineer Using your experiencentest the problem area corresponding to the cla...

Page 34: ...2 3 3 TROUBLESHOOTING ITEMS TABLE CROSS REFERENCE P 36 P 54 P 83 P 86 34 KX FL501...

Page 35: ...2 3 3 1 SIMPLE CHECK LIST CROSS REFERENCE P 114 35 KX FL501...

Page 36: ...2 3 4 PRINT 2 3 4 1 GHOST IMAGE 36 KX FL501...

Page 37: ...2 3 4 2 DARK AND WHITE VERTICAL LINE Note When wiping the cover glass reflecting mirror and LSU lens use a dry and soft cloth 37 KX FL501...

Page 38: ...2 3 4 3 DARK OR WHITE HORIZONTAL LINE 38 KX FL501...

Page 39: ...2 3 4 4 DIRTY AND HALF DARKNESS BACKGROUND 39 KX FL501...

Page 40: ...2 3 4 5 BLACK PRINT 40 KX FL501...

Page 41: ...2 3 4 6 LIGHT PRINT 41 KX FL501...

Page 42: ...2 3 4 7 BLACK DENSITY IS LIGHT OR UNEVEN 42 KX FL501...

Page 43: ...2 3 4 8 BLANK PRINT 43 KX FL501...

Page 44: ...2 3 4 9 BLACK WHIT POINT 44 KX FL501...

Page 45: ...2 3 5 RECORDING PAPER FEED 2 3 5 1 Multiple feed 2 3 5 2 The printing paper is waved or wrinkled 45 KX FL501...

Page 46: ...2 3 5 3 Skew 46 KX FL501...

Page 47: ...2 3 5 4 The recording paper does not feed 47 KX FL501...

Page 48: ...2 3 6 ADF Auto document feed section 2 3 6 1 No document feed 48 KX FL501...

Page 49: ...2 3 6 2 Document JAM 49 KX FL501...

Page 50: ...2 3 6 3 Multiple feed 50 KX FL501...

Reviews: