


2
3
4
5
6
7
8
9
0
1
48
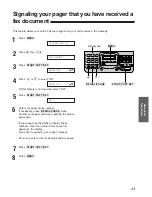
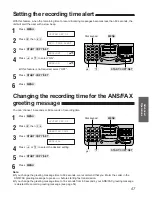
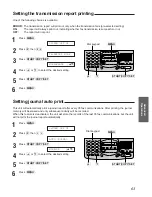
1
Press
(MENU)
.
2
For common message transfer,
press
K
, then
F @
.
For mailbox 1 message transfer,
press
K
, then
F A
.
For mailbox 2 message transfer,
press
K
, then
F B
.
For mailbox 3 message transfer,
press
K
, then
F C
.
3
Press
(START/COPY/SET)
.
4
Press
(‹)
or
(›)
to select the desired setting.
MESSAGE: transfers incoming messages.
PAGER:
calls your pager.
OFF:
turns off this feature.
5
Press
(START/COPY/SET)
.
6
a: If you selected “MESSAGE” in step 4:
Enter the number where the message is to be
transferred.
b: If you selected “PAGER” in step 4:
Enter your pager phone number.
If necessary, press
(REDIAL/PAUSE)
twice.
Contact your pager company regarding the
proper pause time.
b:
If your pager has the ability to display phone
numbers, enter the number that you wish to
appear on the display.
Press
K
if required by your pager company.
b:
¡
You may enter a total of 46 digits and/or
pauses.
7
Press
(START/COPY/SET)
.
8
Press
(MENU)
.
NO.=
MODE=OFF [
ÿŸ
]
BOX3 MSG TRNSF
BOX2 MSG TRNSF
BOX1 MSG TRNSF
COMMON MSG TRNSF
SYSTEM SET UP
Note:
¡
This feature can be turned on/off remotely from a touch tone phone (see page 53).
(MENU)
(START/COPY/SET)
Dial keypad
(‹)
(›)
(REDIAL/PAUSE)
Setting the message transfer/pager call


