Panasonic i-pro WJ-NT314 Network Operating Instructions Download Page 18

18

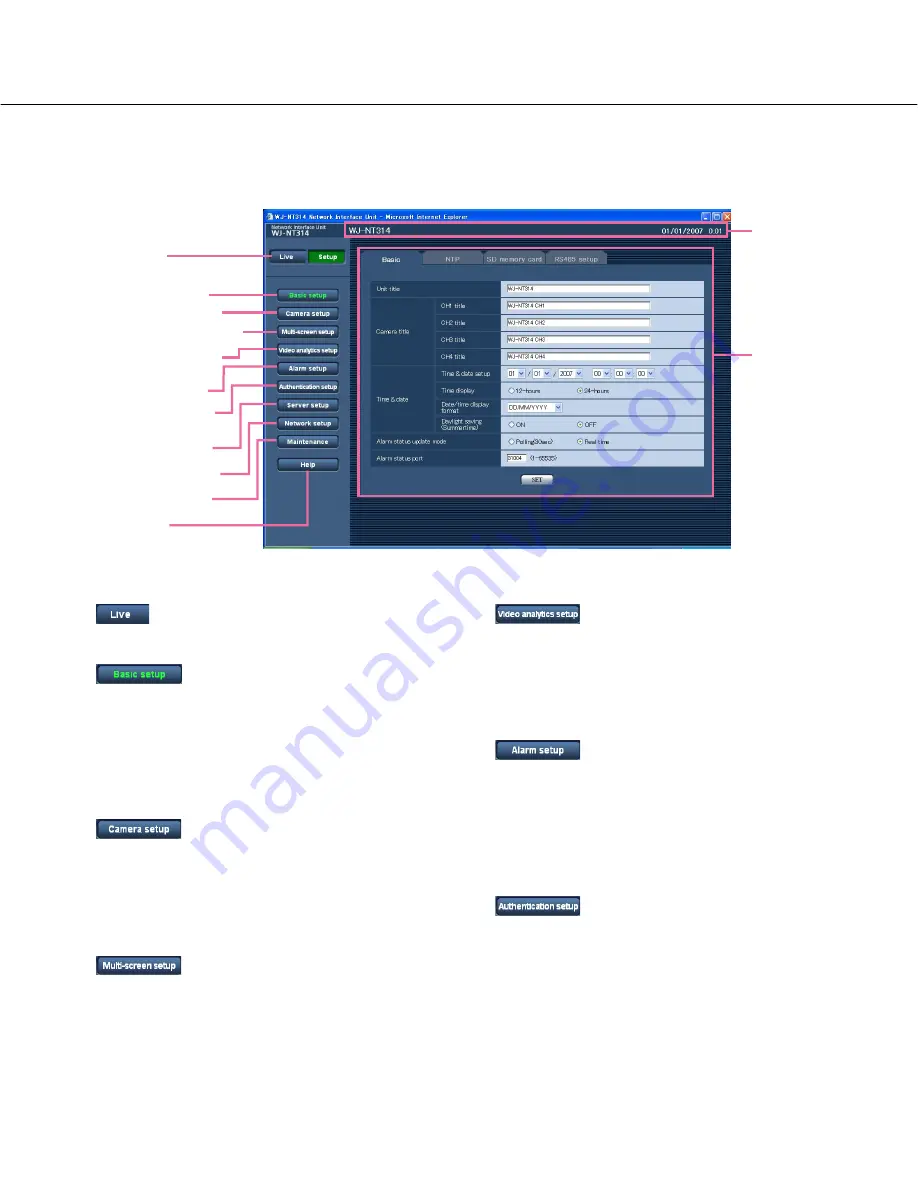
About the operation window

q

[Live] button

The "Live" page will be displayed.

w

[Basic setup] button

Click this button to display the "Basic setup" page.
The basic settings such as time and date and cam-
era title, and the settings relating to the NTP server
and the SD memory card can be configured on the
"Basic setup" page. Refer to page 20 for further
information.

e

[Camera setup] button

Click this button to display the "Camera setup" page.
The settings relating to JPEG/MPEG-4 images and
camera operation can be configured on the "Camera
setup" page. Refer to page 26 for further informa-
tion.

r

[Multi-screen setup] button

Click this button to display the "Multi-screen setup"
page. The cameras to be used for the multi-screen
display can be registered on the "Multi-screen setup"
page. Refer to page 33 for further information.

t

[Video analytics setup] button

Click this button to display the "Video analytics
setup" page.
The detection program and schedule for AVMD can
be configured on this page.
Refer to page 34 for further information.

y

[Alarm setup] button

Click this button to display the "Alarm setup" page.
The settings relating to alarm occurrences such as
settings for the alarm action at an alarm occurrence
and the alarm occurrence notification can be config-
ured on the "Alarm setup" page. Refer to page 40 for
further information.

u

[Authentication setup] button

Click this button to display the "Authentication setup"
page. The settings relating to the authentication
such as users and PCs restrictions for accessing the
unit can be configured on the "Authentication setup"
page. Refer to page 46 for further information.

!3

Setup page

!2

Status display
area

q

[Live] button

w

[Basic Setup] button

e

[Camera setup] button

r

[Multi-screen setup] button

t

[Video analytics setup]
button

u

[Authentication setup]
button

i

[Server setup] button

o

[Network setup] button

!0

[Maintenance] button

!1

[Help] button

y

[Alarm setup] button

Summary of Contents for i-pro WJ-NT314

Page 1: ...ct or operate this product please read these instructions carefully and save this manual for future use Network Interface Unit Network Operating Instructions Model No WJ NT314 LINK RCV SND OPERATE Network Interface Unit WJ NT314 ...

Page 2: ... periodic transmission function 13 About the Network Security of This Unit 15 Equipped security functions 15 Display the Setup Menu and Configure the Settings of the Unit using a PC 16 How to display the setup menu 16 How to operate the setup menu 17 Configure the basic settings of the unit Basic setup 20 Configure the settings relating to images and audio Camera setup 26 Configures the multi scre...

Page 3: ...install it Trademarks and registered trademarks Microsoft Windows Internet Explorer ActiveX and DirectX are either registered trademarks or trademarks of Microsoft Corporation in the United States and or other countries Adobe and Reader are either registered trademarks or trademarks of Adobe Systems Incorporated in the United States and or other countries SD logo is a trademark Other names of comp...

Page 4: ... for MPEG 4 transmission In this case the refresh interval will be lowered to approx half the set value Refresh interval JPEG When ON is selected for MPEG 4 transmission JPEG VGA 15 fps JPEG QVGA 60 fps These are the total maximum values of all the chan nels The refresh interval may be longer depending on a network environment PC spec photographic sub ject access traffic etc Important When display...

Page 5: ...ission on the setup menu the MPEG 4 button will not be dis played page 27 The letters JPEG on the button will turn green and JPEG image will be displayed y AUX buttons 2 Select 1 AUX1 to AUX3 from the pull down menu and click the OPEN CLOSE button page 43 AUX1 and AUX2 are auxiliary outputs of camera AUX3 is the auxiliary output from the AUX 1 terminal of this unit The AUX connector will open The ...

Page 6: ...st preset posi tion number Patrol Operates the camera in accordance with patrol function settings Auto track Performs auto track when the camera supports auto track AUTO TRACK Notes To activate Auto pan Sort Sequence or Patrol it is required to perform the settings on the SETUP MENU of camera in advance page 28 To check if the camera supports auto track refer to the operating instructions of the c...

Page 7: ...his button is clicked the button will turn into the button and audio from the unit will not be heard Notes When this button is clicked audio from the PC will be turned off When closing the window click the button again to turn on the audio Audio reception is turned on for CH 1 only 2 Audio output button 3 Turns on off the audio transmission play audio from the PC on the unit speaker This button wi...

Page 8: ...om the registered cameras will be displayed on a 4 split screen q To display images on a single screen click the 1 button or Live button w Click a camera title Live images from the camera corresponding to the clicked camera title will be dis played on the Live page of the newly opened win dow 1 Operable by only users and hosts whose access level is 1 Administrator 2 Only operable by users and host...

Page 9: ...ason it may take a maximum of 30 seconds until the alarm occurrence indication button is displayed on the Live page at an alarm occurrence Notify of alarm occurrences to the device connected to the alarm connector It is possible to output signals from the alarm connector on the rear of the unit and sound the buzzer when an alarm occurs The settings for the alarm output can be configured on the Ala...

Page 10: ...ment removal page 34 in the shooting area of the channel for which the AVMD is activated it is possible to activate an alarm when an object is abandoned in the area or removed from the area To prevent false notifications it is necessary for the object to be detected as an abandoned or removed object for 20 seconds or more Up to 8 objects can be detected simultaneously per channel It is impossible ...

Page 11: ...r OFF from Track under the live image About Live page when AVMD is activated Weather condition is extremely poor When setting AVMD check the performance during both daytime and nighttime after setting the detection area according to the installation place of camera and the assumed motion of object If the AVMD is activated improperly or not activated even after the setting use a sensor Luminance le...

Page 12: ...nsmitted images may not reach the set number of images to be transmitted Transmit images at a designated interval or period FTP periodic transmission Images can be transmitted at a designated interval or period To transmit images at a designate interval or period it is necessary to configure the settings in advance The settings for the FTP server to which images are to be transmitted can be config...

Page 13: ...mmended to check the recording condition and select 5 sec or longer for Interval on the FTP tab page 55 Save images on the SD memory card By selecting Use for About SD memory card on the SD memory card tab of the Basic setup page page 23 saving images which had been failed to transmit to the FTP server using the FTP periodic transmission function will become available Obtain images on the SD memor...

Page 14: ...d_data ftp 070101 0123 and press the Enter key The current directory will be sd_data 070101 0123 r The transfer mode will be set to the binary mode Enter ftp bin and press the Enter key t Obtain the image Enter ftp get img_0107010101230000 jpg and press the Enter key The image will be obtained y Log out by entering ftp bye and press the Enter key You will log out of the FTP directory It is possibl...

Page 15: ...anging the HTTP port It is possible to prevent illegal access such as port scanning etc by changing the HTTP port number page 51 Note When user authentication authentication error has failed to pass 8 times 6 times when clicking the Go button of the browser within 30 seconds using the same IP address PC access to the unit will be denied for a while Important Design and enhance security countermeas...

Page 16: ...isplay the setup menu Step 1 Display the Live page page 4 Step 2 Click the Setup button on the Live page The window with the user name and password entry fields will be displayed Step 3 Click the OK button after entering the user name and the password Refer to page 4 for the default user name and password Click this button to display the setup menu Refer to the next page for further information ab...

Page 17: ...ow Step 3 After completing each setting item click the SET but ton to apply them Important When there are two SET buttons or REG but tons or more on the page click the respective but ton to the edited setting item Example When completing the setting items in field A click the SET button below field A A 1 The edited set ting items in field A will not be applied unless the SET button below field A A...

Page 18: ... Click this button to display the Video analytics setup page The detection program and schedule for AVMD can be configured on this page Refer to page 34 for further information y Alarm setup button Click this button to display the Alarm setup page The settings relating to alarm occurrences such as settings for the alarm action at an alarm occurrence and the alarm occurrence notification can be con...

Page 19: ... Protocol and FTP File Transfer Protocol can be configured on the Network setup page Refer to page 50 for further information 0 Maintenance button Click this button to display the Maintenance page System log check firmware upgrade and initializa tion of the setup menu can be carried out on the Maintenance page Refer to page 57 for further information 1 Help button Click this button to display the ...

Page 20: ... CH3 Name of CH4 WJ NT314 CH4 Time date setup Enter the current time and date When 12 hours is selected for Date time display format AM or PM can be selected Available value 01 01 2006 00 00 00 12 31 2035 23 59 59 Time display Select the time display format from 12 hours 24 hours and OFF Enter the current hour reflecting this setting when entering the current time and date for Time date setup Defa...

Page 21: ...dates the status each 30 seconds and provide notification of the unit status Real time Provide notification of the unit status when the status has changed Except the alarm occur rence indication button Default setting Real time Note Depending on the network environment notification may not be provided in real time Alarm status port When selecting Real time for Alarm status update mode designate a ...

Page 22: ... Default setting Manual setup NTP server address Enter the IP address or the host name of the NTP serv er Number of characters that can be entered 1 128 characters Default setting blank Important When entering the host name for NTP server address it is necessary to configure the DNS set tings on the Network tab of the Network setup page page 51 NTP port Enter a port number to be used for the NTP s...

Page 23: ...ace of the SD memory card reached the values above For example notification will be provided for the destination IP address when the remaining space reaches 50 or less when 50 is selected page 45 Notification may not always be made at the very moment when the remaining space of the SD mem ory card has reached each value Information about SD memory card SD memory card Available size and the total s...

Page 24: ...rding to photographic subject settings relating to the SD memory card etc Image capture size VGA Important Before formatting the SD memory card it is neces sary to select Use for SD memory card on the SD memory card tab of the Basic setup page page 55 and OFF for FTP periodic transmis sion on the FTP tab of the Network setup page page 49 Format the SD memory card only by clicking the Execute butto...

Page 25: ...prox 27 000 pics Approx 13 500 pics Approx 6 750 pics Approx 3 375 pics Approx 1 687 pics Approx 843 pics Approx 28 000 pics Approx 14 000 pics Approx 7 000 pics Approx 3 500 pics Approx 1 750 pics Approx 875 pics Approx 30 000 pics Approx 15 000 pics Approx 7 500 pics Approx 3 750 pics Approx 1 875 pics Approx 937 pics 0 Super fine 1 Fine 2 3 4 Image quality Configure the settings relating to the...

Page 26: ...gs Unlimited 64 kbps 128 kbps 256 kbps 512 kbps 1024 kbps 2048 kbps 4096 kbps 8192 kbps 16384 kbps Default setting Unlimited Notes When selecting 64 kbps select OFF for Audio mode on the Audio tab page 31 Otherwise images cannot be transmitted correctly When 64 kbps or 128 kbps is selected do not carry out the live transmission of JPEG images and the FTP periodic transmission simultaneously Otherw...

Page 27: ...FF to determine whether or not to transmit MPEG 4 images ON Transmits MPEG 4 images OFF Does not transmit MPEG 4 images Default setting ON Note When ON is selected for MPEG 4 transmission displaying rather of MPEG 4 image or JPEG image will be available However the refresh interval JPEG may be longer than the set value when dis playing JPEG images Max bit rate per 1 client Select a MPEG 4 bit rate...

Page 28: ... via a network the transmitted image sometimes may not be displayed In this case refer to the network administrator When two or more network interface cards are installed on the PC in use the network interface card s not used for receiving images should be invalidated when displaying images using the multi cast port Unicast port1 Image Enter the unicast port number used to transmit images from the...

Page 29: ...EG note the fol lowing When OFF is selected for MPEG 4 transmis sion on the setup menu the total refresh interval of all the selected channels shall be 40 fps or less When QVGA is selected for Image cap ture size divide the value by four Example When the set values are CH1 VGA 10 fps CH2 VGA 15 fps CH3 QVGA 30fps CH4 QVGA 30fps 10 CH1 15 CH2 30 4 CH3 30 4 CH4 40 fps Total When ON is selected for M...

Page 30: ...hese button to select the parameters Down button Up button Click these buttons to move the cursor ESC button Click this button to return to the previous page RESET SPECIAL button Display the SETUP MENU of camera move the cursor onto SPECIAL and click this button to move to the SPE CIAL SETUP menu Move the cursor onto REFRESH on the SPECIAL SETUP menu and click this button to refresh the camera pos...

Page 31: ...a setup page page 28 it is impossible to carry out the audio output operation while monitoring MPEG 4 image To carry out the audio output operation click the JPEG button Audio bit rate Select 16 kbps or 32 kbps for the audio bit rate used to transmit receive audio data Default setting 32 kbps Mic input interval Unit to PC Select an interval for audio reception from the following 20 msec 40 msec 80...

Page 32: ... communication Coaxial setup Click the Coaxial setup tab on the Camera setup page page 26 The settings relating to camera control and cable compensation with coaxial communication can be configured on this page CH No Select a channel to configure the setting and configure the following items DATA Select ON or OFF to determine whether or not to control cameras with the coaxial communication ON Cont...

Page 33: ...e camera had been changed enter as follows Example 192 168 0 10 8080 Number of characters that can be entered 1 128 characters Default setting blank Notes When using the host name it is necessary to config ure the DNS settings of the PC in use When displaying images from cameras connected to this unit on a multi screen set the IP address of the unit CH No Select a desired channel number CH1 to 4 w...

Page 34: ...Alarm tab on the Alarm setup page page 40 However up to 2 chan nels of CH1 to CH4 are available Step 1 Select the title of desired detection program from Detection program and click the DISPLAY button Setup items will be displayed Note When the detection program has already been set the edited titles will be displayed on the pull down menu It is possible to display and change the set tings by sele...

Page 35: ...around 2 minutes Select P Bla when setting an area not to activate AVMD Even moving objects are not detected in the area w Select the shape of frame by clicking Paint quad rangle detection area or Paint polygon detection area of Paint type e When selecting Paint quadrangle detection area set a square area by dragging the mouse on the screen When selecting Paint polygon detection area set a polygon...

Page 36: ...ll be displayed Step 2 Select Auto setup for Setup mode Step 3 Click the START button of Auto setup Depth cal culation Step 4 The person moves forward and backward several times within the image at the preset position of the selected channel Calculation result will be displayed in 3D on the screen The result will be refreshed every second When the depth is properly calculated or when the 3D displa...

Page 37: ... retry drawing the marker click CLEAR button Assuming that people go forward and backward it is possible to calculate the correct depth by drawing the larger marker for the nearer object lower area in the image and the smaller marker for the farther object upper area in the image Step 4 After drawing the marker click the Execute button of Depth calculation Calculation result is displayed in 3D on ...

Page 38: ...ek The selected day of the week will be validated for the schedule Step 3 To designate time click i and select the desired hour and minute When not designating time check the checkbox of 24 hours Available value 00 00 23 59 Step 4 Select the detection program The channel number set for the selected detection program will be displayed in CH No Step 5 Click the SET button after completing the settin...

Page 39: ...om Schedule 1 to Schedule 8 Step 2 Uncheck the check box of the set day of the week Step 3 Click the SET button after completing the settings Step 4 To check the schedule on the time bar click i and select the channel number detection program from the CH No pull down menu ...

Page 40: ...plied Up to 2 channels are available When the AVMD detection program setting is applied to 2 channels the settings of other channels will be dis played in gray The following values are available OFF AVMD will become unavailable Detection program up to 8 AVMD will be applied to the selected detection program Schedule Detection program will be changed and the AVMD will be activated according to the ...

Page 41: ...t receive Default setting OFF Video loss CH1 to 4 Select ON or OFF to determine whether or not to detect the video loss from the camera connected to the video input connector of CH1 to 4 ON Detects video loss OFF Does not detect Command alarm Select ON or OFF to determine whether or not to receive the command alarm When ON is selected perform the following settings ON Receives alarms OFF Does not ...

Page 42: ...o transmit the alarm image to the FTP server Default setting OFF Directory Enter the directory name where the alarm images are to be saved For example enter ALARM to designate the directory ALARM under the FTP root directory Number of characters that can be entered 0 256 characters Default setting blank File name Enter the file name used for the alarm image to be transmitted to the FTP server The ...

Page 43: ... setting CLOSE Note When OPEN is selected the alarm signal will be output for around 90 seconds when the power of the unit is turned on Pulse width When Pulse is selected for Alarm output select an alarm output terminal duration from the following Available value 1 120 sec Default setting 1 sec AUX name The names of AUX OPEN and CLOSE on the Live page can be changed AUX Up to 10 characters Enter t...

Page 44: ...estination addresses can be registered To notify by e mail when an alarm occurred check the Alarm checkbox respective to the desired address To delete the registered address click the DEL button respective to the desired address Number of characters that can be entered 3 128 characters Default setting blank Mail subject Enter the mail subject Number of characters that can be entered 0 50 character...

Page 45: ... the following Host name is unavailable for the IP address Up to 8 destination addresses can be registered Default setting blank Unavailable IP addresses 0 0 255 255 127 0 0 1 Class D address 224 0 0 0 239 255 255 255 Class E address 240 0 0 0 255 255 255 255 To provide notification at an alarm occurrence to the desired IP address using Panasonic alarm protocol check the Alarm checkbox respective ...

Page 46: ...laying live images is available The unit setting configuration and unit control are unavailable Default setting 3 Live only Note By clicking i of User name check the registered user can be selected and the selected user s infor mation can be checked The registered user will be displayed with the access level Example admin 1 To delete the registered user click the DEL button after selecting the use...

Page 47: ...camera with the access level 2 Camera control When the IP address already in use is entered and the SET button is clicked the respective host infor mation will be overwritten Access level Select the access level of the host from the following 1 Administrator 2 Camera control 3 Live only Refer to page 46 for further information about the access level Default setting 3 Live only Note By clicking i o...

Page 48: ...address it is necessary to configure the DNS set tings on the Network tab of the Network setup page page 51 Authentication Select the authentication method to send e mails from the following None It is not necessary to clear any authentication to send e mails POP before SMTP It is necessary to clear the POP server authentication first to use the SMTP server to send e mails SMTP It is necessary to ...

Page 49: ...essary to configure the DNS set tings on the Network tab of the Network setup page page 51 User name Enter the user name login name to access the FTP server Number of characters that can be entered 1 32 characters Default setting blank Password Enter the password to access the FTP server Number of characters that can be entered 0 32 characters Default setting blank Control port Enter a control por...

Page 50: ...p DHCP Select ON or OFF to determine whether or not to use the DHCP function Configure the DHCP server not to assign the same IP addresses used for the other network cameras and PCs whose IP address is unique Refer to the network administrator for the settings of the server Default setting OFF IP address When not using the DHCP function enter the IP address of the unit Do not enter the IP address ...

Page 51: ...to config ure the settings for the DNS When using the DHCP function it is possible to obtain the DNS address automatically by selecting AUTO Refer to the network administrator for further information about the settings Default setting MANUAL Primary DNS Secondary DNS When MANUAL is selected for DNS enter the IP address of the DNS Refer to the network administrator about the IP address of the DNS D...

Page 52: ...Network Address Translation NAT have this function This function is to be set in a router Enter Global IP address colon port number in the Address box of the browser via the Internet Global address for the WAN vvv xxx yyy zzz Private address for the LAN 192 168 0 254 vvv xxx yyy zzz 82 vvv xxx yyy zzz 81 Broadband router Internet WAN Cable modem xDSL modem Address translation using the port forwar...

Page 53: ... 1 min is selected error message may be displayed on the System log tab of the Maintenance page page 57 depending on the response from the DDNS server This does not affect operation of the unit Configure the settings relating to DDNS DDNS Click the DDNS tab on the Network setup page page 50 The settings relating to DDNS can be configured on this page When accessing the unit via the Internet from t...

Page 54: ...ry to enter the community name When no community name is entered the SNMP function will not work Unit title Enter a unit title to be used to manage the unit with the SNMP function Number of characters that can be entered 0 32 characters Default setting blank Unit location Enter the name of the location where the unit is installed Number of characters that can be entered 0 32 characters Default set...

Page 55: ...isplayed page 49 FTP periodic transmission Select ON or OFF to determine whether or not to transmit images using the FTP periodic transmission function When ON is selected it is necessary to configure the settings of the FTP server page 49 The images from the selected channel will be transmit ted to the FTP server page 26 Default setting OFF Directory Enter the directory name where the images are ...

Page 56: ...e result will be displayed at the bottom of the win dow How to delete the set schedule Step 1 Uncheck the check box of the desired day of the week Step 2 Click the SET button after completing the settings The result will be displayed at the bottom of the win dow Configure the schedule settings of the FTP periodic transmission Schedule setup Click the FTP tab on the Network setup page page 50 The s...

Page 57: ...100 logs each When using the SD memory card the logs will be saved even when the power of this unit is turned off When not using the SD memory card the logs will be deleted when the power of this unit is turned off 80 KB of system log is periodically overwritten every 5 minutes Considering the system log occurs periodically it is recommended to maintain the SD memory card approx 5 MB or more When ...

Page 58: ...er or not to initialize the settings after the firmware upgrade Step 4 Click the Upgrade button The confirmation window will be displayed When Do not default settings after completing the upgrade is selected the confirmation window will not be displayed After completing the upgrade delete temporary internet files page 70 Important Upgrade the firmware using a PC in the same sub net as of the unit ...

Page 59: ...ata to the default Camera restart Click the Execute button to restart all the cameras con nected to the unit After restart it is impossible to control the cameras for around 1 minute Unit restart Click the Execute button to restart the unit The unit will be inoperable for around 3 minutes after the restart just as when the power is turned on Notes To initialize all the settings do the following Tu...

Page 60: ...ess of the server may be incorrect Check if the IP address of the server is configured correctly The SMTP server may be down Ask the network admin istrator Sender mail address may be incorrect Check if the mail settings are configured correctly Sender mail address may be incorrect Check if the mail settings are configured correctly Content Description Category FTP server error Connection error Fai...

Page 61: ...work administrator The designated IP address of the DNS server may be incorrect Check if the DNS settings are configured correctly The DNS server may be down Ask the network administrator Time correction succeeded An error occurred in the NTP function Check if the NTP settings are configured cor rectly Entered user name or password may be incorrect Check if the DDNS settings are configured correct...

Page 62: ... the front of this unit to ON The network settings will be initialized and the IP address will return to the default setting 192 168 0 10 After the unit is initialized access the unit and set the IP address again Are the set IP addresses valid Is the link LED right by the network connector lit When it is not lit connection to a LAN may not be established or a network may be not working correct ly ...

Page 63: ...een changed from the default setting Use with the default font setting 47 Some contents are not dis played on the browser Reload the contents by pressing the F5 key Cannot close the authentica tion window Are the correct user name and password entered Confirm the correct user name and password The line speed settings may be not the same between the unit and the hub for example 100M BASE TX Full fo...

Page 64: ...pgrade it No image is displayed Images are displayed blurry Operating Instructions Reference pages Cause solution Symptom Depending on the traffic of the network or the concen tration of access to the unit there might be difficulties displaying the camera picture Click the reload button of the browser to request the camera picture to be refreshed The image is not being refreshed Is any part of the...

Page 65: ...not be saved on the SD memory card SD MEMORY NOT DETECTED is notified in the message of Panasonic alarm protocol Is ON selected for Super Dynamic 3 Set to OFF When flickers appear frequently set the shutter speed to AUTO or 1 100 Are objects hard to focus on with the auto focus func tion Adjust the focus manually Is there dust or dirt on the transparent part over the lens of the dome cover camera ...

Page 66: ...er software installed on a PC Confirm that the viewer software Network Camera View3 is installed Is the audio mode set correctly To receive and transmit audio select Interactive for Audio mode on the Audio tab Are you accessing with the access level that can receive and transmit audio Access with the access level selected for Authentication on the Audio tab Are images displayed on a full screen Au...

Page 67: ...e current status in real time Operating Instructions Does your PC meet the system requirements to oper ate this unit Check the system requirements Are the mic input button and audio output buttons set to display the current status in real time Select Real time for Alarm status update mode on the Basic tab of the Basic setup page Operating Instructions 21 Reference pages Cause solution Symptom ...

Page 68: ...P Professional SP2 is installed on the PC in use 1 Right click on the desktop and select Properties from the displayed pop up menu 2 Select Settings from Display Properties and then click the Advanced button 3 Click the Troubleshoot tab and disable the DirectDraw acceleration by adjusting the level of Hardware acceleration When displaying MPEG 4 images on two browser win dows or more images from t...

Page 69: ...n on the displayed Security Warning window Depending on the OS installed on the PC the following may occur Follow the instructions below when the following occurred By performing the following solutions other applications and the security level may not be affected The Information Bar expressed in the following symptom and solutions will be displayed just below the address bar only when there is in...

Page 70: ...ick the Delete Files button in the Temporary Internet files section on the General tab The firewall function of the anti virus software may be filtering the port of the camera Exclude the port num ber of the camera from the list of the port numbers to be filtered by the anti virus software Images are not displayed or refreshed smoothly Reference pages Solutions Symptom ...

Page 71: ...5 624 5010 http www panasonic ca Panasonic Sales Company Division of Panasonic Puerto Rico Inc San Gabriel Industrial Park 65th Infantry Ave KM 9 5 Carolina P R 00985 809 750 4300 2007 Matsushita Electric Industrial Co Ltd All Rights Reserved N1007 1127 3TR005218BAB Printed in Japan For European and other fields Matsushita Electric Industrial Co Ltd Osaka Japan http panasonic net Importer s name a...

Reviews: