8
3.4.
How to Define the Model Suffix (NTSC or PAL model)
There are five kinds of HX-WA20.
• a) HX-WA20 (Japan domestic model)
• b) HX-WA20PP
• c) HX-WA20EB/EC/EF/EG/GN
• d) HX-WA20GT
• e) HX-WA20PU/GA/GC
What is the difference is that the “INITIAL SETTING” data which is stored in Flash ROM mounted on Main P.C.B..
3.4.1.
Defining methods:
To define the model suffix to be serviced, refer to the rating label and caution label which are putted on the Unit.
NOTE:
After replacing the MAIN P.C.B. or IC121, be sure to achieve update the Firmware and adjustment.
1. The firmware together with version up procedure are available at “software download” on the “Support Information from
NWBG/VDBG-AVC” web-site in “TSN system”.
2. The adjustment instruction is available at “software download” on the “Support Information from NWBG/VDBG-AVC” web-site
in “TSN system”, together with Maintenance software.
Summary of Contents for HX-WA20EB
Page 10: ...10 4 Specifications ...
Page 11: ...11 ...
Page 12: ...12 ...
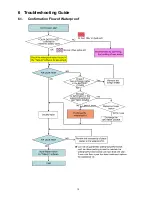
Page 15: ...15 6 Troubleshooting Guide 6 1 Confirmation Flow of Waterproof ...
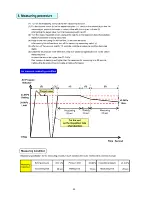
Page 16: ...16 6 2 Airtight Inspection with Air Leak Tester ...
Page 17: ...17 6 3 Air Leak Tester RFKZ0528 Operating Instruction ...
Page 18: ...18 ...
Page 19: ...19 ...
Page 20: ...20 ...
Page 24: ...24 8 3 1 Removal of the Top Ornament Fig D1 8 3 2 Removal of the Front Cabinet Unit Fig D2 ...
Page 25: ...25 8 3 3 Removal of the Side L Cabinet Unit Fig D3 Fig D4 ...
Page 26: ...26 Fig D5 Fig D6 8 3 4 Removal of the Battery Cover Fig D7 ...
Page 27: ...27 Fig D8 8 3 5 Removal of the Waterproof Rubber Fig D9 Fig D10 ...
Page 30: ...30 Fig D16 8 3 10 Removal of the Lens Holder Fig D17 8 3 11 Removal of the Speaker Fig D18 ...
Page 31: ...31 8 3 12 Removal of the LCD Unit Fig D19 Fig D20 ...
Page 32: ...32 Fig D21 Fig D22 ...
Page 33: ...33 Fig D23 8 3 13 Removal of the Hinge Cover LCD Case T Unit Fig D24 Fig D25 ...
Page 34: ...34 Fig D26 Fig D27 8 3 14 Removal of the LCD O Ring Fig D28 ...
Page 35: ...35 Fig D29 8 3 15 Removal of the LCD Panel Fig D30 ...
Page 36: ...36 Fig D31 8 3 16 Removal of the Mic Unit Monitor P C B Fig D32 Fig D33 ...
Page 37: ...37 Fig D34 8 3 17 Removal of the LCD Hinge Unit Fig D35 ...
Page 38: ...38 Fig D36 Fig D37 ...
Page 39: ...39 8 3 18 Removal of the Switch Unit Fig D38 Fig D39 ...
Page 40: ...40 Fig D40 ...
Page 43: ...43 10 Maintenance 10 1 Regular Maintenance Flow ...
Page 44: ...44 10 2 Component Kits of Waterproof ...
Page 50: ...Model No HX WA20 Schematic Diagram Note ...
Page 51: ...Model No HX WA20 Parts List Note ...
Page 52: ...Model No HX WA20 Main DMA Schematic Diagram Main P C B ...
Page 53: ...Model No HX WA20 Main PWA Schematic Diagram Main P C B ...
Page 54: ...Model No HX WA20 Main STA Schematic Diagram Main P C B ...
Page 55: ...Model No HX WA20 Monitor Schematic Diagram Monitor P C B ...
Page 56: ...Model No HX WA20 Main P C B Component Side ...
Page 57: ...Model No HX WA20 Main P C B Foil Side ...
Page 58: ...Model No HX WA20 Monitor P C B Component Side ...
Page 59: ...Model No HX WA20 Monitor P C B Foil Side ...
Page 66: ...Model No HX WA20 Frame and Casing Section 1 ...
Page 67: ...Model No HX WA20 Frame and Casing Section 2 ...
Page 68: ...Model No HX WA20 Packing Parts and Accessories Section ...


