background image


VQT4X05 

17

3

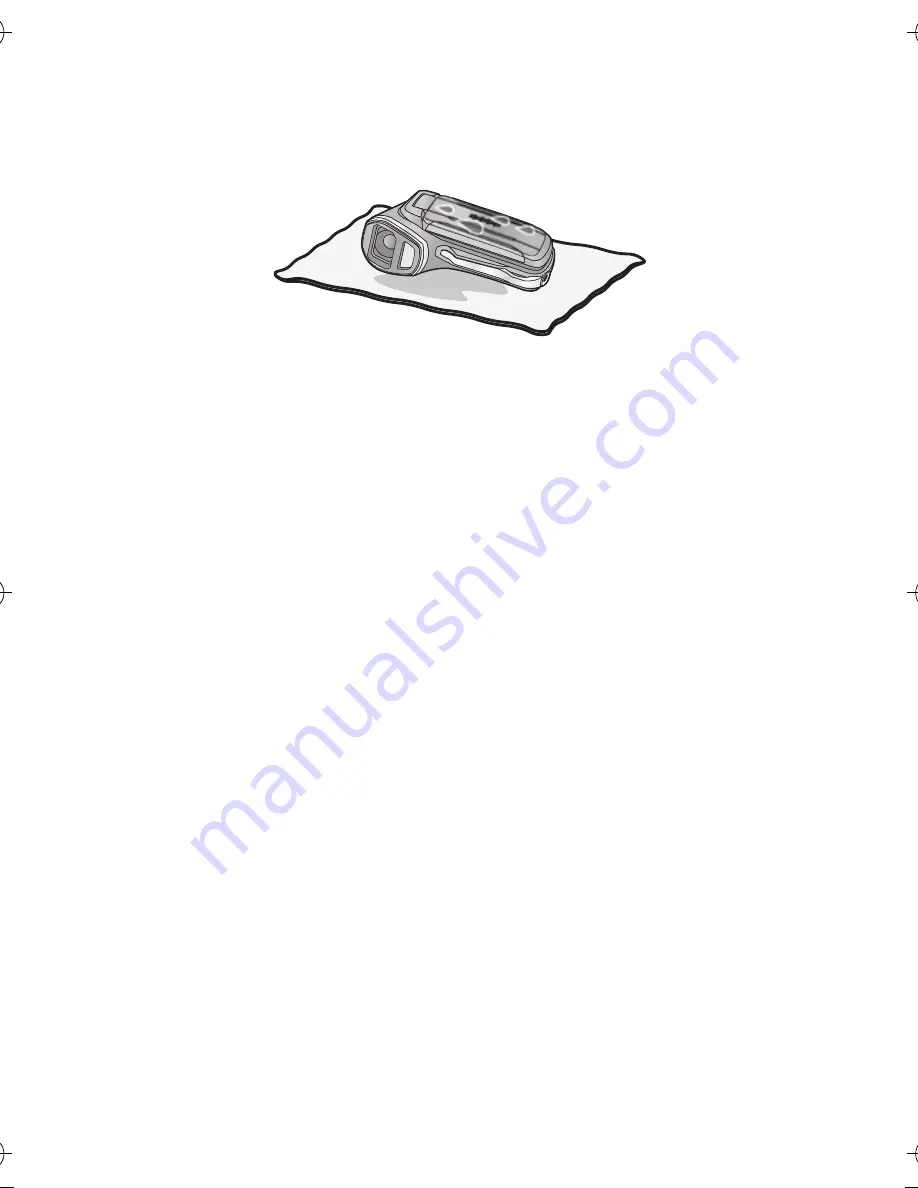
Wipe off water drops on this unit with a dry soft cloth 
and dry this unit in a shaded area which is well 
ventilated.

Dry this unit by standing it on a dry cloth.

If water collects on the microphones or speaker of this unit, it may 
cause lower sound or distorted sound. Dry for approximately 1 hour.

Do not dry this unit with hot air from dryer or similar. It will deteriorate 
the waterproof performance or cause failure due to deformation.

Do not use chemicals such as benzine, thinner, alcohol, or cleanser, or 
soap or detergents.

4

Confirm that there are no water droplets, open the 
rear door, and wipe off any water droplets or sand left 
inside using a soft dry cloth.

Water droplets may adhere to the card when the rear door is opened 
without thoroughly drying. Also, water may accumulate in the gap 
around the card compartment, the battery compartment or the terminal 
connector. Be sure to wipe any water off with a soft dry cloth.

The water droplets may seep into this unit when the rear door is closed 
while it is still wet, causing condensation or failure.

HX-WA30&WA3&WA03_PP&PU-VQT4X05_mst.book  17 ページ  2013年1月16日 水曜日 午後5時29分

Summary of Contents for HX-WA03W

Page 1: ...it For more detailed explanation please refer to Owner s Manual PDF format which is recorded in the enclosed CD ROM For USA and Puerto Rico assistance please call 1 800 211 PANA 7262 or contact us via...

Page 2: ...e unit Do not expose accessories battery pack AC adaptor SD memory card and etc to rain moisture dripping or splashing Do not place objects filled with liquids such as vases on accessories Use only th...

Page 3: ...the equipment and receiver Connect the equipment into an outlet on a circuit different from that to which the receiver is connected Consult the dealer or an experienced radio TV technician for help F...

Page 4: ...than the specified unit Do not get dirt sand liquids or other foreign matter on the terminals Do not touch the plug terminals i and j with metal objects Do not disassemble remodel heat or throw into...

Page 5: ...is device may not cause interference and 2 this device must accept any interference including interference that may cause undesired operation of this device This transmitter must not be co located or...

Page 6: ...d If this unit is adversely affected by electromagnetic equipment and stops functioning properly turn this unit off and remove the battery or disconnect AC adaptor Then reinsert the battery or reconne...

Page 7: ...al SD Memory Card SDHC Memory Card and SDXC Memory Card are referred to as the SD card Functions that can be used for motion picture recording motion picture playback are indicated by in this owner s...

Page 8: ...arging the battery 24 Charging and recording time 25 Recording to a card 27 Cards that you can use with this unit 27 Inserting removing an SD card 28 Turning the unit on off 30 Setting date and time 3...

Page 9: ...oom HX WA3 HX WA03 42 Recording in Slow Motion Mode HX WA30 43 Recording with a filter effect 45 Recording underwater 46 Wi Fi HX WA30 What you can do with the Wi Fi function 47 If the Wi Fi connectio...

Page 10: ...the IP68 rating Provided the care and maintenance guidelines described in this document are strictly followed this unit can operate underwater to a depth not exceeding 10 m 33 feet for a time not exc...

Page 11: ...un screen chemical etc wipe it off immediately Waterproof function of this unit is for sea water and fresh water only Any malfunction caused by customer misuse or mishandling will not be covered by th...

Page 12: ...the lens is fogged condensation It is not a malfunction or failure of this unit It may be caused by the environment in which this unit is used Be careful of condensation since it causes lens stains fu...

Page 13: ...r sand etc on the surrounding area water will leak within a few seconds causing malfunction Check before using underwater Do not open or close the rear door in places with sand and dust close to water...

Page 14: ...integrity of the rubber seals may decrease after about 1 year with use and age To avoid permanently damaging this unit the seals should be replaced once each year Please contact Panasonic s Service C...

Page 15: ...the water will splash strongly such as rapid flow or waterfall Strong water pressure may be applied and it may cause malfunction This unit will sink in the water Take care not to drop this unit and l...

Page 16: ...he unit in fresh water pooled in a shallow container for 10 minutes or less Do not directly rinse this unit with tap water 2 Hold this unit as shown in the illustration and shake it gently several tim...

Page 17: ...ue to deformation Do not use chemicals such as benzine thinner alcohol or cleanser or soap or detergents 4 Confirm that there are no water droplets open the rear door and wipe off any water droplets o...

Page 18: ...hat water that entered the gaps around the zoom button etc drains out For this reason bubbles may appear when the unit is immersed in water but this is not a malfunction Draining water from the unit D...

Page 19: ...r when the temperature is under 0 oC 32 oF If the unit gets very cold in cold places such as ski resorts or places at high altitude performance of the LCD monitor may temporarily drop immediately afte...

Page 20: ...reparation Accessories Check the accessories before using this unit Product numbers correct as of Jan 2013 These may be subject to change Battery pack VW VBX090 Handstrap VFC4817 AC adaptor VSK0750 CD...

Page 21: ...hase in some markets Some of these battery packs are not adequately protected with internal protection to meet the requirements of appropriate safety standards There is a possibility that these batter...

Page 22: ...rt the battery A terminal markings Confirm that lever B is locked on to the battery It is possible to mistakenly insert the battery upside down so be sure to check the orientation carefully To remove...

Page 23: ...en close lever 3 Lock the LOCK lever Lock securely to the points where the red portion C of the open close lever and LOCK lever are no longer visible LOCK SD CARD BATTERY LOCK SD CARD BATTERY SD CARD...

Page 24: ...rged while the unit is off or in the Standby Mode The battery cannot be charged while the unit is recording or playing back It is recommended to charge the battery in a temperature between 10 oC and 3...

Page 25: ...USB cables except the supplied one We recommend using Panasonic batteries l 20 58 If you use other batteries we cannot guarantee the quality of this product Do not heat or expose to flame Do not leave...

Page 26: ...y starting stopping recording turning the unit on off moving the zoom lever etc Remaining battery level display The remaining battery level is displayed on the LCD monitor The display will turn red an...

Page 27: ...ass 4 or higher of the SD Speed Class Rating for motion picture recording Keep the Memory Card out of reach of children to prevent swallowing Preparation Recording to a card Please confirm the latest...

Page 28: ...e SD card is formatted all of the recorded data is deleted Once the data is deleted it cannot be restored Caution Check that the status indicator has gone off 1 Open the rear door Status indicator A W...

Page 29: ...n the illustration and press it straight in as far as it will go Press the center of the SD card and then pull it straight out 1 Close the rear door 2 Slide the open close lever 3 Lock the LOCK lever...

Page 30: ...ower button to turn on the unit The LCD monitor turns on Preparation Turning the unit on off To turn off the unit Hold down the power button until the LCD monitor goes off Pressing the power button fo...

Page 31: ...an item DATE TIME DISP using the SET button and then tilt the SET button to the right or press the SET button 3 When DATE or TIME is selected Tilt the SET button to the left or right to select the des...

Page 32: ...the waterproof performance After the notes are displayed the recording mode setting screen is automatically displayed To move to the next display press the SET button After the notes are displayed th...

Page 33: ...ecorded to the built in memory 1 Open the LCD monitor 2 Press the REC button to change to recording mode 3 Press the recording start stop button to start recording A When you begin recording appears 4...

Page 34: ...n memory 1 Open the LCD monitor 2 Press the REC button to change to recording mode 3 For Auto Focus only Press the button halfway A Focus area area inside brackets 4 Press the button fully If you cont...

Page 35: ...ecording mode 3 Select the menu l 38 4 Start recording by pressing the recording start stop button 5 Press the recording start stop button again to stop recording The modes appropriate for the conditi...

Page 36: ...file to play back using the SET button and press the SET button A The information for the file in the yellow frame is displayed Tilt and hold the SET button up or down to display the next or previous...

Page 37: ...ures Watching Video Pictures on your TV Connect the unit to a TV using the AV cable supplied or a HDMI micro cable optional Connecting the AV cable in the wrong direction may cause damage to the USB A...

Page 38: ...to the left 3 Select tab A using the SET button and tilt the SET button to the right or press the SET button 4 Select from menu items B using the SET button and tilt the SET button to the right or pr...

Page 39: ...e that reflects the currently displayed setting is displayed C Applicable mode indicator Setting is applied to still picture and motion picture recording Setting is applied to still picture recording...

Page 40: ...uage on the screen display and the menu screen Formatting Please be aware that if a medium is formatted then all the data recorded on the medium will be erased and cannot be restored Back up important...

Page 41: ...hange to recording mode During zoom operations the zoom bar is displayed i Zoom and Digital Zoom can be set in ZOOM MODE Basic Using the zoom Zoom button T side Close up recording zoom in W side Wide...

Page 42: ...recording mode 2 Press the zoom range button On the normal zoom recording screen the icon is displayed On the double range zoom recording screen the icon is displayed You cannot operate the zoom rang...

Page 43: ...switch the recording mode Each time you press the button display changes Basic Recording in Slow Motion Mode HX WA30 SLOW MOTION MODE Records a slow motion picture at 120 240 or 480 frames per second...

Page 44: ...elected If you press the SET button the recording mode switches You can also switch the mode during recording standby 5 Press the recording start stop button again to pause recording MENU SLOW MOTION...

Page 45: ...motion pictures and still pictures 1 Press the REC button to change to recording mode 2 Select the menu l 38 You can also display the CREATIVE CONTROL menu by pressing the button Basic Recording with...

Page 46: ...aintenance after use in water are displayed Please check beforehand to maintain the waterproof performance Press the MENU button to exit the message screen After use underwater wash the unit in fresh...

Page 47: ...the Wi Fi connection For the operations and settings of your device such as the smartphone please read the operating instructions of the device Wi Fi HX WA30 What you can do with the Wi Fi function Fe...

Page 48: ...ess point is registered in this unit The device may be unable to locate the wireless access point due to problems with the signal Use Manual Connection The Wi Fi function will not work underwater Easy...

Page 49: ...ve been correctly input Make sure the smartphone is not connected to the wireless access point If it is connected to the wireless access point change the Wi Fi access point using the smartphone s Wi F...

Page 50: ...and WPA2 are marks or registered marks of the Wi Fi Alliance DLNA the DLNA Logo and DLNA CERTIFIED are trademarks service marks or certification marks of the Digital Living Network Alliance Other name...

Page 51: ...ntly by or for Panasonic Corporation 2 the software owned by third party and licensed to Panasonic Corporation and or 3 the open source software For the software categorized as 3 please refer to the d...

Page 52: ...2 ch Recording mode and transfer rate Approx 17 Mbps VBR Approx 15 Mbps VBR Approx 15 Mbps VBR Approx 9 Mbps VBR Approx 3 Mbps VBR Approx 24 Mbps VBR Approx 24 Mbps VBR Approx 18 Mbps VBR Approx 14 Mb...

Page 53: ...K 16 9 1 2 33z 1MOS image sensor Total Approx 14400 K Effective pixels Motion picture 14300 K 4 3 11900 K 16 9 Still picture 14300 K 4 3 11900 K 16 9 Lens Auto iris F2 8 to F3 9 Focal length 4 0 mm to...

Page 54: ...Normal Approx 10 cm 3 9 q Wide Approx 1 m 3 3 feet Tele Macro Approx 1 cm 0 39 q Wide Approx 80 cm 2 6 feet Tele Zoom Motion picture 5k optical zoom 18k i Zoom 120k digital zoom Still picture 5k optic...

Page 55: ...or audio output level Linear PCM USB Reader function SD card Read only No copyright protection support Built in memory Read only Hi Speed USB USB 2 0 USB terminal Type micro B AV output share Battery...

Page 56: ...oC to 35 oC 14 oF to 95 oF The performance of the battery recording time operating time may decrease temporarily when using in a temperature between j10 oC and 0 oC 14 oF and 32 oF cold places such as...

Page 57: ...and the device to be dropped onto a plywood panel 3 cm 0 10 feet thick with the LCD screen folded with the screen side inward per the above MIL STD 810F Method 516 5 Shock standards Paint peeling defo...

Page 58: ...ription VW VBX090 Rechargeable Lithium Ion Battery Pack RP CHEU15 HDMI micro cable Please refer to page 25 concerning the battery charging time and available recording time NOTE Accessories and or mod...

Page 59: ...ORDER TO PANASONIC NATIONAL PARTS CENTER 20421 84th Ave S Kent WA 98032 Ship To Mr Mrs Ms First Last Street Address City State Zip Phone Day Night 4 Shipping information UPS delivery requires complet...

Page 60: ...nd labor for non rechargeable batteries antennas and cosmetic parts cabinet This warranty only applies to products purchased and serviced in the United States or Puerto Rico This warranty is extended...

Page 61: ...requests by visiting our Web Site at http www panasonic com help or contact us via the web at http www panasonic com contactinfo You may also contact us directly at 1 800 211 PANA 7262 Monday Friday...

Page 62: ...nstallation set up adjustments misadjustment of consumer controls improper maintenance improper batteries power line surge lightning damage modification introduction of sand humidity or liquids commer...

Page 63: ...800 726276 Costa Rica 800 PANA737 800 7262737 El Salvador 800 PANA 800 7262 Guatemala 1 801 811 PANA 1 801 811 7262 Chile 800 390 602 From a cell phone 797 5000 Venezuela 800 PANA 800 800 7262 800 Uru...

Page 64: ...rketing Company of North America Division of Panasonic Corporation of North America One Panasonic Way Secaucus NJ 07094 Panasonic Canada Inc 5770 Ambler Drive Mississauga Ontario L4W 2T3 F0113AS0 Pana...

Reviews: