background image

12

SQT0149 (ENG)

The unit can record still pictures or motion pictures to an SD card or built-in memory. To record to an 
SD card, read the following.

Cards that you can use with this unit

Use SD cards conforming to Class 4 or higher of the SD Speed Class Rating for motion 
picture recording.
When recording a motion picture with [REC MODE] set to [1080/50M] or in FULL HD Slow 
Motion Video Mode, use an SD card conforming to Class 10 of the SD Speed Class Rating. If 
the SD Speed Class Rating is lower than Class 10, recording may suddenly stop.

Keep the Memory Card out of reach of children to prevent swallowing.

Inserting/removing an SD card

When using an SD card not from Panasonic, or one previously used on other equipment, for the first 
time on this unit, format the SD card. (

l

24) When the SD card is formatted, all of the recorded data 

is deleted. Once the data is deleted, it cannot be restored.

Caution:
Check that the access lamp has gone off.

Preparation

Recording to a card

Please confirm the latest information about SD Memory Cards/SDHC Memory Cards/SDXC 
Memory Cards that can be used for motion picture recording on the following website.

http://panasonic.jp/support/global/cs/e_cam

(This website is in English only.)

1

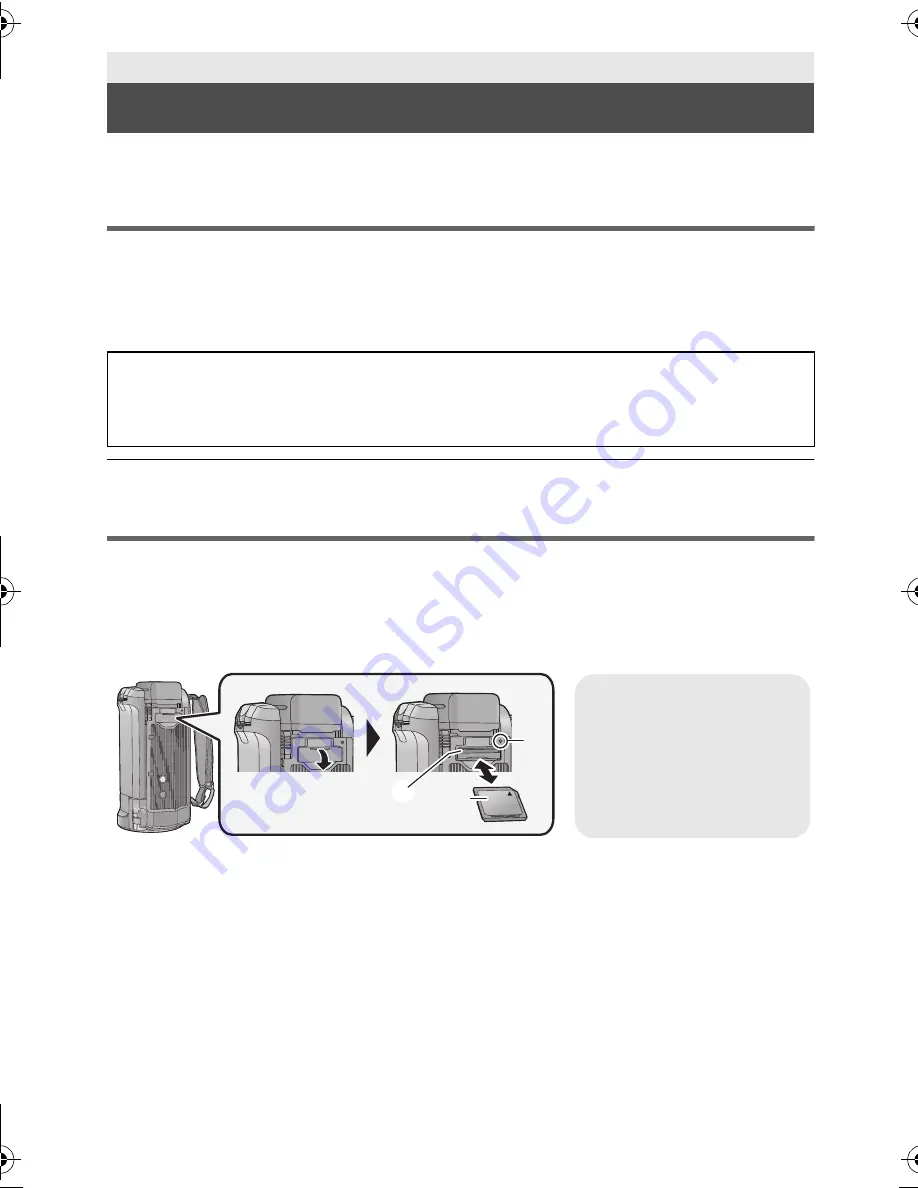
Open the SD card cover and insert (remove) the SD card into (from) the 
card slot 

B

.

Face the label side 

C

 in the direction shown in the illustration and press it straight in as far as 

it will go.

Press the centre of the SD card and then pull it straight out.

2

Securely close the SD card cover.

Securely close it until it clicks.

Access lamp 
[ACCESS] 

A

When this unit is accessing 
the SD card or built-in 
memory, the access lamp 
lights up.

Simplified-HC-W850&W850M&V750&V750M&V730EP&EB-SQT0149_mst.book  12 ページ  2014年1月9日 木曜日 午後2時28

Summary of Contents for HC-W850

Page 1: ...V730 Please read these instructions carefully before using this product and save this manual for future use This document explains basic operations of the unit For more detailed explanation please ref...

Page 2: ...es Do not remove covers Do not repair this unit by yourself Refer servicing to qualified service personnel CAUTION To reduce the risk of fire electric shock or product damage Do not install or place t...

Page 3: ...our local municipality Penalties may be applicable for incorrect disposal of this waste in accordance with national legislation Note for the battery symbol bottom symbol This symbol might be used in c...

Page 4: ...e RP CDHM15 RP CDHM30 optional About using a headphone Excessive sound pressure from earphones and headphones can cause hearing loss Listening at full volume for long periods may damage the user s ear...

Page 5: ...ge 12 for more details on SD cards For the purposes of these operating instructions SD Memory Card SDHC Memory Card and SDXC Memory Card are referred to as the SD card The smartphone and tablet are in...

Page 6: ...Recording motion pictures 19 Recording still pictures 19 Recording with the Sub Camera Twin Camera HC W850 HC W858 HC W850M 20 Using the zoom 21 Motion picture Still picture playback 21 Watching Vide...

Page 7: ...der accessory and consumable items for your product with ease and confidence by phoning our Customer Communications Centre Monday Friday 9 00 am 5 00 pm Excluding public holidays Or go on line through...

Page 8: ...VSK0815K DC cable K2GHYYS00002 USB cable K2KYYYY00236 HDMI mini cable K1HY19YY0021 Shoe adaptor VYC1055 A CD ROM Software CD ROM Operating Instructions SFM0013 Optional accessories EB Battery charger...

Page 9: ...paration Power supply It has been found that counterfeit battery packs which look very similar to the genuine product are made available to purchase in some markets Some of these battery packs are not...

Page 10: ...d off indicating that charging has begun It will turn off when the charging is completed Connecting to the AC outlet It is possible to use this unit with power supplied from the AC outlet by turning o...

Page 11: ...to the recordable time when repeatedly starting stopping recording turning the unit on off moving the zoom lever etc Battery capacity indication The battery capacity indication is displayed on the LC...

Page 12: ...the first time on this unit format the SD card l 24 When the SD card is formatted all of the recorded data is deleted Once the data is deleted it cannot be restored Caution Check that the access lamp...

Page 13: ...ing Mode and Playback Mode by pressing the recording playback button If you touch the recording mode switching icon in Recording Mode this unit can be switched between Motion Picture Recording Mode an...

Page 14: ...isplay the recording mode switching icon Display of the recording mode switching icon will disappear when no touch operation is performed for a specific period of time To display it again touch the sc...

Page 15: ...ture Touch the centre of the icon Touching the touch screen will not operate while you are touching another part of the touch screen Slide while touching Move your finger while pressing on the touch s...

Page 16: ...operation icons It is also possible to switch the operation icons by sliding the Touch Menu right or left while touching it A Touch Menu Display of the Touch Menu will disappear when no touch operatio...

Page 17: ...setting When the unit is turned on for the first time a message asking you to set the date and time will appear Select YES and perform Steps 2 to 3 to set the date and time The card and built in memor...

Page 18: ...rightness and colour balance settings to the Intelligent Auto Mode and record 1 Creative Control You can record motion pictures with added effects Scene Mode This option allows this unit to automatica...

Page 19: ...button again to pause recording Recording can also be started stopped by touching the recording button icon 1 Open the LCD monitor and set this unit to Still Picture Recording Mode l 14 2 Press the bu...

Page 20: ...ay it 2 Start recording Rotate the Sub Camera to the desired position The Sub Camera works in Auto Focus which adjusts focus automatically Normally hold this unit as shown in the illustration when rec...

Page 21: ...then select the still picture C or the recording format of the motion picture D you wish to play back Touch Enter Basic Using the zoom Basic Motion picture Still picture playback Zoom lever Zoom butto...

Page 22: ...e next previous page j Slide the thumbnail display upward downward while touching it j Switch the Touch Menu and then touch up down on the thumbnail scroll lever 6 Select the playback operation by tou...

Page 23: ...ay After touching touching the submenus and items will cause function descriptions and settings confirmation messages to appear After the messages have been displayed the guide display is cancelled La...

Page 24: ...hone please read the operating instructions of the device SETUP FORMAT MEDIA desired media MENU Built inMemory 1 SD CARD HDD 2 HC W850M HC V750M Wi Fi HC W850 HC W858 HC W850M HC V750 HC V757 HC V750M...

Page 25: ...e connection the Wi Fi connection will be aborted Reset the connection settings Check how to connect to the wireless access point and how to set the security settings Make sure the wireless access poi...

Page 26: ...time every time to connect to a smartphone It may take longer time to connect depending on the Wi Fi connection setting of the smartphone but it is not a malfunction This unit is not displayed in the...

Page 27: ...cording mode and transfer rate AVCHD 1080 50p Maximum 28 Mbps VBR PH Maximum 24 Mbps VBR HA Average 17 Mbps VBR HG Average 13 Mbps VBR HE Average 5 Mbps VBR MP4 iFrame 1080 50M Maximum 50 Mbps VBR 108...

Page 28: ...tor 7 5 cm 3 0z wide LCD monitor Approx 460 K dots Microphone 5 1 channel surround microphone Zoom microphone Focus microphone Stereo microphone Minimum required illumination Approx 2 lx 1 25 with Low...

Page 29: ...395 g with battery supplied and an SD card optional HC W850 HC W858 HC W850M HC V750 HC V757 HC V750M HC V730 HC W850 HC W858 HC W850M HC V750 HC V757 HC V750M HC V730 Operating temperature 0 oC to 40...

Page 30: ...on for your safety Power source AC 110 V to 240 V 50 60 Hz AC input 0 25 A DC output DC 5 0 V 1 8 A Dimensions VSK0815L 66 4 mm W k72 mm H k46 3 mm D VSK0815K 66 4 mm W k78 8 mm H k31 mm D Mass VSK081...

Page 31: ...of NFC Forum Inc in the United States and in other countries DLNA the DLNA Logo and DLNA CERTIFIED are trademarks service marks or certification marks of the Digital Living Network Alliance Other name...

Page 32: ...p panasonic net Panasonic Corporation 2014 Manufactured by Panasonic Corporation Kadoma Osaka Japan Importer for Europe Panasonic Marketing Europe GmbH Panasonic Testing Centre Winsbergring 15 22525 H...

Reviews: