background image

English

15

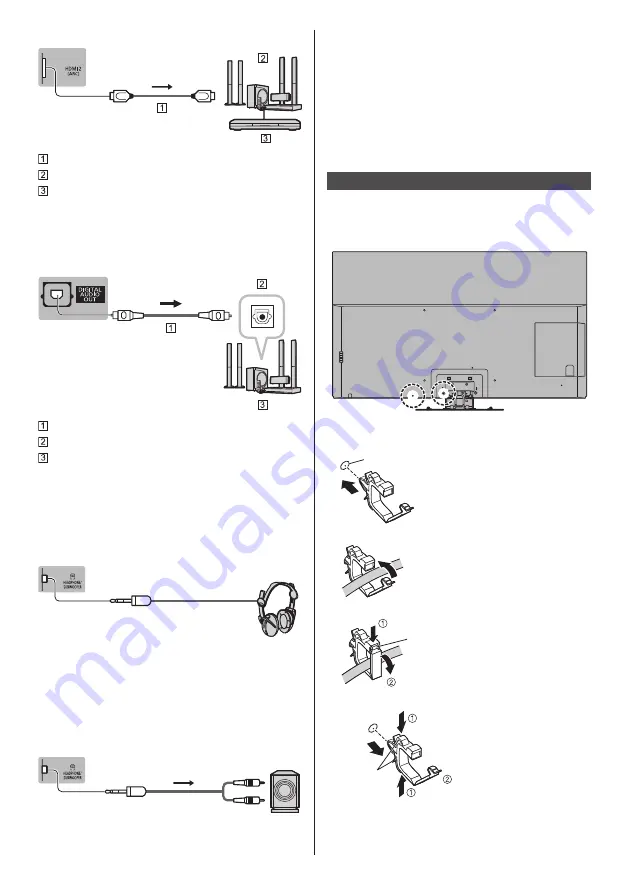
 TV

 
   HDMI cable
   Amplifier with speaker system
   External equipment (DVD Player, etc.)

● 

 Use HDMI2 to connect the TV to an amplifier which 
has ARC (Audio Return Channel) function.
 If connecting to an amplifier without ARC function, 
use DIGITAL AUDIO OUT.

 TV

 
   Optical cable
   DIGITAL AUDIO IN
   e.g. Amplifier with speaker system


  Headphones

● 

 To use headphones, set [Headphone Terminal 
Output] to [Headphone].

● 

 For information about the volume settings, refer to 
[eHELP] (Search by Purpose > Settings > Sound).

 TV


 (3.5 mm stereo mini plug)


 Subwoofer

● 

 To use the subwoofer, set [Headphone Terminal 
Output] to [Sub Woofer].

● 

 For information about the headphone terminal output 
settings, refer to [eHELP] (Search by Purpose > 
Settings > Sound).

 TV


 Audio cable (3.5 mm stereo mini 
plug - audio pin plug)


 USB HDD (for recording)

● 

 Use USB 1 port for connecting the USB HDD.

● 

 For details, refer to [eHELP] (Search by Purpose > 
Recording).


  VIERA Link

● 

 Use HDMI1 - 4 for VIERA Link connection.

● 

 For details, refer to [eHELP] (Search by Purpose > 
Functions > VIERA Link “HDAVI Control™”).

  Cable arrangement

 Fix the cables using the cable clamp, cable tie, etc. and 
then attach the terminal cover to the TV.


  Fixing the Mains lead using the cable clamp 


 Attach the cable clamp

 Insert the cable clamp in a hole


 Hole

 Bundle the cable


 Set

 To release:


 Keep pushing the tab

 Tab

 Tab

 To remove from the TV:


 Keep pushing both side snaps

 Snaps

Summary of Contents for GZ1000G Series

Page 1: ...nce Please carefully read the Safety Precautions of this manual before use The images shown in this manual are for illustrative purposes only GZ1000G series GZ1000K series GZ1000M series GZ1000S series GZ1000T series For more detailed instructions please refer to eHELP Built in Operating Instructions How to use eHELP p 21 image TH 65GZ1000S Operating Instructions OLED TV English ...

Page 2: ... Sure to Read Important Notice 3 Safety Precautions 5 Accessories 8 Installing the TV 9 Installing the wall hanging bracket 11 Connections 11 Identifying Controls 18 First time Auto Tuning 20 Watching TV 21 How to Use eHELP 21 FAQs 23 Maintenance 24 Specifications 24 ...

Page 3: ...teed Not all features are available depending on service providers and network environments Notice for Digital terrestrial broadcasting functions The terms HDMI and HDMI High Definition Multimedia Interface and the HDMI Logo are trademarks or registered trademarks of HDMI Licensing Administrator Inc in the United States and other countries Dolby Dolby Vision Dolby Atmos Dolby Audio and the double ...

Page 4: ...dcasting services are received Consult your local Panasonic Dealer with coverage areas Not all the features are available depending on the country area broadcaster and service provider This TV has the capability for Digital broadcasting specifications But future Digital broadcasting services cannot be guaranteed Internet apps are provided by their respective service providers and may be changed in...

Page 5: ...es and ensure that the TV does not hang over the edge of the base Safety Precautions To help avoid risk of electrical shock fire damage or injury please follow the warnings and cautions below Mains plug and lead Warning If you detect anything unusual immediately remove the mains plug Mains plug types vary depending on the model and countries GZ1000G series GZ1000K series GZ1000M series GZ1000S ser...

Page 6: ...is case turn the TV off at the Mains power On Off switch then turn it back on Bluetooth wireless technology Caution The TV uses the 2 4 GHz radio frequency ISM band Bluetooth To avoid malfunctions or slow response caused by radio wave interference keep the TV away from the devices such as other wireless LAN devices other Bluetooth devices microwaves mobile phones and the devices that use 2 4 GHz s...

Page 7: ... lead to early failure of some electronic components cm 10 10 10 10 Ventilation should not be impeded by covering the ventilation openings with items such as newspapers tablecloths and curtains Whether you are using a pedestal or not always ensure the vents at the bottom of the TV are not blocked and there is sufficient space to enable adequate ventilation Moving the TV Caution Before moving the T...

Page 8: ...entionally Accessories Standard accessories Remote Control p 18 N2QAYB001189 Pedestal p 9 Cable clamp p 16 Cable clamp 2 p 15 Cable tie 3 p 15 Batteries 2 R03 p 19 Operating Instructions Accessories may not be placed all together Take care ...

Page 9: ...15 mm Base Pedestal cover Preparations Make sure to assemble the pedestal before taking out the TV from the carton Do not hold the screen panel part Make sure not to scratch or break the TV Assembling the pedestal Do not assemble the pedestal by any method other than those specified below ...

Page 10: ...al Be sure to remove the pedestal in the following procedures when you use the wall hanging bracket or repack the TV 1 Remove the pedestal cover 2 Remove the assembly screws from the pedestal 3 Pull out the pedestal from the TV C 2 ...

Page 11: ... wall hanging bracket installation Rear of the TV a b 55 inch model a 400 mm b 300 mm 65 inch model a 400 mm b 400 mm View from the side Depth of screw minimum 23 mm maximum 28 mm Diameter M6 Screw for fixing the TV onto the wall hanging bracket not supplied with the TV Warning Using other wall hanging brackets or installing a wall hanging bracket by yourself have the risk of personal injury and p...

Page 12: ...eep pushing both side snaps Snaps GZ1000M series GZ1000S series AC 110 240 V 50 60 Hz Aerial Special notices for receiving digital terrestrial Terminals 3 4 5 6 7 8 9 10 2 1 1 Model name plate 2 Headphone Subwoofer jack p 15 3 HDMI1 2 p 13 13 14 14 4 USB 1 port This symbol indicates DC operation 5 Aerial terminal p 12 6 ETHERNET terminal p 13 7 USB 2 3 port This symbol indicates DC operation 8 HDM...

Page 13: ...mix them TV RF cable RF mixer Aerial Analogue TV Aerial Digital TV If you receive analogue TV signals through a cable TV network an aerial is required to receive digital TV signals In this case using an RF mixer is not recommended because the TV signals interfere with each other An RF selector is available to switch analogue and digital TV signal TV Cable Analogue TV RF cable RF selector Aerial Di...

Page 14: ...HDR compatible equipment Connect the 4K compatible equipment to HDMI terminal using a 4K compatible cable and you can watch content in 4K format Supporting HDR does not increase the peak brightness capabilities of the TV panel HDMI Auto Setting Setup Menu Reproduces the image more precisely with the expanded colour gamut when connecting the 4K compatible equipment Select the mode depending on the ...

Page 15: ...put to Sub Woofer For information about the headphone terminal output settings refer to eHELP Search by Purpose Settings Sound TV Audio cable 3 5 mm stereo mini plug audio pin plug USB HDD for recording Use USB 1 port for connecting the USB HDD For details refer to eHELP Search by Purpose Recording VIERA Link Use HDMI1 4 for VIERA Link connection For details refer to eHELP Search by Purpose Functi...

Page 16: ... cable clamp and then attach the terminal cover cable cover to the TV Cable clamp Fix cables as necessary When using the optional accessory follow the option s assembly manual to fix cables Attaching the terminal cover pedestal cover Do not apply load to the terminal cover pedestal cover Be careful not to nip the cables between the TV and the terminal cover pedestal cover When using USB 2 port USB...

Page 17: ...English 17 Terminal cover C C ...

Page 18: ... Displays Subtitle Menu 17 Exit Returns to the normal viewing screen 18 HOME Displays Home For details refer to eHELP Search by Purpose Read first Features 19 APPS Displays Apps applications list 20 Cursor buttons Makes selections and adjustments 21 Return Returns to the previous menu page 22 Channel Up Down 23 Sound Mute On Off 24 Last view Switches to previously viewed channel or input mode 25 O...

Page 19: ...n for a while This is not a malfunction For information about panel maintenance refer to eHELP Search by Purpose Watching For best picture Screen Settings Installing Removing batteries Pull open Hook Note the correct polarity or Close Indicator Control panel When pressing 4 5 6 buttons the control panel guide appears on the right side of the screen for 3 seconds to highlight which button has been ...

Page 20: ... retune all channels Auto Tuning in Tuning Menu Setup Menu To add the available TV signal mode later Add TV Signal in Tuning Menu Setup Menu To initialise all settings Shipping Condition in System Menu Setup Menu First time Auto Tuning When the TV is turned on for the first time it will automatically search for available TV channels and give options to set up the TV These steps are not necessary i...

Page 21: ...t the menu select access To access How to use green Keyword Search Search the content of eHELP in the keyword Search by Purpose Search the content of eHELP for each item Support Access the support information FAQs etc 3 Select the item Example select access To return to the previous screen field Watching TV 1 Turn power on TV or Remote Control Mains power On Off switch should be on p 19 2 Select D...

Page 22: ...n if more than 1 page While the description is highlighted To open the reference screen To display the menu related to the description only for some descriptions red To check the features of this TV Search by Purpose Read first Features ...

Page 23: ...tup Menu The image or sound from external equipment are unusual when the equipment is connected via HDMI Set HDMI Auto Setting Setup Menu to Mode1 p 14 Parts of the TV become hot Parts of the TV may become hot These temperature rises do not pose any problems in terms of performance or quality When pushed with a finger the display panel moves slightly and makes a noise There is a little gap around ...

Page 24: ...ated and may be easily damaged Take care not to tap or scratch the surface with your fingernail or other hard objects Do not allow the cabinet and pedestal to make contact with a rubber or PVC substance for a long time This may degrade surface quality Mains plug Wipe the mains plug with a dry cloth at regular intervals Moisture and dust may cause fire or electrical shock Specifications TV Model No...

Page 25: ...Dolby Audio Fibre optic Receiving systems Band name 17 Systems Function 1 PAL B G H Reception of broadcast transmissions and Playback from Video Cassette Tape Recorders 2 PAL I 3 PAL D K 4 SECAM B G 5 SECAM D K 6 SECAM K1 7 NTSC M NTSC 3 58 4 5 MHz 8 NTSC 4 43 5 5 MHz Playback from Special VCR s or DVD 9 NTSC 4 43 6 0 MHz 10 NTSC 4 43 6 5 MHz 11 NTSC 3 58 5 5 MHz 12 NTSC 3 58 6 0 MHz 13 NTSC 3 58 ...

Page 26: ... bit Bluetooth wireless technology 2 Standard Compliance Bluetooth 4 2 Frequency Range 2 402 GHz 2 480 GHz 1 The frequency and channel differ depending on the country 2 Not all the Bluetooth compatible devices are available with this TV Up to 5 devices can be used simultaneously Note Design and Specifications are subject to change without notice Mass and Dimensions shown are approximate For inform...

Page 27: ...Built in wireless LAN and Bluetooth UAE TRA REGISTERED No ERxxxxx 18 DEALER No DA0052708 10 Nigeria Connection and use of this communications equipment is permitted by the Nigerian Communications Commission ...

Page 28: ... serial number label located on the rear panel when the terminal cover is removed You should note this serial number in the space provided below and retain this book plus your purchase receipt as a permanent record of your purchase to aid in identification in the event of theft or loss and for Warranty Service purposes Model Number Serial Number Web Site http www panasonic com Panasonic Corporatio...

Reviews: