23
[AWC MEMORY] Specifies the destination
where AWC setting is saved.
The destination to save AWC that starts by holding donw
the [BAR
] button on the front face of the CCU for 2
seconds or more is specified. The destination can be
selected with use of the [
e
] or [
f
] button. The destina-
tion is selectable from among 1 (default), 2 and 3.
When AWC is started by holding down the [BAR
]
button for 2 seconds or more at displaying an image, the
selected MEMORY number is displayed.
Note:
• If the indicator lights red when a scene file is
changed by pressing the [SCENE] button on the front
face of the CCU, restart AWC.
• If a different destination to save AWC is selected for
each scene file, the white balance adjustment is
required for each scene file.
9. White balance setting [WHITE BAL]
The white balance adjustment is selectable from the fol-
lowing:
AWC (default):
Activates the automatic white balance
control mode. This adjustment is suitable for a loca-
tion where a light source is stable.
When "AWC" is selected, the operation to adjust the
white balance is required.
ATW:
Activates the automatic white balance tracking
mode. The camera constantly checks and automati-
cally adjusts the white balance.
If the situation meets one of the following or other,
color may not be accurately reproduced. In these
cases, perform "AWC" to adjust the white balance.
• The subject is mostly highly-colored.
• The photographic atmosphere is under the bright
blue sky or at nightfall.
• The illumination of the light illuminating the sub-
ject is low.
MANU:
Manually adjusts the white balance.
When "AWC" is selected, follow the steps below to adjust
the white balance.
z
Aim the camera at a white subject.
AWC
AWC
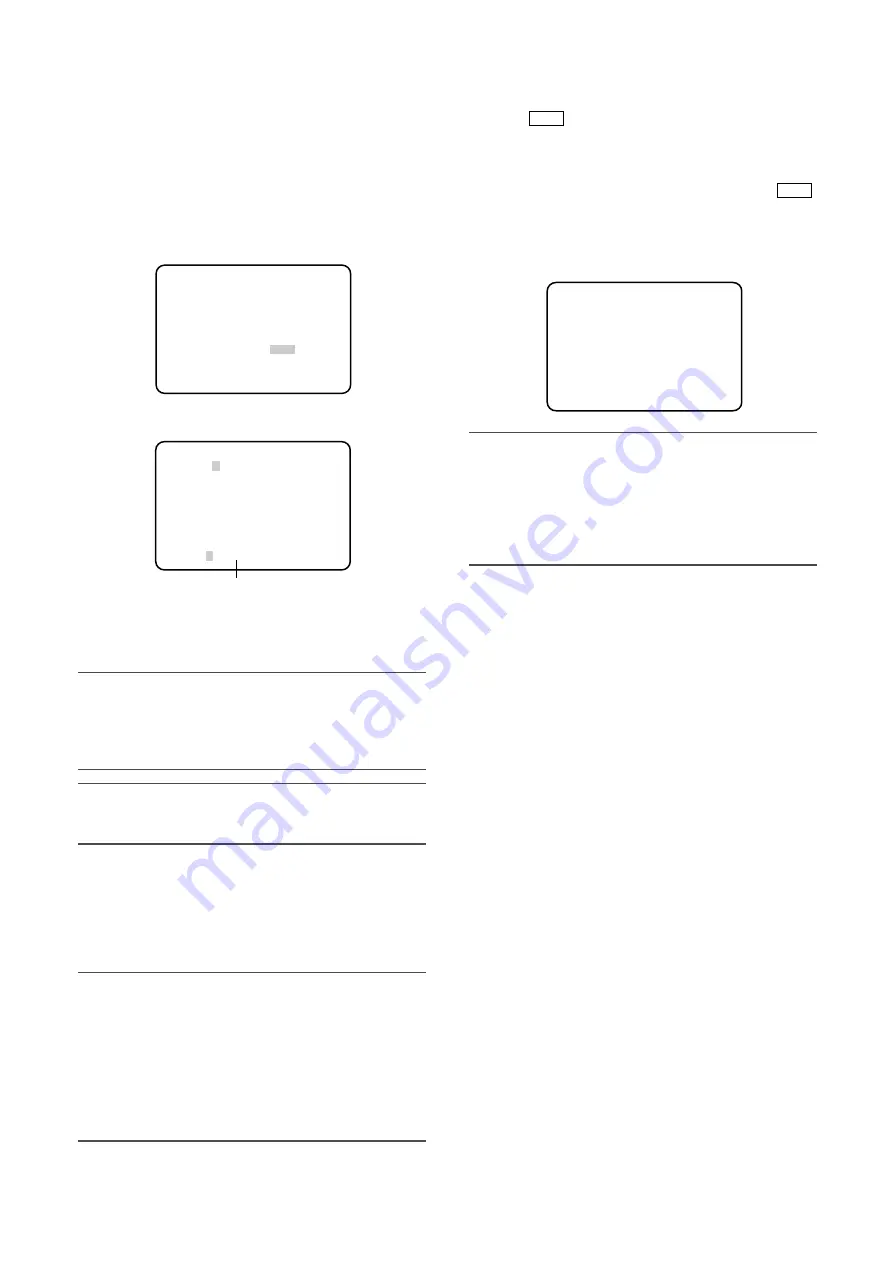
[FILE LABEL] Puts a label name instead of a
scene file number.
Characters (label) are displayed instead of the scene file
number that is displayed on the screen when the
[SCENE] button on the front face of the CCU is pressed.
Up to 16 alphanumerics and symbols can be used to cre-
ate a label. The created label is displayed in "LABEL" on
the "SCENE FILE" screen.
Follow the procedure below to specify the label.
z
Set "FILE LABEL" to "ON" and press the [SEL] button.
→
The title creation screen appears.
Note:
• Even when "FILE LABEL" is set to "OFF", pressing the
[SEL] button allows the label creation screen to
appear.
• A label can be created for each scene file.
Important:
• When "FILE LABEL" is set to "OFF", a label is not dis-
played even if the label is created.
x
Move the cursor to the target character with use of
the [
g
], [
h
], [
e
] and [
f
] buttons, and press the
[SEL] button.
→
The entered characters are displayed in the entry
range.
<Character entry>
• To revise a character, move the cursor to "
←
" or "
→
"
and press the [SEL] button.
Move the cursor to the character to be revised in the
entry range and reenter a correct character.
• To enter a blank, move the cursor to "SPACE" and
press the [SEL] button.
• To delete all the entered characters, move the cursor
to "RESET" and press the [SEL] button.
** SCENE FILE 1 ** P2
LABEL:................
FLARE COMP OFF
DNR LOW
MATRIX *USER
CHROMA GAIN .....
|
...160
TOTAL PED ....
|
.... 76
FILE LABEL *OFF
AWC MEMORY 1
RET END
"SCENE FILE" screen
ABCDEFGHIJKLM
NOPQRSTUVWXYZ
0123456789
().,'":;&#!?=
+-*/%$ÄÜÖÆÑÀ
←
→
SPACE
RET END RESET
................
Editing area
Label creation screen
AWC
MEMORY1
AWC-started screen


