12
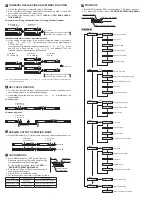
PRO MODE
●
When MODE indicator: PRO (yellow) lights up, PRO mode can be set.
●
For detail of PRO mode, refer to “
PRO MODE OPERATION MANUAL
.”
DOWN (-) key (select)
MODE indicator PRO (Yellow)
MODE key
UP (+) key (select)
SET key (confirm)
Procedure
<PRO1>
Shift amount setting
Timer setting
Responce time setting
Hysteresis setting
Emission power setting
Timer range setting
Teaching lock setting
Setting items in digital display setting
Setting of digital display turning
Time period hold setting
Data bank loading setting
Back up setting
Communication protocol setting
Copy lock setting
Copy action setting
Data bank saving setting
<PRO3>
<PRO4>
Copy setting
<PRO2>
ECO setting
Display adjustment setting
Setting of threshold value tracking
<PRO5>
Code setting
<PRO6>
Reset setting
CUSTOM setting
Interference prevention setting
Sensing output setting
<PRO7>
Logic operation setting
SET
SET
+, -
+, -
+, -
+, -
+, -
+, -
+, -
+, -
+, -
+, -
+, -
+, -
+, -
+, -
+, -
+, -
+, -
+, -
+, -
+, -
+, -
+, -
+, -
+, -
+, -
+, -
+, -
+, -
+, -
+, -
+, -
SET
SET
SET
SET
SET
8
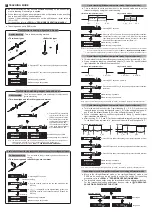
THRESHOLD VALUE FINE ADJUSTMENT FUNCTION
● Set the fine adjustment of threshold value in RUN mode.
● Also, the threshold value fine adjustment function can be used in forced ON
output mode and forced OFF output mode.
●
For setting of the sensing output, refer to
<PRO6>
in “
PRO MODE OPERA-
TION MANUAL
.”
<Normal mode, Rising differential mode or Trailing differential mode>
Confirmed
Press down
UP / DOWN key
Press down
SET key
Automatically set without pressing
down SET key in approx. 2 sec.
<Window comparator mode or Hysteresis mode>
●
When setting sensing output to the window comparator mode or hysteresis
mode, “
” and “
” can be changed to another by pressing down
SET key for 2 sec.
In case conducting threshold value fine adjustment of “
” or “
”, press
down UP key or Down key, and “
” or “
” are displayed. Then, the
threshold value fine adjustment can be conducted.
Press down
UP / DOWN key
Press down
SET key
Press down
UP / DOWN key
Confirmed
Automatically set without pressing
down SET key in approx. 2 sec.
Note: It may not respond when values of “
” and “
” are close because of relation of hysteresis. Be sure
to confirm with this device.
9
KEY LOCK FUNCTION
●
The key lock function prevents key operations so that the conditions set in
each setting mode are not inadvertently changed.
●
If operating key switch after key lock is set, “
” is indicated on the
digital display.
<Set key lock>
Automatic
Press down for
3 sec. or more
<Release key lock>
,
are displayed
Press down for
3 sec. or more
Automatic
10
SENSING OUTPUT OPERATION MODE
●
When MODE indicator: L / D (yellow) lights up, sensing output operation can be set.
Press down
SET key
Press down
UP / DOWN key
Confirmed
Confirmed
11
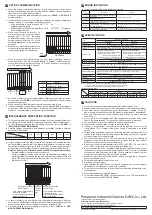
CUSTOM MODE
●
When MODE indicator: CUST (yellow) lights up,
Response time setting, Emission power setting
or Hysteresis setting can be displayed.
For the setting procedure, refer to
<PRO5>
in
“
PRO MODE OPERATION MANUAL
.”
●
By pressing UP key or DOWN key, the setting in
each item will be changed.
MODE indicator
CUST (Yellow)
UP key
SET key
DOWN key
MODE key
● Press SET key to confirm the setting.
●
For setting of each item, refer to the following table.
Item
Digital display
Reference item
Response time setting
<PRO 1: Response time setting>
Emission power setting
<PRO 1: Emission power setting>
Hysteresis setting
<PRO 1: Hysteresis setting>


