background image

26

中文

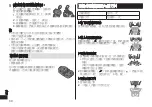
部件說明


a

c

b

d

背面

A

 主體

1

 保護蓋

2

 外層網面

3

 網層

4

 平滑滾輪

• 

協助鬚刨更輕鬆地
滑過皮膚

5

 網層拆除按鈕

6

 電源開關

7

 顯示燈

a. 「偵感」刀頭震動

感應燈( )

b.  電池電量指示燈
c.  開關鎖定燈( )
d.  充電狀態指示燈

( )

 充電插座

 外層網面部分

 拆除外層網面的按鈕

 內層刀片

 修剪器

 修剪器推桿

B

 電源供應器 (RE7‑87)

 轉接器

 電源插頭

 電源線

 電源線插頭

配件

C

 輕便旅行盒

D

 潤滑油

準備

充電


關掉電源。


抹乾充電插座上的水滴。

將電源線插頭插入鬚刨。

將轉接器插入家用插座。


檢查充電狀態指示燈( )有亮起。


充電約 1 小時後完成。

充電完成後,請拔除轉接器。

2

1


您無法在充電時使用鬚刨。

快速充電
即使電池用盡後,您也可以在充電 3 分鐘後剃鬚一次。

(視乎使用情況而異)

Summary of Contents for ES-LV5U

Page 1: ...Operating Instructions Household use Rechargeable Shaver Model No ES LV5U English 3 21...

Page 2: ...2...

Page 3: ...ating Instructions Household use Rechargeable Shaver Model No ES LV5U Safety precautions 4 Important information 8 Parts identification 10 Preparation 10 How to use 12 Cleaning the shaver 14 Replacing...

Page 4: ...esult in minor injury or property damage The symbols are classified and explained as follows This symbol indicates prohibition This symbol indicates requirement that must be followed WARNING This prod...

Page 5: ...the appliance if the AC adaptor is damaged or if the power plug fits loosely in a household outlet Do not damage the cord or the power plug Do not deface modify forcefully bend or pull the cord or the...

Page 6: ...s This appliance is not intended for use by persons including children with reduced physical sensory or mental capabilities or lack of experience and knowledge unless they have been given supervision...

Page 7: ...om the household outlet when not charging Failure to do so may cause electric shock or fire due to electrical leakage resulting from insulation deterioration Handling of the removed battery when dispo...

Page 8: ...se this watertight shaver in the shower and clean with water The following symbol means suitable for use in a bath or shower Treat yourself to wet lather shaves for at least three weeks and notice the...

Page 9: ...storing Store the shaver in a place with low humidity after use Failure to do so may cause malfunction due to condensation or rust Be sure to place the protective cap on the shaver when carrying arou...

Page 10: ...System outer foil release buttons Inner blades Trimmer Trimmer handle BAC adaptor RE7 87 Adaptor Power plug Cord Appliance plug Accessories CTravel case DOil Preparation Charging the shaver Turn the s...

Page 11: ...ime may change or the charge status lamp may not glow for a few minutes It will eventually glow if kept connected Recommended ambient temperature for charging is 10 C 35 C It may take longer to charge...

Page 12: ...r foil do not shave with only a part of the system outer foil 2 Press when finished While using Approximate amount of battery charge is displayed as LOW HIGH It will turn off approximately 5 seconds a...

Page 13: ...switch lock lamp will light up for 5 seconds and turn off Unlocking the power switch 1 Press for more than 2 seconds until the switch lock lamp turns off 2 Once the shaver starts operating release The...

Page 14: ...ve the outer foil section and clean with running water See page 15 for removing the outer foil section Splashing is reduced by rinsing the shaver in sonic vibration cleaning mode After rinsing with wa...

Page 15: ...ades system outer foil once every year inner blades once every two years Removing the outer foil section Press the foil frame release buttons and lift the outer foil section upwards Attaching the oute...

Page 16: ...attery life Why should the adaptor be disconnected after charge Charging the battery for more than 1 hour will not affect battery performance but disconnect the adaptor for safety and to save energy W...

Page 17: ...m Action The shaving sensor responds even though the shaver is not in contact with the skin When the shaver is extremely dirty remove the foil frame and wash with water See page 14 Replace the system...

Page 18: ...drive This does not indicate a problem Confirm that the blades are properly attached Wash the system outer foil with water See page 14 Problem Action The odor is getting stronger Clean the shaver Shav...

Page 19: ...be waterproof which may cause it to malfunction Remove the shaver from the AC adaptor Press the power switch to turn on the power and then keep the power on until the battery is completely discharged...

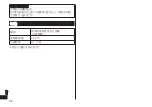
Page 20: ...20 English Specifications Power source See the name plate on the AC adaptor Automatic voltage conversion Motor voltage 3 6 V Charging time Approx 1 hour This product is intended for household use only...

Page 21: ...21 Panasonic ES LV5U 22 25 26 26 27 29 30 31 31 33 33 34...

Page 22: ...22 Panasonic Panasonic...

Page 23: ...23 26...

Page 24: ...24...

Page 25: ...25 Panasonic 26 Panasonic...

Page 26: ...26 a c b d A 1 2 3 4 5 6 7 a b c d B RE7 87 C D 1 2 1 3 2 1 3...

Page 27: ...27 LOW MID HIGH 5 6 10 35 2 20 30 3 1...

Page 28: ...28 2 LOW HIGH 5 LOW LOW 2 3 5 2 29 1 2 2 3 5 1 2 2 5...

Page 29: ...29 1 2 a 1 2 2 20 3 30 4...

Page 30: ...30 5 1 2 3 4 1 2 1 2...

Page 31: ...31 Panasonic ES LV5U WES9181 WES9170 6 6 1 Panasonic 28 30...

Page 32: ...32 29 1 2 2 3 5 29...

Page 33: ...33 30 1 2 3 Panasonic 1 5...

Page 34: ...34 3 6 V...

Page 35: ...35 MEMO...

Page 36: ...F EN HK Printed in Japan ES9700LV5U1J Y0722 0 Panasonic Corporation https www panasonic com Panasonic Corporation 2022...

Reviews: