background image

Thinner

Benzine

Alcohol

35

CAUTION

• Always unplug the unit before cleaning it. Never touch a power plug with wet hands.

Failure to follow these instructions may lead to electrocution or burns.

CAUTION

• Do not move the unit while someone is seated on it. Do not place objects on or sit, climb, or stand on 

the legrest.

• When moving the unit using the wheels, remove all obstacles from around it, make sure the backrest is 

in the upright position, lift it no higher than waist height (no higher than 31 in. (80 cm)) and roll it slowly.

Failure to do so may cause the unit to tip over, which may lead to damage or injury.

CLEANING AND MAINTENANCE

• Wipe these areas with a soft, dry cloth. (Do NOT 

use cloths containing any kind of chemical, etc.)

• If the synthetic leather is particularly dirty, soak a soft 

cloth in water or a 3~5% solution of mild detergent, 
wring it out thoroughly and tap the surface with it. 
Next, rinse the cloth in water, wring it out 
thoroughly and then wipe any remaining detergent 
from the surface, wipe the surfaces with a soft dry 
cloth and allow them to dry naturally.
(Do NOT use a hair dryer to try to dry the surfaces 
more quickly.)

• Do not allow these areas to come in contact with 

plastic for extended periods of time as this may 
lead to discoloration.

Areas Covered with Synthetic Leather

Lifting the Unit

Using the Wheels to Move the Unit

Pipe and Plastic Areas

Moving the Unit

(1) Wipe the unit with a cloth that has 

been soaked in a mild detergent and 
then thoroughly wrung out.

(2) Next wipe the unit with a cloth that 

has been moistened with just water 
and thoroughly wrung out.
* Make sure you thoroughly wring out 

the cloth first when cleaning the 
control panel.

(3) Allow the unit to dry naturally.
• Please do NOT use thinners, benzine 

or alcohol.

Seat Fabric

(1) Wipe the seat fabric with a cloth that 

has been soaked in a mild detergent 
and then thoroughly wrung out.

(2) Use a mild detergent and brush on 

areas where the seat fabric has 
become particularly soiled. Be careful 
not to brush the fabric too much as 
you may damage it.

(3) Next wipe the fabric with a cloth that 

has been moistened with just water 
and thoroughly wrung out.

(4) Allow the fabric to dry naturally.

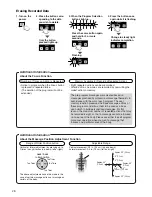
• Move the chair by having one person hold onto the rubber 

section on the underside of the legrest and another person 
use the handle on the back of the backrest. 

* Please hold the handle and legrest securely to avoid dropping 

the unit as it may damage your floor.

• Move the chair by holding onto the rubber section on the 

underside of the legrest and using the wheels.  
(It is easier to move the unit when the massage heads are 
positioned at the top of the backrest.)  

* Place a mat on the floor and gently roll the unit over it to avoid 

damaging the floor.

Mat

Mat

Wheels

Place your fingers in the groove.

Make sure the legrest is 
retracted to the minimum length.

Make sure the legrest is 
retracted to the minimum length.

Place the control 
panel on the seat.

Place the control 
panel on the seat.

Hold onto the rubber section on 
the underside of the legrest.  
Do not hold onto the fabric.

Hold onto the rubber section 
on the underside of the legrest. 
Do not hold onto the fabric.

Roll the unit 
slowly.

Rubber Section  

Handle  

Rubber Section

Water

Mild Detergent

Mild Detergent

Water

Water

Summary of Contents for EP3513 - MASSAGE LOUNGER - MULTI-LANG

Page 1: ...fore operating this unit please read these instructions completely and save for future reference Antes de utilizar esta unidad lea completamente estas instrucciones y guárdelas para referencia futura Avant d utiliser cet appareil nous vous recommandons de lire l ensemble de ces instructions et de les ranger dans un endroit accessible pour une consultation ultérieure ...

Page 2: ...See pages 1 39 Ver página S1 S39 INDICE Español Reportez vous à la page F1 F39 INDEX Français INDEX English ...

Page 3: ...d in water 9 Always raise the back cushion to check that the fabric of the unit itself has not been ripped before using the unit Please also check other areas to ensure that the fabric has not been ripped No matter how small the rip if you find one then immediately stop using the unit unplug the power cord and have the unit repaired at an authorized service center 10 Keep power cords away from hea...

Page 4: ...tretching the muscles which may result in discomfort do not use the unit for more than 5 minutes when first using it You can gradually increase the duration and strength of the massage as you become used to it Do not massage any one point for more than 5 minutes at a time Excessive massaging can overstimulate the muscles and nerves and result in an adverse effect To prevent excessive massaging do ...

Page 5: ... and have the massager checked by an authorized service center 6 Do not attempt to repair the massager yourself 7 Do not repeatedly operate any switch at short intervals Such action may cause the switch to malfunction 8 Some noise may be heard coming from the massager while in use This is due to the structure of the massager and is normal 9 Make sure there are no obstacles behind the chair before ...

Page 6: ...e with all local codes and ordinances DANGER Improper connection of the equipment grounding conductor can result in a risk of electric shock Check with a qualified electrician or serviceman if you are in doubt as to whether the product is properly grounded Do not modify the plug provided with the product if it will not fit the outlet have a proper outlet installed by a qualified electrician This p...

Page 7: ...on Seat Thigh Side Airbag Shiatsu Point in Hip Massage Sliding up down possible Legrest Legrest Slide Lever Includes integrated air massage function Extendable length of 9 in 22 cm Back Cover Handle Safety Precaution Label Power Cord Back Cushion Zipper Pillow Back Cushion Backrest Armrest Connector Hose Side Cover Pillow Fastener Child Safety Decal Power Switch Wheels Caution Label Front Back Loc...

Page 8: ...ts the volume of the voice guidance function Each press of the button progressively switches the volume through low medium high and off settings See Page 14 Voice Guidance Volume button Use this button to adjust the angle of the backrest and legrest See Page 13 Reclining button Use this button to adjust the position of massage heads for the upper body in manual operation mode See Page 30 CONTROL P...

Page 9: ...being massaged See Additional Information below Massage Area Display Flashes when the Focus button has been pressed to repeat a massage action Flashes when a repeated action is in progress during a program recorded to the user memory Focus and Repeat Display Lights up when the massage position is adjusted during a massage Roller Position Adjustment Display Displays hand arm massage action and stre...

Page 10: ...etc as this can lead to electric shock or other accidents Place the unit on a totally flat surface Failure to do so may result in the seat tipping over Do not use the massage lounger in direct sunlight or in places where it will be exposed to high temperatures such as in front of a heater etc as this can cause discoloration or hardening of the synthetic leather Place the unit on a mat to prevent f...

Page 11: ...e pinched when fitting the right armrest onto the unit 2 Fasten the armrest with the attachment screws Set the three attachment screws in place first and then tighten them firmly 1 Decide which side to attach the control panel stand to 2 Fasten the control panel stand with the attachment screws in four places Set the four attachment screws in place first and then tighten them firmly 1 Insert the a...

Page 12: ...he top tabs on the cover into the notches on the armrest Use the pillow fasteners to attach the pillow Cover for Side WITH Control Panel Stand Cover for Side WITHOUT Control Panel Stand 1 Insert the head of a flat tip screwdriver between the top tabs of the cover Performing this procedure with the Allen key or a cross point screwdriver could damage the unit 2 Pull out the top tabs of the cover two...

Page 13: ...d is heard 3 Move the control panel cord under the legrest to the left side 4 Fasten the control panel cord at three points Raising the Backrest to the Upright Position Placing the Control Panel into the Control Panel Stand Moving the Control Panel Cord to the Left Side When Control Panel Stand is on Left Side 1 Insert the control panel at an angle into the tabs on the control panel stand 2 Push t...

Page 14: ... Legrest Prior to Sitting Down Do not sit down when the legrest is raised Doing so may result in injury due to the chair tipping over To lower the legrest Pull the legrest slide lever make sure the legrest is fully retracted then press twice to return the legrest to its lowest position BEFORE SITTING DOWN Please Check the Following Before Using the Unit ...

Page 15: ...start to move shortly after the backrest During a lower body massage the legrest cannot be positioned at a level lower than that of the correct massage position See Page 16 Adjust the height of the pillow so that the bottom edge is at ear level If positioned too low the pillow may interfere with massage of the area around the neck ADJUSTINGTHE SEAT Adjusting the Reclining Angle Extending the Legre...

Page 16: ...ce Volume Adjusting the Control Panel Stand Arm Section The arm section bends to allow positioning towards the front or the rear The control panel can also be rotated sideways or tilted backwards when in the control panel stand The single beep when a button is pressed and the triple beep when the adjustable setting limit is reached are still audible ...

Page 17: ...Body For an overview of each massage program please refer to the additional information on page 20 Additional Information Stretch Uses mainly compression to slowly stretch out muscles and joints Recommended when a refreshing stretch is desired Deep Uses mainly kneading to manipulate and loosen muscles Recommended for those with mild stiffness and tension Swedish Uses mainly Swedish massage to gent...

Page 18: ...h the soft tapping Leg stretch and back vibration functions are also in operation Automatic adjustment of the angle of the legrest may also occur The body scanning will commence when the program is selected See Page 36 The body height range that can be properly detected by the body scanning is between approximately 4 6 and 6 1 ft 140 and 185 cm The unit will automatically recline to the correct ma...

Page 19: ... and forearm Pull the legrest slide lever to adjust the length of the legrest See Page 13 CAUTION Remove hard objects such as false fingernails wristwatches or rings when massaging hands or arms Failure to do so may result in injury Hand Arm Position Insert hand all the way inside Position the forearm and hand at the center of the armrest Note Raise backrest if difficulty is experienced when posit...

Page 20: ...etails on how to use the user memory function Press twice to return the backrest and legrest to the upright position Note The backrest and legrest may stop mid way if an occupant cannot be detected The unit will remain in the reclining position of the massage when it shuts off To stop mid way through a massage press The massage heads will return to the retracted position The backrest and legrest w...

Page 21: ...gth Levels 0 No massage 1 2 3 USINGTHE PRE PROGRAM AND QUICK MASSAGES Adjusting toYour Preference to adjust Press to toggle on off Press Lower body and hand arm massages will stop when set to zero The display will indicate whether leg stretch and back vibration functions are turned on or off Lit areas indicate active functions Unlit areas indicate inactive functions Leg Stretch Back Vibration Adju...

Page 22: ...r Back Kneading Finishing Touches SwedishB TapB KneadA KneadE KneadC ShiatsuD ShiatsuA SwedishB KneadA TapB FullRoll SwedishB SwedishC CompressionA FullRoll CompressionA CompressionB SwedishB FullRoll CompressionA FullRoll FullRoll CompressionA FullRoll GraspA KneadB SwedishB SwedishC SwedishD SwedishA SwedishB KneadB KneadD SwedishA SwedishD SwedishB SwedishB TapB SwedishD SwedishA SwedishB Knead...

Page 23: ...ength buttons Roller Position button Back Vibration OFF ON button Leg Stretch OFF ON button Self Program Creation buttons Setting Examples for Self Program A B and C below are provided as examples of how you can use the self program to create a massage using different time settings for different parts of your body A My neck and shoulders are always particularly stiff so I ll focus the massage on m...

Page 24: ...Strength or Focus buttons during the massage OK From this point on the instructions for operation are the same as those for those once a massage program is selected as covered starting from step 2 of page 16 Strength adjustment on off switching of leg stretch and back vibration functions are performed in the same way See Page 19 The duration of a massage in the self program mode is approximately 1...

Page 25: ... time settings will begin immediately OK 2 Close the cover If the cover is left open you will be unable to use the Leg Stretch OFF ON Back Vibration OFF ON Program Strength or Focus buttons during the massage This indicates that settings have already been recorded using that User Memory button To record over the existing data press the same button once more The existing data will be deleted To kee...

Page 26: ...te circulation Uses mainly strong upward strokes to promote circulation and alleviate tiredness Order of Massage for Upper Body About the Time Settings in Self Program The type and duration of massage actions in self program are determined according to different areas of the body based on the time settings Areas are massaged in order of the longest to the shortest time setting When two areas are s...

Page 27: ... body is adjusted See page 28 for the adjustable range The massage heads automatically shift to the same position they were adjusted to within the program The adjustment is also reflected in other massage programs 2 Making adjustments to your liking during the massage When you find a spot that feels good ADVANCED USAGEWITHTHE USER MEMORY FUNCTION A function that allows you to create customized pro...

Page 28: ...anges to settings were made in manual operation Setting changes are recorded in the same way as described in Change and record massage programs according to your preference Recordable Settings Settings are divided between those that are recorded for individual programs and those that are recorded as settings shared by all programs Record changes made to individual settings during a massage program...

Page 29: ...ediately if the occupant is determined to have the same physical characteristics The body scanning will be performed if physical characteristics are determined to be different due to the occupant s sitting position etc See Page 16 If time settings are recorded A massage using the recorded time settings will start To change time settings please see page 23 If time settings are not recorded Set time...

Page 30: ...nformation Range of Roller Position button About the Massage Position Adjustment Function Vertical or lateral adjustment by pressing up to 2 times in any direction up down left or right The above adjustments cannot be made in the case of certain massage actions or massage on certain of the body Adjustable Range Vertical movement 0 9 in 2 4 cm up and down Lateral movement 0 4 in 1 0 cm left and rig...

Page 31: ...The LED above the selected massage will light up The icon of the button pressed will light up on the display Massage actions are combinable Massage actions indicated by the area in chart below cannot be combined with one another Back Vibration OFF ON button Massage Strength button Lateral Movement button Massage Speed Adjustment button Roller Position button Recommended for focused massage using p...

Page 32: ...ay in five stages In some cases the degree to which the strength of the massage can be adjusted will depend on the area being massaged See Page 31 In some cases the massage strength will not immediately change even though the Massage Strength button is pressed The strength of the back vibration function is not adjustable Adjusting Massage Speed The speed of the massage is shown on the Upper Body M...

Page 33: ...o stop the massage immediately See Page 18 USING MANUAL OPERATION Lower Body Manual Operation for Massage of the Lower Body 1 Press to turn on the power 2 Select your massage action of preference The selected massage action may be changed to another part way through the massage If this is done the massage will start again once the air has been released Only the legrest will automatically rise to t...

Page 34: ...ne Recommended for focused stretching on a portion of the muscles along the spine Shiatsu A Shiatsu B Tap A Tap B Full Roll Regional Roll Knead A Knead B Swedish A Swedish B Compres sion A Compres sion B 2 Pressed One Time Knead A Knead B Control Display Pressed Two Times Knead A Pressed Three Times Knead B knead A B knead A B knead A B 3 Adjust to your preferred level of strength 4 When the massa...

Page 35: ...cted then the width of the massage will automatically be reduced before the Roll massage begins Upper Body Massage Adjustment The scope of the massage heads depending on the type of massage selected is shown below 1 After the seat thighs and the whole of the legs have been grasped by the airbags they are given a light stretch as the legrest lowers approximately 10 degrees 2 The legrest rises to it...

Page 36: ...arms vibration off on leg stretch off on neck back roller position 1 2 1 Check that nothing is under the legrest and that air is being released AFTER COMPLETINGTHE MASSAGE Return the Seat to the Original Position Disconnect the Power 2 Always return the legrest to its original length if it has been slid out 3 Press twice to return the chair to the upright position 4 If the pillow or back cushion h...

Page 37: ... that has been moistened with just water and thoroughly wrung out Make sure you thoroughly wring out the cloth first when cleaning the control panel 3 Allow the unit to dry naturally Please do NOT use thinners benzine or alcohol Seat Fabric 1 Wipe the seat fabric with a cloth that has been soaked in a mild detergent and then thoroughly wrung out 2 Use a mild detergent and brush on areas where the ...

Page 38: ...of a massage at the top of the shoulders If the body pressure level is different from that of the previous massage a soft tapping massage will begin When the Body Scanning Function is Not Completed Successfully A recorded voice message will announce In the interests of safety the massage will now finish because an occupant could not be detected in the chair during the body scanning This may occur ...

Page 39: ...tons on the control panel start to flash which is extremely unusual turn off the power switch wait for approximately 10 seconds and then turn the power switch on again If the massage heads stop again position yourself so that your back is not completely in contact with the backrest These sounds are perfectly normal and will not have any effect on the operation of the unit Cause and Remedy It is no...

Page 40: ...in after retracting it The unit has been damaged Stop using the unit immediately The power cord or power plug is abnormally hot Stop using the unit immediately The arm massage does not work The power cord has been disconnected See Page 11 The power switch on the unit has not been turned on See Page 11 A Pre Program button or Manual Operation button hasn t been pressed after pressing See Pages 15 2...

Page 41: ...dth Rolling Vertical Movement Approx 2 6 in 5 15 cm Other than the above Same as massage area left right Hand Arm Massage Air Pressure Strong Approx 33 5 kPa Medium Approx 26 0 kPa Weak Approx 15 5 kPa Sole Calf Seat Massage Air Pressure Sole Calf Areas Strong Approx 33 5 kPa Medium Approx 26 5 kPa Weak Approx 16 5 kPa Seat Thigh Areas Strong Approx 29 5 kPa Medium Approx 22 0 kPa Weak Approx 13 5...

Page 42: ...inted in Japan Impreso en Japón Imprimé au Japon P93103513231 Panasonic Consumer Electronics Company One Panasonic Way 4A 3 Secaucus New Jersey 07094 1 800 338 0552 for questions and comments www panasonic com massage ...

Reviews: