background image

4

SAFETY PRECAUTIONS

WARNING: To avoid risk of injury

1. This product should not be used by pregnant women, persons who are ill, or persons

with back, neck, shoulder or hip pain, or conditions of any kind, without consulting a
physician prior to use. Do not use on any area of the body that has received medical
treatment without consulting a physician prior to use.

2. Never put any part of the body between the massage heads. The squeezing action of

the massage heads may cause injury. Never put any part of the body between the
armrest and the chair back.
Do not place hands in the mechanical portion of the legrest located under the seat.

3. Do not use against bare skin; always wear clothing.

Thin clothing increases the effectiveness, but exposing the skin directly to the massager
can irritate the skin.

4. Do not use for massaging the head, abdomen, elbows or knees.

5. Do not stretch the back muscles for more than approximately 15 minutes at one time.

To avoid overstretching of muscles and resulting discomfort when first using the chair,
do not use for more than 5 minutes. You can gradually increase duration and intensity
as you adjust to the chair.
Do not massage any one point for longer than 5 minutes at a time.
Excessive massaging can overstimulate the muscles and nerves and result in an
adverse effect.
To prevent excessive massaging, do not use the massager for more than a total of 15
minutes per session. After approximately 15 minutes, the massage heads will return to
the “resting” position and stop.

6. While using the massager, if you start feeling sick, or if the massage seems painful, stop

use immediately.
While using the massager, if the pressure seems too strong, the movement of the
massage heads can be stopped by pressing the “quick stop” button.

7. When the chair back is in a reclined position, do not sit on it, or sit with your legs resting

on the headrest.
Do not sit on the legrest. The chair may fall over.

8. Do not allow children or pets to play on or around the chair, especially during operation.

9. Do not remove the back cushion without first reading instructions on page 16.

Summary of Contents for EP1014 - MASSAGE LOUNGER - MULTI-LANG

Page 1: ...ing Instructions Instrucciones de funcionamiento Before operating this unit please read these instructions completely and save this manual for future use Antes de utilizar esta unidad lea completamente estas instrucciones y guarde este manual para utilizarlo en el futuro en caso de ser necesario ...

Page 2: ...ANUALMENTE EL APOYO PARA LAS PIERNAS 27 UTILIZACIÓN 28 PARA INICIAR DETENER LA ACCIÓN DE MASAJE 28 OPERACIÓN DEL MASAJEADOR DE LAS PIERNAS 29 MASAJE PROGRAMADO 30 MASAJE MANUAL 31 COJÍN DEL RESPALDO Y APOYO PARA LA CABEZA 34 COJÍN DE ESPUMA 34 DETALLES DEL MASAJE PROGRAMADO 35 ALCANCE DE MOVIMIENTO DE LAS CABEZAS DE MASAJE 36 GUÍA PARA LA LOCALIZACIÓN Y SOLUCIÓN DE PROBLEMAS 37 ESPECIFICACIONES 38...

Page 3: ... use accessories not recommended by the manufacturer 6 This appliance should not be used by children Keep children away from massage lounger To avoid possible injury always return chair to an upright position and retract the legrest carefully Make sure nothing can be caught in the legrest mechanism 7 Never operate this appliance if it has a damaged cord or plug if it is not working properly or if ...

Page 4: ...me To avoid overstretching of muscles and resulting discomfort when first using the chair do not use for more than 5 minutes You can gradually increase duration and intensity as you adjust to the chair Do not massage any one point for longer than 5 minutes at a time Excessive massaging can overstimulate the muscles and nerves and result in an adverse effect To prevent excessive massaging do not us...

Page 5: ...ls Such action may cause the switch to malfunction 8 Some noise may be heard coming from the massager while in use This is due to the structure of the massager and is normal 9 Make sure there are no obstacles behind the chair before reclining it The chair can be reclined to a maximum angle of 160 If the back hits a wall or pillar the chair may malfunction Be sure to have ample space behind the cha...

Page 6: ...it and has a grounding plug that looks like the plug shown in Figure A Make sure that the product is connected to an outlet having the same configuration as the plug No adaptor should be used with this product HOW TO MOVE THE CHAIR CAUTION Do not move the chair while someone is sitting in it Failure to observe this point may cause the chair to tip over possibly resulting in personal injury Use the...

Page 7: ...indicator lamp Quick stop button Leg massage on off button Reclining buttons Massage heads adjustment neck roller position button Programmed massage course buttons Tapping on off button Kneading upward downward button Tapping button Rolling button Stroke adjustment button Width adjustment button Up down adjustment buttons on off on off quick stop leg massage reclining 1 3 5 neck roller position Pr...

Page 8: ...h the cord under the leg frames of the chair or any other objects 3 Using a flat head screwdriver or similar object insert into the lock switch and turn to open 4 Move the power switch to on When the operating lock switch is pointing toward lock the power switch cannot be moved to the on position After each use Be sure to turn the power switch to off To prevent children from using this unit lock t...

Page 9: ... that is most suitable for you The more you recline the more intense the massage will feel Adding or removing the cushion insert pad will also increase the intensity NOTE Position the chair at least 16 in 40 cm away from any wall or other obstacle to ensure adequate reclining space To lower Press and hold the button The legrest will be returned to its resting position and the backrest will be rais...

Page 10: ...osition Operation indicator lamp Quick stop button If you wish to stop the massage immediately press the quick stop button The massage heads will stop where they are Check to be sure that the operation indicator lamp goes out To resume the massage press the on off button The massage action or programmed massage course will start from the beginning To return the massage heads to the resting positio...

Page 11: ...button is lit 2 To turn off the leg massager press this leg massage on off button again Automatic timer for leg massager To prevent continuous operation of the leg massager there is a built in timer that will automatically turn off the leg massager after 30 minutes of operation Leg massage button on off on off quick stop leg massage reclining 1 3 5 neck roller position ...

Page 12: ...es Check to be sure that the course indicator lamp is lit Whole back Massages the whole back See massage course on page 17 Neck shoulder Massages primarily the neck and shoulders See page 17 Lower back Massages primarily the lower back See page 17 If you do not press any button the whole back course will start automatically about 40 seconds after you turn on the massager Massage will operate for a...

Page 13: ...sage heads press the up button To lower them press the down button 3 To adjust the intensity of massage press the intensity buttons Tapping massage 1 Press the tap button The massage heads move to the narrowest position and start the tapping massage 2 Press the width adjustment button to select the width of the massage heads narrow or wide 3 To raise the massage heads press the up button To lower ...

Page 14: ...ess the width adjustment button to select the width of the massage heads narrow or wide 3 To raise the massage heads press the up button To lower them press the down button All functions that include rolling are available for the entire back or for a limited section of the back by pressing the stroke adjustment button 4 To adjust the intensity of massage press the intensity buttons NOTE When using...

Page 15: ...lling and tapping rolling massage modes Press the stroke button to change the stroke NOTE Switches between regional and full 24in Approx 23 5 8 in 600 mm 4in Approx 4 3 4 in 120 mm When 4in is selected you can adjust the height of the massage heads to the desired position with the up down adjustment buttons Massage intensity adjustment Use of the intensity adjustment buttons allows you to adjust t...

Page 16: ...or people who have not previously experi enced a shiatsu massage For this reason a foam cushion insert pad is provided to soften the effect of the massage The cushion insert pad can be removed for a full shiatsu massage but be aware of the intensity of the massage you will receive The first time you try it if you decide to sit in a relaxed manner and do not use it for more than two minutes After t...

Page 17: ...ng Kneading rolling Tapping rolling Concentrated massage of neck and shoulders Rolling Tapping rolling Kneading rolling Upward kneading Downward upward kneading Tapping Tapping rolling Kneading rolling Kneading rolling Rolling Upward downward kneading Tapping Kneading rolling Lower back course Concentrated massage of lower back Rolling Kneading rolling Tapping rolling Upward kneading Tapping Rolli...

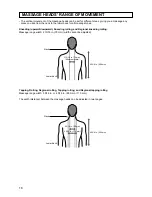
Page 18: ...olling and Regional kneading rolling Massage range width 2 15 16 in 75 mm width cannot be adjusted Tapping Rolling Regional rolling Tapping rolling and Regional tapping rolling Massage range width 3 5 16 in or 4 5 16 in 85 mm or 110 mm The width distance between the massage heads can be adjusted in two ranges Neck Lower back 2 15 16 in 75 mm Minimum width 23 5 8 in 600 mm Neck Lower back 23 5 8 in...

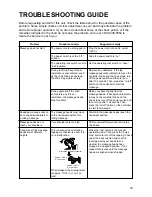
Page 19: ...der the back cushion and cushion insert pad with your hands to see whether the massage heads have stopped in an aligned position If not repeat this process until the massage heads are aligned when stopped Your shoulders are too high This is because an alternating tapping mechanism is used It is not a malfunction When stopped the misalignment is approx 13 32 in 1 cm at most Massage heads do not rea...

Page 20: ...ing Automatic repetition within approx 4 3 4 in 120 mm range Intensity adjustment Adjusts massage head protrusion steplessly within approx 1 3 4 in 45 mm range Shoulder position adjustment 5 steps Leg massage speed Approx 60 cycles min Automatic shut off Approx 15 min Dimensions H x W x D Not reclined with legrest lowered 41 11 32 x 34 41 64 x 40 35 64 in 1050 x 880 x 1030 mm Reclined with legrest...

Page 21: ...e la silla de masaje Para evitar posibles daños vuelva a poner siempre la silla en posición vertical y pliegue cuidadosamente el apoyo para las piernas Asegúrese de que no quede nada atrapado en el mecanismo de apoyo a las piernas 7 Nunca utilice este aparato si el cable de alimentación o su clavija está estropeado si no funciona bien o si ha sido estropeado Llame a su centro de servicio autorizad...

Page 22: ...rar excesivamente los músculos y las molestias que esto causa al utilizar por primera vez la silla no la utilice durante más de 5 minutos Podrá aumentar poco a poco la duración y la intensidad del masaje según se va adaptando a la silla No dé masajes a ninguna parte del cuerpo durante más de 5 minutos cada vez El masaje excesivo puede sobreestimular los músculos y los nervios y causar un efecto ad...

Page 23: ...ptor 8 La silla de masaje puede que produzca algunos ruidos al funcionar Esto se debe a su estructura No es ninguna condición anormal 9 Asegúrese de que no haya ningún obstáculo detrás de la silla cuando la recline La silla puede reclinarse con un ángulo máximo de 160 Si el respaldo golpea contra una pared o columna puede que éste funcione mal Asegúrese de disponer de un espacio amplio detrás de l...

Page 24: ... una corriente nominal de 120 voltios y tiene una clavija de conexión a tierra como la ilustrada en la figura A Asegúrese de conectar el producto a una toma de corriente cuya configuración sea la misma que la de la clavija Con este producto no deberá utilizarse ningún adaptador CÓMO MOVER LA SILLA PRECAUCIÓN No mueva la silla estando alguien sentado en ella Si no sigue este consejo la silla podrá ...

Page 25: ...ra de funcionamiento Botón de parada rápida Botón de encendido apagado de masaje de las piernas Botones de reclinación Botón de ajuste de las cabezas de masaje Botones del proceso de masaje programado Botón de encendido apagado de masaje golpeando Botón de masaje amasando y rodando hacia arriba hacia abajo Botón de masaje golpeando Botón de masaje rodando Botón de ajuste de extensión Botón de ajus...

Page 26: ...el cable de debajo de los marcos de las patas o de cualquier otro objeto 3 Utilizando un destornillador de punta plana o un objeto similar insértelo en el interruptor de bloqueo y gírelo hacia open 4 Mueva el interruptor de la alimentación hacia on Cuando el interruptor de bloqueo de operación esté apuntando hacia lock el interruptor de la alimentación no se podrá mover a la posición on Después de...

Page 27: ... u otro obstáculo para asegurar un espacio de reclinación adecuado Para extender Mantenga pulsado el botón Mientras el botón se mantiene pulsado el apoyo para las piernas se extenderá y el respaldo se reclinará Suelte el botón al alcanzar la posición deseada Para bajar Mantenga pulsado el botón El apoyo para las piernas volverá a su posición de reposo y el respaldo subirá Para obtener el máximo be...

Page 28: ...icadora de operación Botón de parada rápida Pulse el botón quick stop si desea parar inmediatamente el masaje Las cabezas de masaje se detendrán donde están Asegúrese de que la luz indicadora de operación esté apagada Para reanudar el masaje pulse el botón on off La acción de masaje o el proceso de masaje programado empezarán desde el principio Para volver a poner las cabezas de masaje en la posic...

Page 29: ... 2 Para apagar el masajeador de las piernas vuelva a pulsar este botón de encendido apagado de masaje de las piernas Temporizador automático para el masajeador de piernas Para impedir la operación continua del masajeador de piernas hay un temporizador incorporado que apaga automáticamente el masajeador de piernas después de 30 minutos de operación Botón de masaje de las piernas on off on off quick...

Page 30: ... la espalda Para dar un masaje en toda la espalda Vea el proceso de masaje en la página 35 Cuello y hombros Para dar un masaje principalmente en el cuello y en los hombros Consulte la página 35 Parte inferior de la espalda Para dar un masaje principalmente en la parte inferior de la espalda Consulte la página 35 Si no pulsa ningún botón el proceso de masaje de toda la espalda empezará automáticame...

Page 31: ...se el botón up Para bajarlas pulse el botón down 3 Para ajustar la intensidad del masaje pulse los botones intensity Masaje golpeando 1 Pulse el botón tap Las cabezas de masaje se mueven a la posición más estrecha y comienza el masaje golpeando 2 Pulse el botón de ajuste width para seleccionar la anchura de las cabezas de masaje estrecha o ancha 3 Para subir las cabezas de masaje pulse el botón up...

Page 32: ...botón de ajuste witdh para seleccionar la anchura de las cabezas de masaje estrecha o ancha 3 Para subir las cabezas de masaje pulse el botón up Para bajarlas pulse el botón down Todas las funciones que incluyen el masaje rodando se encuentran disponibles para toda la espalda o para una sección limitada de la espalda pulsando el botón de ajuste stroke 4 Para ajustar la intensidad del masaje pulse ...

Page 33: ...lamente en los modos de masaje rodando amasando y rodando y golpeando y rodando Pulse el botón stroke para cambiar la extensión NOTA Cambia entre zonal y completo 24in 23 5 8 600 mm aproximadamente 4in 4 3 4 120 mm aproximadamente Cuando se selecciona 4in usted puede ajustar la altura de las cabezas de masaje en la posición deseada con los botones de ajuste ascendente descendente Ajuste de intensi...

Page 34: ...ara las personas que no han recibido previamente masajes shiatsu Por esta razón se ha insertado un cojín de espuma que suaviza el efecto del masaje El cojín de espuma puede retirarse para recibir un masaje shiatsu completo pero tenga cuidado con la intensidad del masaje que usted reciba La primera vez que lo intente siéntese de una forma relajada y procure que el masaje no dure más de dos minutos ...

Page 35: ...o Golpeando y rodando Masaje concentrado en el cuello y en los hombros Rodando Golpeando y rodando Amasando y rodando Amasando hacia arriba Amasando hacia abajo arriba Golpeando Golpeando y rodando Amasando y rodando Amasando y rodando Rodando Amasando hacia arriba abajo Golpeando Amasando y rodando Proceso en la parte inferior de la espalda Masaje concentrado en la parte inferior de la espalda Ro...

Page 36: ...sando y rodando en zona localizada Anchura de la zona de masaje 2 15 16 75 mm no se puede ajustar la anchura Masajes golpeando rodando rodando localizado golpeando y rodando y golpeando y rodando localizado Anchura de la zona de masaje 3 5 16 ó 4 5 16 85 ó 110 mm La anchura distancia entre las cabezas de masaje se puede ajustar de dos formas Cuello Parte inferior de la espalda 2 15 16 75 mm Anchur...

Page 37: ... Verifique debajo del cojín del respaldo y del cojín de espuma con sus manos para ver si las cabezas de masaje se han parado en posición alineada Si no repita este procedimiento hasta que las cabezas queden alineadas cuando se paren Sus hombros están demasiado altos Esto se debe al uso de una mecanismo de golpes alternativos No es un funcionamiento defectuoso Al detenerse el desajuste es de aproxi...

Page 38: ...a espalda Repetición automática en una gama de 4 3 4 120 mm aproximadamente Ajuste de intensidad Ajuste sin pasos de la proyección de las cabezas de masaje dentro de una gama de 1 3 4 45 mm aproximadamente Ajuste de la posición de los hombros 5 pasos Velocidad de masaje para el apoyo para las piernas 60 ciclos minuto Apagado automático Aproximadamente 15 minutos Dimensiones Al x An x F No reclinad...

Page 39: ......

Page 40: ...Panasonic Consumer Electronics Company One Panasonic Way 4A 3 Secaucus New Jersey 07094 1 800 338 0552 for questions and comments www panasonic com massage Printed in USA No 1 EN SP ...

Reviews: