background image

EN16

Assembly

1

2

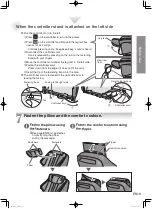
Attaching the controller stand to the right or left side panel of this unit

Fasten the armrest with the attachment screws.

 (On both the right and left sides)

Fasten the controller stand with the 

attachment screws. (4 positions)

Use this screw 

  Attachment screws (M6 

×

 13)


×

 4 pcs. (Black)

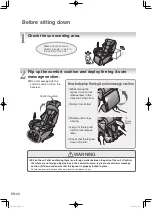
Insert the armrest into the unit.


R

 (right side) and 

L

 (left side) are indicated 

at the bottom of the armrest.


Insert the armrest from the top aligning the 


marks on the side of the armrest.


Be careful to avoid pinching your fingers and air plugs.

Fasten the armrest with the attachment 

screws. (One position for each side)

Use this screw 

 Attachment screws (M6 

×

 20)


×

 2 pcs. (Silver)

Slide the armrest toward the back 
while pushing it downward.

<When attaching on the right side panel>

Controller 

Stand

<When attaching the right armrest>


Tighten the 4 screws 
lightly using your fingers. 
(Make the screws level 
with the holes.)


Align the 2 prongs of the 
side panel with the holes 
of the controller stand.

How to tighten the screws

How to tighten the screws


Put an attachment screw 
on the edge of the allen 
key and tighten the screw 
horizontally to the hole.


Screw may be damaged 
if you tighten the screw 
inserted into the hole 
crookedly using an allen key.


Tighten firmly with the allen key.


Screw may be damaged if 
you tighten the screw inserted 
into the hole crookedly using 
an allen key.

Attachment screw

Hole

Allen key

Allen key

Align the 


marks.

Front

Back

EP-MA73_EN.indb   16

2014-4-24   10:24:04

Summary of Contents for EP-MA73T

Page 1: ...de modèle EP MA73 Before operating this unit please read these instructions completely Antes de utilizar esta unidad lea compleatamente estas instrucciones y guárdelas para referencia futura Avant d utiliser cet appareil nous vous recommandons de lire l ensemble de ces instructions et de les ranger dans un endroit accessible pour une consultation ultérieure EP MA73_EN indb 1 2014 4 24 10 23 50 ...

Page 2: ...26 29 Starting automatic course Adjusting the intensity of neck shoulder back and lower back massages Turning air massage or stretch On Off To register your preferences EN30 31 Registering favorite settings Starting with registered settings About the Heat massage heads Foot Heat EN32 33 When you want a concentrated massage of a particular body part with your favorite action such as Kneading on the...

Page 3: ...nce of poor circulation The unattended use of heat by children or incapacitated persons may be dangerous 18 Always raise the comfort cushion to check that the fabric covering the movement area of the massage heads in the backrest has not been ripped before using the unit Please also check other areas to ensure that the fabric has not been ripped No matter how small the rip if you find one then imme...

Page 4: ...eme care when you use this mode in order to avoid back pain or injury Use only for short periods of time no more than 16 minutes Reinstall the comfort cushion if you want to restore to normal massage intensity 7 While using the massager if you start feeling sick or if the massage seems painful stop using it immediately While using the massager if the pressure seems too strong the movement of the m...

Page 5: ...ximum angle of 170 If the back hits a wall or pillar the chair may malfunction Be sure to have ample space behind the chair Recline the chair slowly in order to avoid contact with an obstacle 8 When excessive pressure is applied to the massage heads they may stop moving for safety When moving the heads up from the lowered position one s body weight may stop the heads movement In such a case slight...

Page 6: ...body only Raise the comfort cushion for use You can use this unit as a normal reclining chair Main functions To use the massage function When not using the massage function Automatic course Page EN26 Heat massage heads Page EN32 Foot Heat Page EN32 Manual operation Page EN34 Air action Page EN38 Stretch action Page EN38 Comfort cushion for extra comfort Use your chair in a wide variety of situatio...

Page 7: ...pprox 79 cm 31 1 in Length with leg rest folded down Approx 153 cm 60 2 in Length with leg rest extended Approx 173 cm 68 1 in Amount of recline of leg section Approx 11 cm 4 3 in Amount of slide of sole massage section Approx 18 cm 7 1 in Height With pillow attached Approx 66 cm 26 in Front Side Maximum length Approx 202 cm 79 5 in Unit dimensions Armrest height Approx 73 cm 28 7 in Backrest heig...

Page 8: ...age section Leg rest Flat section Use the unit as a comfort chair by rotating and storing when not using for massaging Leg rest Leg sole massage section Includes air massage function Position can be adjusted by sliding sole massage section Includes built in Heat heater section 4 Pillow 2 Retracted position of massage heads 3 Shoulder side massage section Includes integrated air massage function 9 ...

Page 9: ...be stored when not using for massage Leg rest is rotated manually while pulling on the leg rest rotation lock release lever Leg rest Leg sole massage section Flat section Leg sole massage section 21 22 Lock switch Power switch Lock switch key Lock switch key tag For preventing children from swallowing it by accident Lock switch is set to open and power switch is set to on prior to leaving the fact...

Page 10: ...roller See page EN25 3 13 Quick stop button Press this button to stop the massage immediately POSITION button See page EN27 9 10 DEMO button See page EN26 BACKHEAT Heat massageheads See page EN32 On Offbutton Foot Heat On Off button See page EN32 19 AIRMASSAGEselectionOn Offbuttons See page EN38 Shoulder arm lower back leg foot air 5 15 7 17 6 16 8 18 TAP button See page EN37 REPEAT button See pag...

Page 11: ...ay See page EN38 12 Air intensity display See page EN28 5 7 10 11 8 4 6 Back intensity display See page EN29 Massage ending display Demo course ULTRA KNEAD display Voice guidance volume display See page EN51 Current approximate massage position flashes Currently selected air massage parts light up Current air massage position flashes Currently selected stretch parts light up Current stretch positi...

Page 12: ...uld touch the floor Area where unit touches the floor Mat Keep at least 10 cm 3 9 in away from the wall Approx 202 cm 79 5 in Approx 30 cm 11 8 in Width approx 90 cm 35 4 in Approx 49 cm 19 3 in Setting up the massage lounger Main unit Accessories Armrests Right Left Right Left indication Back of the armrest Controller 4 mm Cross section Allen key 1 This is initially inserted in the lock switch of...

Page 13: ...til it has been set on the floor completely If you release your hands before the leg rest is fully extended the leg rest will forcefully return to the initial position The floor may get damaged so it is recommended to place a mat etc on the floor To put the unit down on the floor Leg rest Back cover Mat Groove Hold onto the sides of the leg rest Place your fingers in the groove Hold onto the sides...

Page 14: ... Stand When attaching the right armrest Insert the armrest into the unit R right side and L left side are indicated at the bottom of the armrest Fasten the armrest with the attachment screws One position for each side Use this screw Attachment screws M6 20 Slide the armrest toward the back while pushing it downward Tighten the 4 screws lightly using your fingers Make the screws level with the hole...

Page 15: ... to reduce the risk of electric shock This unit is equipped with a cord with an equipment grounding conductor and a grounding plug The plug must be plugged into an appropriate outlet that has been properly installed in accordance with all local codes and ordinances Check for dirt and damage on appliance inlet of the power switch section and the connector of the power cord Be sure to push the conne...

Page 16: ... is set to the open position Confirm the power switch is set to the on position Press on the controller twice Press once and then press again approx 1 second later Backrest will rise automatically Insert the power plug into the power outlet Always be sure to insert into an AC Fasten the controller cord using the clip Fasten so the cable under Placing the controller into the controller stand Confir...

Page 17: ... the left side Run the controller cord to the left Press on the controller to turn on the power Press on the controller and hold until the leg rest has risen as far as it will go Continue pressing until a beep beep beep sound is heard Disconnect the controller cord Hook is released by pressing on the tab on the fastening band with your fingers Move the controller cord under the leg rest to the lef...

Page 18: ...elease lever in the direction of the arrow Rotate from bottom Rotate until it stops rotating Let go of the leg rest rotation lock release lever Check that the leg rest does not rotate WARNING Sit on the unit after confirming there is no foreign matter between the parts of the unit Confirm that there are no foreign objects stuck in the comfort cushion leg rest or hand arm massage section Sit down a...

Page 19: ...RNING Periodically remove dust etc from the power plug Failure to do so may result in insulation failure due to humidity etc which may cause fire Remove dust using a dry cloth Never operate the unit if it has a damaged power cord or plug Return the unit to the nearest authorized service center if it is not working properly if it has been dropped or damaged or if it has been immersed in water Keep ...

Page 20: ...tion Make sure the leg rest is in the fully lowered position Check that the leg rest does not rotate WARNING Always raise the comfort cushion to check that the fabric covering the movement area of the massage heads in the backrest has not been ripped before using the unit Please also check other areas to ensure that the fabric has not been ripped No matter how small the rip if you find one then im...

Page 21: ...2 If positioned too low the pillow may interfere with a massage of the area around the neck When the reclining angle changes the position of the pillow may shift In that case adjust the position again It will slide up to about 18 cm 7 1 in Pillow Lower edge of the pillow Ear level Push with the soles of your feet to slide the sole massage section out Lift your soles slightly and the sole massage s...

Page 22: ...rporation of North America Two Riverfront Plaza Newark NJ 07102 5490 1 800 338 0552 USA only for questions and comments 1 877 PANAFIX USA only for massage chairs customer service http www panasonic com massage Panasonic Canada Inc 5770 Ambler Drive Mississauga ON L4W 2T3 1 800 561 5505 http www panasonic com Panasonic Corporation 2014 EP MA73_Fre indb 60 2014 2 12 17 59 49 ...

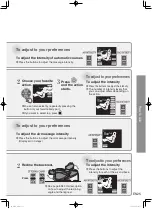
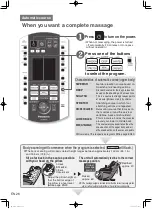
Page 23: ...tion Stretch Action For details see pages EN26 to EN29 For details see pages EN34 to EN37 Body part Action For details see pages EN38 to EN42 For details see pages EN38 to EN42 Select one from Select the body part and press the button Manual operations and air actions can be used at the same time Select the body part and press the button You can select multiple body parts Select the body part and ...

Page 24: ...n also select by repeatedly pressing the button of your favorite body part If you want to select tap press Recline the backrest Choose your favorite action Press and the action starts 2 2 3 To adjust the intensity To adjust the intensity Press the buttons to adjust the intensity The number of intensity levels that you can adjust differs depending on the action Press the buttons to adjust the inten...

Page 25: ...r to middle back This course lets you experience the ultra knead action on the upper body and air ultra knead action on the soles and palms Overview of the respective programs See page EN50 Correct massage position Reclined approx 20 Raised approx 60 The body scanning will properly detect height ranges between approximately 140 cm 55 1 in and 185 cm 72 8 in Sit as far back in the seat as possible ...

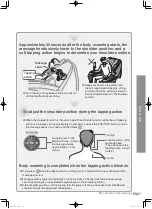
Page 26: ...onds after the body scanning starts the massage heads slowly lower to the shoulder position and a soft tapping action begins to determine your shoulder position A single press of the button will raise or lower the massage heads approximately 1 2 cm 0 5 in Too high Correct position of the massage head The point where the tapping action should be felt Too low Body scanning is completed when the tapp...

Page 27: ... off for the air massage or stretch can be confirmed on the display Lit On Off Off Leg Foot Lower back Hip Neck Chest Shoulder Hand Arm Adjustment may not be possible depending on the position Number of adjustments possible 3 times 3 times 3 times 3 times Contents of current massage action will be repeated by pressing Fine adjustment of the position You may not feel the difference in intensity for...

Page 28: ...ng You can turn on off the Foot Heat by pressing Lit Heat massage heads On Off Heat massage heads Off Lit Foot Heat On Off Foot Heat Off Temperature cannot be adjusted For details see page EN33 High Low Temperature can be adjusted between two levels For details see page EN33 Sense of warmth differs depending on your body shape the massage body part massage action clothing and room temperature Adju...

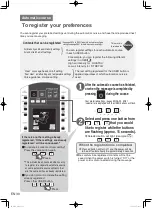
Page 29: ...date to contents of new setting Press the same button again This will also be announced when you try to register to a separate automatic course or same automatic course contents that are the same as those already registered If you do not want to delete the setting already registered Press other USER button Press Press Automatic course To register your preferences Air intensity and back intensity s...

Page 30: ...is selected the standard automatic course massage is applied However the Heat massage heads on off settings Foot Heat on off settings temperature settings and volume settings registered to the USER button are applied See page EN30 To delete the registered settings Example Press Press and hold for more than 3 seconds Press Press Press to turn on the power Press the button you want to delete Press a...

Page 31: ...g on your body shape the massage body part massage action clothing and room temperature To turn Heat massage heads Off Press to turn off Button will turn off Button also turns off WARNING When Heat massage heads are used do not let the massage heads touch the same place for a long time Do not use the Foot Heat massage for a long time Low temperature burn may occur Lit Heat massage heads On Lit Hig...

Page 32: ...be used alone Warmth may vary according to room temperature clothing and physical build Warmth will vary between Heat massage heads and Foot Heat If the Foot Heat controller is set at a low temperature try adjusting it higher Place feet so that they are firmly pressed against the Heat heater section Raise the sole massage section during use so that soles of your feet touch this section to feel the...

Page 33: ...selected in step When is selected ROLL or a combination of ROLL and another action can be selected The currently selected action flashes Example When NECK is selected WARNING Do not massage any one point for more than 5 minutes at a time Excessive massaging can overstimulate the muscles and nerves and result in an adverse effect Manual operation Whenyouwantaconcentratedmassageofaparticularbodypart...

Page 34: ...ll automatically move up approximately 3 cm 1 2 in Select your favorite one again in steps to Press within approximately 40 seconds after reselecting an action in step otherwise the reselection will be cancelled automatically NECK SHOULDER FULL BACK Normal body scanning MIDDLE BACK LOWER BACK Simple body scanning The massage heads will not come up to the shoulder position Body scanning for manual ...

Page 35: ...ogether Fine adjustment of the position It can be adjusted with Changing the intensity of the air massage The stretch action will not be performed simultaneously The manual operation is cleared when any STRETCH button is pressed Caution Intensity is displayed in 3 levels When you keep on pressing the button up or down the position will move continuously until you release the button On off for the ...

Page 36: ...nsity might increase drastically when the intensity is increased in multiple steps Always increase the intensity one step at a time checking how it feels Caution Adding tapping actions to the current operation Adjusting the back intensity Press You can select tap on off every time it is pressed You cannot select on off when you are massaging only with the tapping action Turning the Heat massage he...

Page 37: ...tch preparation action To adjust the air intensity Adjust by pressing Intensity is displayed in 3 levels To adjust the back intensity only for stretch Turrning Heat massage heads On and Off only for stretch Turning Foot Heat On and Off Adjust by pressing Intensity is displayed in 3 levels Press to turn this on and off Press to turn this on and off See page EN32 for details See page EN32 for detail...

Page 38: ...the arch of your feet are touching the shiatsu points If the slide of the sole massage section is adjusted your knees will not be lifted as much Press the button Press the button Knees will not be lifted as much also by lowering the leg rest It is possible to massage your leg completely by laying the sole massage section flat Sole massage section How to use the hand arm massage Position the forear...

Page 39: ...on according to arm length Alternates Short arms Operation of the HAND ARM Ultra knead on palms massage The arm massage simultaneously massages the left and right hands with a different intensity for either hand Only one hand at a time is strongly massaged so that the massage can be immediately stopped in the event of an abnormality or danger Right hand Strong Right hand Gentle Left hand Gentle Le...

Page 40: ... the sides Pressure is applied to clamp your lower back through tights from the sides The 3 airbags in the seat gives stimulation to your posterior through hamstring Sole Example below Leg Calves will be compressed by pressing against from both sides Operation of the SOLE Ultra knead on soles and LEG FOOT massage Operation of the LOWER BACK massage Operation of the SHOULDER massage Continued on th...

Page 41: ...ags to extend the neck muscles Muscles are loosened by widely twisting and swaying around your pelvis Operations of the LEG stretch Legs are stretched by clamping on the sides of your thighs and legs soles and lowering the leg rest Sole massage section might hit the floor etc when the LEG stretch is performed with the sole massage section having been slid out to extend To perform air massage for s...

Page 42: ... beep sound is heard if the buttons are held down The movement of the leg rest may be delayed slightly Armrest will move in accordance with the reclining of the backrest When not massaging the power is turned off automatically if 3 minutes or more pass without operation Do not raise or lower the backrest and or leg rest repeatedly for any purpose other than adjusting to your preferred positions EP...

Page 43: ... of the leg rest rotation lock release lever Check that the leg rest does not rotate Store the leg rest 2 Press firmly Let go WARNING Sit on the unit after confirming there is no foreign matter between the parts of the unit Confirm that there are no foreign objects stuck in the comfort cushion leg rest or hand arm massage section Sit down and ensure that the leg rest is properly locked in place Fa...

Page 44: ...on is extended out since it will hit the floor Raise your legs to retract all the way The massage heads move to the retracted position The leg rest lowers and the backrest raises automatically The backrest will move after the massage heads retract All operations will stop immediately Get off the unit carefully not to fall Press Backrest will not rise automatically The massage heads move to the ret...

Page 45: ... foam sponge in mild detergent such as dish detergent and wipe the unit with it Do not use a hair dryer to dry the surface more quickly Since colors may transfer from clothing to the synthetic leather surface be careful when using the unit with clothing such as jeans or colored clothes Do not allow these areas to come in contact with plastic for extended periods of time as this may lead to discolo...

Page 46: ...cooler than 30 C and wash by gently pressing Rinse thoroughly Remove excess water by pressing gently Gently smooth out any wrinkles and hang up to dry Precautions when washing Hand washing please do not use a washing machine Use a net when washing Never rub or wring while washing Never use detergents with bleaching agents as these cause the color to fade Wash separately from other items as the col...

Page 47: ...et on the floor completely If you release your hands before the leg rest is fully extended the leg rest will forcefully return to the initial position You may damage the floor by dropping the unit if you do not hold it correctly Never carry by the armrest because it may get damaged Hold onto the sides of the leg rest Place the controller and power cord on the seat Place your fingers in the groove ...

Page 48: ...down on the floor Put the unit down slowly and carefully watch your step Put down the leg rest by holding it with your hands until it has been set on the floor completely If you release your hands before the leg rest is fully extended the leg rest will forcefully return to the initial position Hold onto the sides of the leg rest Lift it no higher than waist height Roll the unit slowly Castors Hold...

Page 49: ...ders Knead Roll Ultra knead on shoulders Knead Shiatsu Ultra knead on shoulders Knead Shiatsu Neck stretch Neck stretch Roll on neck Neck Shoulder Knead Ultra knead Neck Shoulder Knead Ultra knead Neck stretch Finishing touches Finishing touches Finishing touches Finishing touches Neck Shoulder Back Ultra knead Neck Shoulder Back Ultra knead Neck stretch Back Chest Ultra knead Ultra knead on lower...

Page 50: ...ody along the backbone KNEAD Deep kneading action SWEDISH Action of rubbing gently across a wide area Seat yourself deeply in the chair and adjust the position of the pillow Press the OK button if the position is OK The figures are images of the respective operations This is a function which briefly explains the operation procedures and contents of the action Press to shift the volume level by one...

Page 51: ...his may exacerbate some illnesses Be sure to consult a doctor if you have an illness See pages EN5 6 Usage method Q Is it possible to massage only the upper body or legs A Yes Massaging only the upper body Store the leg rest and raise the comfort cushion to expose the backrest and pillow Massaging only the legs Use the leg sole massage section with the comfort cushion on the backrest For details o...

Page 52: ... POSITION button See page EN27 For more correct scanning sit firmly in the unit and lean back gently so that your head is touching the pillow backrest Body scanning Q How does body scanning work A The shoulder position is detected by the following mechanism The massage heads rise up the back to the base of the neck making a series of short beeps The massage heads protrude If the shoulder position ...

Page 53: ...t setting or are too strong even at the weakest setting A Try the following methods If the automatic course is not strong enough even at the strongest setting Recline the backrest The extra body weight adds intensity to the massage If the automatic course is too strong even at the weakest setting Place a piece of fabric or blanket between you and the backrest to decrease the sensation of the massa...

Page 54: ...fety reasons If this happens rotate them to the correct position When is pressed to end the massage The chair automatically returns to the upright position Only the leg rest returns to the original position if the massage is completed according to the 16 minute timer If is pressed to end the massage all operations immediately stop and the angle does not automatically change Reclines around 20 Rais...

Page 55: ...ise the massage heads to around the center of the backrest This moves the center of gravity to the center of the unit and makes it easier to move Do not move the chair while a person is sitting in it Press to turn the power on Press to recline the backrest Select an automatic course when the power is on The massage heads move An error occurs and the movement stops when they reach the center of the...

Page 56: ... not automatically recline Automatic reclining will not activate when the backrest is reclined to flat position more than massage position and leg rest is in upper position See page EN55 The backrest does not return to the upright position If the unit is stopped by automatic shut off or by pressing it will not return automatically To return from the reclined position to the original position press...

Page 57: ...Sounds when air pressure is applied Rattling sound of the leg rest Sounds of the pump beneath the seat Sounds of the valve beneath the seat Clunking sound during leg stretch or operation Sounds of air moving Sounds of the foot massager sliding The power plug has been disconnected See page EN21 The power switch on the unit has not been turned on An automatic courses button or manual operation butto...

Page 58: ...arranty card for the contact number Service and maintenance will be carried out smoother if the error number is communicated when contacting Contents of the error will be displayed in the remaining time display area when an error occurs during the operation Example of error display For the error U10 will flash alternately For safety reasons operation will terminate automatically when it cannot det...

Page 59: ...Intensity adjustable Approx 10 cm 3 9 in Massage speed Knead From approx 4 times min approx 73 times min Tap From approx 190 times min approx 520 times min one side Moving speed From approx 1 cm s approx 5 cm s Air massage Air pressure Calf 3 Approx 32 kPa 2 Approx 29 kPa 1 Approx 17 kPa It may vary with the area slightly Reclining angle Backrest Approx 120 170 Leg rest Leg sole massage section Ap...

Reviews: