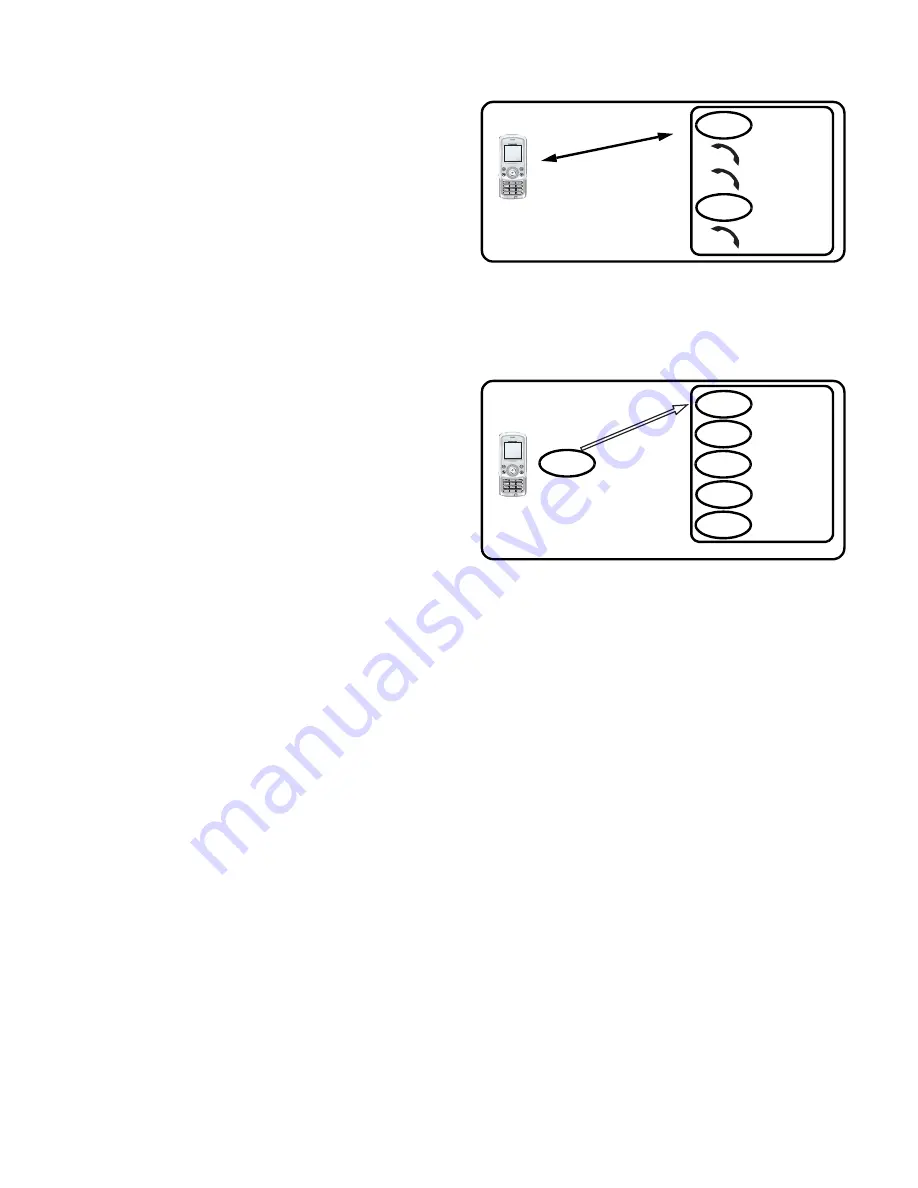
Panasonic EB-X500 Operating Instructions Manual Download Page 22

Basic Operation

          19

Ending a call in 
a Multi-party call

You can end a call in a Multi-party 
call one by one.

While on a Multi-party call

1. Press 

<

 (Menu)

2.

4

 move to 

Hang up

3. Press 

<

 (Select)

4.

4

 move to the required phone number

5. Press 

<

 (Select)

Ending a Multi-party call

You can end a Multi-party call.

While on a Multi-party call

1. Press 

D

 (End) 

2. All calls will be disconnected

DTMF Tones

DTMF (Dual Tone Multi-Frequency) Tones can be sent while on a call. These 
are often used to access voice mail, paging and computerised home banking. 
For example, you may need to enter a number to remotely access voice mail 
messages. A phone number may be stored in 

Contacts

 together with a DTMF 

sequence, allowing the number to be dialled upon recall and the DTMF 
sequence to be sent automatically. You can use “

p

” to pause for a few second 

and “

w

” to pause and wait your response.

Call A

Conne

ction 1

Call C

Call B

Call D
Call E

End

End

Call A

Conn

ecti

on 1

Call B

Call D

End

End

End

End

Call C

End

Call E

End

Summary of Contents for EB-X500

Page 1: ...Operating Instructions Part 1 Digital Cellular Phone ...

Page 2: ...Hot key dial 51 My Contacts 51 Games Apps 52 Games Apps 52 Settings 54 View certificate 56 Browser 57 Starting the Browser 57 Bookmarks 59 Settings 62 Camera 63 Camera Appearance 63 Preview mode 65 Capture mode 70 Messages 71 Settings 71 Create 75 Inbox and Outbox 76 Chat SMS 77 User messages 77 Cell Broadcast 78 Calendar 80 Viewing the Calendar 80 My Media 83 My Pictures 83 My Animations 84 My So...

Page 3: ...ii Contents ...

Page 4: ...key Right soft key Navigation key Power End key Shutter key Microphone Personal Handsfree Connector Send key Hash Quiet key Asterisk Shift key Camera lens Photo light Battery cover Charging connector Centre key Self portrait mirror Front View Back View Shutter key ...

Page 5: ...ess to activate the function assigned to the Short press Shortcut key Press and hold to activate the function assigned to the Long press Shortcut key Numeric keys Enter numbers In idle screen Press and hold to apply the appropriate Hot key dial Press and hold to enter see International calls on page 11 p or w see DTMF Tones on page 19 C Send key Press to answer or make a call In idle screen Press ...

Page 6: ...ll diverts are enabled page 36 Voicemail is enabled page 50 Ringtone is enabled page 26 Vibration mode Vibration and Ringtone mode Flashing mode GPRS service is available page 99 Only emergency calls are available page 9 GSM signal strength Line 1 or Line 2 is selected E page 34 Receiving or Sending the data through USB cable page 94 Status icons Idle screen Left soft key selection area Centre key...

Page 7: ...ody slowly until it stops Closing the phone body Slide down the upper part of the phone body slowly until it stops Note If you close the phone body while operating the menu functions such as My Phone Contacts Browser Messages My Media or Applications it returns to the idle screen You can operate the phone with the phone body closed while you are using Games Camera or creating a message ...

Page 8: ...ttery 1 Push the upper edge of the cover 2 Slide the battery cover down carefully N 3 Remove the battery cover O 4 Push the lower part of the battery forward P 5 Lift the battery to remove Q Attaching the battery 1 Insert the upper edge of the battery N 2 Push down on the lower edge of the battery carefully until it clicks O 3 Put the battery cover on the battery 4 Slide the cover into place P ...

Page 9: ...amage the phone and or the charger Disconnecting the plug Pull the plug gently from the connector Note DO NOT pull the cable as this may damage the phone and or the charger Battery level indicator Low battery power warning When the battery power is low the battery indicator will be red If the battery power is critically low a warning tone will beep 2 minutes after the beep the power will automatic...

Page 10: ... SIM holder 6 Slide the SIM holder to left until it clicks 7 Replace the battery and the battery cover Note Ensure the gold contacts on the SIM and the phone body are facing each other Removing the SIM 1 Remove the battery cover and the battery see Removing the battery on page 5 2 Slide the SIM holder to right until it clicks 3 Lift the SIM holder 4 Remove the SIM 5 Replace the SIM holder 6 Replac...

Page 11: ...ll be displayed for 2 seconds see Greeting on page 28 4 The display will remain in idle screen Switching Off Press and hold D Power End for 2 to 3 seconds When is displayed 1 Open the phone body 2 Press and hold D Power End for 2 to 3 seconds OR 1 Press 2 Press OK 3 Press and hold D Power End for 2 to 3 seconds Note Key guard page 30 setting affects switching off the phone ...

Page 12: ...e call will be displayed If Max Cost see Max cost on page 35 is set the remaining units will also be displayed While on a call 1 Press D Power End OR Close the phone body see Active slide on page 30 2 Duration is displayed 3 Max Cost is displayed when set Emergency calls In an emergency you can make an emergency call by dialling the international emergency number 112 which is adopted by most count...

Page 13: ...he entries in Recent calls You can view delete or delete all the entries in Recent calls From Recent calls menu 1 4 move to the required Recent calls list 2 Press Select 3 4 move to the required entry 4 Press Menu 5 4 move to View Delete or Delete all 6 Press Select Storing Recent calls in Contacts You can store the required entry in Recent calls lists in Contacts From Recent calls menu 1 4 move t...

Page 14: ...code and the phone number with 4 Press C Send Contacts list You need to store the phone numbers in Contacts list before using this function see Create on page 45 In idle screen 1 Press 1 or 5 to display Contacts list 2 4 move to the required entry 3 Press C Send Hot key dial You need to set the Hot key dial before using this function see Hot key dial on page 51 In idle screen 1 Press and hold the ...

Page 15: ...ed only if SIM or All is selected in My Contacts see My Contacts on page 51 If your operator does not offer these services service numbers will not be displayed Incoming call Answering While the phone is ringing press any key except D Power End and Mute to answer an incoming call You can answer a call without pressing any key by opening the phone body Note Active slide page 30 Key guard page 30 an...

Page 16: ...swer on page 31 Caller s ID If you receive an incoming call whose number is stored in Contacts list the caller s name will be displayed If the number is not stored in the Contacts list only a phone number will be displayed In call operations You may use various functions while on a call Volume control You can adjust the speaker volume while on a call While on a call 1 volume up 5 volume down Acces...

Page 17: ... Messages on page 71 Handsfree If Handsfree is activated you can hold a conversation without holding the phone to your ear While on a call 1 Press Menu 2 4 move to Handsfree 3 Press OK 4 4 move to On or Off 5 Press Select Hold You can put a call on hold While on a call 1 Press Hold To resume 1 Press Resume Call A Connection 1 Call A Connection 1 Hold ...

Page 18: ...hile on a call 1 You hear an incoming call and the Caller s ID is displayed 2 Press C Send End and answer You can end the current connection and answer a new call While on a call 1 You hear an incoming call and the Caller s ID is displayed 2 Press D Power End 3 Press C Send Call A Connection 1 Call B Call A Connection 1 Hold Call B Connection 2 Call A Connection 1 Call B Call A End Call B Connecti...

Page 19: ... ID is displayed 2 Press Reject Second call You can make another call while on a call While on a call 1 Press Hold 2 Enter the required phone number with OR Press A and select the required number 3 Press C Send The first call will be put on hold Call A Connection 1 Call B Connection 1 Call B Call A Reject Call A Connection 1 Hold Call B Connection 2 ...

Page 20: ...nd you will be returned to the second call Ending one connection While on calls 1 Press Menu 2 4 move to Hang up 3 Press Select 4 4 move to Active or Hold 5 Press Select Ending both connections While on calls Press D End Call A Connection 1 Hold Call B Connection 2 Connection 1 Call A Connection 2 Call A Connection 1 Hold Call B Connection 2 Call B Hold Connection 1 Call A Connection 2 Call B End ...

Page 21: ... OR Answer an incoming call 3 Press Menu 4 4 move to Conference call 5 Press Select Splitting a caller You can split a call from a Multi party call and make it another connection While on a Multi party call 1 Press Menu 2 4 move to Private call 3 Press Select 4 4 move a to required phone number 5 Press Select The Multi party call is kept on hold Call A Connection 1 Hold Call B Connection 2 Call A ...

Page 22: ...al Tone Multi Frequency Tones can be sent while on a call These are often used to access voice mail paging and computerised home banking For example you may need to enter a number to remotely access voice mail messages A phone number may be stored in Contacts together with a DTMF sequence allowing the number to be dialled upon recall and the DTMF sequence to be sent automatically You can use p to ...

Page 23: ... Example of Text entry Entering Hello Text Mode Key English T9 Normal abc Greek ΑΒΓ Extended aäå Numeric 0 9 _ _ _ 0 1 _ 1 ACB2 acb2 ABC abc ΑΒΓ AÄÅÆBCÇ aäåæàbc 2 EDF3 edf3 DEF def ΕΖ DEÉF deèéf 3 IHG4 ihg4 GHI ghi ΗΘΙ GHI ghiì 4 KLJ5 klj5 JKL jkl ΚΛΜ JKL jkl 5 OMN6 omn6 MNO mno ΝΞΟ MNÑOÖØ mnñoöøò 6 SPRQ7 sprq7 PQRS pqrs ΠΡΣ PQRS pqrsß 7 TVU8 tvu8 TUV tuv ΤΥΦ TUÜV tuüùv 8 XWYZ9 xwyz9 WXYZ wxyz ΧΨΩ...

Page 24: ...d correctly before continuing on to the next word If the combination of letters typed has produced a word which is not the one you require press 4 repeatedly until the correct word is displayed Continue to the next word If the word you require is not in the internal dictionary i e it is a unique noun or a rarely used word then it should be entered using the Normal abc mode Editing Text Pressing 4 ...

Page 25: ...Browser Starting the Browser 57 Bookmarks 59 Settings 62 Camera Camera Appearance 63 Preview mode 65 Capture mode 70 Messages Settings 71 Create 75 Inbox and Outbox 76 Chat SMS 77 User messages 77 Cell Broadcast 78 Calendar Viewing the Calendar 80 My Media My Pictures 83 My Animations 84 My Sounds 85 Memory status 85 Applications Games Apps 87 Alarms 87 Voice memo 88 Sound recorder 89 Clock 89 Aut...

Page 26: ...7 Warning tone 27 Alerts 27 Display Wallpaper 28 Colour themes 28 Greeting 28 Operator notice F 29 Backlight time 29 Key backlight 29 Slide settings Key guard 30 Active slide 30 Open action 30 Language Auto answer Shortcut key Menu view 9 launcher 33 Scroll launcher 33 Phone settings Call services 34 Call diverts 36 Security 37 Network 40 Defaults page 24 page 25 page 28 page 30 page 31 page 31 pa...

Page 27: ...ble Activating a profile From Profiles menu 1 4 move to the required profile 2 Press Select 3 4 move to Activate 4 Press Select Editing a profile From Profiles menu 1 4 move to the required profile 2 Press Select 3 4 move to Edit 4 Press Select 5 4 move to the required setting see Sounds on page 25 Normal Suitable for everyday settings Quiet Ringtone for formal occasions Press and hold see Hash ke...

Page 28: ...Rename 4 Press Select 5 Enter a profile name see Text Entry on page 20 6 Press OK Sounds You can select each sound from a preinstalled selection shown in the figure right or downloaded Ringtone in My Sounds see My Sounds on page 85 From My Phone menu 1 4 move to Sounds 2 Press Select Volume You can adjust the ringtone volume From Sounds menu 1 Press Select 2 The ringtone will start to ring 3 0 adj...

Page 29: ... preinstalled selection or from My Sounds From Sounds menu 1 4 move to Message tone 2 Press Select 3 4 move to Preinstalled or My Sounds 4 Press Select 5 4 move to the required sound and sample sound will be played 6 Press Select Slide open tone You can set Slide open tone off or select a sound from a preinstalled selection or My Sounds From Sounds menu 1 4 move to Slide open tone 2 Press Select 3...

Page 30: ...sound will be played 6 Press Select Key tone The Key tone is the sound you hear when you press a key From Sounds menu 1 4 move to Key tone 2 Press Select 3 4 move to On or Off 4 Press Select Warning tone The Warning tone indicates a low battery From Sounds menu 1 4 move to Warning tone 2 Press Select 3 4 move to On or Off 4 Press Select Alerts You can set the type of Alert required From Sounds men...

Page 31: ...image as wallpaper 5 Press Select Colour themes You can change the Colour themes which affect the colour of the cursor and the background colour From Display menu 1 4 move to Colour themes 2 Press Select 3 4 move to the required theme 4 Press Select Greeting You can set your original Greeting which is displayed after startup animation From Display menu 1 4 move to Greeting 2 Press Select 3 Enter y...

Page 32: ...o On or Off 4 Press Select Backlight time You can set the time length of the backlight From Display menu 1 4 move to Backlight time 2 Press Select 3 4 move to the required time length 4 Press Select Key backlight You can set the Key backlight on or off for the numeric keys From Display menu 1 4 move to Key backlight 2 Press Select 3 4 move to On or Off 4 Press Select Note Setting Key backlight On ...

Page 33: ...ive slide is activated you can answer or end a call by opening and closing the phone body without pressing any keys From Slide settings menu 1 4 move to Active slide 2 Press Select 3 4 move to On or Off 4 Press Select Note The Active slide system employs a magnet Keep your phone away from magnetized objects to avoid malfunction Open action You can select the option to active when opening the phone...

Page 34: ...guage E From My Phone menu 1 4 move to Language 2 Press Select 3 4 move to the required language or Automatic 4 Press Select Auto answer When you connect the Personal Handsfree earpiece you can set Auto answer on and answer a call automatically From My Phone menu 1 4 move to Auto answer 2 Press Select 3 4 move to On or Off 4 Press Select ...

Page 35: ... once or a Long press press and hold From My Phone menu 1 4 move to Shortcut key 2 Press Select 3 4 move to Short press or Long press 4 Press Select 5 4 move to the required function 6 Press Select The following functions are available Camera Start Browser Calendar Games Apps My Media Calculator Contacts Alarms Sound recorder ...

Page 36: ...ire first level of the main menu In main menu 1 0 move to the required menu 2 Press OR Press Scroll launcher In this mode you can scroll up down the main menu In main menu 1 4 move to the required menu 2 Press OR Press You also can see the 3 most frequently used menus in the next level by moving the Scroll launcher left In main menu 1 4 move to the required menu 2 Press 3 3 2 move to the required ...

Page 37: ...Calls F You can check the call status From Call services menu 1 4 move to Calls 2 Press Select 3 4 move to the required status 4 Press Select Last call You can see the duration of the last call All calls You can see the total duration of all calls You can reset the total by pressing Reset Call waiting You can activate Call waiting and see the status Caller s ID You can check how Caller s ID is rec...

Page 38: ...d data You can reset the total of All connections data From Call services menu 1 4 move to Connections 2 Press Select 3 4 move to Last connections or All connections 4 Press Select Show my number You can select how your ID should be displayed From Call services menu 1 4 move to Show my number 2 Press Select 3 4 move to the required method 4 Press Select Cost left Check the cost left Price unit You...

Page 39: ...mber to divert and press OK Voice calls Voice calls will be diverted under the following conditions Not reachable When the phone is not in the network coverage area all incoming voice calls will be diverted No reply Unanswered incoming voice calls will be diverted Busy When the lines are busy all incoming voice calls will be diverted All conditional With above 3 conditions all incoming voice calls...

Page 40: ... Security menu 1 Press Select 2 4 move to Status or Change mode Note You are advised to write down your unlock code for yourself If you forget your unlock code you will need to contact your service provider to unlock the phone Changing the Status From Phone lock menu 1 Press Select 2 4 move to On or Off 3 Press Select 4 Enter the correct 4 digit unlock code 5 Press OK OR In idle screen 1 Press and...

Page 41: ...e provider When updating checking the Call bar status the phone must be registered to a network From Security menu 1 4 move to Call bar 2 Press Select 3 4 move to the required function 4 Press Select Bar voice You can bar Voice calls and select the type from Incoming calls and or Outgoing calls Bar data You can bar Data calls and select the type from Off International calls except home Internation...

Page 42: ...anging the PIN code Ensure the PIN Status is On before changing the PIN code 1 Enter old PIN code with 2 Press OK 3 Enter new PIN code with 4 Press OK 5 Enter new PIN code to verify 6 Press OK Changing the Status 1 4 move to On or Off 2 Press Select 3 Enter the PIN code with 4 Press OK PIN2 You cannot change the PIN2 code without the current PIN2 code From Security menu 1 4 move to PIN2 2 Press Se...

Page 43: ...SIM PIN2 code with 4 Press OK 5 4 move to On or Off 6 Press Select Network You can select a Network that is available in your current location From Phone settings menu 1 4 move to Network 2 Press Select 3 4 move to New network or Search mode 4 Press Select Defaults You can return all personal settings of My Phone to the factory default settings From My Phone menu 1 4 move to Defaults 2 Press Selec...

Page 44: ... messages from the Contacts list 44 Deleting an entry from the Contacts list 44 Copying an entry to the other Contacts list 44 Memory status My Contacts My numbers Voicemail Groups Viewing the Group 47 Editing the Group 47 Hot key dial Assigning Hot keys 51 Viewing Hot key dial list 51 Contacts list Create Viewing My numbers 49 Editing My numbers 49 Viewing Voicemail 50 Editing Voicemail 50 Copyin...

Page 45: ...Press Select 2 4 move to the required entry OR Press the numeric key which contains the first letter of the required name Viewing the entries in the Contacts list From Contacts list menu 1 4 move to the required entry OR Press the numeric key which contains the first letter of the required name 2 Press Menu 3 Press Select Located in Phone Contacts list Located in SIM Contacts list ...

Page 46: ...tem 8 Press OK 9 Press A Save Note You can enter Name Tel number 1 and Location No only for the SIM Contacts list Making a call using the Contacts list From Contacts list menu 1 4 move to the required entry OR Press the numeric key which contains the first letter of the required name 2 Press C Send From Contacts list menu 1 4 move to the required entry OR Press the numeric key which contains the f...

Page 47: ... 7 Press A Done Follow the steps in Messages see Messages on page 71 Deleting an entry from the Contacts list From Contacts list menu 1 4 move to the required entry OR Press the numeric key which contains the first letter of the required name 2 Press Menu 3 4 move to Delete 4 Press Select 5 Press Yes Copying an entry to the other Contacts list From Contacts list menu 1 4 move to the required entry...

Page 48: ...n No Creating a new entry From Contacts menu 1 4 move to Create 2 Press Select 3 4 move to SIM or Phone 4 Press Select 5 4 move to the required item 6 Press Edit 7 Edit the entry item 8 Press OK 9 Press A Save From Contacts list menu 1 Press Menu 2 4 move to Create 3 Press Select 4 4 move to SIM or Phone 5 Press Select 6 4 move to the required item 7 Press Edit 8 Edit the entry item 9 Press OK 10 ...

Page 49: ...ress Select 5 4 move to the required item 6 Press Edit 7 Edit the entry item 8 Press OK 9 Press A Save The following entry items are available Icon Item Icon Item Name Hot key dial Tel number 1 3 Photo E mail address 1 2 Note Ringtone Location in Phone Contacts list Groups Location in SIM Contacts list ...

Page 50: ...roup From Contacts menu 1 4 move to Groups 2 Press Select 3 4 move to the required group 4 Press Menu 5 4 move to View 6 Press Select Editing the Group You can change the name of the group ringtone photo and reset the group setting to the default From Groups menu 1 4 move to the required group 2 Press Menu 3 4 move to Edit 4 Press Select 5 4 move to the required item To reset the group setting sel...

Page 51: ...menu 1 4 move to Memory status 2 Press Select 3 2 bars indicating Contacts list memory status are displayed in use location s maximum locations Copying all entries to the other Contacts list While displaying the Memory status 1 Press Menu 2 4 move to the required action 3 Press Select 4 Press Yes Note Original entries will not be deleted from the Contacts list ...

Page 52: ...ss Select 3 4 move to Line 1 or Line 2 4 Press Menu 5 4 move to View 6 Press Select To edit the entry press Edit Editing My numbers From My numbers menu 1 4 move to Line 1 or Line 2 2 Press Menu 3 4 move to Edit 4 Press Select 5 4 move to Name or Tel number 1 6 Press Edit 7 Enter the required name or number 8 Press OK 9 Press A Save Service dial E See Service dial E on page 12 ...

Page 53: ...oicemail From Contacts menu 1 4 move to Voicemail 2 Press Select 3 Press Menu 4 4 move to View 5 Press Select To edit the entry press Edit Editing Voicemail From Voicemail menu 1 Press Menu 2 4 move to Edit 3 Press Select 4 4 move to Name or Tel number 1 5 Press Edit 6 Enter the required name or number 7 Press OK 8 Press A Save ...

Page 54: ...er the required number 4 Press OK Note To clear the Hot key dial assignment of an entry enter instead of the entry s original Hot key dial number and press OK Viewing Hot key dial list From Contacts menu 1 4 move to Hot key dial 2 Press Select 3 The Hot key dial list is displayed My Contacts You can select from All SIM or Phone to display the entries in the Contacts list entries From Contacts menu...

Page 55: ...o the required JavaTM game 3 Press Select 4 Your phone starts to load the JavaTM game application Note Most JavaTM games include instructions Games Apps Settings View certificate page 56 page 54 page 52 Playing a JavaTM game 52 Aborting or Exiting from a JavaTM game 53 Viewing Details 53 Changing a Permission setting 53 Volume 54 Backlight time 54 Vibration 54 Access point 55 ...

Page 56: ... Press A Menu 3 4 move to Permission 4 Press Select 5 4 move to Net access or Messaging If you want to reset the permission setting select Defaults 6 Press Select 7 4 move to the required setting Suspend Suspend the game and continue the game the next time when you select Games Apps Terminate Abort the game Cancel Return to the game Always ask Your phone always asks your permission to access the n...

Page 57: ...ng JavaTM games the sound will only be heard from the phone s speaker not from the Personal Handsfree if connected Backlight time From Settings menu 1 4 move to Backlight time 2 Press Select 3 4 move to On 30 seconds or Off 4 Press Select Note Setting Backlight time On might make the battery life shorter Vibration From Settings menu 1 4 move to Vibration 2 Press Select 3 4 move to On or Off 4 Pres...

Page 58: ...ting a network setting From Access point menu 1 4 move to the required network 2 Press Select 3 4 move to Edit 4 Press Select 5 4 move to Rename or Connection 6 Press Select Editing GPRS Connection From Connection menu 1 4 move to GPRS 2 Press Select 3 Press Select to Edit Login name Password GPRS APN Authentication Editing CSD Connection From Connection menu 1 4 move to CSD 2 Press Select 3 Press...

Page 59: ...56 Games Apps View certificate From Games Apps menu 1 4 move to View certificate 2 Press Select 3 4 move to the required certificate 4 Press Select ...

Page 60: ...ng press Retry or try again later Navigating contents Use 0 to scroll through the contents on the screen When linked text is highlighted press to load the page 1 Scroll up Page up with Long press 5 Scroll down Page down with Long press 7 Scroll up Return to the previous object 3 Scroll down Return to the next object Starting the Browser Navigating contents 57 Using the Browser 58 Bookmarks Managin...

Page 61: ...gs Inbox Store view or delete WAP push messages from the network Jump to the home page Bookmarks Jump to the page by setting a bookmark or bookmark the current page see Managing Bookmarks in Browser on page 59 Save Items To save images or other items from the current page Snapshots Capture the screen image of the current page and view or delete it Reload Reload and update the current page Settings...

Page 62: ... the other is off line Bookmarks Managing Bookmarks in Browser You can add a bookmark by entering the URL From Browser Menu in Browser 1 4 move to Bookmarks 2 Press 3 Press A Menu 4 Press 5 Enter the Title and URL with 6 Select a folder 7 Press Save Adding a current page as a bookmark From Browser Menu in Browser 1 4 move to Bookmarks 2 Press 3 Press to Mark Site Using Bookmarks From Browser Menu ...

Page 63: ...y Adding a new bookmark From Browser menu 1 4 move to Bookmarks 2 Press Select 3 4 move to New entry 4 Press Select 5 4 move to Title or URL 6 Press Select 7 Enter the required Title or URL 8 Press OK 9 Press A Save Details Display and edit the bookmark information Delete Delete the bookmark New Bookmark Add a new bookmark New Folder Add a new folder in which to save the bookmarks Move Move a book...

Page 64: ...okmarks 2 Press Select 3 4 move to the required bookmark 4 Press Menu 5 4 move to the required function 6 Press Select The following functions are available Select Jump to the selected bookmark site Edit Edit the Title and URL Delete Delete the bookmark Delete all Delete all bookmarks ...

Page 65: ... failure of the Browser See Personal Settings on page 101 for your details From Browser menu 1 4 move to Settings 2 Press Select 3 4 move to the required network 4 Press Select 5 4 move to Activate or Edit To activate the selected network select Activate To edit the network settings select Edit 6 Press Select 7 4 move to the required setting 8 Press Select You can edit the following settings Serve...

Page 66: ...Operating the Camera 66 Options 66 Preview mode Capture mode Camera Appearance Key functions 64 Status icons 65 page 70 page 65 page 63 Shutter key Turn the Camera Video Preview mode on Press to take a picture or record a video clip Camera lens Self portrait mirror Photo light ...

Page 67: ...ordingly Key Function 1 Zoom in 5 Zoom out 3 Brightness up 7 Brightness down Shutter Options Capture mode Shutter A Options Save Cancel to delete a captured image D Exit the camera mode Landscape Cancel Shutter Options Zoom out Zoom in Brightness up Brightness down Portrait Shutter Cancel Zoom in Brightness up Zoom out Options Brightness down ...

Page 68: ...ld the shutter key if Key guard or Phone lock is off Note The quality of display images may vary depending on the object or environment Note Displayed images may distort when shooting moving objects especially in a fast moving environment Change mode Quality Close up mode Brightness Zoom is not available in Video mode nor VGA mode For Change mode see page 66 Twilight mode ...

Page 69: ...ideo Note See Change mode below for changing the camera mode and video mode Options In Preview mode 1 Press A The option menu is displayed 2 4 move to the required function 3 Press Select Change mode If you select Video size the Video Preview mode will be launched From options menu 1 Press Select 2 4 move to the required size 3 Press Select The following image modes are available Video size 128 12...

Page 70: ... at a close range From options menu 1 4 move to Close up mode 2 Press Select 3 4 move to On or Off 4 Press Select Twilight mode You can turn the Twilight mode on when taking a picture in low light conditions From options menu 1 4 move to Twilight mode 2 Press Select 3 4 move to On or Off 4 Press Select Quality You can choose the image quality of your picture This function is available only for the...

Page 71: ...Normal Sunset Monochrome Inverse Emboss Cold Frames If you set a frame and take a picture the picture will be decorated with fancy preinstalled frames This function is available only when QQVGA or Wallpaper is selected in Change mode From options menu 1 4 move to Frames 2 Press Select 3 4 move to the required frame 4 Press Select The following frames are available Normal Dreamy 60s Experimental Lo...

Page 72: ...ess Select 3 4 move to Landscape or Portrait 4 Press Select Shutter sound You can change the sound of the shutter From options menu 1 4 move to Shutter sound 2 Press Select 3 4 move to the required sound 4 Press Select Anti flicker If the display flickers you can change Anti flicker to 50Hz or 60Hz Choosing 50Hz or 60Hz is country dependent From options menu 1 4 move to Anti flicker 2 Press Select...

Page 73: ...uired function 3 Press Select The following functions are available for a picture Create MMS Set as wallpaper Set as caller ID Set as group ID Rotation not available with VGA mode Effect Frames Rename Properties Delete Note Press 4 to rotate 1 rotate the picture in clockwise 5 rotate in counterclockwise The following functions are available for a video Play Set as wallpaper Set as caller ID Set as...

Page 74: ...You can send media attached messages to phone numbers whose network support MMS or E mail address Settings From Messages menu 1 4 move to Settings 2 Press Select 3 4 move to MMS or SMS EMS 4 Press Select Settings MMS settings 72 SMS EMS settings 73 Receiving messages 74 User messages Cell Broadcast Receiving Cell Broadcast messages 78 Reading Cell Broadcast messages 78 Topic list 78 Languages 79 C...

Page 75: ...equired network 4 Press Select 5 4 move to Activate or Edit 6 Press Select To activate the selected network select Activate To edit the network settings select Edit 7 4 move to the required setting 8 Press Select You can edit the following settings Server name Primary IP Primary port Secondary IP Secondary port Linger time MMS centre Connection ...

Page 76: ...that your message is stored at the message centre Select Maximum or Manual Delivery report Request a report on the delivery status of your message Select On or Off Sender visibility Select Show or Hide your address to the recipient Restore settings Reset the MMS settings to the factory default settings Validity period You can select from Defaults 1 hour 12 hours 1 day 1 week or Maximum Message cen...

Page 77: ...ou have more than 1 message use 4 to move to the required message If you press other keys without reading new messages the idle screen will be displayed To read new received messages press A and check the Inbox The following functions are available for received messages Reply Create a reply message to the sender Call Call back to the sender Forward Forward the selected message Chat Send a chat mes...

Page 78: ... Sounds Previous Next slide Move to the previous or next slide User msg Select pre defined sentences and insert in the message Add signature Add signature to the message View View and confirm the message before sending MMS only Delete slide picture animation sound Delete the current displayed slide picture animation or sound Set timer Set a time and delay for sending maximum 60 seconds the message...

Page 79: ...x and sent messages in the Outbox From Messages menu 1 4 move to Inbox or Outbox 2 Press Select The following folders are available in Outbox To Enter receiver s phone number for SMS EMS phone number or email address for MMS Cc Send carbon copied message to other receivers Bcc Send carbon copied message to other receivers and hide that information Subj Enter a title for this message Draft Save mes...

Page 80: ...tting with the other party providing he she has the Chat SMS facility on his her phone 7 Enter your message 8 Press OK 9 4 move to Phone number or Contacts 10 Press Select 11 Enter or select a destination phone number 12 Press OK Your phone sends the message When receiving a message from the other party in chat mode the text will be displayed automatically above the last message 13 Press OK to con...

Page 81: ...ve to On or Off 4 Press Select Reading Cell Broadcast messages From Cell Broadcast menu 1 4 move to Latest messages 2 Press Select 3 4 move to the required message 4 Press Read Topic list Managing a topic From Cell Broadcast menu 1 4 move to Topic list 2 Press Select 3 4 move to the required topic 4 Press Menu 5 4 move to the required function 6 Press Select The following Predefined topics are ava...

Page 82: ...3 Press Menu OR 4 move to New channel and press Menu 4 Press Select to Insert 5 4 move to Predefined topics or Manual 6 Press Change 7 To select from Predefined topics 4 move to the required topics OR To enter Channel no manually Enter Channel no 8 Press Select Languages You can select the language of the message you receive From Cell Broadcast menu 1 4 move to Languages 2 Press Select 3 4 move to...

Page 83: ...Menu 2 0 move to Calendar 3 Press OR In idle screen Press 7 to display Calendar Moving the cursor When the Calendar is displayed the cursor is on the current day Press 0 to move the cursor to a different day To display the next previous month place the cursor on the Month and press 4 To display the next previous year place the cursor on the Year and press 4 Moving the cursor 80 Creating a reminder...

Page 84: ...TE 6 Press OK 7 Enter a title of the event OR On Calendar 1 Press A List 2 4 move to New event 3 Press Select Follow the step 1 7 above Reminder list Viewing a reminder On Calendar 1 Press A List 2 4 move to the required entry 3 Press View Editing a reminder On Calendar 1 Press A List 2 4 move to the required entry 3 Press View 4 Press Edit See Creating a reminder above ...

Page 85: ...82 Calendar Deleting a reminder On Calendar 1 Press A List 2 Press A Del 3 Press Yes to delete OR Press No not to delete ...

Page 86: ...humbnails Move the cursor with 0 From My Media menu 1 Press Select 2 0 move to the required picture 3 Press View OR Press A Menu 4 4 move to the required function 5 Press Select The following functions are available View Create MMS Set as wallpaper Set as caller ID Set as group icon Rename Delete Properties Note Group icon Caller ID and Wallpaper are available with JPG pictures only My Pictures My...

Page 87: ...1 4 move to My Animations 2 Press Select 3 0 move to the required animation 4 Press View OR Press A Menu 5 4 move to the required function 6 Press Select The following functions are available View Set as wallpaper Set as caller ID Set as group icon Rename Delete Properties Note Group icon Caller ID and Wallpaper are available with AVI pictures only ...

Page 88: ...d sound Sound files are played automatically 4 Press Play to play again OR Press A Menu 5 4 move to the required function 6 Press Select The following functions are available Create MMS Play Rename Delete Properties Memory status You can check the Memory status occupied by media files From My Media menu 1 4 move to Memory status 2 Press Select ...

Page 89: ...7 Alarms Recording a Voice memo 88 Playing a Voice memo 88 Deleting a Voice memo 88 Voice memo Sound recorder Time date 89 Format 90 Clock Auto power on Conversion 92 Currency rate 92 Calculator Composing a melody 93 Melody composer page 87 page 89 page 90 page 87 page 88 page 89 page 91 page 93 Auto power off page 91 ...

Page 90: ...rms 2 Press Select 3 4 move to the required alarm set 4 Press Select 5 4 move to the required type of alarm To cancel the alarm setting select Cancel 6 Press Select 7 or 4 move and set HOUR 8 2 move to the MINUTE 9 or 4 move and set MINUTE 10 Press OK The following types of alarm frequency are available Time Once Daily Mon to Fri Mon to Sat You can select the alarm tone from Melody When an alarm s...

Page 91: ...must ask for the other party s agreement before recording Recording a Voice memo While on a call 1 Press Menu 2 4 move to Memo 3 Press OK to start recording 4 Press Stop to stop Playing a Voice memo From Applications menu 1 4 move to Voice memo 2 Press Select 3 Press Select to Playback 4 Press to stop Deleting a Voice memo From Applications menu 1 4 move to Voice memo 2 Press Select 3 4 move to De...

Page 92: ...types of clock formats Time date From Applications menu 1 4 move to Clock 2 Press Select 3 Press Select Time date 4 The currently set time and date is displayed Setting time From Time date menu 1 Press Select 2 or 4 to change HOUR setting 3 2 move to MINUTE 4 or 4 to change MINUTE setting 5 Press OK Setting date From Time date menu 1 4 move to the current date 2 Press Select Calendar is displayed ...

Page 93: ...d automatically switch on the phone at the set time Note Even if the phone is switched off at the set Auto power on time the phone will switch on automatically From Applications menu 1 4 move to Auto power on 2 Press Select 3 or 4 to change HOUR setting 4 2 move to MINUTE 5 or 4 to change MINUTE setting 6 Press OK 7 4 move to the required setting 8 Press Select ...

Page 94: ...NUTE setting 6 Press OK 7 4 move to the required setting 8 Press Select Calculator You can use the 4 function calculator addition subtraction multiplication and division for simple arithmetic operations From Applications menu 1 4 move to Calculator 2 Press Select 3 Enter a number with maximum 8 digits If a decimal point is required press Press C to add if needed 4 Press to select an arithmetic ope...

Page 95: ...mber with maximum 8 digits 2 Press A Menu 3 4 move to Conversion 4 Press Select Calculated amount is displayed Currency rate You can set currency rate to convert to from a particular currency On Calculator 1 Press A Menu 2 4 move to Currency rate 3 Press Select 4 Enter a number with up to 6 decimal places 5 Press OK ...

Page 96: ...r the melody 7 Press OK 8 Press A Save Format of the Notes The notes appear in a format like 2C4 by pressing The first number 2 in this case indicates the note octave The default value is 2 Press to change the octave from 1 to 3 The second number 4 in this case indicates the note length The default value is 1 4 Press to change the note length from 1 to 1 32 To enter dotted notes i e notes extended...

Page 97: ...ation includes contacts messages the calendar and image or sound data stored in your phone For further information please refer to the documentation on the CD ROM or to the Panasonic website www panasonicmobile com Note A USB data cable must be purchased separately for connecting your phone to a PC Installing the Software The software is compatible with PCs and laptops running Microsoft Windows 98...

Page 98: ...on when charging The battery is not attached to the phone or when the battery has been deeply discharged the phone will take a short time until the indicator lights Leave the phone charging the battery for a few minutes before the indicator is lit and attempting to switch it on Battery fails to charge The battery is not attached to the phone Ensure the battery is fitted to the phone prior to comme...

Page 99: ... the phone number is stored in the Fixed Dial Calls cannot be received The phone is not switched on Switch the phone on Incoming calls are barred Disable incoming call barring The phone is not registered to a network Move to a coverage area and operate your phone after it has registered with a network Emergency calls cannot be made You are not in a GSM coverage area Check that the antenna symbol i...

Page 100: ...ctly ten times contact your Service Provider Capacity full A message has been received but the message store is full to receive messages delete some of the currently stored messages or set messages to Auto Delete MMS only Password incorrect Try again The SIM has failed one or more of the SIM personalisation checks contact your Service Provider Phone number too long Max 20 The edited or newly creat...

Page 101: ...98 Important Error Messages Unregistered SIM The network has detected an authentication failure because your SIM is not registered with that network contact your Service Provider ...

Page 102: ... voice mailboxes etc EMS Enhanced Message Service Upgraded feature of Text Messages GPRS General Packet Radio Service A GSM data transmission technique that transmits and receives data in packets rather than setting up a continuous channel It makes very efficient use of available radio spectrum and users pay only for the volume of data sent and received GSM Global System for Mobile Communications ...

Page 103: ...ll be blocked Registration The act of locking on to a GSM GPRS network This is usually performed automatically by your phone Roaming The ability to use your phone on networks other than your Home network Service Provider The organisation responsible for providing access to the GSM GPRS network SIM Subscriber Identity Module A small smart card which stores unique subscriber and user entered informa...

Page 104: ...GPRS WAP settings Item Hint Current setting WAP setting Primary IP Primary port Secondary IP Secondary port Timer Homepage Connections GPRS Login name Password GPRS APN Authentication None PAP CSD Login name Password Phone number Call type Analog ISDN Transfer rate Automatic 9600 ...

Page 105: ...ving the cursor 80 Reminder list 81 Call bar 38 Call diverts 3 36 Call meters Service charges 35 Call services 34 Call type CSD 55 Call waiting 15 34 End and answer 15 Ending both connections 17 Ending one connection 17 Hold and answer 15 Caller ID 83 84 Caller s ID 13 34 Calls 34 Camera 22 32 63 Capture mode 70 Preview mode 65 Shutter 64 Status icons 65 Camera lens 1 63 Cancel Camera 64 Capture m...

Page 106: ...Terms 99 GPRS 3 99 Greeting 28 Groups 47 Groups Status Icons 46 Set as group icon 83 84 GSM 3 99 H Handset Manager 94 Handsfree 14 Personal Handsfree Connector 1 Hash key 1 2 Holding call 14 Hot key dial 51 Hot key dial Status Icon 46 Making a call 11 I Idle screen 3 Inbox Messages 76 In call operations 13 Incoming call 12 International calls 11 International calls except home Bar data 38 K Key ba...

Page 107: ...ing contents 57 Navigation key 1 2 Network Editing a network setting 55 New network 40 Search mode 40 Network dependent 2 Network Operator 99 Note Contacts list 46 Notes Melody format 93 Numeric keys 2 O Open action 30 Operator notice 29 Outbox Messages 76 Draft folder 76 Sent folder 76 Unsent folder 76 P PAP 99 Part Names 1 Password 99 CSD 55 GPRS 55 PC Software 94 Downloading 94 Installing 94 Pe...

Page 108: ...ver name MMS 72 Service charges 35 Service dial 12 49 Service Provider 100 Settings Alarms 87 Browser 62 EMS 73 Games 54 Messages 71 MMS 72 Network Games Apps 55 Permission 53 Phone settings 34 Restore MMS settings 73 Slide settings 30 SMS 73 Shift key 1 2 Short press 32 Shortcut key 32 Show my number 35 Shutter key 1 2 63 Shutter sound Camera 69 Shutter Camera 64 Signature MMS 73 SIM 7 42 100 Att...

Page 109: ...65 67 U Unanswered call Incoming call 12 Unanswered call Recent calls 10 Unsent folder Messages 76 USB data cable 3 94 User messages 77 V Validity period MMS 73 SMS EMS 73 Vibration 3 54 Viewing Details Games Apps 53 Voice memo 88 Voicemail 3 50 Volume 13 25 54 W Wallpaper 28 83 84 WAP 100 Warning tone 27 Withhold ID 34 Z Zoom Camera 65 66 in out 64 ...

Page 110: ...All screen images in this manual are simulated Some phone colours may not be available in every country X500EN1CP1 ...

Reviews: