background image

5

Playback and Search Interface

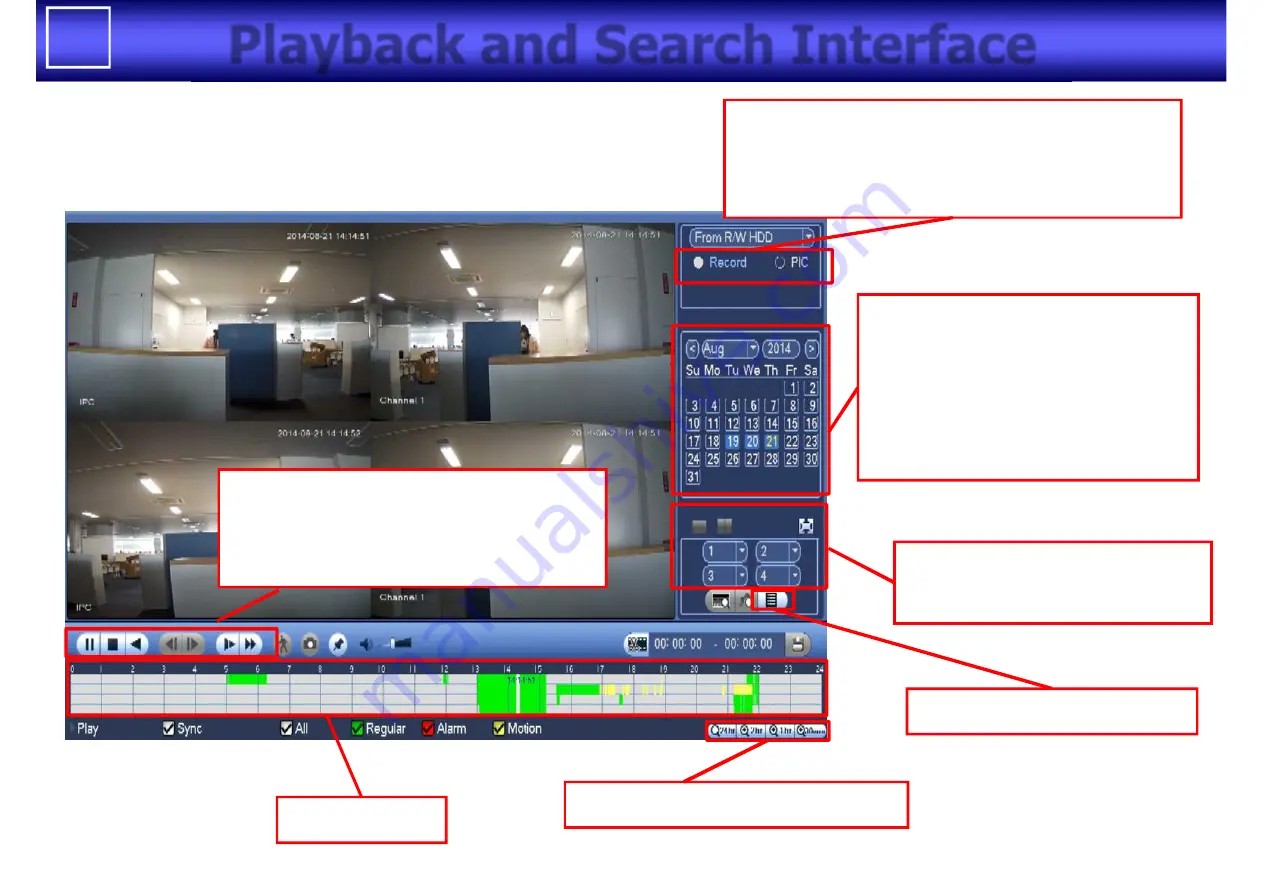
Video / Snapshot selection for playback

“Record” : Video select

“PIC” :  Snapshot select

Window split mode(1/4/9)

Playback channel selection

Playback Control Pane

(Play/Pause/Play Backwards/

Fast Playback/Rewind/Slow Play)

Time Line Bar

Can change scale of time line

Display file list of the day

Calendar  for playback

(Blue Highlighted  date)

There is recorded data

(Yellow colored date)

Currently selected for playback

Summary of Contents for E series

Page 1: ...E Series NVR Operation Guide Panasonic System Networks Co Ltd Security Systems Business Division V1 9th Dec 2014 V2 30th Jan 2015...

Page 2: ...ocument is supplementary to the operation manual The screens used in this document is taken from K NL 308K with firmware version3 20 Depending on the firmware version the screens may differ from the a...

Page 3: ...3 CONTENTS 1 Camera Preview Live View 2 Playback and Search Mark Playback File List Smart Search Accurate Playback by Time 3 Backup Snap Shot Video Clipping File Backup...

Page 4: ...l interface Shortcut Menu Right Click Real time Playback button latest time playback Digital Zoom button Point cursor to upper side of the screen Manual Record button record on USB memory Snapshot but...

Page 5: ...split mode 1 4 9 Playback channel selection Playback Control Pane Play Pause Play Backwards Fast Playback Rewind Slow Play Time Line Bar Can change scale of time line Display file list of the day Cal...

Page 6: ...ayback and Search Mark Playback 1 Click Mark button to add mark 2 Put Name to the mark 3 Click Mark File list button to see the list of marked files Note this button will work only in single channel m...

Page 7: ...lick File Lock button after selected a file in the list Locked files will not be overwritten 4 Click Search Locked File button to see the list of locked files 2 Check Start time to select Double Click...

Page 8: ...Search Smart Search 1 Preparation Go to SETTING EVENT DETECT Motion Detect 4 Select search area with mouse drag 5 Click Smart Search Button 2 Check Enable 3 Click Smart Search button Smart Search is n...

Page 9: ...ick Full Screen button 2 Click Snap Shot button Precondition Insert USB memory to USB port on NVR NOTE Snapshot is saved in USB memory Screen shot image is saved as JPEG file CAUTION USB memory need t...

Page 10: ...back up window is pop up 3 Click Clip button to decide start time 5 Click Clip button to decide end time Precondition Insert USB memory to USB port on NVR 7 Check the clipped file for backup then clic...

Page 11: ...11 Backup File Backup 2 Specify time period 3 Check files to backup This window pop up after insertion of USB memory to USB port on NVR 1 Click file backup...

Page 12: ......

Reviews: