background image

7

R

Q

TC

011

5

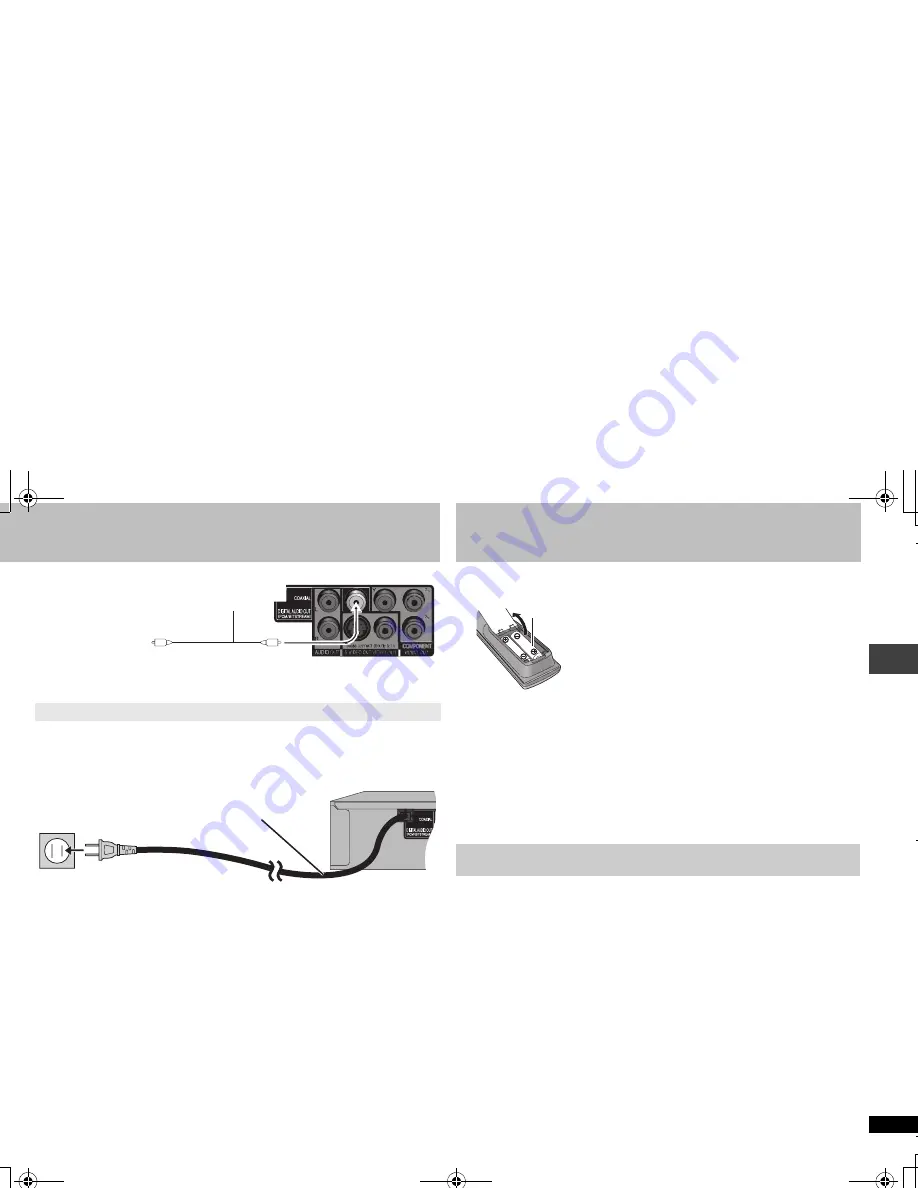
Enjoying multi-channel surround sound

You cannot use DTS Digital Surround decoders not suited to DVD.

Connect the AC power supply cord last

Conserving power

This unit consumes a small amount of power even when it is turned off (1 W). To save 
power when the unit is not to be used for a long time, unplug it from the household AC 
outlet.

Change “PCM OUTPUT”, “DOLBY DIGITAL” and “DTS” (

17, “AUDIO” menu).

COAXIAL I

N

Amplifier with a built-in 
decoder or a decoder-
amplifier combination

Coaxial cable

Back of the unit

AC power supply cord

To household AC outlet (AC 120 V, 60 Hz)

STEP 2

 The remote control

Preparation
Turn on the television and select the appropriate video input on the television.

1 Press [

Í

]

.

2 Press [SETUP].

QUICK SETUP screen appears.

3 Follow the on-screen instructions and select the settings with [

3 4

and [ENTER].

Press [RETURN] to return to previous screen.

4 Press [ENTER] to finish setting.
5 Press [SETUP] to exit the setup menu.

To change these settings later, select “QUICK SETUP” (

17, “OTHERS” menu).

Batteries

Insert so the poles (

i

 and 

j

) match those in the 

remote control.

Do not use rechargeable type batteries.

Do not:

mix old and new batteries.

use different types at the same time.

heat or expose to flame.

take apart or short circuit.

attempt to recharge alkaline or manganese 
batteries.

use batteries if the covering has been peeled off.

Mishandling of batteries can cause electrolyte leakage which can damage items the 
fluid contacts and may cause a fire.

Remove if the remote control is not going to be used for a long period of time. Store 
in a cool, dark place.

Use

Aim at the remote control sensor (

8), avoiding obstacles, at a maximum range of 

7 m (23 feet) directly in front of the unit.

STEP 3

 Quick setup

R6/LR6, AA

S

T

EP 1

 Conne

ctio

n

/STEP

 2

 The

 r

emote con

tr

o

l/S

T

EP 3

 Qui

ck

 se

tu

p

RQTC_0115_Y.fm  Page 7  Wednesday, December 27, 2006  11:46 AM

Summary of Contents for DVDS43 - DIGITAL STILL CAMERA

Page 1: ...rating or adjusting this product please read the instructions completely Please keep this manual for future reference If you have any questions contact 1 800 561 5505 Region number The player plays DVD Video marked with labels containing the region number 1 or ALL 2 4 1 ALL 1 Example MULTI FORMAT PLAYBACK See page 4 for details Operations Reference Getting started RQTC_0115_Y fm Page 1 Friday Janu...

Page 2: ... 6 Clean only with dry cloth 7 Do not block any ventilation openings Install in accordance with the manufacturer s instructions 8 Do not install near any heat sources such as radiators heat registers stoves or other apparatus including amplifiers that produce heat 9 Do not defeat the safety purpose of the polarized or grounding type plug A polarized plug has two blades with one wider than the othe...

Page 3: ... AS VASES SHALL BE PLACED ON THE APPARATUS USE ONLY THE RECOMMENDED ACCESSORIES DO NOT REMOVE THE COVER OR BACK THERE ARE NO USER SERVICEABLE PARTS INSIDE REFER SERVICING TO QUALIFIED SERVICE PERSONNEL CAUTION DO NOT INSTALL OR PLACE THIS UNIT IN A BOOKCASE BUILT IN CABINET OR IN ANOTHER CONFINED SPACE ENSURE THE UNIT IS WELL VENTILATED TO PREVENT RISK OF ELECTRIC SHOCK OR FIRE HAZARD DUE TO OVERH...

Page 4: ...type of discs the condition of the recording the recording method and how the files were created 5 Tips for making WMA MP3 JPEG MPEG4 and DivX discs 1 This unit can also play CD R RW recorded with CD DA or Video CD format 2 Discs recorded on DVD recorders or DVD video cameras etc using Version 1 1 of the Video Recording Format a unified video recording standard 3 Discs recorded on DVD recorders or...

Page 5: ... unit is not compatible with ID3 tags JPEG DVD RAM 2 DVD R RW 3 CD R RW 1 JPG jpg JPEG jpeg JPEG files taken on a digital camera that conform to DCF Standard Version 1 0 are displayed Files that have been altered edited or saved with computer picture editing software may not be displayed This unit cannot display moving pictures MOTION JPEG and other such formats still pictures other than JPEG e g ...

Page 6: ...deo cables When using this connection the audio cable red and white plugs should also be connected You can connect the audio cable to the 2 channel audio input terminals of an analog amplifier or system component to enjoy stereo sound Not used Television Back of the unit Select DARKER from the BLACK LEVEL 16 VIDEO menu To enjoy progressive video Connect to a progressive output compatible televisio...

Page 7: ...NTER Press RETURN to return to previous screen 4 Press ENTER to finish setting 5 Press SETUP to exit the setup menu To change these settings later select QUICK SETUP 17 OTHERS menu Batteries Insert so the poles i and j match those in the remote control Do not use rechargeable type batteries Do not mix old and new batteries use different types at the same time heat or expose to flame take apart or ...

Page 8: ...tart play Remote control sensor Load double sided discs so the label for the side you want to play is facing up DVD RAM Remove discs from their cartridges before use Skip Press 9 to skip chapters tracks etc DVD VR Can also skip to the markers Stop The position is memorized when flashes on the display Press 1 PLAY to resume Resume play Press to clear the position Search during play Slow motion duri...

Page 9: ...k0 6 to k1 4 in 0 1 units Press 1 PLAY to return to the normal play After you change the speed ADVANCED SURROUND 10 does not work Digital audio output switches to PCM 2ch This may not work depending on the disc s recording Convenient when you want to skip commercials etc During play press CM SKIP This may not work depending on the play position DVD VR Does not work with parts containing still pict...

Page 10: ...ndtrack DVD VR VCD Press AUDIO to select L R LiR or L R Press ANGLE PAGE to select the angle During pause press ANGLE PAGE to rotate the still picture 1 JPEG Press 2 Press ZOOM to select the zoom ratio NORMAL AUTO DVD VR DVD V VCD only k2 k4 b NORMAL Displayed in the size used for recording AUTO Automatically zooms in and adjusts the size of images with upper and lower black bands k2 2X zoom k4 4X...

Page 11: ...ffect 3 Strong effect OFF Transfer mode Discs with pictures Changing picture mode Discs with pictures Smoothing block noise Motion picture TRANSFER MODE AUTO1 PICTURE MODE NORMAL DNR 1 Playing programs playlists Titles appear only if they have been entered You cannot edit playlists and titles Set DVD VR DATA to DVD VR to play DVD VR on DVD RAM 17 OTHERS menu 1 While stopped press DIRECT NAVIGATOR ...

Page 12: ...the picture in Thumbnail menu JPEG 1 While pictures are being displayed press TOP MENU to display the thumbnails 2 To select a picture in a group Press 3421 to select the picture and press ENTER Press 9 to skip forward page by page Press to skip backward page by page To select picture in other group 1 Press 3 to select the group name 2 Press 2 1 to select the group and press ENTER 3 Press 3421 to ...

Page 13: ...X 8 alphanumeric characters Manufactured under license from Dolby Laboratories Dolby and the double D symbol are trademarks of Dolby Laboratories DTS is a registered trademark of DTS Inc and DTS 2 0 Digital Out is a trademark of DTS Inc This product incorporates copyright protection technology that is protected by method claims of certain U S patents and other intellectual property rights owned by...

Page 14: ...ess 3 4 to select AUDIO PICTURE or VIDEO and press ENTER 2 While stopped press PLAY MODE several times to select RANDOM When playing a disc with both WMA MP3 and JPEG recorded select MUSIC RANDOM for WMA MP3 or PICTURE RANDOM for JPEG pictures 3 WMA MP3 JPEG MPEG4 DivX Only when the disc has groups folders Press 3 4 to select a group and press ENTER will be displayed next to the selected groups Pr...

Page 15: ...t 1 Press 3 4 to select A B 2 Press ENTER at the starting and ending points Press ENTER again to cancel SUBTITLE 10 Changing subtitles ANGLE 10 Angle select DATE DISPLAY JPEG Select ON to display shooting date ON OFF ROTATION JPEG 10 Still picture rotation C2 T1 On screen menu 2 Video PICTURE MODE 11 Changing picture mode ZOOM 10 Zoom DNR 11 Smoothing block noise TRANSFER MODE 11 Transfer mode SOU...

Page 16: ...n screen instructions PASSWORD Change the password for RATINGS above 1 Select CHANGE and press ENTER 2 Enter the current password with the numbered buttons then press ENTER 3 Enter the new password with the numbered buttons then press ENTER 4 When VERIFY is displayed please verify the password and input it again SETTING STATE Display the current setting of the items below TV ASPECT Choose the sett...

Page 17: ...djusts for clarity even when the volume is low through compressing the range of the lowest sound level and the highest sound level Convenient for late night viewing Only works with DOLBY DIGITAL OFF SETTING STATE Display the current setting of the items below LANGUAGE ENGLISH FRANÇAIS ESPAÑOL SETTING STATE Display the current setting of the items below REGISTRATION Displays the unit s registration...

Page 18: ...582 Uzbek 8590 Vietnamese 8673 Volapük 8679 Welsh 6789 Wolof 8779 Xhosa 8872 Yiddish 7473 Yoruba 8979 Zulu 9085 Language code list Glossary DivX DivX is a popular media technology created by DivX Inc DivX media files contain highly compressed video with high visual quality that maintains a relatively small file size Film and video DVD Videos are recorded using either film or video This unit can de...

Page 19: ...t values It takes time before play starts Play may take time to begin when an MP3 track has still picture data Even after the track starts the correct play time will not be displayed however this is normal This is normal on DivX video The program play function do not work These functions do not work with some DVD Videos Menu doesn t appear VCD with playback control Press twice and then press 1 PLA...

Page 20: ...ed 4 The disc may be dirty 21 You haven t inserted the disc correctly Insert it correctly 8 Trouble may have occurred Turn the unit off and then back to ON Alternatively turn the unit off disconnect the AC power supply cord and then reconnect it If the service numbers fail to clear note the service number and contact a qualified service person You haven t inserted a disc Insert one You haven t ins...

Page 21: ...n jack Number of connectors 2 channel 1 system Audio performance 1 Frequency response DVD linear audio 4 Hz to 22 kHz 48 kHz sampling 4 Hz to 44 kHz 96 kHz sampling CD Audio 4 Hz to 20 kHz 2 S N ratio CD Audio 115 dB 3 Dynamic range DVD linear audio 92 dB CD Audio 90 dB 4 Total harmonic distortion CD Audio 0 003 Digital audio output Coaxial digital output Pin jack Pickup Wave length 653 nm 790 nm ...

Page 22: ...tresTM locator under Customer support IF YOU SHIP THE PRODUCT TO A SERVICENTRE Carefully pack and send prepaid adequately insured and preferably in the original carton Include details of the defect claimed and proof of date of original purchase 1 Damage requiring service The unit should be serviced by qualified service personnel if a The AC power supply cord or AC adaptor has been damaged or b Obj...

Page 23: ...Countries outside the European Union This symbol is only valid in the European Union If you wish to discard this product please contact your local authorities or dealer and ask for the correct method of disposal RQTC_0115_Y fm Page 23 Wednesday December 27 2006 11 46 AM ...

Page 24: ...e Mode 11 Playlist 11 Play speed 9 Program play 14 Programs 11 Q Quick OSD 9 Quick replay 10 Quick setup 7 R Random play 14 Repeat 9 Resume play 8 Rotate picture 10 S Setup 16 Soundtrack 10 Subtitle 10 w WMA 5 12 Z Zoom 10 As an ENERGY STAR Participant Panasonic has determined that this product meets the ENERGY STAR guidelines for energy efficiency This manual was printed with soy based ink Inside...

Reviews: