Panasonic DP-C406 Operating Instructions Manual Download Page 18

Chapter 2   General Settings

18

Example : Dept. Counter Mode

Registering passwords (department codes) of departments in “

Dept. Counter Mode

” allows you to 

manage the copy, print, and scan counts by department. Up to 1000 departments can be managed.
Let’s take a look at how to register/change passwords (department codes), clear the total counter, print 
a departmental list or report such as a departmental counter list, and change a departmental limit of 
copy count.

z

To use “

Dept. Counter Mode

”, a special service setting is required. Contact your authorised Panasonic dealer.

z

When the Departmental Counter function is enabled, the password (department code) entry screen appears on 
the Touch Panel Display. If you do not enter the password (department code), you cannot use the Copy, Fax, 
Scan, and Print function.
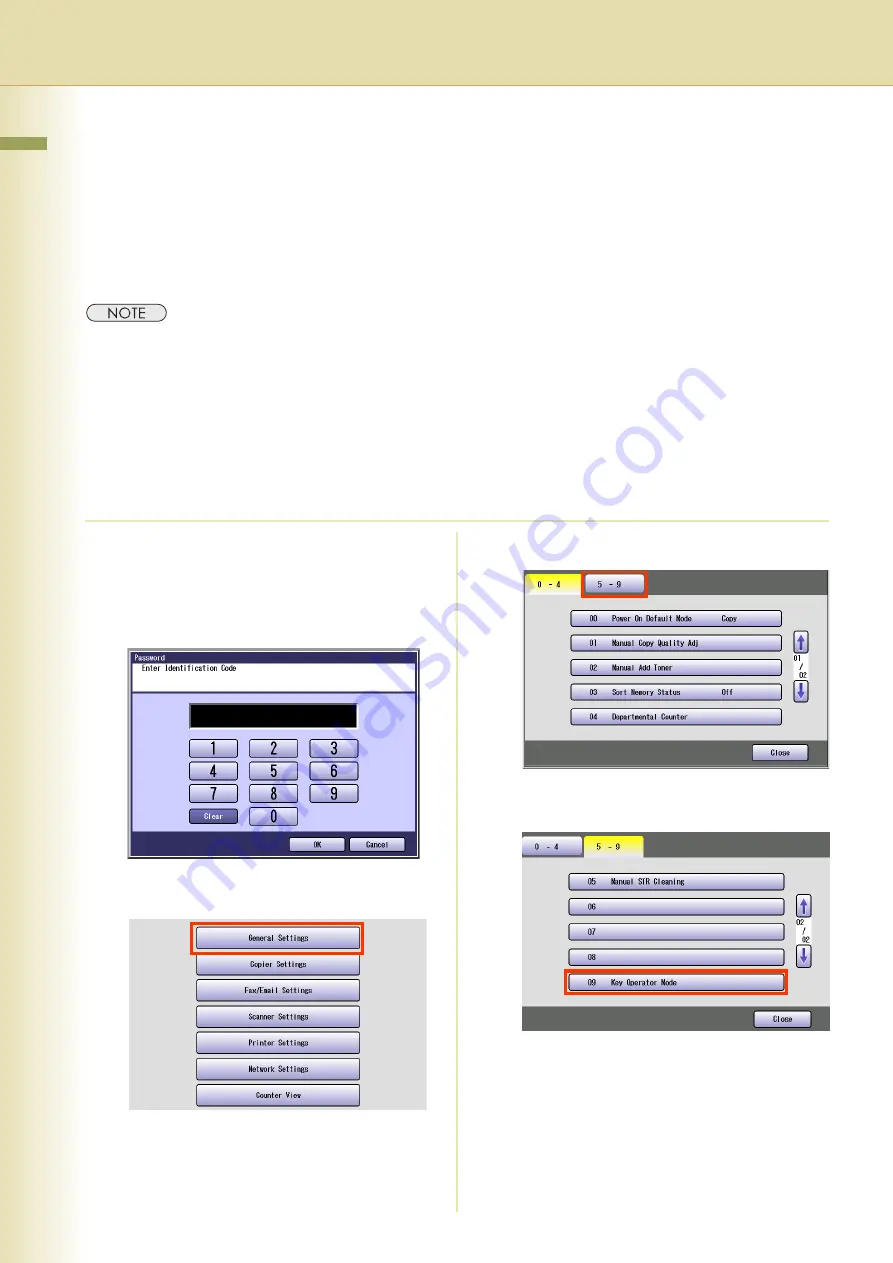
1

Press the 

Function

 key.

z

The password (department code) entry 
screen appears on the Touch Panel Display.
Press the 

Function

 key on the Control 

Panel without entering any code.

2

Select “

General Settings

”.

3

Select “

5-9

”.

4

Select “

09 Key Operator Mode

”.

Summary of Contents for DP-C406

Page 1: ...l and keep this documentation in a safe place for future reference Illustration shows optional accessories that may not be installed on your machine English Operating Instructions Digital Colour Imagi...

Page 2: ...ide For Administrator Describes how to set up the machine Setup Guide For User Describes how to install the printer driver and application software to client PC Copy Function Describes how to make a C...

Page 3: ...ual Icon Description Indicates important information that must be read in detail Indicates reference information Notation Description For Keys and Buttons Hard buttons on the Control Panel are depicte...

Page 4: ...al Counter 26 Example Date Time Setting 28 Chapter 3 Copier Settings Copier Settings 30 General User Mode 30 Key Operator Mode 35 Example Digital Skyshot Mode 40 Example Manual Skyshot Mode 41 Chapter...

Page 5: ...pter 5 Scanner Settings Scanner Settings 74 General User Mode 74 Key Operator Mode 76 Chapter 6 Printer Settings Printer Settings 77 General User Mode 77 Key Operator Mode 80 Chapter 7 Network Setting...

Page 6: ...e any change can be made in the Key Operator Mode For security the Key Operator is advised to setup and manage the 8 digit password To set the password consult with the authorised Panasonic dealer The...

Page 7: ...2 Enter characters and then select OK Entering Numeric Characters and Symbols 1 Select Numeric Symbols to shift numbers symbols Ex When setting 03 EMAIL 00 Email Address in Network Settings See page...

Page 8: ...isplayed as 01 02 zSelect or to scroll items up or down on the screen zWhen setting the parameters in the Key Operator Mode enter the password 8 digits and then select OK 5 Change the settings using t...

Page 9: ...ghter or Darker Select Lighter or Darker and then select OK Ex When setting 04 Text Density in the Copier Settings See page 35 Entering characters Enter characters and then select OK Ex When setting 0...

Page 10: ...2 Manual Add Toner Set whether to darken the printing manually by using more toner Off On Off 03 Sort Memory Status Set whether to display the percentage of sorting memory used Off On Off 04 Departmen...

Page 11: ...e paper type Change Size A3 B4 A4 A4 B5 B5 A5 11x17 Legal 8 5x11 8 5x11 5 5x8 5 8x13 8 5x13 Change Type Plain Glossy Recycled Thick 02 A4R A5 Size Selection Set the smallest paper size that can be fed...

Page 12: ...y Set an Output Tray for the Print function z Outer is available for selection when the optional Paper Transport Unit is installed Inner Outer Inner 14 Fax Email Output Tray Set an Output Tray for the...

Page 13: ...13 Chapter 2 General Settings 17 Fold Position A4 LTR R Set the binding margin for booklet copy A4 Letter R 4 0 to 4 0 mm 0 0 No Parameter Comments Selective Item Standard Setting A4 Letter R 8 5x11...

Page 14: ...atically 1 to 240 min 3 min 28 Auto Reset Time If you do not select any key within a given time period the Touch Panel Display goes back to the initial screen of the current active function automatica...

Page 15: ...n during the lockout time 1 to 60 min 5 min 49 Administrator Name When 45 User Authentication is set to On and a local machine is selected as domain set administrator s name and password for authentic...

Page 16: ...rd Disk Error Check Set the hard disk error check z Not required in the Copy mode but needed when installing options with advanced functions Stop Start Start 67 Data Deletion of HD Set deletion securi...

Page 17: ...andard Setting 80 Key Operator Password Set the 8 digit Key Operator Password Up to 8 characters 00000000 81 Address Book Group ID Set the Address Book Group ID 0 to 99 0 89 Customised Screen Select t...

Page 18: ...a departmental limit of copy count zTo use Dept Counter Mode a special service setting is required Contact your authorised Panasonic dealer zWhen the Departmental Counter function is enabled the pass...

Page 19: ...ter Refer to Changing the Departmental Counter see page 23 Changing the Departmental Limit with the Maximum Prints button You can change the departmental counter Refer to Changing the Maximum Prints s...

Page 20: ...mber to register change the password department code and then select Input 3 Enter the department code up to 8 digits and then select OK 4 Enter the department name up to 25 characters and then select...

Page 21: ...Total Counter 1 If the total counter is not displayed select Total Counter 2 Select Clear 3 Select Yes to clear the counter 4 Select OK 5 Select Close zPress the Reset key to return the machine to the...

Page 22: ...t Print List 2 Select the list or report you want to print and then select OK zPrinting of the selected list or report starts 3 When printing is completed select OK 4 Select Close zPress the Reset key...

Page 23: ...departmental count of and then select Input 3 Select the count you want to change 4 Select the colour you want to change zIf you select Scanner Count in step 3 the Colour Selection screen is not displ...

Page 24: ...ey to return the machine to the initial screen of the current active mode Changing the Maximum Prints 1 Select Maximum Prints 2 Select the department number to change the departmental limit of and the...

Page 25: ...e Keypad and then select OK zIf you enter 9999999 the copy count limit becomes infinite zIf the set limit is exceeded the machine stops automatically 5 Select Close 6 Select OK 7 Select Close zPress t...

Page 26: ...page 18 zWhen the Departmental Counter function is enabled the password department code entry screen appears on the Touch Panel Display If you do not enter the password department code you cannot use...

Page 27: ...Chapter 2 General Settings 27 6 After displaying the counter or copy limit select Close zPress the Reset key to return the machine to the initial screen of the current active mode...

Page 28: ...y of October the clock will be reset to normal zOn occasion the clock may need adjustment Lunar inequality 1 minute zThe date and time can be set automatically by synchronizing to NTP Server Refer to...

Page 29: ...e Time and then select Input Enter the date and time and then select OK Ex 1st January 2009 00 00 9 Select Change for Time Zone and set the time zone and then select OK 10 Select OK 11 Select Close zP...

Page 30: ...e 5 mm 10 mm 15 mm 20 mm 5 mm 02 Book Value Default Set the default book 15 mm 20 mm 25 mm 30 mm 20 mm 03 Margin Reduction Def To copy with the binding margin set whether to reduce the copy image No Y...

Page 31: ...in 1 copy set whether to leave a margin between copy images No No margin is inserted Yes A margin is inserted No Yes No 07 Booklet Default Mag For Booklet copy set whether to reduce the copy image 100...

Page 32: ...page 40 No Normal Quality Normal 09 Manual Skyshot Mode Enable or disable the Manual Skyshot mode Off The Manual Skyshot mode is disabled M1 On The image is copied in pre registered M1 size Standard s...

Page 33: ...aper Transport Unit is installed this setting is available None Sort Shift Staple Group Rotate None 13 Stamping Default Mode Set the default Stamping mode Page Date Issue Text Page 14 Page Numbering S...

Page 34: ...register the mixed colour 01 to 06 21 Modify User Colour When registering 20 Add User Colour modify a registered Colour 22 Delete User Colour When registering 20 Add User Colour delete a registered co...

Page 35: ...uality adjustment Text Text1 Printed Text2 Pencil Text Photo T P1 Commercial T P2 Photo Paper T P3 Laser Printed Photo Photo1 Commercial Photo2 Photo Paper Photo3 Laser Printed Other Types Other1 Map...

Page 36: ...rough Prevention Off 1 to 6 Off 11 Contrast Set the default contrast 3 to 3 0 12 Sharpness Set the default sharpness 3 to 3 0 13 Saturation Set the default colour saturation 3 to 3 0 14 Tint Set the d...

Page 37: ...ge the Manual Skyshot size registered on the M2 key X 5 to 432mm Y 5 to 297mm 95 mm 220 mm 27 Memory Overflow Warning Set sort copying when the memory is full Print The read original is copied Cancel...

Page 38: ...4 Colour Toner Save P In the Colour mode set the level of toner saving when the original type is Photo None Level 1 Level 2 Level 3 Level 4 Level 5 None 35 Colour Toner Save Other In the Colour mode s...

Page 39: ...Parameter Comments Selective Item Standard Setting 40 Copy Customise Set whether to indicate the More Menus functions individually 41 Reserve a Job Settings Set whether to clear or save the copy job...

Page 40: ...1 or 2 Page the Quality mode will be changed to Normal automatically 1 Press the Function key 2 Select Copier Settings 3 Select 4 Select 08 Digital Skyshot Mode 5 Select the desired item and then sel...

Page 41: ...he Sort function Sort Shift Sort Rotate Sort and Staple Sort is not available in the Manual Skyshot mode 1 Press the Function key 2 Select Copier Settings 3 Select 4 Select 09 Manual Skyshot Mode 5 Se...

Page 42: ...Operator Mode To open the User Parameter or Fax Parameter mode z Enter the Key Operator password to display the Key Operator Mode No Parameter Comments 00 Print Address Book List Refer to Address Book...

Page 43: ...r beep is produced The feeding paper s will be ejected before completing the above cancellation operation If setting a parameter an asterisk mark will be added before the parameter number Stop Start S...

Page 44: ...ange the Email address for RightFax server Initial setting can be done at Fax Parameter No 132 z This setting is displayed only when 132 Via Fax Server in Fax Parameters is set to Valid To use this fu...

Page 45: ...most used original 3 2 1 0 1 2 3 0 02 Resolution HOME Set the default resolution according to the most used original z When installing the optional Fax Communication Board the standard setting can be...

Page 46: ...is printed Invalid Valid Invalid 12 Comm Journal HOME Select the printing attributes for the communication journal Off Communication journal is not printed Always Prints whether communication has succ...

Page 47: ...tting of 25 Reduction Ratio Auto Reduce received original according to their length z For the reduction methods refer to Print Reduction in the Operating Instructions For Facsimile and Internet Fax of...

Page 48: ...tails about retransmission refer to Resending an Incomplete Document in the Operating Instructions For Facsimile and Internet Fax of provided CD ROM Invalid Valid Invalid 33 XMT Reduction Enable or di...

Page 49: ...rd Setting 42 Conf File Save Set whether to save an original in memory after the Confidential transmission Invalid After Confidential transmission the original is deleted from memory Valid Even after...

Page 50: ...tic Password Set the Diagnostic Password z Consult with the authorised Panasonic dealer on how to use this item 53 Sub Address Password Set the Sub Address Password Up to 20 digits 54 Fax Forward Set...

Page 51: ...OM No Parameter Comments Selective Item Standard Setting 82 Quick Memory XMT Enable or disable the Quick Memory Transmission function Invalid Transmission starts after all originals are scanned Valid...

Page 52: ...ard Base Memory Optional Memory 117 Multi Station HOME Set the default setting for the Multi Station function Off The document is sent to a single destination only Select the Multi Station button to a...

Page 53: ...r to Confirming the Destination in the Operating Instructions For Facsimile and Internet Fax of provided CD ROM Invalid Valid Invalid 131 Job Tracking Set the Job Tracking under the following conditio...

Page 54: ...to 30 fax numbers can be registered for junk fax number z Up to 20 digits including numerals blank space and symbol can be registered for a fax number z When comparing the sender s numeric ID to the r...

Page 55: ...d Valid 143 Relay XMT Report Select the printing attributes for a LAN Relayed transmission report Off Not send Always Always sends Inc Only Sends only if communication has failed z Refer to Example Re...

Page 56: ...Email is kept in the POP server Valid After reception from the POP server the Email is deleted from the POP server z For details about POP reception refer to Receiving an Email in the Operating Instru...

Page 57: ...contents of the From field when transferring Email to a computer or internet fax on the network by routing Origi Sender information is printed Rly Stn Relay station information is printed Origi Rly S...

Page 58: ...the routing station Invalid Valid Invalid 164 IFax XMT Header Set whether to include the header when sending an original to an address in the same domain as specified in the Default Domain parameter...

Page 59: ...to Email z This setting can be ignored when sending to multi stations or attaching oversized file in multi page setting z High Compressed PDF can be attached as a multi page file only Single Multi Si...

Page 60: ...y Operator must enter the correct password The procedure of setting Receive to Memory is described below zFor memory reception refer to Receive to Memory in the Operating Instructions For Facsimile an...

Page 61: ...Start key to select 37 Receive to Memory 7 Select 37 Receive to Memory 8 Enter the Identification Code 8 digits and then select OK zThe Identification Code must contain at least two different characte...

Page 62: ...ction set 43 Password Transmit or 44 Password Receive to On by following the procedure below zFor password transmit refer to Password Communication in the Operating Instructions For Facsimile and Inte...

Page 63: ...ication code 4 digits and then select OK Ex Password Transmit screen password 5678 zIf you made an input error select Clear on the screen to delete all characters at a time 9 Select On and then select...

Page 64: ...acsimile and Internet Fax of provided CD ROM 1 Press the Function key 2 Select Fax Email Settings 3 Select 04 Key Operator Mode 4 Enter the password 8 digits and then select OK 5 Select 01 Fax Paramet...

Page 65: ...4 Fax Email Settings 65 7 Select 8 Select 46 Select Receive 9 Select Valid and then select OK 10 Select Close zPress the Reset key to return the machine to the initial screen of the current active mo...

Page 66: ...ng Station LAN Relay refer to Using the Relay Feature in the Operating Instructions For Facsimile and Internet Fax of provided CD ROM LAN RLY XMT Request Fax Parameter 140 Set the LAN Relay Transmissi...

Page 67: ...operation If you know the parameter number enter the number with the Keypad and then press the Start key Ex In step 6 enter 140 with the Keypad and press the Start key to select 140 LAN RLY XMT Reque...

Page 68: ...ameter 142 Set the LAN Relay Transmission function Enabling the LAN Relayed Transmission function Fax Parameter 142 Relay XMT Setting the Communication Journal Fax Parameter 143 Relay XMT Report Setti...

Page 69: ...ypad for quick operation If you know the parameter number enter the number with the Keypad and then press the Start key Ex In step 6 enter 142 with the Keypad and press the Start key to select 142 Rel...

Page 70: ...elect how the Relay XMT Report is sent to the originator 1 Select 143 Relay XMT Report 2 Select how the Relay XMT Report is sent and then select OK 3 Select Close zAdvance to Relay XMT Password User P...

Page 71: ...ns from accessing your machine to relay messages to a G3 fax machine via PSTN This password should be given out to authorised personnel only 1 Select 00 User Parameters 2 Select 40 54 3 Select 40 Rela...

Page 72: ...ation of all Internet Relayed transmissions for supervision and cost control purposes 1 Select 20 39 and then select 2 times 2 Select 30 Manager s Email Addr 3 Enter the Email address up to 60 charact...

Page 73: ...Request 1 Select 40 54 and then select 2 Select domain names from 45 Relay Domain 01 to 54 Relay Domain 10 Up to 10 domain names zSelect to select from 50 Relay Domain 06 to 54 Relay Domain 10 3 Enter...

Page 74: ...o 3 0 08 Compression Mode Black Set the default compression of black and white image MH MR MMR JBIG MMR 09 Compress Mode Colour Set the default compression of full colour image Standard Speed Quality...

Page 75: ...ss Book Edit a computer IP Address in the Address Book 1 24 Edit Address Book Email Edit an Email address in the Address Book 3 25 Delete Address Delete a computer IP Address from the Address Book 1 2...

Page 76: ...g the cancellation panel operation is denied and an error beep is produced The feeding paper s will be ejected before completing the above cancellation operation If setting a parameter an asterisk mar...

Page 77: ...installed Auto Bypass Tray 1 Tray 2 Tray 3 Tray 4 Auto 03 Print Direction Set the printing direction Portrait Landscap e Portrait 05 2 Sided Print Set duplex printing Off On Off 06 Bound Edge Set the...

Page 78: ...and then enter the desired value No Parameter Comments Selective Item Standard Setting 30 SD Print Settings Set the default of SD print settings 00 Colour Mode Set the Colour mode for printing JPEG T...

Page 79: ...3 0 10 Mirror Default Enable or disable the Mirror mode Off On Off 11 Sort Priority Select the sort priority None Sort Group Shift Rot Grp Rotate Sort 12 Individual Orientation Set the default orient...

Page 80: ...time 1 to 999 Sec 180 Sec 02 Page Protection Set to On to use page protection Off On Off 03 Error Page Print Set to On to print the data of an error job Off On On 04 Spool Function Set to On to set th...

Page 81: ...from mail box No Yes Yes 14 Mbox File Delete Action Set whether to delete or save a file from the mail box under the following condition z Mbox File Delete Action is displayed when 13 Mbox File Delet...

Page 82: ...ort Set the default sort None Sort Group Shift Rot Grp Rotate Sort 31 Staple Set the default staple None T Centre Top L Top R Centre L Centre R Saddle R Right L Left T Top None 32 Hole Punch Set the d...

Page 83: ...S z Banner Sheet will not be finished Sort Staple Punch z Banner Sheet will be counted with 1 count of monochrome image z Print out orientation will be fixed according to the paper size Portrait A3 B4...

Page 84: ...d before completing the above cancellation operation If setting a parameter an asterisk mark will be added before the parameter number Stop Start Start 01 General 00 Ethernet 00 MAC Address Displays t...

Page 85: ...functions Allow Deny Allow 09 IP Filter Address Set the IP Filter Address Up to 4 addresses can be set z When setting only one IP filter address enter the same IP Address for both Start Address and E...

Page 86: ...4 digits x 8 03 DNS Select Yes and set the DNS server address when using the Internet Fax Email function No Yes Yes 04 SNMP 00 SNMP Set whether to use SNMP Off On On 03 Community Name R Set the SNMP c...

Page 87: ...the certificate is valid from Valid to Enter the date which the certificate is valid to z If the entered Common Name and the Hostname portion of the URL for the machine do not match the alert message...

Page 88: ...et whether to use FTP Off On On 09 HTTP Set whether to use HTTP Off On On 08 Protocol Client 00 SMTP Set whether to use SMTP Off On On 01 POP3 Set whether to use POP3 Off On On 02 FTP Set whether to u...

Page 89: ...l be automatically set up Off On Off 06 Bonjour Name Set the name of Bonjour z When the optional Printer Controller Module for Adobe PostScript 3 is installed There is no default value When the machin...

Page 90: ...to Yes set the SMTP Server Name When 01 General 03 DNS in the Network Settings is set to No set the SMTP IP Address Up to 60 characters 02 SMTP Authentication If you transmit to the SMTP server user...

Page 91: ...is set to No set the LDAP Server IP Address The default port number is changed by setting SSL z Refer to Example LDAP Server see page 92 Up to 60 characters SSL Off 389 On 636 01 LDAP User Name Set th...

Page 92: ...imile and Internet Fax of provided CD ROM zThis feature is available in certain countries only LDAP Server Name or LDAP Server IP Set LDAP Server Name or IP Address according to the setting of 01 Gene...

Page 93: ...nter the LDAP Server IP Address 7 Select the authentication method and then select OK zTo select Kerberos for the authentication method set 01 General 03 DNS to Yes in Function Parameters Network Sett...

Page 94: ...rs Select Off or On and then select OK When Kerberos is selected Enter the realm name in uppercase and then select OK 8 Enter the port number up to 5 digits and then select OK zAdvance to 01 LDAP User...

Page 95: ...02 LDAP Password or 03 LDAP Search Base 2 Enter LDAP User name up to 40 characters Password up to 30 characters or Search Base up to 60 characters and then select OK Ex LDAP Search Base screen 3 Selec...

Page 96: ...rs of Copy 1 Colour Print 17 Copy Print Count 2C Count numbers of Copy 2 Colour Print 18 Copy Print Count 4C Count numbers of Copy 4 Colour Print 19 Copy Print Count Single Count numbers of Copy Singl...

Page 97: ...Area in the last original 51 Magenta Img Area Last Ratio of Magenta Image Area in the last original 52 Cyan Image Area Last Ratio of Cyan Image Area in the last original 53 Black Image Area Last Rati...

Page 98: ...elect 00 Print Counter List 4 Select Start and then select OK Stop Stops printing counter list Start Starts print the counter list zTo cancel printing the counter list select Stop and OK While process...

Page 99: ...re is required 1 Press the Function key 2 Select Counter View 3 Select 40 59 4 Select 40 Clear Toner Counter Y Ex Clears the Toner Counter for yellow zSelect the desired colour of Toner Counter 5 Sele...

Page 100: ...ID 43 Check then Print Qty 81 Clear Toner Counter BK 97 Clear Toner Counter C 97 Clear Toner Counter M 97 Clear Toner Counter Y 97 99 Colour Attachment 59 Colour Balance 36 79 Colour Mode 78 Colour M...

Page 101: ...int PS 80 FTP 88 Function Key 8 G G Cl Detect Mode 33 General 84 Group Dial 42 H Hard Disk Error Check 16 Hard Disk Initialize 16 HD Drive Lock Settings 16 Header Format 46 Header Print 46 Hole Punch...

Page 102: ...80 Panel Beep Sound 14 Pap Tray Priority B W 11 Pap Tray Priority Col 12 Paper Size 11 77 Paper Size Priority 35 Paper Tray 77 Password Receive 49 63 Password Transmit 49 63 PC Print Count 2C 96 PC P...

Page 103: ...7 43 Selectable Domain 08 43 Selectable Domain 09 43 Selectable Domain 10 43 Sender Selection 55 Sharpness 36 74 Simulated Coverage 4C 97 Simulated Coverage B W 97 Sleep Timer 14 SMB 87 88 SMB Comment...

Page 104: ...104 V Via Fax Server 53 W Weekly Timer 14 Wide A4 78 WINS Server 1 IP 85 WINS Server 2 IP 85 X XMT File Type 59 XMT Reduction 48 Y Yellow Drum Unit 96 Yellow Image Area Avg 97 Yellow Image Area Last...

Page 105: ...Chapter 9 Appendix 105 Appendix Memo...

Page 106: ...Office and may be registered in other jurisdictions ColorSet is a registered trademark of Monotype Imaging Inc registered in the U S Patent and Trademark Office and may be registered in other jurisdic...

Reviews: