


12
RQT8203
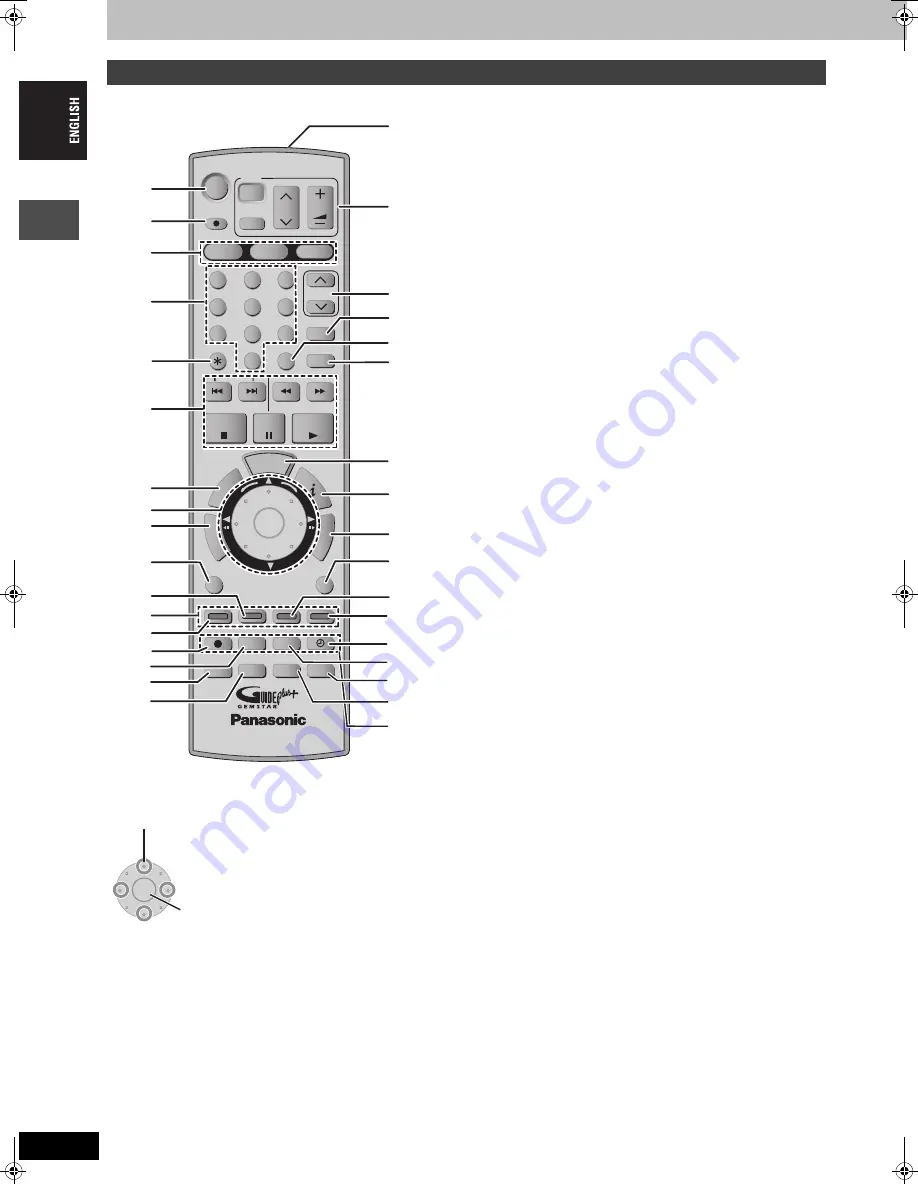
Control reference guide
Instructions for operations are generally described using the remote control.
∫
Smart Wheel operation
1
Turn the unit on (
➡
18, 19)
2
Direct TV recording (
➡
25)
3
Select drive (HDD, DVD or SD) (
➡
22, 30, 34)
4
Select channels and title numbers, etc./Enter numbers
5
Cancel
6
Basic operations for recording and play
7
Show timer recording programme screen (
➡
28)
8
Smart Wheel (
➡
below)
9
Show Top menu/Direct Navigator (
➡
30, 31, 38)
:
Show sub menu (
➡
38)
;
Show status messages (
➡
37)
<
Colour buttons for switching between Video/Picture and Video/
Playlists, selecting character type when entering text, manual
tuning settings and GUIDE Plus+ operations
§
(
➡
30, 45, 53, 58)
=
Show on-screen menu (
➡
36)
>
Start recording (
➡
22)
?
Change recording mode (
➡
22)
@
Skip the specified time/Display the television image as a picture-
in-picture (
➡
25, 32)
A
Select audio (
➡
32)
B
Transmission window
C
Television operations (
➡
21)
D
Channel select/Change pages in the GUIDE Plus+ system
§
(
➡
22)
E
Show S
HOW
V
IEW
screen (
➡
26)
F
Input select (AV1, AV2, AV3, AV4 or DV) (
➡
25, 47)
G
Skip 30 seconds forward (
➡
32)
H
Show the GUIDE Plus+ screen (
➡
18, 26)
I
Show programme information in the GUIDE Plus+ system
§
J
Show FUNCTIONS window (
➡
37)
K
Return to previous screen
L
Create chapter (
➡
32)
M
Erase items (
➡
32)
N
Timer recording standby/release (
➡
26–28)
O
Linked timer recordings with external equipment (
➡
29)
P
Flexible Recording (
➡
24)
Q
One touch transfer (dubbing) (
➡
44)
R
Recording functions
§
Refer to the “User’s manual for the GUIDE Plus+ system” for more
information.
[Note]
≥
Buttons such as the [
¥
REC] button do not protrude as much as
other buttons to stop them from being pressed accidentally.
≥
If you press [EXT LINK] accidentally, the unit turns off and switches
to recording standby mode. Press [EXT LINK] again to cancel
recording standby.
≥
The word “button” is not used in these operating instructions so
“Press the [ENTER] button.” is shown as “Press [ENTER].”
≥
You can use this remote control to operate your television if you set
the television manufacturer code (
➡
21).
Remote control
≥
Select items on menu screens and set items.
These operations are also possible…..
≥
Frame-by-frame (backward/forward/):
While paused, press [
2;
] or [
;1
]
(left/right)
≥
Search (forward/backward):
During play, turn right or turn left
≥
Slow-motion (forward/:backward):
While paused, turn right or turn left
[Note]
Press the Smart Wheel lightly when turning it.
If you press it strongly when turning it, [
3
,
4
,
2
,
1
] may be
mistakenly activated.
DVD
HDD
HDD
DVD
DVD
SD
SD
1
2
3
4
5
6
7
8
9
GUIDE
FU
N
C
TIO
NS
Í
Í
DIRECT TV REC
AV
CH
VOLUME
TV
TV
PAGE
CH
ShowView
MANUAL SKIP
0
INPUT SELECT
SKIP
SLOW/SEARCH
STOP
PAUSE
PLAY/x1.3
NA
V
IG
AT
O
R
D
IR
E
C
T
PR
OG
/CH
ECK
SUB MENU
RETURN
DISPLAY STATUS
CREATE
CHAPTER
ERASE
REC
REC MODE EXT LINK
TIMER
TIME SLIP AUDIO
DUBBING
F Rec
DVD/TV
DVD/TV
ENTER
ENTER
CANCEL
TO
P
M
E
N
U
S
C
D
E
F
G
B
I
J
K
L
M
H
1
2
3
4
5
6
7
8
9
:
;
<
=
>
@
A
?
N
O
P
Q
R
ENTER
ENTER
Press [
3
,
4
,
2
,
1
] (up, down, left or right) to select an item.
Press [ENTER] to confirm.
You can also turn the wheel to select an item.
12
Contr
o
l r
e
fe
re
nc
e
guide
EH60.book Page 12 Monday, June 27, 2005 8:46 PM
Summary of Contents for DMREH60 - DVD RECORDER DECK
Page 73: ...RQT8203 MEMO 73 ...


