background image

28

RQT7301

Edit

ing

Editing titles/chapters

[RAM]


[DVD-R]

The maximum number of items on a disc:

–Titles:

99

–Chapters:

Approximately 1000
(Depends on disc contents.)

[Note]

Once erased or shortened, it cannot be restored to its original 

state. Make certain before proceeding.

You cannot edit during recording.

Preparation
Release protection (cartridge 

page 15, disc

page 33). 

[RAM]

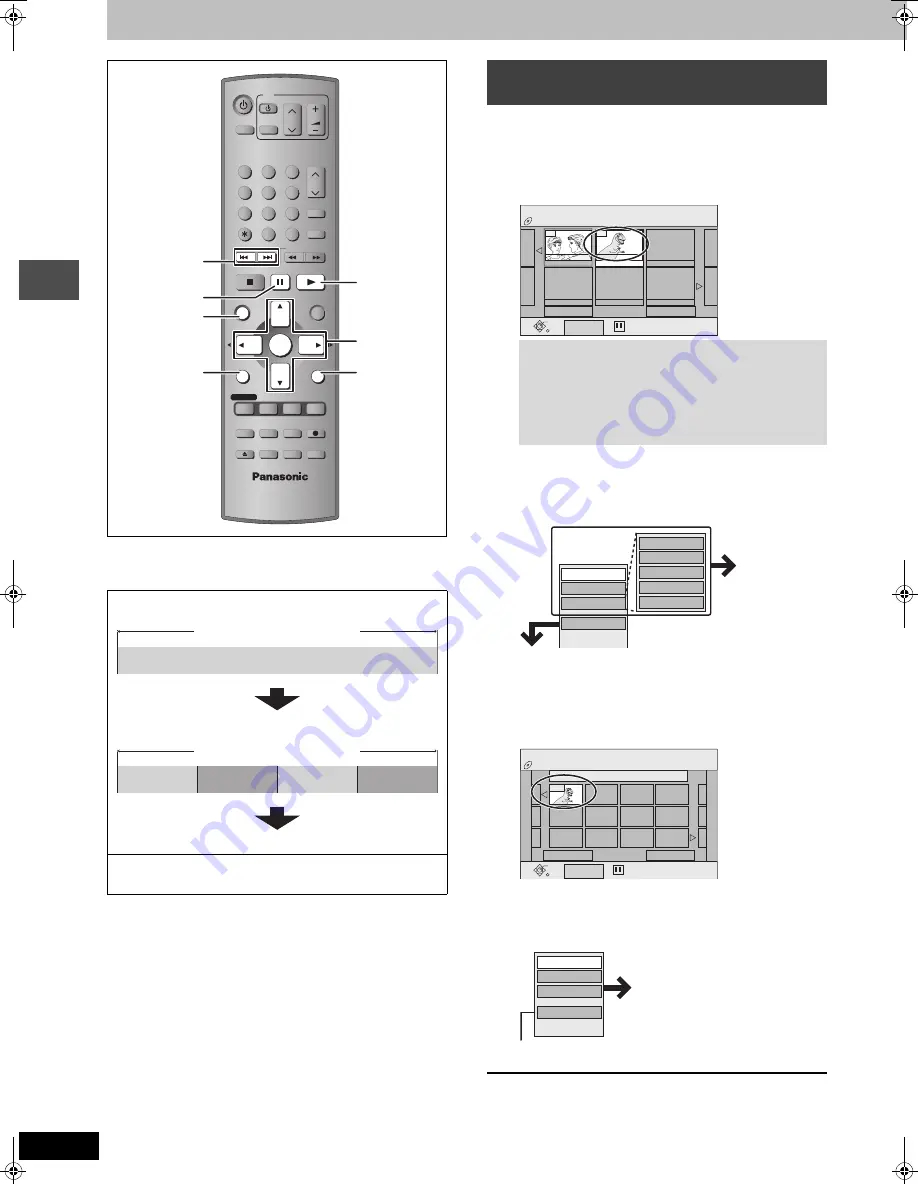
1

Press [DIRECT NAVIGATOR].

2

Press [

3

,

4

,

2

,

1

] to select the title.

3

Press [SUB MENU], then [

3

,

4

] to 

select the operation and press [ENTER].

If you select “Edit”, press [

3

,

4

] to select the operation and 

press [ENTER].

If you select “Chapter View”

4

Press [

3

,

4

,

2

,

1

] to select the 

chapter.

To start play 

 Press [ENTER].

To edit 

 Step 5.

To show other pages/Multiple editing (

above)

5

Press [SUB MENU], then [

3

,

4

] to 

select the operation and press [ENTER].

You can go back to the Title View.

To exit the screen
Press [DIRECT NAVIGATOR].

To return to the previous screen
Press [RETURN].

Title/Chapter
Programs are recorded as a single title consisting of one chapter.

You can divide a title into multiple chapters. 

[RAM]

(

page 24, Create chapters, 

page 29, Divide Chapter)

You can change the order of chapters and create a play list. 

[RAM]

Titles are divided into about 5-minute chapters after finalizing 

(

page 33). 

[DVD-R]

POWER

VOLUME

CH

INPUT SELECT

DVD POWER 

TV

TV/VIDEO

1

2

3

4

5

6

7

8

0

9

CM SKIP

AUDIO

CH

CANCEL

VCR Plus+

SKIP

STOP

PAUSE

PLAY/x1.3

SLOW/SEARCH

FUNCTIONS

ENTER

DIRECT NAVIGATOR

TOP MENU

RETURN

SUB MENU

CHAPTER

ADD/DLT

OPEN/CLOSE

PROG/CHECK

REC MODE

ERASE

REC

F Rec

TIME SLIP

STATUS

DISPLAY

SETUP

DIRECT

NAVIGATOR

SUB MENU

1

:


9

;

3


4


2


1


ENTER

RETURN

Chapter

Title

Start

End

Chapter

Chapter

Chapter

Chapter

Title

Editing titles/chapters and playing 
chapters

To show other pages
Press [

3

,

4

,

2

,

1

] to select “Previous” or “Next” and 

press [ENTER].

You can also press [

:

9

] to show other pages.

Multiple editing
Select with [

3

,

4

,

2

,

1

] and press [

;

]. (Repeat.)

A check mark appears. Press [

;

] again to cancel.

DVD-RAM

DIRECT NAVIGATOR

Title View

Select

Play

Previous

02/02

Next

SUB MENU

10 10/27 Mon

07

08

8 10/27 Mon

- -

- -

- -

- -

Set up Protection

Cancel Protection

Shorten

Change Thumbnail

Enter Name

Properties

Edit

Chapter View

Erase

Refer to “Title 
operations”.

DVD-RAM

DIRECT NAVIGATOR

Chapter View

Select

Play

Previous

01/01

Next

SUB MENU

08 8 10/27 Mon

001

---

---

---

---

---

---

---

---

---

---

---

Divide Chapter

Combine Chapters

Title View

Erase Chapter

Refer to “Chapter 
operations”.

7301en.book  28 ページ  2004年3月1日 月曜日 午後5時35分

Summary of Contents for DMRE55P

Page 1: ...mber supported by this unit Region numbers are allocated to DVD players and software according to where they are sold The region number of this unit is 1 The unit will play DVDs marked with labels containing 1 or ALL Example 1 ALL 2 4 1 For U S A only The warranty can be found on page 46 For Canada only The warranty can be found on page 47 La referencia rápida en español se puede encontrar en la p...

Page 2: ...s close to the point of cable entry as practical The lightning flash with arrowhead symbol within an equilateral triangle is intended to alert the user to the presence of uninsulated dangerous voltage within the product s enclosure that may be of suffi cient magnitude to constitute a risk of electric shock to persons CAUTION CAUTION TO REDUCE THE RISK OF ELECTRIC SHOCK DO NOT REMOVE SCREWS NO USER...

Page 3: ...VCR Plusi and PlusCode are registered trademarks of Gemstar Development Corporation The VCR Plusi system is manufactured under license from Gemstar Development Corporation Pats 5 307 173 5 335 079 4 908 713 4 751 578 and 4 706 121 Table of contents IMPORTANT SAFETY INSTRUCTIONS 2 Useful features 3 Accessories 4 The remote control 4 Control reference guide 5 STEP 1 Connection 6 STEP 2 Plug in Auto ...

Page 4: ...ontrol N2QAKB000050 1 AC power supply cord For U S A and Canada K2CB2CB00006 For units with PX printed on the outer packaging RJA0019 2K 1 75 coaxial cable VJA1125 For use with this unit only Do not use it with other equipment For units with PX printed on the outer packaging 2 Batteries for remote control 1 Audio video cable K2KA6CA00001 1 Power plug adaptor K2DA42E00001 U S A only Product Registr...

Page 5: ...een Show status messages page 35 Skip the specified time Display the television image as a picture in picture page 17 23 Change recording mode page 16 Start recording page 16 Start Flexible Recording page 18 Create chapters page 24 Main unit PULL OPEN OPEN CLOSE REC x1 3 TIME SLIP POWER CH L2 S VIDEO IN VIDEO IN AUDIO IN R L MONO TIME SLIP Connection for camcorder etc page 18 Skip the specified ti...

Page 6: ...To L2 input terminals front To L1 or L3 input terminals rear From AUDIO OUT terminals or DIGITAL AUDIO OUT terminal From AUDIO VIDEO OUT terminals Before moving the unit ensure the disc tray is empty Failure to do so will risk severely damaging the disc and the unit Do not place the unit on amplifiers or equipment that may become hot The heat can damage the unit For units with PX printed on the ou...

Page 7: ...COMPONENT VIDEO OUT 480P 480I DIGITAL AUDIO OUT PCM BITSTREAM IN1 IN3 VHF UHF RF IN RF OUT VHF UHF RF IN VIDEO OUT VHF UHF RF IN R L AUDIO OUT COMPONENT VIDEO IN AUDIO IN R L S VIDEO IN VIDEO IN 4 3 2 1 To the antenna Outdoor antenna Cable TV Indoor antenna Television Audio Video cable Antenna cable To household AC outlet Video cassette recorder Cooling fan Component video cable 75 coaxial cable b...

Page 8: ...EO OUT 480P 480I DIGITAL AUDIO OUT PCM BITSTREAM IN1 IN3 VHF UHF RF IN RF OUT OUT IN OUT IN IN Satellite receiver 75 coaxial cable This unit From antenna or cable TV jack Cable TV box From satellite dish antenna Audio video cable Television or To AUDIO VIDEO IN To VHF UHF RF IN R AUDIO L VIDEO Y PB PR S VIDEO R AUDIO L VIDEO S VIDEO R AUDIO L VIDEO S VIDEO OPTICAL OUT L1 L3 COMPONENT VIDEO OUT 480...

Page 9: ...N RF OUT OPTICAL IN AUDIO IN R L Optical digital audio cable Do not bend sharply when connecting Insert fully with this side facing up Audio cable This unit Red White Red White Connect an amplifier with a built in decoder displaying these logo marks using an optical digital audio cable and change the settings in Digital Audio Output page 37 You cannot use DTS Digital Surround decoders not suited t...

Page 10: ...shows the time difference from Greenwich meantime GMT EST Eastern Standard Time l GMT j5 CST Central Standard Time l GMT j6 MST Mountain Standard Time l GMT j7 PST Pacific Standard Time l GMT j8 AST Alaska Standard Time l GMT j9 HST Hawaii Standard Time l GMT j10 For other areas xx hr 4 Press ENTER Band Channel TV Mode Airwaves VHF 2 13 UHF 14 69 CATV Mode Cable VHF 2 13 CATV LOW BAND 95 99 CATV M...

Page 11: ...s a few minutes 7 Press ENTER To cancel partway Press RETURN To exit the screen Press SETUP Add or delete channels if necessary channels are not set or unnecessary channels are set 1 Press the numbered buttons to select a channel TV Mode Airwaves e g 5 0 5 15 1 5 CATV Mode Cable e g 5 0 0 5 15 0 1 5 115 1 1 5 You can also use W X CH when you are going to delete a channel 2 Press ADD DLT e g The ch...

Page 12: ...return to the previous screen Press RETURN VCR Plusi guide channel settings Station name Guide channel Channel number Channel setting CBS 04 04 Unnecessary HBO 33 15 Enter channel 15 next to Guide Channel 33 Nickelodeon 38 20 Enter channel 20 next to Guide Channel 38 POWER VOLUME CH INPUT SELECT DVD POWER TV TV VIDEO 1 2 3 4 5 6 7 8 0 9 CM SKIP AUDIO CH CANCEL VCR Plus SKIP STOP PAUSE PLAY x1 3 SL...

Page 13: ...ENTER 3 Press 3 4 to select Manual Channel Captions and press ENTER 4 Press 3 4 to select the channel and press 1 Channels are only displayed if they contain a station and if preset captions have not been added 5 Press 3 4 to select the first character and press 1 You can choose from the following characters A Z 0 9 space To delete the caption press CANCEL Repeat this step to enter the other chara...

Page 14: ...es 1 Press SETUP 2 Press 3 4 to select Set Up and press 1 3 Press 3 4 to select Remote Control Code and press ENTER 4 Press 3 4 to select the code 1 2 or 3 and press ENTER 5 While pressing ENTER press and hold the numbered button 1 2 or 3 for more than 2 seconds 6 Press ENTER When the following indicator appears on the unit s display Change the code on the remote control to match the main unit s s...

Page 15: ...g instrument Do not use record cleaning sprays benzine thinner static electricity prevention liquids or any other solvent Do not use scratch proof protectors or covers Do not use the following discs Discs with exposed adhesive from removed stickers or labels rented discs etc Discs that are badly warped or cracked Irregularly shaped discs such as heart shapes Do not place in the following areas In ...

Page 16: ...ent information after recording finishes To pause recording Press Press again to restart recording Title is not split into a separate title To specify a time to stop recording During recording Press REC to select the recording time Each time you press the button This does not work during timer recordings page 19 or while using Flexible Recording page 18 Off Timer The unit switches to standby after...

Page 17: ...Press DIRECT NAVIGATOR 1 Press TIME SLIP Time Slip indicator on the main unit lights You will hear the playback audio 2 Press 3 4 to select the time and press ENTER Press TIME SLIP to show the play images in full Press again to show the play and recording images To stop play Press To stop recording 2 seconds after play stops Press To stop timer recording Press then ENTER within 5 seconds You can a...

Page 18: ...ent is monaural connect to L MONO The S VIDEO terminal achieves a more vivid picture than the VIDEO terminal 1 While stopped Press INPUT SELECT to select the input channel for the equipment you have connected 2 Press REC MODE to select the recording mode XP SP LP or EP Using Flexible Recording left you can save content of a video cassette to 1 disc with the best possible quality of recording witho...

Page 19: ... 9 CM SKIP AUDIO CH CANCEL VCR Plus SKIP STOP PAUSE PLAY x1 3 SLOW SEARCH FUNCTIONS ENTER DIRECT NAVIGATOR TOP MENU RETURN SUB MENU CHAPTER ADD DLT OPEN CLOSE PROG CHECK REC MODE ERASE REC F Rec TIME SLIP STATUS DISPLAY SETUP Í DVD POWER CANCEL PROG CHECK ADD DLT VCR Plusr 3 4 2 1 ENTER REC MODE DIRECT NAVIGATOR 1 Numbered buttons No 1 58 SP VCR Plusi Remaining RecordingTime 3 26TUE12 53 PM 0 9 En...

Page 20: ...T MON FRI Weekly timer WEEKLY SUN WEEKLY SAT CANCEL TIMER RECORDING Remaining RecordingTime MODE CHECK OFF ON No CHANNEL DATE 1 58 SP 3 26TUE 12 55 PM Press ENTER or VCR Plus to store new program New Timer Program 01 SP OK 2 00 PM 1 00 PM 64 ABC 3 26 TUE TIMER RECORDING Remaining RecordingTime 1 58 SP 3 26TUE 12 55 PM 3 00 PM 3 26 TUE MODE OFF ON CHANNEL DATE SP 64 ABC 2 30 PM Enter Name SP OK 2 0...

Page 21: ...Remaining RecordingTime MODE CHECK OFF ON No CHANNEL DATE 1 57 LP 3 26TUE 1 19 PM Press ENTER or VCR Plus to store new program New Timer Program Icons This program is currently recording W The times overlap those in another program Recording of the program with the later start time starts when the earlier program finishes recording You stopped a weekly or daily timer recording The icon disappears ...

Page 22: ...selected using the numbered buttons VCD Press the numbered buttons to select the item e g 5 0 5 15 1 5 To return to the menu screen DVD A Press TOP MENU DVD V Press TOP MENU or SUB MENU VCD Press RETURN POWER VOLUME CH INPUT SELECT DVD POWER TV TV VIDEO 1 2 3 4 5 6 7 8 0 9 CM SKIP AUDIO CH CANCEL VCR Plus SKIP STOP PAUSE PLAY x1 3 SLOW SEARCH FUNCTIONS ENTER DIRECT NAVIGATOR TOP MENU RETURN SUB ME...

Page 23: ...urn to normal speed This does not work if the setting is Off in Search Audio PLAY k1 3 page 37 Slow motion RAM DVD R DVD A Motion picture parts only DVD V VCD While paused press 6 or 5 On the main unit press and hold D or E The speed increases up to 5 steps Press 1 PLAY to restart play Forward direction only VCD The unit will pause if slow motion play is continued for 5 minutes Frame by frame RAM ...

Page 24: ... is the selected language page 26 Sound track Editing operations during play Erase RAM DVD R 1 Press ERASE 2 Press 2 1 to select Erase and press ENTER A title cannot be restored once it is erased Make certain before proceeding You cannot erase when recording and playing at the same time Create chapters RAM Press CHAPTER Press 9 to skip to the start of a chapter You cannot divide when recording and...

Page 25: ... No Selected group G Group no T Track no in the group TOTAL Track no Total track no in all groups Using the tree screen to find a group Tips for making MP3 discs Discs must conform to ISO9660 level 1 or 2 except for extended formats Compatible compression rate between 32 kbps and 320 kbps Compatible sampling rate 16 kHz 22 05 kHz 24 kHz 32 kHz 44 1 kHz and 48 kHz Maximum number of tracks and group...

Page 26: ... Setting Disc menu Setting disc content Sound track RAM DVD R The disc s audio attributes appear DVD A DVD V Select the audio and language Audio attribute Language below Subtitle RAM DVD R Only discs that contain subtitle on off information DVD A DVD V Turn the subtitle on off and select the language Subtitle on off information cannot be recorded using this unit RAM DVD R If the subtitles overlap ...

Page 27: ...en progressive output is on closed captions cannot be displayed Transfer When Progressive is set to ON Select the method of conversion for progressive output to suit the type of material being played page 40 Film and video Auto1 normal Detects 24 frame per second film content and appropriately converts it Auto2 Compatible with 30 frame per second film content in addition to 24 frame per second fil...

Page 28: ...29 Divide Chapter You can change the order of chapters and create a play list RAM Titles are divided into about 5 minute chapters after finalizing page 33 DVD R POWER VOLUME CH INPUT SELECT DVD POWER TV TV VIDEO 1 2 3 4 5 6 7 8 0 9 CM SKIP AUDIO CH CANCEL VCR Plus SKIP STOP PAUSE PLAY x1 3 SLOW SEARCH FUNCTIONS ENTER DIRECT NAVIGATOR TOP MENU RETURN SUB MENU CHAPTER ADD DLT OPEN CLOSE PROG CHECK R...

Page 29: ...n change the image to be shown as a thumbnail picture in the Title View 1 Press 1 PLAY to start play 2 Press ENTER when the image you want to use as a thumbnail is shown 3 Press 3 4 to select Exit and press ENTER Properties No CH Date 01 4 6 20 2002 Start Rec time 10 00 AM 2 15 SP Wed Dinosaur DVD RAM DIRECT NAVIGATOR Title V 10 10 27 Mon 07 08 8 10 27 Mo DVD RAM DIRECT NAVIGATOR Shorten Start Nex...

Page 30: ...28 to create a play list Editing play lists doesn t modify the recorded data Play lists are not recorded separately so this doesn t use much capacity Creating play lists POWER VOLUME CH INPUT SELECT DVD POWER TV TV VIDEO 1 2 3 4 5 6 7 8 0 9 CM SKIP AUDIO CH CANCEL VCR Plus SKIP STOP PAUSE PLAY x1 3 SLOW SEARCH FUNCTIONS ENTER DIRECT NAVIGATOR TOP MENU RETURN SUB MENU CHAPTER ADD DLT OPEN CLOSE PRO...

Page 31: ... LIST Play List View Select Play Previous 01 01 Next SUB MENU 01 Create 10 27 Mon 0 30 Copy Enter Name Change Thumbnail Create Properties Edit Chapter View Erase Refer to Play list operations DVD RAM PLAY LIST Chapter View Select Previous 01 01 Next SUB MENU 08 10 27 Mon 0 30 001 002 Play Move Chapter Divide Chapter Combine Chapters Erase Chapter Play List View Add Chapter Refer to Chapter operati...

Page 32: ...ess RETURN several times To return to the previous screen Press RETURN Note Once the disc has been formatted the contents cannot be restored Check carefully before proceeding The contents on the disc are erased when you format it even if you have set title or disc protection After finalizing DVD R The disc becomes play only and you can no longer record or edit There is a pause of several seconds b...

Page 33: ...ct Top Menu or Title 1 and press ENTER Top Menu The top menu appears first Title 1 The disc content is played without displaying the top menu page 40 Finalize DVD R You can play DVD R on compatible DVD players by finalizing them on this unit effectively making them into DVD Video that complies with DVD Video standards 1 Press 2 1 to select Yes and press ENTER 2 Press 2 1 to select Start and press ...

Page 34: ...not saved RAM Characters Title 64 44 Play list 64 Disc 64 DVD R Characters Title 44 Disc 40 POWER VOLUME CH INPUT SELECT DVD POWER TV TV VIDEO 1 2 3 4 5 6 7 8 0 9 CM SKIP AUDIO CH CANCEL VCR Plus SKIP STOP PAUSE PLAY x1 3 SLOW SEARCH FUNCTIONS ENTER DIRECT NAVIGATOR TOP MENU RETURN SUB MENU CHAPTER ADD DLT OPEN CLOSE PROG CHECK REC MODE ERASE REC F Rec TIME SLIP STATUS DISPLAY SETUP CANCEL 3 4 2 1...

Page 35: ...IDEO 1 2 3 4 5 6 7 8 0 9 CM SKIP AUDIO CH CANCEL VCR Plus SKIP STOP PAUSE PLAY x1 3 SLOW SEARCH FUNCTIONS ENTER DIRECT NAVIGATOR TOP MENU RETURN SUB MENU CHAPTER ADD DLT OPEN CLOSE PROG CHECK REC MODE ERASE REC F Rec TIME SLIP STATUS DISPLAY SETUP 3 4 2 1 ENTER FUNCTIONS STATUS DVD DVD RAM DIRECT NAVIGATOR TIMER RECORDING PLAY LIST SETUP FLEXIBLERECORDING DISC SETTING Record Dubbing Edit Set up Pl...

Page 36: ... numbered buttons when the password screen is shown Do not forget your password 8 No Limit All DVD Video can be played 1 to 7 Prohibits play of DVD Video with corresponding ratings recorded on them 0 Lock All Prohibits play of all DVD Video Unlock Recorder Change Password Change Level Temporary Unlock Recording Time in EP Mode Select the maximum number of hours for recording in EP mode page 17 Rec...

Page 37: ...ected equipment can process signals with sampling frequency of 96 kHz or 88 2 kHz Dolby Digital Select how to output the signal to output Bitstream so the connected equipment decodes the signal or to decode on this unit and output the signal as PCM 2 channel Note Not making the proper settings may result in noise possibly damage your hearing and speakers and digital recording may not work properly...

Page 38: ...3 4 to select Manual Clock Setting and press ENTER 4 Press 2 1 to select the item you want to change and press 3 4 to change the setting DST Daylight Saving Time ON or OFF If you select ON the clock is advanced one hour starting at 2 a m on the first Sunday in April and ending at 2 a m on the last Sunday in October TIME ZONE above 5 Press ENTER The clock starts When you change the time zone the re...

Page 39: ...B Input impedance 47 k Output LINE pin jack a1 Reference output 309 mVrms FS 2 Vrms 1 kHz 0 dB Output impedance 1 k Load impedance 10 k Number of channels Recording 2 channels Playback 2 channels Other input output connectors Digital audio optical output connector Operating temperature range 5 oC 40 oC 41 oF 104 oF Operating humidity range 10 80 RH no condensation Clock unit Quartz controlled 12 h...

Page 40: ...reen Letterbox Black bands appear at the top and bottom of the picture so the picture itself appears in an aspect ratio of 16 9 Playback control PBC If a Video CD has playback control you can select scenes and information with menus This unit is compatible with version 2 0 and 1 1 Progressive Interlace NTSC the video signal standard has 480 interlaced I scan lines whereas progressive scanning uses...

Page 41: ...tell me about DVD R and DVD RW compatibility with this unit This unit records and plays DVD R However you cannot record onto DVD R discs that are finalized This unit also records and plays 1k 4k recording speed DVD R discs This unit does not record or play DVD RW Please tell me about CD R and CD RW compatibility with this unit You can play CD R and CD RW on this unit that are created using a compa...

Page 42: ...ted properly The operation is prohibited by the unit or disc CHK REMOTE stands for a number The remote control and main unit are using different codes Change the code on the remote control Press and hold ENTER and the indicated number button at the same time for more than 2 seconds 14 HARD ERR If there is no change after turning the unit on and off consult the dealer where the unit was purchased N...

Page 43: ...imes Even if you erase recorded content from the DVD R there is no increase in disc space More disc space than the actual recording time is used after recording or editing the DVD R 200 times or more While searching the elapsed time may not display correctly Television reception worsens after connecting the unit This can occur because the signals are being divided between the unit and other equipm...

Page 44: ...switch to standby press and hold POWER Í I on the main unit for about 10 seconds The unit is forcibly switched to standby Alternatively disconnect the AC power supply cord wait one minute then reconnect it Cannot eject disc The unit may have a problem While the unit is off press and hold and CH W on the main unit at the same time for about 5 seconds Remove the disc and consult the dealer Cannot re...

Page 45: ...n only be changed during scenes where different angles are recorded You have forgotten your ratings password While the disc tray is open press and hold D and E on the main unit at the same time for 5 or more seconds Quick View does not work This does not work if the setting is Off in Search Audio PLAY k1 3 This does not work when audio is other than Dolby Digital This does not work when recording ...

Page 46: ...damage that is attributable to acts of God THERE ARE NO EXPRESS WARRANTIES EXCEPT AS LISTED UNDER LIMITED WARRANTY COVERAGE THE WARRANTOR IS NOT LIABLE FOR INCIDENTAL OR CONSEQUENTIAL DAMAGES RESULTING FROM THE USE OF THIS PRODUCT OR ARISING OUT OF ANY BREACH OF THIS WARRANTY As examples this excludes damages for lost time travel to and from the servicer loss of media or images data or other recor...

Page 47: ...S FOR A PARTICULAR PURPOSE IN NO EVENT WILL PANASONIC CANADA INC BE LIABLE FOR ANY SPECIAL INDIRECT OR CONSEQUENTIAL DAMAGES In certain instances some jurisdictions do not allow the exclusion or limitation of incidental or consequential damages or the exclusion of implied warranties so the above limitations and exclusions may not be applicable WARRANTY SERVICE For product operation and information...

Page 48: ... VIDEO S VIDEO R AUDIO L VIDEO S VIDEO OPTICAL OUT L1 L3 COMPONENT VIDEO OUT 480P 480I DIGITAL AUDIO OUT PCM BITSTREAM IN1 IN3 VHF UHF RF IN RF OUT VHF UHF RF IN VIDEO OUT VHF UHF RF IN R L AUDIO OUT COMPONENT VIDEO IN AUDIO IN R L S VIDEO IN VIDEO IN 4 3 2 1 A la antena Antena exterior TV por cable Antena interior Televisor Cable de audio vídeo Cable de antena A una toma de CA de casa Videograbad...

Page 49: ... y pulse 1 5 Pulse 3 4 para seleccionar el canal correspondiente al canal guía y pulse 2 Para borrar un número pulse CANCEL Repita los pasos 4 y 5 para introducir otros canales 6 Pulse ENTER Para salir de la pantalla Pulse SETUP Para volver a la pantalla anterior Pulse RETURN No tiene que cambiar el ajuste cuando conecte a un televisor de aspecto estándar 4 3 que no sea compatible con salida progr...

Page 50: ...número VCR Plusi y pulse ENTER 3 Haga las correciones necesarias utilizando 3 4 2 1 4 Pulse ENTER Repita los pasos 1 4 para programar otras grabaciones 5 Pulse PROG CHECK 6 Pulse Í DVD POWER F se enciende en el visualizador de la unidad RAM Para detener la reproducción Pulse Para detener la grabación 2 segundos después se detiene la reproducción Pulse Para detener la grabación con temporizador Pul...

Page 51: ...reproduce desde Direct Navigator y cuando se reproduce una lista de reproducción Función de reanudación de la reproducción Pulse 1 PLAY para reanudar la reproducción desde esta posición Pausa Pulse Pulse de nuevo para reiniciar la reproducción Búsqueda Pulse 6 o 5 En el aparato principal mantenga pulsado D o E La velocidad aumenta hasta 5 pasos Pulse 1 PLAY de nuevo para reiniciar la reproducción ...

Page 52: ...ode 36 MPEG DNR 27 MP3 25 Noise redction NR MPEG DNR 27 Line in NR 36 On screen language 37 menus 26 Status messages 35 PCM Down Conversion 37 Picture 27 Play list 30 Progressive 27 40 Properties play list 31 title 29 Protection cartridge 15 disc 33 title 29 Quick View 23 Ratings level 36 Recording Flexible Recording 18 mode 17 timer 19 21 Re initialize settings 36 Repeat play 27 Resume play funct...

Reviews: