background image

- 34 -

Reference

The number of channels listed is the maximum possible 

number of output channels when connected to amplifier/

receiver compatible with the respective audio format.

*1

When “BD-Video Secondary Audio” is set to “On”, the 
audio will be output as Dolby Digital, DTS Digital 
Surround

TM

 or 5.1ch PCM.

File formats that are not supported by your 
DLNA server cannot be played.

Video

Photo

Audio

* Only when the file is transcoded by DLNA server.
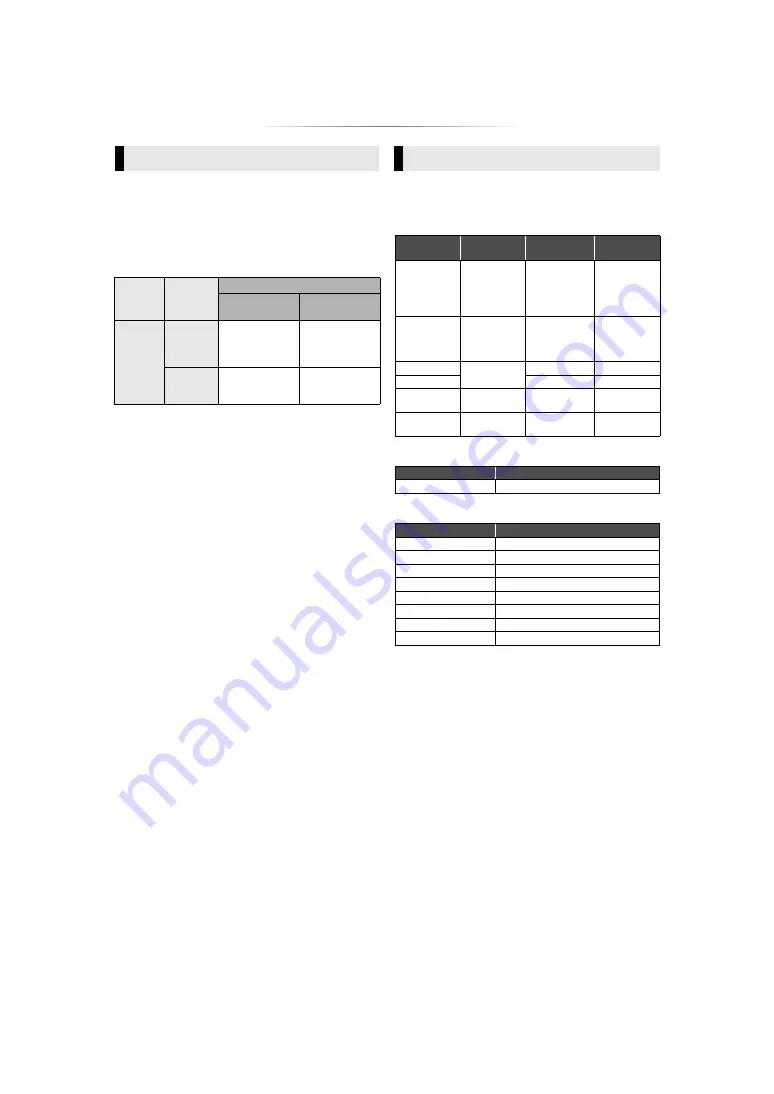
Audio information

The audio output differs depending on which 
terminals are connected to the amplifier/receiver, 
and the settings on the unit. (

>

25, “Digital Audio 

Output”)

Terminal

“Digital Audio Output”

“Bitstream”/

“On”

*3

“PCM”/“Off”

*3

Output 

channel

HDMI AV 

OUT

*2

Outputs using 

original audio

*1

BD-Video :

7.1ch PCM

*1

DVD-Video :

5.1ch PCM

OPTICAL

Dolby Digital/

DTS Digital 

Surround

TM

Down-mixed 2ch 

PCM

*2

When “DTS Neo:6” is set to “Cinema” or “Music”, 2ch 
(2.1ch) audio can be expanded to 7ch (7.1ch) and output. 
(

>

25)

*3

For “DSD Output Mode”

Supported format for DLNA

Container

Video codec Audio codec

Example of 

file extension

MKV

H.264

AAC

DTS

®

PCM

Vorbis

FLAC

.mkv

Xvid*

MPEG-4 

Advanced 

Simple Profile 

(ASP) 

MP3

Dolby Digital

.avi

AVCHD

H.264

Dolby Digital

.mts

MP4

AAC

.mp4, .mov

PS

MPEG2

Dolby Digital

Linear PCM

.mpg, .mpeg

TS

MPEG2

H.264

AAC

Dolby Digital

.m2ts, .ts

Format

Example of file extension

JPEG

.jpg

Audio codec

Example of file extension

MP3

.mp3

FLAC

.flac

WAV

.wav

AAC

.m4a

WMA

.wma

ALAC

.m4a

DSD

.dsf, .dff

Linear PCM

Summary of Contents for DMP-BDT384

Page 1: ...ing this product and save this manual for future use Firmware updates Panasonic is constantly improving the unit s firmware to ensure that our customers are enjoying the latest technology Panasonic re...

Page 2: ...openings with newspapers tablecloths curtains and similar items Do not place the unit on amplifiers receivers or equipment that may become hot The heat can damage the unit Do not expose this unit to...

Page 3: ...se of this unit Data transmitted and received over radio waves may be intercepted and monitored This unit contains delicate electronic components Please use this unit in the manner in which it was int...

Page 4: ...ons and settings Connecting to a TV 10 Connecting to an amplifier receiver 11 Connecting to the network 12 Settings 13 Playback Inserting or removing media 14 HOME menu 15 Playback 16 Enjoying Network...

Page 5: ...d cloth carefully read the instructions that came with the cloth This unit s lens Use the lens cleaner not supplied to clean the unit s lens Clean discs Wipe with a damp cloth and then wipe dry with a...

Page 6: ...JPEG MPO AAC ALAC DSD FLAC MP3 WAV WMA BD R Video MKV Xvid AAC ALAC DSD FLAC MP3 WAV WMA DVD Video Video DVD R Video AVCHD MKV Xvid JPEG MPO AAC ALAC DSD FLAC MP3 WAV WMA DVD R DL DVD RW Video AVCHD...

Page 7: ...32 and NTFS If the HDD is not recognized the power to the HDD may not be supplied Supply power from an external source BD RE BD R Discs recorded in DR mode using Panasonic Blu ray Disc recorders may n...

Page 8: ...ic playback control buttons 16 7 Show Pop up menu 16 8 Show Top menu 16 9 Show Option menu 22 10 Coloured buttons red green yellow blue Used for various purposes depending on the display 11 Transmit t...

Page 9: ...and right 3 USB ports 14 4 Display 5 Open or close the disc tray 14 6 Stop 16 7 Start play 16 8 Standby on switch I 13 Press to switch the unit from on to standby mode or vice versa In standby mode t...

Page 10: ...Non HDMI compliant cables cannot be utilized It is recommended that you use Panasonic s HDMI cable When outputting 1080p or 24p 4K signal please use HDMI cables 5 0 meters or less This unit consumes a...

Page 11: ...eceiver and TV must also be connected using an optical digital cable in order to enjoy the TV s sound through the amplifier receiver HDMI AV OUT HDMI IN ARC HDMI OUT ARC HDMI IN HDMI cable HDMI cable...

Page 12: ...tion method refer to the instructions supplied with the connected equipment For up to date compatibility information on your wireless router refer to http panasonic jp support global cs This site is i...

Page 13: ...ttings and press OK select Wireless Settings and press OK select Connection Setting and press OK select Manual setting and press OK If your wireless network is encrypted Encryption Key input screen wi...

Page 14: ...ger or may not work properly depending on the connection environment If you do not want to check for the latest firmware version set Automatic Update Check to Off 28 You must agree to the terms of use...

Page 15: ...banner is shown the HOME menu is displayed When connected to the network the banner content may be changed You can disable the Start up Banner 28 Videos Music Photos Setup Network HOME Blu ray Disc P...

Page 16: ...e stopping point is memorized Resume play function Press 1PLAY to restart from this point The point is cleared if the media is removed On BD Video discs including BD J the resume play function does no...

Page 17: ...d adjust various settings during the playback 1 Insert the media 2 Select Photos 3 Select an item and press the green button The following items can be set Still pictures displayed as cannot be played...

Page 18: ...tup menu items When restricting the use of Network Service 27 Network Service Lock When correcting the displayed time 26 Time Zone Summer Time When using another device such as a smartphone in combina...

Page 19: ...on the content by pressing OPTION To exit from Home Network Press HOME Home Network feature Before using the following features be sure to configure the connected equipment on your Home Network Using...

Page 20: ...t be possible Items displayed in grey on the display cannot be played back by this unit Using the Digital Media Controller Renderer Server Controller Renderer Server Controller 3 Select Home Network 5...

Page 21: ...roperly Repeat this procedure when the connections or settings are changed When the unit starts playback the TV will automatically switch the input channel and the screen of the unit will be displayed...

Page 22: ...andom Start Slideshow Start the slideshow Status Show the status messages Sound Select the soundtrack and audio channel number during the playback of DLNA Reception The radio wave status during the pl...

Page 23: ...he factory defaults Picture Settings If the video is disrupted when Auto is selected select either Video or Film depending on the material to be played back Only when you have selected 24p 4K or 24p i...

Page 24: ...when a TV that supports Deep Colour is connected Contents Type Flag Depending on the playback content the TV will output adjusting to the optimal method when a TV that supports this function is connec...

Page 25: ...the signals that are converted to 48 kHz are output If Off is selected and the connected equipment does not support 96 kHz the sound will not be output normally Signals are converted to 48 kHz despite...

Page 26: ...less Settings This allows the wireless router and connection settings to be set up Current connection settings and connection state can be checked Press OK to show the following settings Connection Se...

Page 27: ...the following settings TV Aspect Set to match the type of TV connected When connected to a 4 3 aspect TV and playing 16 9 ratio image When connected to a 16 9 widescreen TV and playing 4 3 ratio imag...

Page 28: ...33 Remote Control Change the remote control code if other Panasonic products react to this remote control Firmware Update 14 Press OK to show the following settings Automatic Update Check When this e...

Page 29: ...Depending on the TV this phenomenon may be prevented by reconnecting the HDMI cable to a different HDMI input terminal or by changing the HDMI auto connection setting This unit is turned off automatic...

Page 30: ...rly 24 A black band is displayed around the edge of the screen The aspect ratio of the screen is abnormal Confirm the TV Aspect is set properly 27 Adjust the aspect setting on the TV a USB extension c...

Page 31: ...tect your network name 13 SSID Check the operating instructions for each device and connect accordingly When using wireless LAN connection video from the DLNA Certified media server is not played back...

Page 32: ...REMOVE The USB device is drawing too much power Remove the USB device SET stands for a number The remote control and this unit are using different codes Change the code on the remote control Press an...

Page 33: ...ile format File format Extension Reference MKV MKV mkv The video file and subtitles text file are inside the same folder and the file names are the same except for the file extensions Some MKV Xvid fi...

Page 34: ...nal Digital Audio Output Bitstream On 3 PCM Off 3 Output channel HDMI AV OUT 2 Outputs using original audio 1 BD Video 7 1ch PCM 1 DVD Video 5 1ch PCM OPTICAL Dolby Digital DTS Digital SurroundTM Down...

Page 35: ...egistered trademarks and DTS HD Master Audio is a trademark of DTS Inc DTS Inc All Rights Reserved The terms HDMI and HDMI High Definition Multimedia Interface and the HDMI Logo are trademarks or regi...

Page 36: ...ation the Software to deal in the Data Files or Software without restriction including without limitation the rights to use copy modify merge publish distribute and or sell copies of the Data Files or...

Page 37: ...ller andre inngrep enn de beskrevet i denne bruksanvisning kan f re til farlig bestr ling Plasser ikke pen ild slik som levende lys opp apparatet Dette apparatet er beregnet for bruk under moderate kl...

Reviews: