background image

22

RQT9037

(ENG)

When connecting to an amplifier/receiver to enjoy multi-channel surround sound, use the following settings on this unit if they cannot be set on the 
amplifier/receiver.
The settings are not effective when outputting bitstream signals.

§

Surround back channel is enabled only when the unit is connected 

to an amplifier/receiver supporting HDMI 7.1 channel audio.

Speaker presence and size (

A

)

1

Press [

3

,

4

,

2

,

1

] to select the speaker icon (

A

) and press 

[OK].

2

Press [

3

,

4

] to select the setting and press [OK].

Icon examples: 

Surround speaker (LS)

Large

: Select when the 

speaker supports 

low-frequency (under 

100 Hz) reproduction.

Small

: Select when the speaker does not support low-frequency 

reproduction.

In order to make an ideal listening environment, settings of speaker 

sizes may be automatically adjusted. 

For example, if the subwoofer is set to “No”, the front speakers will 

automatically be set to “Large”. (In this case, we recommend 

connecting a speaker that can reproduce bass below 100 Hz.)
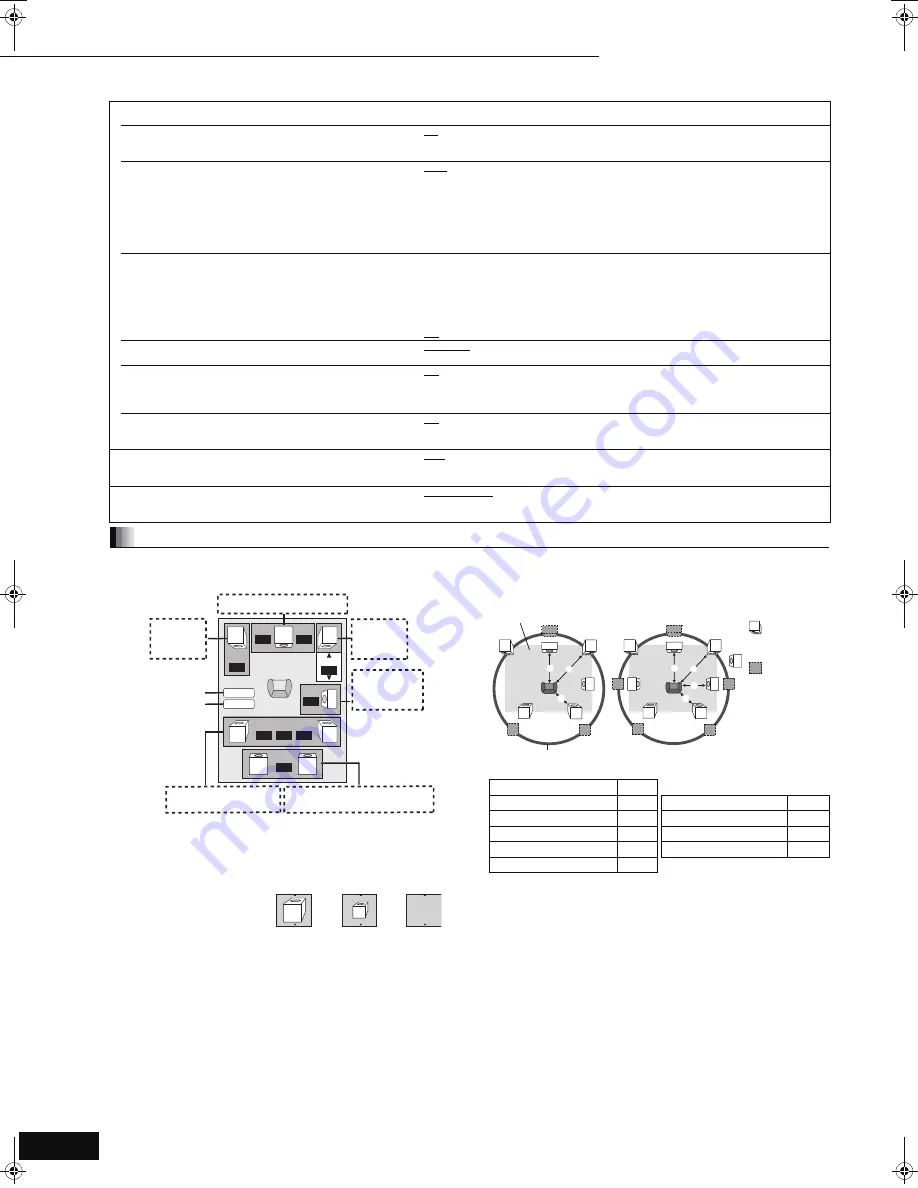
Delay time (

B

)

For optimum listening with 7.1/5.1-channel sound, all the speakers, 
except for the subwoofer, should be the same distance from the 
seating position.
If you have to place the center, surround and surround back 

speakers closer to the seating position, adjust the delay time to 

make up for the difference.

If either distance 

or 

is less than 

E

, find the difference in the 

relevant table and change to the recommended setting.

1

Press [

3

,

4

,

2

,

1

] to select the delay time box (

B

) and press 

[OK].

2

Press [

3

,

4

] to select the setting and press [OK].

Channel balance (

C

)

This does not work when connected with the HDMI terminal and 
“HDMI Audio Output” (

D

above) is set to “On”.

1

Select “Test” and press [OK].
A test signal is output.

Front (L)

_—)

Center

_—)

Front (R)

_—)

Surround (RS)

:

;

Surround (LS)

(— 

Surround Back (LB)

§


(— 

Surround Back (RB)

§

§

Test signal is output only when the unit is connected using HDMI 

AV OUT terminal.

2

While listening to the test signal, press [

3

,

4

] to adjust the 

volume of each speaker
Front speakers: 0.0 to 

s

6.0 dB

Center and surround speakers: 0.0 to 

s

12.0 dB

You cannot adjust the volume of surround back speakers.

3

Press [OK].
The test signal stops.

No signal is output for the subwoofer. To adjust its volume, play 
something, then return to this screen to adjust to suit your taste.

4

Press [

3

,

4

,

2

,

1

] to select “Complete” and press [OK].

“TV/Device Connection” tab (continued)

HDMI Connection

Press [OK] to show the following settings.

HDMI Video Mode

Select “On” when video is output from HDMI AV OUT 
terminal.

On:

Images are output from the HDMI terminal in the resolution set in “HDMI 
Resolution”. Video from COMPONENT VIDEO OUT terminal is output as “480i”.

Off

Images are output in the resolution set in “Component Video Resolution”.

HDMI Resolution

The items supported by the connected devices are 
indicated on the screen as “

¢

”. When any item without 

¢

” is selected, the images may be distorted.

Auto:

Automatically selects the output resolution best suited to the 
connected television (1080p, 1080i, 720p or 480p).

480p

720p

1080i

1080p

When the unit is connected to an amplifier/receiver that does not support the 
resolution set on the unit, the video cannot be output properly. In this case, use the 
HDMI cable to connect the unit to the TV and then connect the unit to the amplifier/
receiver using a cable other than HDMI.

BD-Video 24p Output

When playing BD-Video recorded in 24 frames, this unit 
displays each frame at 1/24 second intervals

s

the same 

interval originally shot with the film movie.

This item can be set only when the unit is connected to 
a TV with an HDMI terminal that supports 1080/24p 
input.

On:

Images in 24p are output in 24p as they are.
(This is effective only when “HDMI Resolution” is set to “Auto” or “1080p” 
and “TV Aspect” is set to “16:9” or “16:9 Full”.) 
However, 
– when video is being output at 24 frames, images from any other terminal 

than the HDMI terminal may not be output properly.

– when images other than 24p are played, images are output at 60p.

Off

HDMI RGB Output Range

Effective when connected to a device that only supports RGB output. 

Standard:

Enhanced:  When the black and white images are not distinct.

HDMI Audio Output

This setting selects whether or not to output audio from 
HDMI.

On:

Off:

When the TV is connected to this unit using an HDMI cable, and this unit is 
also connected to other devices, such as an amplifier/receiver using an 
optical digital audio cable or a coaxial cable.

EZ Sync

Set to use “HDAVI Control” function when connected with 
an HDMI cable to a device that supports “HDAVI Control”.

On

Off:

Select when you do not want to use “HDAVI Control”.

Component Video Resolution

This sets the video output resolution when using the 
component video terminal. 

480i

480p

720p

1080i

Even if you select “720p” or “1080i”, images are output in 480p when you play 
DVD-Video.

Speaker

You can set the unit to output the best possible sound for 
your speakers. 

Multi Channel: When using 3 or more speakers. (

>

 below) 

2 Channel:

When using two speakers.

2ch down-mix audio are output from Front L and Front R.

Changing the speaker setting to suit your speakers

ms

ms

L

Complete

Test

LS

R

SW

RS

dB

dB

dB

dB

dB

dB

ms

LB

RB

0.0

0.0

0.0

0.0

0.0

0.0

0.0

0.0

0.0

C


Subwoofer

Front (R)

Center

Front (L)

Complete

 (LS) Surround  (RS)

Surround back

Test

 (RB)

§

 (LB)

LS

LS

No

Large

Small

D

Center speaker

F

Surround/Surround back 
speakers

Difference

Setting

Approx. 34 cm (1 ft. 1 in.)

1.0 ms

Difference

Setting

Approx. 170 cm (5 ft. 6 in.) 5.0 ms

Approx. 68 cm (2 ft. 2 in.)

2.0 ms

Approx. 102 cm (3 ft. 4 in.) 3.0 ms

Approx. 340 cm (11 ft. 1 in.) 10.0 ms

Approx. 136 cm (4 ft. 5 in.) 4.0 ms

Approx. 510 cm (16 ft. 8 in.) 15.0 ms

Approx. 170 cm (5 ft. 6 in.) 5.0 ms

E F

D

L

LS

R

SW

C

RS

C

RS

LS

D

E

F

L

LB

R

RS

SW

C

RB

C

RB

RS

LS

LB

D

E

F

F

LS

Approximate room dimensions

Circle of constant primary listening distance

: Actual 

speaker 
position

: Ideal 

speaker 
position

: Primary 

listening 
distance

5.1ch speaker 
connection

7.1ch speaker 
connection

Settings 

11 

Changing the unit’s settings

DMP-BD30PP_Book1.book  22 ページ  2007年10月5日 金曜日 午前10時44分

Summary of Contents for DMP-BD30K

Page 1: ...eep this manual for future reference Region management information BD Video This unit plays BD Video marked with labels containing the region code A Example DVD Video This unit plays DVD Video marked with labels containing the region number 1 or ALL Example 2 4 1 ALL 1 If you have any questions contact U S A 1 800 211 PANA 7262 Canada 1 800 561 5505 U S A The warranty can be found on page 30 Canad...

Page 2: ... RADIATION EXPOSURE DO NOT OPEN COVERS AND DO NOT REPAIR YOURSELF REFER SERVICING TO QUALIFIED PERSONNEL CAUTION Danger of explosion if battery is incorrectly replaced Replace only with the same or equivalent type recommended by the manufacturer Dispose of used batteries according to the manufacturer s instructions The socket outlet shall be installed near the equipment and easily accessible The m...

Page 3: ... for remote control 1 AC power supply cord K2CB2CB00022 For use with this unit only Do not use it with other equipment Also do not use cords for other equipment with this unit ONLY FOR U S A Product Registration Card Please complete and return the included product registration card or register via the Internet at http www prodreg com panasonic The enclosed Canadian French label sheet corresponds t...

Page 4: ...letion or edition Switch the write protect switch to the LOCK position to protect the content from accidental erasure Packaged discs Type of media Logo Features Indicated as Type of media Logo Features Indicated as BD Video High Definition HD movie and music discs BD V DVD Video High quality movie and music discs DVD V CD Compact Discs CD s that contain audio and music Operation and sound quality ...

Page 5: ...sub sampling is 4 2 2 or 4 2 0 Bit rates 32 kbps to 320 kbps Sampling frequency 44 1 kHz 48 kHz Reference ID3 tags version 1 2 2 2 3 2 4 ID3 is a tag embedded in MP3 track to provide information about the track This unit supports the versions listed above but only titles and the names of artists can be displayed If there is a large amount of still picture data etc within a MP3 file play may not be...

Page 6: ...connect the AUDIO OUT terminals to the two channel audio input terminals of an analog amplifier receiver or system component in place of a television to enjoy stereo sound To improve picture quality Use connections D or E 7 To enjoy a richer sound Use connections F or G 8 Unplug the red and white plugs B Connecting to an HDMI compatible television You can enjoy high quality digital video and audio...

Page 7: ...d to 480p To enjoy high definition progressive video Connect to a television that supports 480p or higher Set Component Video Resolution to 480p 720p or 1080i 22 Set HDMI Video Mode to Off 22 Otherwise the video is output as 480i AC IN AV OUT FRONT R R VIDEO OUT S VIDEO OUT OPTICAL COAXIAL FRONT L L SUBWOOFER CENTER SURROUND AUDIO OUT COMPONENT VIDEO OUT DIGITAL AUDIO OUT PCM BITSTREAM 2ch 5 1ch Y...

Page 8: ...I compatible television 6 B HDMI Audio Output Off 22 Otherwise the sound may not be output with the desired settings With OPTICAL FRONT R R FRONT L L SUBWOOFER CENTER SURROUND AUDIO OUT O OUT 2ch 5 1ch PB PR L R L R Connect Audio cables to terminals corresponding to the speakers you have connected Back of the unit Amplifier receiver with 5 1ch AUDIO IN Multi channel speakers NOTE FRONT R R VIDEO O...

Page 9: ... AH Show FUNCTIONS menu 16 AI Selection OK Frame by frame 12 BJ Show on screen menu 18 BA Return to previous screen BB Select disc drive or SD card drive 11 BC Switch on off Secondary Audio 13 CAUTION Do not place objects in front of the unit The disc tray may collide with objects when it is opened and this may cause injury 1 POWER button POWER Í I 10 Press to switch the unit from on to standby mo...

Page 10: ... 1101 1494 1502 HISENSE 0748 HITACHI 0016 0032 0038 0056 0095 0097 0145 0151 0173 0227 0279 0409 0413 1145 INFOCUS 0736 0738 0741 0752 0781 1164 1516 JVC 0036 0053 0069 0160 0169 0182 0731 1253 KLH 0765 0767 LG 0019 0030 0032 0106 0178 0317 0409 0442 0457 0700 0856 1178 1265 LOEWE 0136 MAGNAVOX 0020 0024 0028 0030 0036 0054 0096 0179 0186 0187 0230 0386 0706 0802 1254 1454 MARANTZ 0030 0054 0444 0...

Page 11: ...n prompting you to use the color buttons appears continue to operate with the color buttons on the remote control DISCS CONTINUE TO ROTATE WHILE MENUS ARE DISPLAYED Press when you have finished playback to protect the unit s motor your television screen and so on To switch drives Press BD SD to select BD to play a disc If a disc or an SD card is inserted while the unit is stopped the drive switche...

Page 12: ...isappear and the image is enlarged Please note that the right and left sides of the image are cut off when the black bar is not displayed Zoom The black bars on the top and bottom sides of the 4 3 image disappear and the image is enlarged Please note that the top and bottom sides of the image are cut off when the black bar is not displayed When TV Aspect 21 is set to 4 3 Pan Scan or 4 3 Letterbox ...

Page 13: ...for copy and playback and the required available capacity on the card may vary with the disc For details refer to the instructions for the disc To use the above functions it is recommended that you format the card on this unit Format the card using the following procedures BD Video data such as secondary video recorded on the card can also be erased with the following procedures Formatting SD card...

Page 14: ...en Press DIRECT NAVIGATOR CD R RW Discs containing data in different file formats To switch from the MP3 menu to JPEG menu perform steps below 1 Press FUNCTIONS 2 Press 3 4 to select Menu and press OK 3 Press 3 4 to select Pictures and press OK Small sized still pictures are displayed with a frame BD RE DVD RAM Album View screen is displayed When the Title View screen is displayed press the B butt...

Page 15: ...ess 3 4 2 1 to select Set and press OK Rotate 1 While playing except for slideshows Press SUB MENU 2 Press 3 4 to select Rotate Right or Rotate Left and press OK The rotation information will be stored until the unit is turned off or the media is removed Zoom out This function is only available for small sized still pictures 1 While playing except for slideshows Press SUB MENU 2 Press 3 4 to selec...

Page 16: ...rom the amplifier receiver When the unit is connected to a Panasonic TV VIERA that supports HDAVI Control 2 and an amplifier receiver the power of the unit is turned off if the power to the television is turned off since Power off link 17 operates The following operations make it possible to keep the power of the unit ON and to play music continuously 1 While playing music Press SUB MENU 2 Press 3...

Page 17: ...1 5 m 4 9 ft RP CDHG30 3 0 m 9 8 ft RP CDHG50 5 0 m 16 4 ft etc Non HDMI compliant cables cannot be utilized Preparation 1 Connect this unit to your TV or amplifier receiver with an HDMI cable 6 7 2 Set EZ Sync to On 22 The default setting is On 3 Set the HDAVI Control operations on the connected equipment e g TV When using HDMI2 terminal of VIERA as HDAVI Control set the input channel to HDMI2 on...

Page 18: ... Audio attribute Subtitle BD V AVCHD DVD V Turn the subtitle on off and select the language D below Language DVD VR Only discs that contain subtitle on off information Turn the subtitle on off Subtitle Style BD V Select the subtitle style Audio channel DVD VR 12 Changing audio during play Angle BD V DVD V Select the number of the angle Some items may be changed only on the disc specific menu 11 13...

Page 19: ...stretched from right to left set to Off Only when you have selected 480p in Component Video Resolution 22 Depending on the type of television used the video may be stretched horizontally when video is output in progressive mode When this occurs select Off and the video will then be output as 480i This setting will be fixed to On if you connect with an HDMI cable and set HDMI Video Mode to On 22 Wh...

Page 20: ... Temporary Unlock Audio Language Choose the language for audio subtitle and disc menus BD V DVD V Some discs start in a certain language despite any changes you make here When the selected language is not available on the disc the default language is played There are discs where you can only switch the language from the menu screen 11 13 Enter a code 28 with the numbered buttons when you select Ot...

Page 21: ...AL AUDIO OUT terminal Down mixed 2ch PCM 1 In the following cases audio is output as Dolby Digital or DTS Digital Surround The connected device does not support Dolby Digital Plus Dolby TrueHD DTS HD High Resolution Audio and DTS HD Master Audio Since multiple devices are connected using HDMI cables operations on the device are restricted 2When playing BD Video without secondary audio or clicking ...

Page 22: ...ed Auto Automatically selects the output resolution best suited to the connected television 1080p 1080i 720p or 480p 480p 720p 1080i 1080p When the unit is connected to an amplifier receiver that does not support the resolution set on the unit the video cannot be output properly In this case use the HDMI cable to connect the unit to the TV and then connect the unit to the amplifier receiver using ...

Page 23: ...eo DVD Video indicates that the disc conforms to industry standards You cannot play discs that do not conform to industry standards or do not have a region code or number Please tell me about disc compatibility with this unit This unit plays BD Video DVD Video CD BD RE BD RE Recording Format JPEG BD R BD R Recording Format DVD RAM DVD Video Recording format AVCHD format JPEG DVD R RW DVD Video for...

Page 24: ... reception transmission Don t place the signal sensor in direct sunlight or in areas that may be subject to sunlight exposure It may be necessary to set the code on the remote control again after changing the batteries 26 3 3 10 26 The unit is on but cannot be operated Confirm the correct drive is selected Some operations may be prohibited by the disc The unit is hot U59 appears on the display Wai...

Page 25: ...he Screen Saver Function in the Setup menu is set to Off the masked off area is displayed in black 21 No sound Low volume Distorted sound Cannot hear the desired audio type Check the connections and the Digital Audio Output settings Check the input mode on the amplifier receiver if you have connected one Press AUDIO to select the audio Turn off V Surround in the following cases When using discs th...

Page 26: ...Video or DVD Video is not played Ensure the disc is for the correct BD Video region code or DVD Video region number and is not defective You have set a ratings level to limit BD Video or DVD Video play Change this setting Some BD Video can only be output with HDMI Cover 20 Picture in picture is not played with BD Video Confirm whether the disc supports picture in picture The virtual package is not...

Page 27: ...ion on a BD Video or DVD Video 20 No READ The disc is dirty or badly scratched The unit cannot play PLEASE WAIT Displayed when the unit is started and turned off This is not a malfunction The unit is carrying out its recovery process You cannot operate the unit while PLEASE WAIT is displayed SET stands for a number The remote control and main unit are using different codes Change the code on the r...

Page 28: ... lbs Note Specifications are subject to change without notice 1 Finalizing is necessary 2 includes SDHC card includes miniSD cards need a miniSD Adaptor includes microSD cards need a microSD Adaptor 3 Does not support long file name 4 The total combined maximum number of recognizable picture contents and folders 3000 picture contents and 300 folders 5 The total combined maximum number of recogniza...

Page 29: ...system used for compressing decoding color still pictures If you select JPEG as the storage system on digital cameras etc the data will be compressed to 1 10 1 100 of its original size The benefit of JPEG is less deterioration in picture quality considering the degree of compression Local storage This storage area is used as a destination for sub contents for playing virtual packages on BD Video L...

Page 30: ...to acts of God THERE ARE NO EXPRESS WARRANTIES EXCEPT AS LISTED UNDER LIMITED WARRANTY COVERAGE THE WARRANTOR IS NOT LIABLE FOR INCIDENTAL OR CONSEQUENTIAL DAMAGES RESULTING FROM THE USE OF THIS PRODUCT OR ARISING OUT OF ANY BREACH OF THIS WARRANTY As examples this excludes damages for lost time cost of having someone remove or re install an installed unit if applicable travel to and from the serv...

Page 31: ...ential damages or the exclusion of implied warranties so the above limitations and exclusions may not be applicable WARRANTY SERVICE FOR PRODUCT OPERATION ASSISTANCE please contact Our Customer Care Centre Telephone 905 624 5505 1 800 1 800 561 5505 Fax 905 238 2360 Email link Customer support on www panasonic ca FOR PRODUCT REPAIRS please locate your nearest Authorized Servicentre at www panasoni...

Page 32: ...n HDMI Altavoces multicanal AC IN AV OUT FRONT R R VIDEO OUT S VIDEO OUT OPTICAL COAXIAL FRONT L L SUBWOOFER CENTER SURROUND AUDIO OUT COMPONENT VIDEO OUT DIGITAL AUDIO OUT PCM BITSTREAM 2ch 5 1ch Y PB PR L R L R AC IN Please connect directly to TV Cable de alimentación de CA incluido Conéctelo cuando haya realizado el resto de conexiones A una toma de corriente doméstica CA 120 V 60 Hz Preparació...

Page 33: ...llectual property rights Use of this copyright protection technology must be authorized by Macrovision and is intended for home and other limited viewing uses only unless otherwise authorized by Macrovision Reverse engineering or disassembly is prohibited HDMI the HDMI logo and High Definition Multimedia Interface are trademarks or registered trademarks of HDMI Licensing LLC This product is licens...

Reviews: