background image

Co

n

n

e

cti

o

n

RQT9334

(ENG)

27

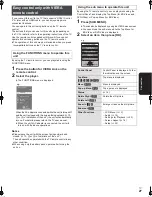
If you connect this unit to the TV that supports “HDAVI Control 
2” or later with an HDMI cable, you can enjoy using more 
convenient functions.
You can operate this unit using buttons on the TV remote 
control.
The buttons that you can use for this unit vary depending on 
the TV. For details, refer to the operating instructions of the TV.
Use the remote control supplied with this unit if you cannot 
operate this unit using buttons on the TV remote control.

The operation of this unit may be interrupted when you press 
incompatible buttons on the TV remote control.

By using the TV remote control, you can play media using the 
FUNCTIONS menu.

1

Press the button for VIERA Link on the 
remote control.

2

Select the player.

The FUNCTIONS menu is displayed.

When the AC adaptor is connected while the unit is turned off 
and the unit is closed with the screen facing outward (

>

10, 

3

 or 

4

 in “Installation of the unit”), the unit will automatically 

turn on. For details, please refer to the TV user manual.

When the unit’s AC adaptor is connected, the unit will 
turn on with the above operations.

Notice

Please leave the unit with the screen facing outward and 
closed. (

>

10, 

3

 or 

4

 in “Installation of the unit”)

The unit cannot be operated with the TV remote control in any 
other condition.

When using only the battery pack, operate after turning the 
unit on.

By using the TV remote control, you can play discs using the 
“Control Panel” and display the Top Menu (for BD-Video and 
DVD-Video) or Pop-up Menu (for BD-Video).

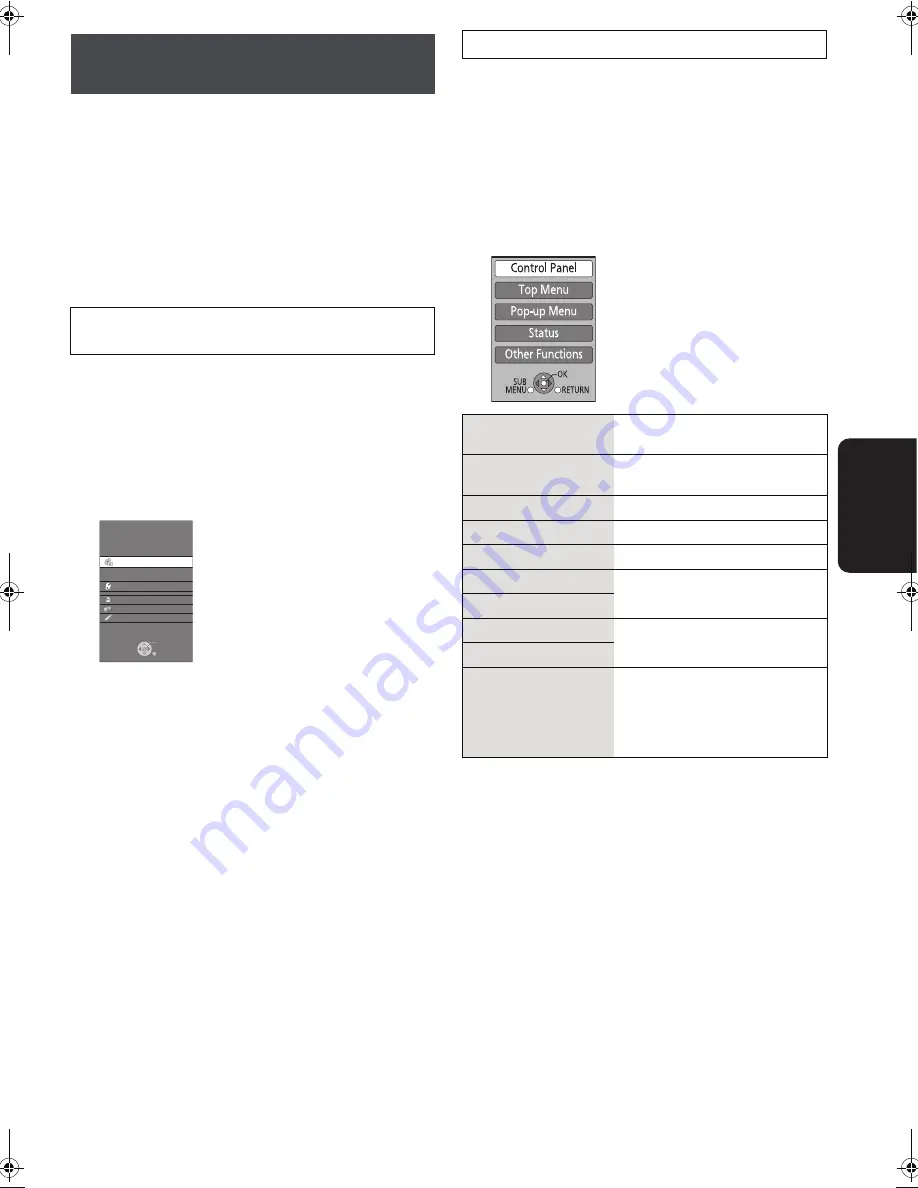
1

Press [SUB MENU].

This can also be displayed by using the VIERA menu screen.

You cannot use the sub menu while the Top Menu for 
BD-Video or DVD-Video is displayed.

2

Select an item, then press [OK].

Easy control only with VIERA 
remote control

Using the FUNCTIONS menu to operate this 
unit

e.g.,

OK
RETURN

Pla

y

back

DISC

Other Functions

SD card
Network
AUX

Blu-ra

y

 Disc Pla

y

er

Using the sub menu to operate this unit

Control Panel

Control Panel is displayed. Follow 
the indications on the screen.

Top Menu 

[BD-V] [AVCHD]


[DVD-V]

Top menu is displayed.

Menu 

[DVD-V]

Menu is displayed.

Pop-up Menu 

[BD-V]

Pop-up menu is displayed.

Status

(

>

16)

Rotate Right 

[JPEG]

Rotate the still picture.

Rotate Left 

[JPEG]

Zoom in 

[JPEG]

Enlarge or reduce the still picture.

Zoom out 

[JPEG]

Other Functions

j

LCD Menu (

>

13)

j

Audio (

>

16)

j

Settings for Playback (

>

23)

j

Screen Aspect (

>

16)

j

Setup (

>

32)

e.g.,

DMPB15P-RQT9334_eng.book  27 ページ  2009年3月28日 土曜日 午後2時39分

Summary of Contents for DMP-B15 - Portable Blu-ray Player

Page 1: ...etely Please keep this manual for future reference Region management information BD Video This unit plays BD Video marked with labels containing the region code A Example DVD Video This unit plays DVD Video marked with labels containing the region number 1 or ALL Example 2 4 1 ALL 1 If you have any questions contact U S A and Puerto Rico 1 800 211 PANA 7262 Canada 1 800 561 5505 Only for U S A and...

Page 2: ...t and easily accessible The mains plug of the power supply cord shall remain readily operable To completely disconnect this apparatus from the AC Mains disconnect the power supply cord plug from AC receptacle RISK OF ELECTRIC SHOCK DO NOT OPEN CAUTION WARNING TO REDUCE THE RISK OF FIRE ELECTRIC SHOCK OR PRODUCT DAMAGE DO NOT EXPOSE THIS APPARATUS TO RAIN MOISTURE DRIPPING OR SPLASHING AND THAT NO ...

Page 3: ...nit Product Identification Marking is located on the bottom of AC adaptor R B R C L i i o n T M AC adaptor This AC adaptor operates on AC between 110 V and 240 V But In the U S A and Canada the AC adaptor must be connected to a 120 V AC power supply only When connecting to an AC supply outside of the U S A or Canada use a plug adaptor to suit the AC outlet configuration When connecting to a supply...

Page 4: ...y For Canada Only 51 Product Service 51 Index Back cover Accessories Please check and identify the supplied accessories Use numbers indicated in parentheses when asking for replacement parts Product numbers correct as of March 2009 These may be subject to change For U S A and Puerto Rico To order accessories refer to Accessory Purchases United States and Puerto Rico on page 50 For Canada To order ...

Page 5: ...solvent Do not use scratch proof protectors or covers Clean any dust water or foreign matter from the terminals on the rear side of the card Do not use the following discs j Discs with exposed adhesive from removed stickers or labels rented discs etc j Discs that are badly warped or cracked j Irregularly shaped discs such as heart shapes To clean this unit wipe with a soft dry cloth Wipe gently wi...

Page 6: ...quality video and audio playback DVD V CD Compact Discs CD s that contain audio and music Operation and sound quality of CDs that do not conform to CD DA specifications copy control CDs etc cannot be guaranteed CD User recorded media Type of media and logo Formats Indicated as BD RE Version 3 of the BD RE Recording Format JPEG format BD V JPEG BD R Version 2 of the BD R Recording Format BD V DVD R...

Page 7: ... PC it is possible that the card may not work properly Keep the Memory Card out of reach of children to prevent swallowing When a card recorded in the AVCHD format is being played the video may momentarily pause especially where one recording ends and the next one begins This is normal and does not indicate a problem To protect the card s contents move the record prevention tab on the SD card to L...

Page 8: ...HDMI AV OUT terminal 25 10 LAN terminal 28 11 Stand 10 12 Stopper wire 10 13 DC IN terminal 11 14 Turn the unit on and off 12 15 Switch the media to playback It will switch every time it is pressed 16 Stop 15 17 Playback 14 18 Skip title numbers etc 15 19 Adjust the volume 14 20 Show the sub menu 18 21 Return to previous screen 22 Selection OK The Unit 1 2 3 4 5 Front View 6 8 9 7 11 10 Rear View ...

Page 9: ... switch every time it is pressed 12 Adjust the volume 14 13 Show FUNCTIONS menu 12 14 Return to previous screen 15 Show on screen menu 23 16 Show status messages 16 17 Turn the unit off automatically 12 18 Change the screen settings 13 Insert the button type battery included 1 Pull out the holder 2 Insert the battery and return the holder Keep the button type battery out of reach of children to pr...

Page 10: ...ic shielding Do not place the unit near televisions personal computers or other devices easily influenced by magnetism Do not keep this unit and magnetized cards bank cards commuter passes etc close together When moving the unit Turn the unit off Close the screen and the stand Do not hold onto the screen or the stand About the LCD screen There may be 0 01 or less chance of missing or constantly tu...

Page 11: ...bove Even when the unit is turned off there is a small amount of voltage running through the unit and this may result in a malfunction Recharge the battery for re use Recharging the battery pack Attach the battery pack and connect the AC adaptor left The CHARGE indicator lights while charging the battery and the CHARGE indicator turns off when battery charging is finished Approximate recharging an...

Page 12: ...perform this setup anytime by selecting Easy Setting in the Setup menu 36 You can also change this setting individually 34 The unit is turned off automatically after set time has passed Switch by pressing the OFF TIMER It will switch every time it is pressed Showing FUNCTIONS menu Some functions of this unit can be operated from the FUNCTIONS menu 1 Press FUNCTIONS Functions displayed depend on th...

Page 13: ...with this unit It cannot be used even if the disc is taken out from the cartridge j DVD RAM 8 cm disc Remove the disc from the cartridge and set the disc in the tray j Place the disc back into the cartridge for storage to prevent dirt and scratches after use Do not touch the lens as it may make it dirty 1 Open the cover at the side of the unit 2 Insert the SD card into the SD card slot Press on th...

Page 14: ...amera on the DVD RAM R RW R DL R RW R DL or SD card and SD Standard Definition Video recorded on the Panasonic SD Video Camera on the SD card Preparation Insert a disc or SD card 13 1 Press AV SELECT to select DISC or SD Video AVCHD or Video MPEG 2 screen is displayed If a media containing data in different file formats is inserted the file selection menu may be displayed Press 3 4 to select Play ...

Page 15: ...6 or 5 DVD VR DVD V Audio is heard during the first level of forward search BD V AVCHD DivX MPEG2 Audio is not heard during all levels of search CD MP3 The speed is fixed to a single step Slow motion While paused press 6 or 5 BD V AVCHD Forward direction 5 only DVD VR If continued for approx 5 minutes slow motion play pauses automatically Skip Skip to the title chapter or track you want to play Ea...

Page 16: ...he top bottom and sides of the image will be cut off in images with no black bars Screen aspect will return to Normal in the following instances j Playback of images starts ends j The unit is turned on off BD V DVD V Side cut does not have any effect When TV Aspect 34 is set to 4 3 Pan Scan or 4 3 Letterbox the Zoom effect is disabled Status messages The status messages give you information about ...

Page 17: ...to be created in order to access the BD Live content Follow the screen display or instruction manual of the disc for information on acquiring an account Preparation Connect to the network 28 1 Insert an SD card 13 If the SD card menu screen is displayed press RETURN to clear the screen 2 Insert the disc 13 3 Press AV SELECT to select DISC For operation method refer to the instructions on the disc ...

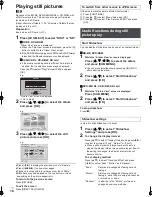
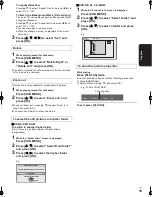
Page 18: ... 1 While the Album View screen is displayed Press 3 4 2 1 to select the album and press SUB MENU You can also start slideshow by pressing 1 PLAY after selecting the album 2 Press 3 4 to select Start Slideshow and press OK DVD R R DL CD R RW SD card 1 While the Picture View screen is displayed Press SUB MENU 2 Press 3 4 to select Start Slideshow and press OK To stop slideshow Press In step 2 in Sta...

Page 19: ... and press OK The zoom out information will not be stored BD RE DVD RAM To switch to another higher folder Only if there is a multiple number of higher folders recognizable 1 While the Album View screen is displayed Press SUB MENU 2 Press 3 4 to select Select Root folder and press OK 3 Press 2 1 to select the higher folder and press OK DVD R R DL CD R RW 1 While the Picture View screen is displaye...

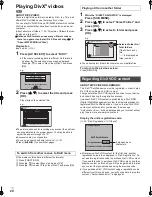
Page 20: ...and VOD content First generate the DivX VOD registration code for your device and submit it during the registration process Important DivX VOD content is protected by a DivX DRM Digital Rights Management system that restricts playback to registered DivX Certified devices If you try to play DivX VOD content not authorized for your device the message Authorization Error will be displayed and your co...

Page 21: ...an display subtitles text onto the DivX video disc on this unit This function has no relation to the subtitles specified in DivX standard specifications and has no clear standard The operation might be different or it may not operate properly depending on the way the file was made or the state of this unit playing stopped etc 1 While playing Press DISPLAY 2 Press 3 4 to select Disc and press 1 3 P...

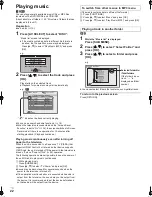
Page 22: ...tinued for several seconds when the power to the television is turned off If the operation mentioned above is executed while audio is output from the television the sound may not be output from the device It is recommended to set the device beforehand so that audio will be output from the device If the media contains data in different file formats 1 Press FUNCTIONS 2 Press 3 4 to select Menu and p...

Page 23: ...d even if there are not multiple subtitles Subtitle Style BD V Select the subtitle style Audio channel DVD VR DivX MPEG2 16 Changing audio during play Angle BD V DVD V Select the number of the angle Some items may be changed only on the disc specific menu 14 Language Audio attribute Video attribute On screen menu operations What you can change with the on screen menu Video The original video recor...

Page 24: ...is effective for audio from the HDMI AV OUT terminal only when Dolby D Dolby D Dolby TrueHD or DTS DTS HD is set to PCM All tracks All tracks Chapter Chapter Playlists Playlist Title Title One track Track Off On Off Normal Default setting Soft Soft picture with smoother video Fine Details are sharper Cinema Mellows movies enhances detail in dark scenes User You can make further adjustments below C...

Page 25: ...evice and switch the input Example Set the input to Video 2 or similar the name of input may be different depending on the connected device 2 Start playback on this unit Preparation Connect the video device to this unit Press AV SELECT to switch to AUX Operate playback using the connected equipment Please read the operating instructions for the connected equipment The unit does not turn off automa...

Page 26: ...it automatically turns off even during playback or any other operation When 1 PLAY is pressed on this unit for Automatic input switching or Power on link the playback image is not immediately displayed on the screen and it may not be possible to watch the contents from where playback started In this case press or 6 to go back to where playback started Playing music continuously even after turning ...

Page 27: ...h the above operations Notice Please leave the unit with the screen facing outward and closed 10 3 or 4 in Installation of the unit The unit cannot be operated with the TV remote control in any other condition When using only the battery pack operate after turning the unit on By using the TV remote control you can play discs using the Control Panel and display the Top Menu for BD Video and DVD Vid...

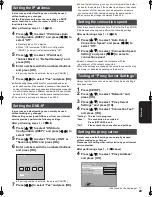
Page 28: ...may not be connected depending on the connection environment 29 It is required that you use a broadband connection Preparation Connect to a broadband network D left Always test the connection when a LAN cable is connected 1 Press SETUP 2 Press 3 4 to select Network and press OK 3 Press 3 4 to select IP Address DNS Settings and press OK 4 Press 3 4 to select Connection Test and press OK Testing The...

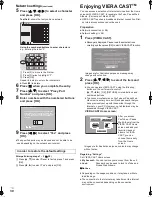
Page 29: ...vider and enter the numbers If the number is unknown then check the number of other devices such as personal computers connected via a LAN cable and assign the same number The numeric input range is between 0 and 255 When the connection test results in Fail after the IP and DNS IP addresses are assigned perform the following settings After performing steps 1 3 28 4 Press 3 4 to select Auto Detect ...

Page 30: ... may change without notice Regarding Settings Set VIERA CAST Home screen My Account You can remove your account from the unit Lock Password can be used to lock YouTube and Picasa Web Albums Notices Depending on the usage conditions it may take a while to load the page The connection to the Internet may take time or the Internet may not be connected depending on the connection environment In order ...

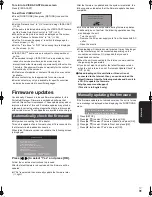
Page 31: ...on screen instructions to proceed After the latest firmware is downloaded the firmware will be updated If No is selected then manually update the firmware later D right After the firmware is updated and the system is restarted the following screen indicates that the firmware update has been completed Other operations are not possible during firmware updates Additionally do not perform the followin...

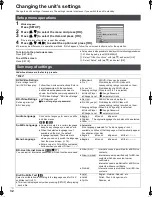
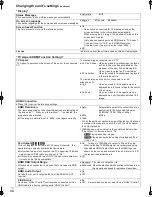
Page 32: ...ry Unlock BD Video Ratings Set an age limit of BD Video play No Limit All BD Video can be played 0 to 254 year s Prohibits play of BD Video with corresponding ratings recorded on them Changing settings When 0 to 254 year s is selected Unlock Player Change Password Change Level Temporary Unlock Audio Language Choose the language for audio subtitle and disc menus BD V DVD V Some discs start in a cer...

Page 33: ...r this unit and audio selected in these items may not be output e g when a television is connected the HDMI audio output of this unit is limited to down mixed 2ch Bitstream Select Bitstream when the connected equipment can decode the respective audio format j Connect equipment supporting HDMI High Bit rate Audio and use a High Speed HDMI Cable in order to output high bit rate audio such as Dolby D...

Page 34: ...es are indicated on the screen as When any item without is selected the images may be distorted If the image is distorted set to 480p or set again correctly Auto Automatically selects the output resolution best suited to the connected television 1080 24p 1080i 720p or 480p 480p 720p 1080i j When the unit is connected to an amplifier receiver that does not support the resolution set on the unit the...

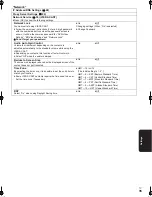
Page 35: ...ted automatically to the standard volume while using the VIERA CAST Depending on contents this function effect will not work Select Off when the audio is warped On Off Reduce to Screen Size The screen is displayed reduced so the displayed screen of the content does not get truncated On Off Time Zone By selecting the time zone it is possible to set the unit s time to match your location Some VIERA ...

Page 36: ...aans 6570 Albanian 8381 Amharic 6577 Arabic 6582 Armenian 7289 Assamese 6583 Aymara 6589 Azerbaijani 6590 Bashkir 6665 Basque 6985 Bengali Bangla 6678 Bhutani 6890 Bihari 6672 Breton 6682 Bulgarian 6671 Burmese 7789 Byelorussian 6669 Cambodian 7577 Catalan 6765 Chinese 9072 Corsican 6779 Croatian 7282 Czech 6783 Danish 6865 Dutch 7876 English 6978 Esperanto 6979 Estonian 6984 Faroese 7079 Fiji 707...

Page 37: ...V This unit supports high bit rate audio Dolby Digital Plus Dolby TrueHD DTS HD High Resolution Audio and DTS HD Master Audio adopted in BD Video In order to enjoy these audio formats the following conditions are necessary Part shown in the shaded area of table given above NECESSARY CONNECTIONS HDMI AV OUT terminal 25 NECESSARY SETTINGS Set BD Video Secondary Audio to Off 33 Set HDMI Audio Output ...

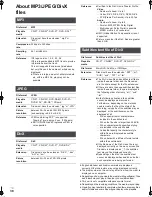
Page 38: ...n 32k32 and 720k576 pixels Reference Certified to the DivX Home Theater Profile Video j Number of stream Up to 1 j Codec DIV3 DIV4 DIVX DV50 DIV6 j FPS Frame Per Second Up to 30 fps Audio j Number of stream Up to 8 j Format MP3 MPEG Dolby Digital j Multi channel Dolby Digital is possible MPEG multi is 2 ch conversion GMC Global Motion Compensation is not supported Picture may stop if the DivX file...

Page 39: ... R DVD R DL CD R CD RW Files inside a folder are displayed in the order they were updated or taken e g 001 010XXXX mp3 011XXXX mp3 012XXXX mp3 003XXXX mp3 004XXXX mp3 005XXXX mp3 006XXXX mp3 007XXXX mp3 008XXXX mp3 009XXXX mp3 001XXXX mp3 002XXXX mp3 Root Folder A Folder B Folder C P0000010 divx P0000011 divx P0000012 divx P0000003 divx P0000004 divx P0000005 divx P0000001 divx P0000002 divx P0000...

Page 40: ...n off the unit once and turn it back on Alternatively turn off the unit disconnect the AC adaptor and the battery pack and attach them back again Authorization Error This unit is not authorized to play this title DivX You are trying to play the DivX VOD content that was purchased with a different registration code You cannot play the content on this unit 20 Cannot play You inserted an incompatible...

Page 41: ...the router 28 j Use the UPLINK port of the hub to connect to a router j If the hub s Link lamp does not light up then check the cable connection LAN terminal connection cable itself a crossover cable may have been used by mistake etc Check the IP Address Subnet Mask and Default Gateway in the IP Address DNS Settings 29 If the MAC address information is required then press SETUP to display the Netw...

Page 42: ...o return all settings to the factory preset Reset the unit as follows 1 Press POWER Í I on the unit to turn off the unit 2 Press and hold POWER Í I and RETURN on the unit at the same time for more than 5 seconds until PLEASE WAIT is displayed on the LCD 3 The power will turn on and then turn off No power Check connections to the AC adaptor or battery pack 11 The unit has protection circuitry that ...

Page 43: ...lower Cannot set On in 24p Output Only when this unit is connected to a TV supporting 1080 24p output via an HDMI cable you can set to On 34 No picture on the LCD Check connections 11 Select On in Monitor 13 The LCD screen is turned off automatically when the LCD screen is rotated 10 The LCD screen can be turned on only when the unit is closed with the screen facing outwards 10 3 or 4 in Installat...

Page 44: ...cable change TV Aspect type to 4 3 Pan Scan 34 No sound from other speakers Check all connections and settings 25 Cannot hear the desired audio type Audio may not be heard when more than 4 devices are connected with HDMI cables Reduce the number of connected devices Cannot switch audio When connecting an amplifier receiver using an HDMI cable you cannot switch the audio if Dolby D Dolby D Dolby Tr...

Page 45: ...n the media Turn the subtitles on Set Subtitle on the on screen menu to On 23 When progressive output is on closed captions cannot be displayed Angle cannot be changed Angles can only be changed during scenes where different angles are recorded The resume play function does not work The memorized position is cleared in the following instances j is pressed several times j The disc or SD card is rem...

Page 46: ...ling CD audio 4 Hz to 20 kHz S N ratio 100 dB Dynamic range 90 dB Total harmonic distortion 0 015 Speaker Output 0 5 W i 0 5 W 8 Headphone output Output 3 5 mm 1 8q stereo mini jack Number of terminals 1 system Pickup Wave length 405 nm 661 nm 783 nm BD DVD CD Laser power CLASS II CLASS II CLASS IIIb BD DVD CD HHS for USA CLASS 2 CLASS 2M CLASS 3B BD DVD CD IEC for Canada Playable disc BD Video BD...

Page 47: ...yright protection technology must be authorized by Macrovision and is intended for home and other limited viewing uses only unless otherwise authorized by Macrovision Reverse engineering or disassembly is prohibited HDMI the HDMI logo and High Definition Multimedia Interface are trademarks or registered trademarks of HDMI Licensing LLC This product is licensed under the AVC patent portfolio licens...

Page 48: ... a high quality sophisticated audio format used in movie theaters Previous DTS Digital Surround compatible equipment can play DTS HD as DTS Digital Surround audio BD Video supports up to 7 1 channel output DTS HD High Resolution Audio This is a signal format achieved by improving the previous DTS DTS ES and DTS96 24 formats It is compatible with sampling frequency 96 kHz 48 kHz BD Video supports u...

Page 49: ...erlaced i scan lines whereas progressive p scanning uses twice the number of scan lines and this is referred to as 480p Using progressive output you can enjoy watching high resolution video Router Distinguishes the IP address assigned to each device such as the PC and relays the flow of data within the network Sampling frequency Sampling is the process of converting the heights of sound wave analo...

Page 50: ...Authorized Servicer or damage that is attributable to acts of God THERE ARE NO EXPRESS WARRANTIES EXCEPT AS LISTED UNDER LIMITED WARRANTY COVERAGE THE WARRANTOR IS NOT LIABLE FOR INCIDENTAL OR CONSEQUENTIAL DAMAGES RESULTING FROM THE USE OF THIS PRODUCT OR ARISING OUT OF ANY BREACH OF THIS WARRANTY As examples this excludes damages for lost time cost of having someone remove or re install an insta...

Page 51: ... preferably in the original carton Include details of the defect claimed and proof of date of original purchase Product Service 1 Damage requiring service The unit should be serviced by qualified service personnel if a The AC power supply cord or AC adaptor has been damaged or b Objects or liquids have gotten into the unit or c The unit has been exposed to rain or d The unit does not operate norma...

Page 52: ... Menu 23 Status messages 16 P Picture in picture 17 Playlist 12 Pop up Menu 14 Product Disposal 5 Progressive 24 49 Properties Chapter 15 Still picture 19 Proxy Server 29 Q Quick Start 36 R Ratings level 32 Remote control 9 Repeat play 24 Restore Default Settings 36 Resume play function 15 S SD card 13 17 Search 15 Selected playback 16 Setup menu 32 Skip 15 Slideshow 18 Slow motion 15 Soundtrack 2...

Reviews: