background image

39

 (ENG) VQT3Q87

Setting the Menu

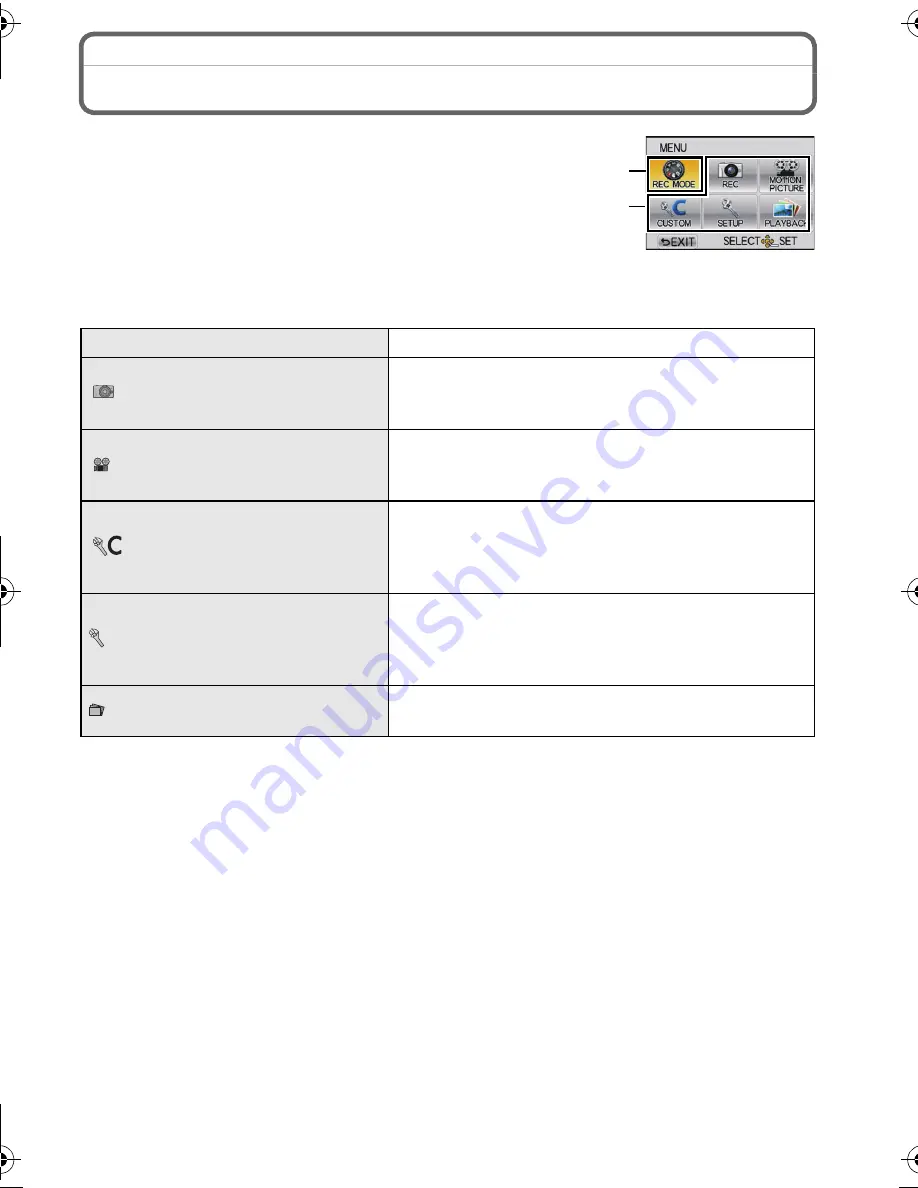
When [MENU/SET] is pressed, [REC MODE] 

A

 and 5 menus 

B

 ([REC], [MOTION PICTURE], [CUSTOM], [SETUP], and 

[PLAYBACK]) are displayed.
In the 5 different menus, there are menus that allow you to 
setup the recording or playback to your preference, or make it 
more fun and easier to use the camera.
In particular, the [SETUP] menu contains some important 
settings relating to the camera’s clock and power. Check the settings of this menu before 
proceeding to use the camera.

Menu

Description of settings


 [REC]

This menu lets you set the aspect ratio, number of 
pixels and other aspects of the pictures you are 
recording.


 [MOTION PICTURE]

This menu lets you set the [REC MODE], [REC 
QUALITY], and other aspects for motion picture 
recording.


 [CUSTOM]

Operation of the unit, such as displaying of the 
screen and button operations, can be set up 
according to your preferences. Also, it is possible 
to register the modified settings.


[SETUP]

This menu lets you perform the clock settings, 
select the operating beep tone settings and set 
other settings which make it easier for you to 
operate the camera.

 [PLAYBACK]

This menu lets you set the Protection, Cropping or 
Print Settings, etc. of recorded pictures.

A

B

DMC-GF3C&GF3K&GF3W&GF3EB-VQT3Q87_eng.book  39 ページ  2011年6月1日 水曜日 午後2時4分

Summary of Contents for DMC-GF3XK

Page 1: ...al Camera Lens Kit Double Lens Kit Body Model No DMC GF3C DMC GF3K DMC GF3W DMC GF3 Before use please read these instructions completely More detailed instructions on the operation of this camera are...

Page 2: ...pose to flame Do not leave the battery ies in an automobile exposed to direct sunlight for a long period of time with doors and windows closed WARNING TO REDUCE THE RISK OF FIRE ELECTRIC SHOCK OR PROD...

Page 3: ...se observe the wiring code as stated below If in any doubt please consult a qualified electrician IMPORTANT The wires in this mains lead are coloured in accordance with the following code Blue Neutral...

Page 4: ...agnetic fields created by speakers or large motors Electromagnetic wave radiation generated by microprocessors may adversely affect this unit disturbing the pictures and or sound If this unit is adver...

Page 5: ...ing For more information about collection and recycling of old products and batteries please contact your local municipality your waste disposal service or the point of sale where you purchased the it...

Page 6: ...ill picture 28 Taking Pictures using the Automatic Function Intelligent Auto Mode 29 Easily adjust and record Intelligent Auto Plus Mode 31 Taking Pictures with Defocus Control Function 32 Taking Pict...

Page 7: ...the interchangeable lens at the time of purchase 8 Body Cap This is attached to the camera body at the time of purchase 9 Battery Pack Indicated as battery pack or battery in the text Charge the batt...

Page 8: ...in DMC GF3W only 4 Supplied in DMC GF3 only 4 5 6 7 11 DMW BLE9E DE A98A K1HY08YY0020 K2CT39A00002 14 15 VFF0833 16 VFC4710 17 VGQ0C14 K1HY08YY0019 2 3 DMC GF3W 3 H H014 VYF3371 H FS014042 VYC1009 VY...

Page 9: ...s 0844 844 3856 Order accessory and consumable items for your product with ease and confidence by phoning our Customer Care Centre Monday Thursday 9 00 a m 5 30 p m Friday 9 30 a m 5 30 p m Excluding...

Page 10: ...ap DMW LFC46 3 DMW LFC52 4 Lens Rear Cap DMW LRC1 5 Body Cap DMW BDC1 Tripod Adaptor 6 DMW TA1 HDMI mini Cable RP CDHM15 RP CDHM30 Interchangeable Lens H VS014140 H FS014042 H FS014045 H FS045200 H F0...

Page 11: ...button 9 Touch panel LCD monitor 10 Playback button 11 Q MENU Fn button Delete Return button 12 MENU SET button 13 Control dial 14 Cursor buttons 3 Exposure Compensation button 1 WB White Balance 2 AF...

Page 12: ...Battery door 28 DC coupler cover When using an AC adaptor ensure that the Panasonic DC coupler DMW DCC11 optional and AC adaptor DMW AC8E optional are used Always use a genuine Panasonic AC adaptor D...

Page 13: ...30 Lens surface 31 Focus ring 32 Contact point 33 Lens fitting mark 34 Tele 35 Wide 36 Zoom ring H H014 LUMIX G 14 mm F2 5 ASPH H FS014042 LUMIX G VARIO 14 42 mm F3 5 5 6 ASPH MEGA O I S 32 33 31 30 3...

Page 14: ...pens Do not operate with your fingernails Wipe the LCD monitor with dry soft cloth when it gets dirty with finger prints and others Do not scratch or press the LCD monitor too hard About the Stylus pe...

Page 15: ...using a Leica lens mount adaptor set SHOOT W O LENS to ON Taking 3D pictures Attaching the 3D interchangeable lens H FT012 optional to the camera allows you to take 3D pictures for extra impact Playi...

Page 16: ...joyment of the camera Change the lens using the following procedure Check that the camera is turned off Change lenses where there is not a lot of dirt or dust While pressing on the lens release button...

Page 17: ...o the mount when the lens and body cap are removed from the camera body To prevent dust or debris from adhering to internal parts of the camera body fit the body cap or a lens to the mount on the came...

Page 18: ...e that came with the interchangeable lens H FS014042 The interchangeable lens H H014 does not have a lens hood Insert the lens hood into the lens with the short sides at the top and bottom and turn in...

Page 19: ...en pass it through the stopper Pass the end of the shoulder strap through the hole on the other side of the stopper Pull the other side of the shoulder strap and then check that it will not come out P...

Page 20: ...battery are dirty In this case wipe them with a dry cloth It has been found that counterfeit battery packs which look very similar to the genuine product are made available to purchase in some market...

Page 21: ...emory Card 2 GB Using the supplied battery Starting recording 30 seconds after the camera is turned on Recording once every 30 seconds with full flash every second recording Turning the camera off eve...

Page 22: ...ded continuously in MOTION JPEG is up to 2 GB Remaining time for continuous recording is displayed on the screen Playback When the interchangeable lens H H014 is used Recordable time Approx 150 min Ac...

Page 23: ...g careful about the battery orientation insert all the way until you hear a locking sound and then check that it is locked by lever A Pull the lever A in the direction of the arrow to remove the batte...

Page 24: ...vibration impact or static electricity perform the operation again Please confirm the latest information on the following website http panasonic jp support global cs dsc This Site is English only Not...

Page 25: ...witch the settings by continuously touching 3 4 Touch CANCEL to cancel the date and time settings without setting a date and time To set the display order and the time display format Touch STYLE to di...

Page 26: ...display the screen listing the Recording Mode by touching the Recording Mode icon in Recording Mode Touch the Recording Mode to select is turned on when is touched and a description of the Recording...

Page 27: ...Mode The shutter speed is automatically determined by the aperture value you set Shutter Priority AE Mode The aperture value is automatically determined by the shutter speed you set Manual Exposure M...

Page 28: ...ocus A Aperture value B Shutter speed Aperture value and shutter speed are displayed It will flash in red if the correct exposure is not achieved except when set to flash When the image is correctly f...

Page 29: ...pressing the button you can switch between the Intelligent Auto or Mode of the Recording Mode and other modes When the Recording Mode is or the button lights up Light turns off during recording Set Re...

Page 30: ...ter speed will be slower than normal Take care not to move the camera while taking pictures An optimum scene for the specified subject will be chosen when set to AF tracking When FACE RECOG is set to...

Page 31: ...lligent Auto Plus Mode is identical to Intelligent Auto Mode 1 Press 3 to display the setting screen 2 Touch the slide bar to set This will adjust the brightness of the image Setting can also be perfo...

Page 32: ...of the background while checking the screen Touch to display the setting screen Touch the slide bar to set Setting can also be performed by rotating the control dial Recording of pictures or motion pi...

Page 33: ...ture value and shutter speed without changing the exposure This is called Programme Shift You can make the background more blurred by decreasing the aperture value or record a moving subject more dyna...

Page 34: ...otion pictures can be recorded continuously for up to 29 minutes 59 seconds Also motion picture recorded continuously in MOTION JPEG is up to 2 GB Remaining time for continuous recording is displayed...

Page 35: ...image by pressing 2 1 of the cursor button Speed of picture forwarding rewinding changes depending on the playback status You can forward or rewind pictures continuously by keeping your finger on the...

Page 36: ...Playing Back Motion Pictures Press Select a picture with a Motion Picture icon and then touch to play back A Motion picture icon B The motion picture recording time After playback starts the elapsed...

Page 37: ...by frame forward while pausing Increase volume level Reduce volume level Not displayed when playing back motion pictures recorded with MINIATURE EFFECT in Creative Control Mode About fast forward rew...

Page 38: ...g Pictures Once deleted pictures cannot be recovered Press To delete a single picture Select the picture to be deleted and then touch Touch DELETE SINGLE Confirmation screen is displayed Picture is de...

Page 39: ...of settings REC This menu lets you set the aspect ratio number of pixels and other aspects of the pictures you are recording MOTION PICTURE This menu lets you set the REC MODE REC QUALITY and other a...

Page 40: ...e menu by pressing 3 4 2 1 or by rotating the control dial It can also be set by the touch operation Press MENU SET to display the menu Select the menu item by pressing 3 4 or by rotating the control...

Page 41: ...menu from REC Mode menu 1 Press 2 A Menu toggle icon 2 Press 4 or rotate the control dial to select the SETUP menu icon 3 Press 1 Select a menu item next and set it Select the settings by pressing 3...

Page 42: ...g examples Underexposed Properly exposed Overexposed Compensate the exposure towards positive Compensate the exposure towards negative Press 3 to switch to Exposure Compensation operation Rotate the c...

Page 43: ...o set the aperture value Each press of the cursor button 3 switches between Aperture Setting and Exposure Compensation When you want to take a sharp picture of a fast moving subject set with a faster...

Page 44: ...d shutter speed Each press of the cursor button 3 switches between Aperture Setting and Shutter Speed Setting A Manual Exposure Assistance Manual Exposure Assistance The Manual Exposure Assistance is...

Page 45: ...or later or Adobe Reader 7 0 or later to browse or print the Operating Instructions PDF format Insert the CD ROM containing the Operating Instructions supplied click A and then follow the messages on...

Page 46: ...ry colour filter Digital Zoom Max 4k Extra Tele Conversion Except for the maximum picture size for each aspect ratio ON OFF simple enlargement compatible with lenses from other manufacturers Focus Aut...

Page 47: ...erture priority AE A Shutter priority AE S Manual exposure M AUTO Exposure Compensation 1 3 EV Step j3 EV to i3 EV Metering Mode Multiple Centre weighted Spot LCD monitor 3 0q TFT LCD 3 2 Approx 460 0...

Page 48: ...tio setting is 2992k2992 pixels 2112k2112 pixels 1504k1504 pixels Recording quality Motion pictures AVCHD With audio When set to FSH 1920k1080 pixels 50i recording Approx 17 Mbps When set to SH 1280k7...

Page 49: ...ral Terminal AV OUT DIGITAL Dedicated jack 8 pin HDMI MiniHDMI TypeC Dimensions Approx 107 7 mm W k67 1 mm H k32 5 mm D 4 24q W k2 64q H k1 28q D excluding the projecting parts Mass Approx 319 g 0 70...

Page 50: ...5 groups 3 aspherical lenses In focus distance 0 18 m 0 59 feet to from the focus distance reference line Maximum image magnification 0 1k 35 mm film camera equivalent 0 2k Optical Image Stabilizer No...

Page 51: ...oups 1 aspherical lens In focus distance 0 3 m 0 99 feet to from the focus distance reference line Maximum image magnification 0 16k 35 mm film camera equivalent 0 32k Optical Image Stabilizer Availab...

Page 52: ...trademark or registered trademark of Adobe Systems Incorporated in the United States and or other countries Mac and Mac OS are trademarks of Apple Inc registered in the U S and other countries Windows...

Reviews: