Panasonic DMC-FZ2000 Operating Instructions Manual Download Page 28

2. Getting Started/Basic Operations

28

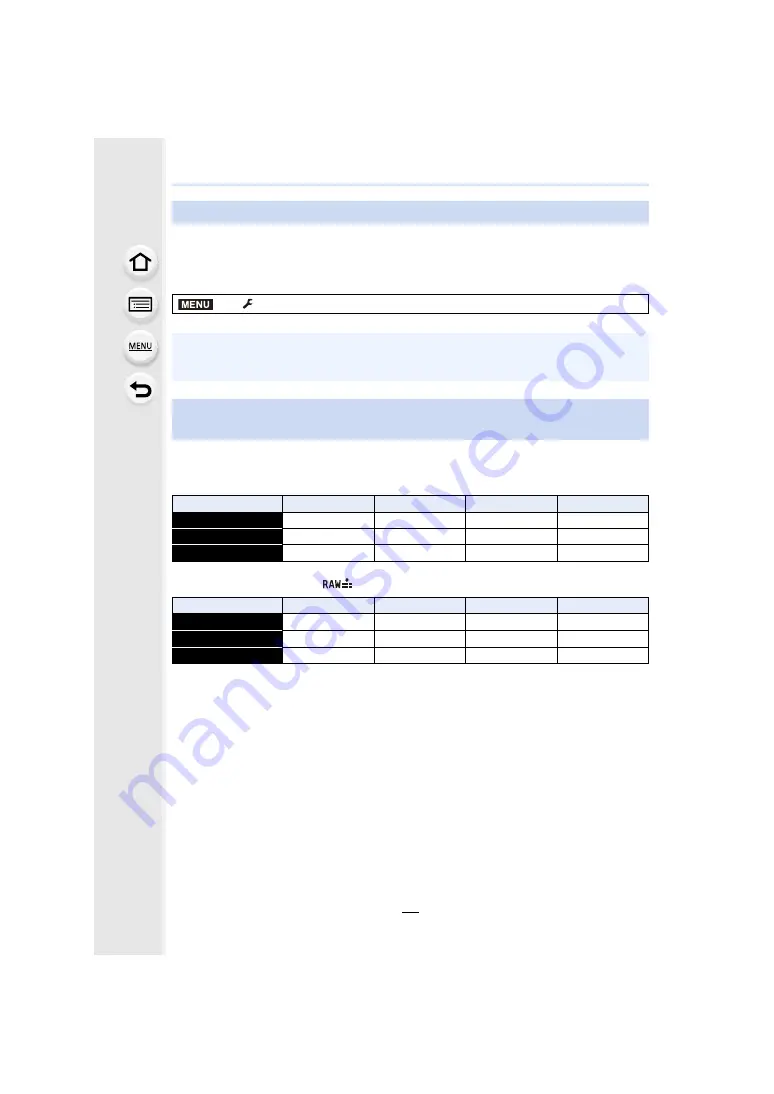
Format the card before recording a picture with this unit.

Since data cannot be recovered after formatting, make sure to back up necessary 
data in advance.
Select the menu. 

(P51)

Number of recordable pictures

• Aspect ratio [3:2], Quality [

A

]

• Aspect ratio [3:2], Quality [

]

Formatting the card (initialisation)

>

 [Setup] 

>

 [Format]

• Use a battery with sufficient battery power or the AC adaptor (optional) when formatting. Do 

not turn the camera off during formatting.

• If the card has been formatted on a PC or other equipment, format it on the camera again.

Approximate number of recordable pictures and available recording 
time

[Picture Size]

16 GB

32 GB

64 GB

128 GB

L (20M)

1450

2910

5810

11510

M (10M)

2650

5310

10510

20810

S (5M)

4600

9220

17640

34940

[Picture Size]

16 GB

32 GB

64 GB

128 GB

L (20M)

450

920

1840

3650

M (10M)

530

1070

2140

4250

S (5M)

580

1170

2340

4630

MENU

Summary of Contents for DMC-FZ2000

Page 1: ...ve this manual for future use Operating Instructions for advanced features Digital Camera Model No DMC FZ2000 DVQP1096ZA F1016YT0 until 2015 9 2 Message Display P325 Troubleshooting P327 Finding the i...

Page 2: ...jump to Contents P4 Search from the list of function names P9 Search from the list of buttons and dials P14 Search from the list of screens and icons P316 Search from Message Display P325 Search from...

Page 3: ...le for a function Black icons Applicable modes Grey icons Unavailable modes indicates that available functions vary depending on the registered Recording Mode Indicates that the menu can be set by pre...

Page 4: ...available recording time 28 Opening the Monitor Adjusting the Monitor 32 Setting Date Time Clock Set 33 Re adjusting the clock 34 Basic Operations 35 Tips for taking good pictures 35 Using the Viewfin...

Page 5: ...image effects Creative Control Mode 79 Registering your preferred settings Custom Mode 85 Registering Personal Menu Settings Registering custom settings 85 Recording using registered custom set 86 4 F...

Page 6: ...tput of the flash to the Exposure Compensation 154 Taking Pictures with Wireless Flashes 155 Using other settings for wireless flash recording 156 7 Recording Motion Pictures Recording Motion Picture...

Page 7: ...enu 237 10 Using the Wi Fi function What you can do with the Wi FiR function 259 Wi Fi function 260 Controlling with a Smartphone Tablet 262 Installing the smartphone tablet app Image App 262 Connecti...

Page 8: ...etup Menu 296 11 Connecting to other equipment Watching 4K motion pictures on a TV Saving 4K motion pictures on your PC or recorder 298 Watching motion pictures in 4K 298 Storing 4K motion pictures 29...

Page 9: ...mum number of pictures that can be taken continuously P115 Self Timer P132 Picture Quality and Colour Tone Sensitivity P105 White Balance P107 Photo Style P191 Filter Settings P193 Picture Size P196 Q...

Page 10: ...ome Live View P226 Video Priority Display P227 Basic settings Format P28 Clock Set P33 Display switching P45 How to set menu items P51 Q MENU P53 Beep P230 Economy P232 Reset initialisation P235 Custo...

Page 11: ...n combination with other devices Playing back pictures on a TV P272 Printing images P278 Sending images to an AV device P279 Sending images to a PC P280 Sending images to a web service P282 Using Clou...

Page 12: ...ns but it may also become irreparable Places with a lot of sand or dust Places where water can come into contact with this unit such as when using it on a rainy day or at the beach If sand dust or liq...

Page 13: ...eir shape will differ depending on the country or area where the camera was purchased For details on the accessories refer to Basic Operating Instructions Battery Pack is indicated as battery pack or...

Page 14: ...F switch P33 11 Mode dial P40 12 Flash P148 13 Stereo microphone P216 Be careful not to cover the microphone with your finger Doing so may make sound difficult to record 14 Hot shoe Hot shoe cover P31...

Page 15: ...MENU SET button P45 51 42 Delete Cancel button P189 Fn6 button P55 43 Speaker P230 44 REMOTE socket P315 45 Card door P25 46 DC coupler cover P315 When using an AC adaptor ensure that the Panasonic DC...

Page 16: ...Close the flash 1 Align the mounting mark under the long side of the lens hood with the mounting projection on the edge of the lens A Mounting projection Lens edge B Mounting mark Lens hood 2 Screw i...

Page 17: ...nd the control of the flash may be disabled because the photo flash may be obscured by the lens hood We recommend detaching the lens hood When temporarily detaching and carrying the lens hood we recom...

Page 18: ...swing around the camera with the lens cap string Make sure to detach the lens cap when turning this unit on Be careful that the lens cap string does not become entangled with the shoulder strap 1 Pass...

Page 19: ...strap eyelet on the camera body A Shoulder strap eyelet 2 Pass the end of the shoulder strap through the ring in the direction of the arrow and then pass it through the stopper 3 Pass the end of the...

Page 20: ...attery packs are not adequately protected with internal protection to meet the requirements of appropriate safety standards There is a possibility that these battery packs may lead to fire or explosio...

Page 21: ...ong time may be longer than normal Battery indication The indication turns red and blinks if the remaining battery power is exhausted The status indicator also blinks Recharge the battery or replace i...

Page 22: ...17M 50i MP4 Recording with picture quality set to FHD 28M 60p FHD 28M 50p MP4 Recording with picture quality set to 4K 100M 30p 4K 100M 25p Approximate operating time and number of recordable picture...

Page 23: ...ime Approx 55 min Recordable time Approx 110 min Actual recordable time Approx 55 min Playback time Approx 300 min The operating times and number of recordable pictures will differ according to the en...

Page 24: ...the lever A in the direction of the arrow to remove the battery 3 1 Close the battery door 2 Slide the release lever in the direction of the arrow Remove the battery after use The battery will be exha...

Page 25: ...ve the card push the card until it clicks then pull the card out upright A Do not touch the connection terminals of the card B Check the orientation of the card 3 1 Close the card door 2 Slide the car...

Page 26: ...ed Class SD Speed Class and UHS Speed Class are the speed standards regarding continuous writing To check the class see the labelled side etc of the card SD Memory Card 512 MB to 2 GB This unit is com...

Page 27: ...ot subject the camera to vibration impact or static electricity The card or the data on the card may be damaged and this unit may no longer operate normally If operation fails due to vibration impact...

Page 28: ...Format Use a battery with sufficient battery power or the AC adaptor optional when formatting Do not turn the camera off during formatting If the card has been formatted on a PC or other equipment for...

Page 29: ...CHD MP4 Rec Quality 16 GB 32 GB 64 GB 128 GB FHD 28M 60p FHD 28M 50p 1h10m 2h30m 5h00m 9h55m FHD 17M 60i FHD 17M 50i 2h00m 4h05m 8h15m 16h25m FHD 24M 30p FHD 24M 25p FHD 24M 24p 1h25m 2h55m 5h50m 11h3...

Page 30: ...p FHD 100M 24p 20m00s 41m00s 1h20m 2h45m FHD 50M 60p FHD 50M 50p FHD 50M 30p FHD 50M 25p FHD 50M 24p 40m00s 1h20m 2h45m 5h35m Rec Quality 16 GB 32 GB 64 GB 128 GB C4K 100M 24p 20m00s 42m00s 1h25m 2h50...

Page 31: ...ontinuous recording time exceeds 30 minutes or the file size exceeds 4 GB but the motion picture file will be divided and recorded played back separately MP4 with a Rec Quality size of 4K MP4 LPCM or...

Page 32: ...its original position Only rotate the monitor after opening it wide enough and be careful not to use excessive force as it may be damaged Free angle shooting The monitor can be rotated to suit your n...

Page 33: ...creen is not displayed proceed to step 4 2 Press MENU SET 3 Press 3 4 to select the language and press MENU SET 4 Press MENU SET 5 Press 2 1 to select the items year month day hour minute and press 3...

Page 34: ...in the Setup menu P51 The clock can be reset as shown in steps 5 and 6 on P33 The clock setting is maintained for 3 months using the built in clock battery even without the battery Leave the charged b...

Page 35: ...ctures There is a risk that your finger will be trapped as the lens retracts Detects orientation of camera Direction Detection Function This function detects the vertical orientation when you record w...

Page 36: ...B Eye sensor You can also use the button as a function button P55 Press LVF If Eye Sensor AF in the Custom menu is set to ON the camera automatically adjusts the focus as the eye sensor is activated...

Page 37: ...ture playback or a slide show the camera does not automatically switch the display to the Viewfinder with the eye sensor The eye sensor does not work depending on the angle of the monitor Setting the...

Page 38: ...in at a speed slower than the normal zoom speed By default Slow Zoom T is assigned to Fn1 and Slow Zoom W is assigned to Fn2 You can change the operation and settings of slow zoom in Slow Zoom Button...

Page 39: ...ion flashes Press the shutter button fully push it in further and take the picture About focus range The focus range is displayed when operating the zoom The focus range is displayed in red when it is...

Page 40: ...tating the mode dial Rotate the mode dial slowly to select the desired mode Motion picture button Recording motion pictures Mode dial Selecting a Recording Mode Intelligent Auto Mode P60 Intelligent A...

Page 41: ...g the items assigned to the front rear dials Dial Operation Switch Dial Operation Switch is assigned to Fn3 at the time of purchase P55 1 Press Fn3 A Function button Fn3 A guide will be displayed show...

Page 42: ...the operations below Press the shutter button halfway Press Fn3 Items that are temporarily assigned to the front rear dials can be used only while the guide step 2 or setting screen step 3 is display...

Page 43: ...tion to the front dial or rear dial so that you can directly adjust it Front Dial Rear Dial OFF You cannot adjust Exposure Compensation in Manual Exposure Mode Dial Operation Switch Setup Sets the ite...

Page 44: ...the amount of light to 1 16 1 64 Reduces the amount of light to 1 64 OFF Does not use the ND filter Not available in these cases In the following cases ND FILTER will be fixed to OFF even if it is set...

Page 45: ...tion was performed for some time press the DISP button or touch the screen to display the information again Switching the display method of the viewfinder monitor Cursor buttons MENU SET button By ass...

Page 46: ...lay With information tilt sensor display With information Without information With information tilt sensor display Without information tilt sensor display Turned off On monitor recording information I...

Page 47: ...Correcting tilt to the left B Vertical direction Correcting downward tilt Even after correcting the tilt there may still be an error of approximately n1 When tilted significantly upwards or downwards...

Page 48: ...ce with two fingers Touch screen Touch operations Touch the screen with the clean and dry finger If you use a commercially available monitor protection sheet please follow the instructions that accomp...

Page 49: ...ter function Touch Taking Pictures Using the Touch Function Taking pictures using the Touch Shutter function 1 Touch 2 Touch Icon will change to and taking a picture with the Touch Shutter function be...

Page 50: ...Brightness for a Specified Area Touch AE 1 Touch 2 Touch The setting screen for the brightness optimisation position is displayed Metering Mode is set to which is used exclusively for the Touch AE 3...

Page 51: ...P220 Operation of the unit such as displaying of the screen and button operations can be set up according to your preferences Setup P229 This menu lets you perform the clock settings select the opera...

Page 52: ...In touch operation Touch the Setting to set There are functions that cannot be set or used depending on the modes or menu settings being used on the camera Switching to other menus 1 Press 2 2 Press...

Page 53: ...2 Rotate the front dial to select the menu item 3 Rotate the rear dial to select the setting 4 Press Q MENU to exit the menu once the setting is complete You can also set items by pressing the cursor...

Page 54: ...tom row and then press MENU SET A Items that can be set B Set items You can also set the menu item by dragging it from the top row to the bottom row If there is no empty space in the bottom row you ca...

Page 55: ...sign and then press MENU SET For details on the functions that can be assigned in Setting in REC mode refer to P56 For details on the functions that can be assigned in Setting in PLAY mode refer to P5...

Page 56: ...AW JPG 1 Shot Spot Metering Cursor Button Lock P57 Dial Operation Switch P41 Fn3 Photo Style P191 Filter Effect P79 193 Aspect Ratio P196 Picture Size P196 Quality P197 AFS AFF P89 Metering Mode P198...

Page 57: ...226 Rec Area P226 Video Priority Display P227 Zoom Lever P227 Zoom Ring P227 Touch Screen P228 Headphone Volume P230 When set to Focus Area Set it is possible to display the position setting screen of...

Page 58: ...set the image as Favorite Functions that can be assigned in Setting in PLAY mode The following functions can be assigned to the button Fn1 Fn2 Fn3 Fn4 Fn5 or Fn7 Function button settings at the time...

Page 59: ...e following operations can be performed by moving the cursor to the item and pressing MENU SET Enter a blank Delete Delete a character Move the entry position cursor to the left Move the entry positio...

Page 60: ...rd without thinking about them 1 Set the mode dial to The camera will switch to either the most recently used of Intelligent Auto Plus Mode or Intelligent Auto Mode At the time of purchase the mode is...

Page 61: ...held Night Shot 2 i Food i Baby 3 i Sunset i Low Light 1 Only displayed when the built in flash is open 2 Only displayed when iHandheld Night Shot is set to ON P63 3 When Face Recog is set to ON will...

Page 62: ...Detection If a tripod is used for instance and the camera has judged that camera shake is minimal when the scene detection has been identified as the shutter speed will be slower than normal Take care...

Page 63: ...gle of view will be slightly narrower Do not move the camera during the continuous shooting after pressing the shutter button Flash is fixed to forced flash off Not available in these cases iHandheld...

Page 64: ...move the camera during the continuous shooting after pressing the shutter button You cannot take the next picture until the combination of pictures is complete A moving subject may be recorded with un...

Page 65: ...en will cancel the setting Auto Focus Mode is set to The position of the AF area can be set by touching the screen Its size cannot be changed Setting brightness 1 Press 2 Rotate the rear dial to adjus...

Page 66: ...an make the background more blurred by decreasing the aperture value or record a moving subject more dynamically by slowing the shutter speed when taking a picture in Programme AE Mode 1 Press the shu...

Page 67: ...play the Exposure Meter Unsuitable areas of the range are displayed in red If the exposure is not adequate the aperture value and the shutter speed turn red and blink when the shutter button is presse...

Page 68: ...value for the brightness of the subject 1 Set the mode dial to 2 Set the shutter speed by rotating the rear dial or the front dial A Shutter speed B Exposure meter Aperture Priority AE Mode Available...

Page 69: ...y so that the exposure will be appropriate for the shutter speed and aperture value Depending on recording conditions an appropriate exposure may not be set or the ISO sensitivity may become higher Ma...

Page 70: ...set to B Refer to P315 for information about the shutter remote control When you take pictures with the shutter speed set to B noise may become visible To avoid picture noise we recommend setting Long...

Page 71: ...ditions 2 Example When you want to take a picture with a blurred background etc 3 Example When you want to take a picture with everything in focus including the background etc Confirm the Effects of A...

Page 72: ...emely dark and it is not possible to achieve adequate exposure by changing the aperture value or shutter speed When recording using the flash In Preview Mode P71 Easily set aperture shutter speed for...

Page 73: ...s 3 Press the shutter button fully and move the camera in a small circle in the direction of the arrow on the screen 4 Press the shutter button once again to end the picture recording Recording can al...

Page 74: ...g direction Picture Size Sets the angle of view image size STANDARD WIDE Image size Recording direction Horizontal Resolution Vertical Resolution STANDARD Horizontal 8176 pixels 1920 pixels Vertical 2...

Page 75: ...he entire panorama picture may not be recorded at the suitable focus or brightness When multiple pictures are combined to create a single panorama picture the subject may appear distorted or the conne...

Page 76: ...uching the Recording Mode icon in recording screen To change the Scene Guide Mode select the tab on the menu screen select Scene Switch and then press MENU SET You can return to step 2 on P76 The foll...

Page 77: ...display Guide display List display Clear Portrait Silky Skin The smoothing effect is applied to the part that has a similar tone to the complexion of a subject as well This mode may not be effective u...

Page 78: ...ly narrower Clear Night Portrait We recommend using a tripod and the self timer When Clear Night Portrait is selected keep the subject still for about 1 second after taking the picture Soft Image of a...

Page 79: ...the example images 3 Press MENU SET It is also possible to display the selection screen by touching the Recording Mode icon in recording screen If you select the tab on the menu screen you can select...

Page 80: ...anations for each picture effect are displayed Types of image effects Normal display Guide display List display Expressive Retro Old Days High Key Low Key Sepia Monochrome Dynamic Monochrome Rough Mon...

Page 81: ...with 3 4 2 1 You can also select the colour you want to leave by touching the screen Pressing DISP will return the frame back to the centre 3 Press MENU SET to set No sound is recorded in motion pictu...

Page 82: ...and colours of the effects can be easily adjusted to fit your preferences 1 Press 1 to display the setting screen 2 Rotate the rear dial to set Press MENU SET to return to the recording screen Point f...

Page 83: ...Colour Orange tinge Blue tinge Toy Pop Area with reduced peripheral brightness Small Large Bleach Bypass Contrast Low contrast High contrast Miniature Effect Freshness Understated colours Pop colours...

Page 84: ...n is displayed P140 Press again to return to the recording screen Change the settings by using the touch screen 1 Touch 2 Touch the item you want to set Adjusts an image effect Defocus level Brightnes...

Page 85: ...ecording Mode you wish to save and select the desired menu settings on the camera Select the menu P51 Registering Personal Menu Settings Registering custom settings Custom Cust Set Mem Custom set wher...

Page 86: ...e and then press MENU SET Saving of the selected custom settings is displayed on the screen Changing the registered content Registered contents do not change when the menu setting is changed temporari...

Page 87: ...st focus in various scenes 1 Set the focus mode lever to AFS AFF or AFC The Focus Mode will be set P89 2 Press 2 3 Press 2 1 to select AF Mode and then press MENU SET The Auto Focus Mode will be set P...

Page 88: ...re area of the screen We recommend that you set Live View Mode to 60fps in dark environments where it is difficult to focus properly If you zoom in out after focusing on a subject the focus may lose i...

Page 89: ...xed while it is pressed halfway AFF Auto Focus Flexible Movement cannot be predicted Children pets etc AFF is an abbreviation of Auto Focus Flexible In this mode focusing is performed automatically wh...

Page 90: ...e Press the shutter button halfway again when it is difficult to focus on the subject While the shutter button is pressed halfway shake may be seen on the screen Focus Mode settings of AFF and AFC wor...

Page 91: ...ng P93 49 Area Up to 49 AF areas can be focused This is effective when a subject is not in the centre of the screen You can select areas to be in focus P97 etc Custom Multi From among 49 AF areas you...

Page 92: ...owing cases Clear Nightscape Cool Night Sky Warm Glowing Nightscape Artistic Nightscape Glittering Illuminations Handheld Night Shot Appetizing Food Cute Dessert Scene Guide Mode Tracking cannot be us...

Page 93: ...shutter button halfway A AF tracking frame AF area will turn green when the camera detects the subject The AF area turns yellow when the shutter button is released Lock is cancelled when MENU SET is...

Page 94: ...Select AF areas The selected AF areas are displayed in yellow Setting the shape of the AF area Custom Multi Horizontal Pattern Horizontal line This shape is convenient for taking panning shots or simi...

Page 95: ...pressed again If you press DISP all the selections will be cancelled 6 Press Fn5 Registering the set AF area to or 1 On the screen in step 3 on P94 press 3 2 Press 3 4 to select a destination to which...

Page 96: ...ed in the touched position when the is selected Setting of the AF area is cleared when MENU SET is pressed or is touched Setting up position of the AF area changing size of the AF area The spot meteri...

Page 97: ...be set at the edge of the screen 1 Press 2 2 Select and press 4 3 Press 3 4 2 1 to set the focus position and then press MENU SET 4 Move to the position to be in focus When the picture is displayed in...

Page 98: ...P91 is set to Face Eye Detection Tracking or 49 Area press MENU SET Setting the AF area position with the Touch Pad Custom Touch Settings Touch Pad AF EXACT Moves the AF area of the Viewfinder by tou...

Page 99: ...he touched position Touching when is selected will cancel the AF AE setting Optimising the focus and brightness for a touched position Custom Touch Settings Touch AF AF AE When the background has beco...

Page 100: ...enlarging the area MF Assist You can also enlarge the area by rotating the focus ring or pinching out P48 the screen or touching the screen twice You can also adjust the focus position by dragging P4...

Page 101: ...after the operation Achieving focus quickly using Auto Focus Touching Auto Focus works at the centre of the frame Auto Focus also works with the following operations Assign AF ON to AF AE LOCK P102 P...

Page 102: ...re and then press shutter button fully A AE Lock indication Setting the functions of AF AE LOCK Custom AF AE Lock AE LOCK Only the exposure is locked When the exposure is set AEL is displayed AF LOCK...

Page 103: ...et B Exposure Compensation C Flash Adjust You can perform the operations below while the exposure compensation screen is displayed You can switch the functions between the rear dial and the front dial...

Page 104: ...Rec menu is set to ON the brightness of the flash will automatically be set to the level appropriate to the selected Exposure Compensation P154 When the exposure value is out of the j3 EV to i3 EV ra...

Page 105: ...1 Press 3 2 Select the ISO sensitivity by rotating the rear dial You can switch the functions between the rear dial and the front dial by pressing DISP A ISO Limit Set B ISO sensitivity 3 Rotate the f...

Page 106: ...1 The shutter speed is not fixed when the shutter button is pressed halfway It is continuously changing to match the movement of the subject until the shutter button is pressed fully L 80 2 L 100 2 f...

Page 107: ...taking pictures outdoors under a cloudy sky When taking pictures outdoors in the shade When taking pictures under incandescent lights When taking pictures with the flash only Set the White Balance val...

Page 108: ...l work within this range 2 Blue sky 3 Cloudy sky Rain 4 Shade 5 Sunlight 6 White fluorescent light 7 Incandescent light bulb 8 Sunrise and sunset 9 Candlelight KlKelvin Colour Temperature You can set...

Page 109: ...e position back to the centre 3 Press MENU SET Finely adjusting the White Balance 2 A AMBER ORANGE 1 B BLUE BLUISH 3 G GREEN GREENISH 4 M MAGENTA REDDISH If you finely adjust the White Balance to A am...

Page 110: ...by touching 2 Press MENU SET White Balance Bracket You can also set the White Balance Bracket in Bracket in the Rec menu P139 Not available in these cases The White Balance Bracket does not work in th...

Page 111: ...ke pictures of a subject as close as 3 cm 0 098 feet from the lens by rotating the zoom lever upmost to Wide 1k Macro Zoom Use this setting to get close to the subject and then further enlarge when ta...

Page 112: ...ra the effective focus range is significantly narrowed Therefore if the distance between the camera and the subject is changed after focusing on the subject it may become difficult to focus on it agai...

Page 113: ...d Burst P114 Recordings are made in succession while the shutter button is pressed 4K PHOTO P117 When the shutter button is pressed a 4K photo is recorded Post Focus P127 When the shutter button is pr...

Page 114: ...cus Release Priority P222 Refer to P197 for information about RAW files Rec Burst Rate H High speed M Middle speed L Low speed Burst speed pictures second AFS 12 7 2 AFF AFC 7 7 2 Live View during Bur...

Page 115: ...you can take 100 or more pictures continuously Focusing in Burst Mode The method for achieving focus varies depending on the focus mode P89 and the Focus Release Priority P222 setting in the Custom m...

Page 116: ...When the burst speed is set to H when the Focus mode is AFF or AFC M or L they are adjusted each time you take a picture It may take time to save pictures taken in Burst Mode on the card If you take p...

Page 117: ...udio is not played back when you perform playback with the camera 3 Press the shutter button halfway to exit the menu Rec 4K PHOTO Rec Method 4K Burst For capturing the best shot of a fast moving subj...

Page 118: ...button immediately after the start of recording up to a period of approximately 1 5 seconds after the moment that the finger has been removed may be recorded 4K Burst S S S S is an abbreviation of Sta...

Page 119: ...omposition P245 4K Pre Burst Press the shutter button fully F Approximately 1 second G Recording is performed Auto Focus adjusts focus continuously and except in Manual Exposure Mode it also adjusts e...

Page 120: ...y every 2 minutes Approximately the last 10 minutes up to approximately 12 minutes will be saved The preceding part will be deleted Select the menu P51 Settings ON OFF Rec 4K PHOTO Loop Recording We r...

Page 121: ...a picture You can also perform the same operation by pressing 2 1 4 Touch to save the picture The picture will be saved in JPEG format The picture will be saved with recording information Exif informa...

Page 122: ...g the next ones or the ones preceding the previous ones s Touching Dragging Selects the frame to be displayed and displays the frames preceding and following the selected frame in slide view Pinching...

Page 123: ...s playback 4 Continuous rewind Pause during continuous rewind 1 Fast forward Frame by frame forward during pause 2 Fast rewind Frame by frame rewind during pause s Touching Dragging Selects the frames...

Page 124: ...using 4K Burst or 4K Pre Burst you can change the electronic shutter sound settings in Shutter Vol and Shutter Tone P230 When recording with 4K Burst S S you can set the start stop tone volume in Bee...

Page 125: ...6000th Exposure Compensation j3 EV to i3 EV ISO sensitivity AUTO 125 to 6400 The following menu items are disabled Picture Size 4K 8M 4 3 3328k2496 3 2 3504k2336 16 9 3840k2160 1 1 2880k2880 Quality A...

Page 126: ...Auto Mode works the same way as when recording motion pictures When the drive mode is set to 4K Photo it is not possible to take pictures while recording motion picture Only when Photo Priority is se...

Page 127: ...ocus Stacking We recommend that you use a tripod when recording images to be used for Focus Stacking Use a UHS Speed Class 3 card P26 1 Set the drive mode dial to 2 Decide on the composition and press...

Page 128: ...K Photo function on P125 In addition to the limitations of the 4K Photo function the following limitations apply to Post Focus recording Focus Mode is fixed to AFS Auto Focus Mode is disabled Motion p...

Page 129: ...the same operation by pressing 2 1 3 Touch to save the picture The picture will be saved in JPEG format Selecting the desired focus area and saving a picture Button operation Touch operation Descripti...

Page 130: ...method Merging multiple pictures to widen the focus range Focus Stacking Auto Merging Automatically selects pictures that are suited to be merged and merges them into a single picture Priority will be...

Page 131: ...unnatural and areas that cannot be selected Button operation Touch operation Description of operation 3 4 2 1 Touching Selects an area Fn5 Set Cancel Specifies cancels an area DISP All Selects all are...

Page 132: ...ter is pressed After 10 seconds the camera takes 3 pictures at about 2 seconds intervals Picture is taken 2 seconds after shutter is pressed When using a tripod etc this setting is a convenient way to...

Page 133: ...to 24 00 Hz CINEMA you can take pictures but you cannot create motion pictures from them To display the setup screen before recording 1 Set the drive mode dial to 2 Display the setup screen The screen...

Page 134: ...rding starts automatically During recording standby the power will turn off automatically if no operation is performed for a certain period The Time Lapse Shot is continued even with the power turned...

Page 135: ...u resume or stop the recording during pause This function is not for use in a security camera Time Lapse Shot is paused in the following cases When the charge on the battery runs out Turning the camer...

Page 136: ...ng screen will be displayed You can also perform the same operation by pressing and holding until the recording screen is displayed Creating Stop Motion Pictures Stop Motion Animation Auto Shooting ON...

Page 137: ...ettings of Stop Motion Animation You can change the settings in Time Lapse Animation in the Rec menu Adding pictures to the Stop Motion Animation group Selecting Add to Picture Group in step 2 will di...

Page 138: ...s per second The larger the number is the smoother the motion picture will be Sequence NORMAL Splices pictures together in recording order REVERSE Splices pictures together in reverse recording order...

Page 139: ...picture When Exposure Bracket is selected the bracket display flashes until all of the pictures you have set are taken If you change the bracket settings or turn off the camera before all of the pictu...

Page 140: ...et When recording motion pictures When recording 4K photos When recording with Post Focus When using Multi Exp When using Time Lapse Shot When using Stop Motion Animation only when Auto Shooting is se...

Page 141: ...until a specified number of pictures are taken Example When the initial position is set to F5 6 1 first picture 2 second picture 3 third picture 5 fifth picture Aperture Bracket Image Count 3 5 Takes...

Page 142: ...ce by which the focus position moves in each step will be shorter if the initial position is closer to a subject and conversely if the initial position is farther from a subject the distance will be l...

Page 143: ...Normal Vertical and horizontal shake are compensated for Panning Camera shake is corrected for up down movements This mode is ideal for panning a method of taking pictures which involves turning the c...

Page 144: ...hen taking pictures while following a moving subject When the shutter speed becomes slower to take pictures indoors or in dark places The panning effect in is more difficult to achieve in the followin...

Page 145: ...ication level differs depending on Picture Size setting Zoom types and use Optical Zoom Not available in these cases This function is not available in the following cases When recording with Zoom Macr...

Page 146: ...l Mode When HDR is set to ON Multi Exp When iHandheld Night Shot is set to ON When iHDR is set to ON When Quality is set to or When recording with Zoom Macro Digital Zoom Rec Motion Picture Digital Zo...

Page 147: ...ragging the slide bar The zoom speed varies depending on the touched position Touch again to end touch zoom operations Zooming using touch operations Touch zoom Zooms slowly Zooms quickly Not availabl...

Page 148: ...ing the flash as the flash will jump out Be careful not to catch a finger when closing the flash bulb In the following cases the flash is fixed to forced flash off When recording motion pictures When...

Page 149: ...et Do not bring the flash too close to objects or close the flash while it is activated The objects may be discoloured by its heat or lighting Do not close the flash soon after the flash is activated...

Page 150: ...to 1 128 in steps of 1 3 Changing the firing mode Rec Flash Firing Mode TTL The camera automatically sets the flash output MANUAL Set the luminosity ratio of the flash manually In TTL you can shoot th...

Page 151: ...be evident Changing Flash Mode Rec Flash Flash Mode Forced Flash On Forced On Red Eye The flash is activated every time regardless of the recording conditions Use this when your subject is back lit o...

Page 152: ...Softness Clear in Backlight Relaxing Tone Sweet Child s Face Distinct Scenery Bright Blue Sky Romantic Sunset Glow Vivid Sunset Glow Glistening Water Clear Nightscape Cool Night Sky Warm Glowing Nigh...

Page 153: ...Flash setting Shutter speed Sec Flash setting Shutter speed Sec 1 60 1 to 1 4000th 1 to 1 16000th 60 2 to 1 16000th Setting to the 2nd Curtain Synchro Rec Flash Flash Synchro 1ST 1st curtain synchro T...

Page 154: ...the menu P51 Settings ON OFF Adjust the flash output Rec Flash Flash Adjust i or j is displayed on the flash icon in the screen when the flash level is adjusted It can be set only when Wireless in Fla...

Page 155: ...ng toward the camera The following figure shows the estimated controllable range when you take pictures by holding the camera horizontally Controllable range differs depending on the surrounding envir...

Page 156: ...Mode is set to TTL Manual Flash Adjust Set the luminosity ratio of the external flash when Firing Mode is set to MANUAL You can set from 1 1 full brightness to 1 128 in steps of 1 3 A Group B Group C...

Page 157: ...cator red C will flash while recording motion pictures Release the motion picture button right after you press it h hour m minute s second 2 Stop the recording by pressing the motion picture button ag...

Page 158: ...ng When Rec Area is set to angle of view during motion picture recording is displayed The Sensitivity will be set to AUTO for motion pictures when recording motion pictures except for Creative Video M...

Page 159: ...high definition TV etc MP4 This data format is suitable for when playing back on a PC etc MP4 LPCM The MP4 data format for image editing MOV Data format for image editing Item System frequency Size Re...

Page 160: ...Hz CINEMA 4K 100M 30p 3840k2160 29 97p 29 97 100 Mbps 4K 100M 25p 3840k2160 25 00p 25 00 100 Mbps 4K 100M 24p 3840k2160 23 98p 23 98 100 Mbps FHD 28M 60p 1920k1080 59 94p 59 94 28 Mbps FHD 28M 50p 192...

Page 161: ...p 24 00 100 Mbps 3840k2160 23 98p 23 98 100 Mbps FHD ALL I 2 200M 60p 1920k1080 59 94p 59 94 200 Mbps FHD 100M 60p 1920k1080 59 94p 59 94 100 Mbps FHD 50M 60p 1920k1080 59 94p 59 94 50 Mbps FHD ALL I...

Page 162: ...4K or C4K in Rec Quality refer to Watching 4K motion pictures on a TV Saving 4K motion pictures on your PC or recorder on P298 The higher the Bit rate value is the higher the picture quality becomes...

Page 163: ...conditions operational sound may be recorded when the Auto Focus is operated while recording a motion picture It is recommended to record with Continuous AF in the Motion Picture menu set to OFF if th...

Page 164: ...still pictures will be recorded in Quality of A Up to 40 still pictures can be recorded during recording of the motion picture A motion picture with a Rec Quality size of 4K up to 10 pictures Photo P...

Page 165: ...ne motion pictures recorded with the camera Music can be added and various editing operations can be performed when you combine them In addition you can send the combined motion picture to a web servi...

Page 166: ...fades out from colour to black and white Audio will be recorded normally OFF Motion pictures recorded with WHITE IN or BLACK IN are displayed as all white or all black thumbnails in Playback Mode If y...

Page 167: ...effect can be achieved by creating a striking contrast of focus between the start and end positions for example by shifting focus from the background to foreground or vice versa After setting focus tr...

Page 168: ...mages are played back with a quick motion effect of k2 4K Live Cropping P171 It is possible to record a motion picture that pans and zooms in out while leaving the camera in a fixed position by croppi...

Page 169: ...hutter button to start recording 5 Press and hold Fn1 to record the scene that you want to record in quick motion or press and hold Fn2 to record the scene that you want to record in slow motion Chang...

Page 170: ...rding 6 Press Fn1 or Fn2 7 Adjust the position of the camera so that the subject stays the same size Move the recording position forward or backward to adjust it Zoom in out while adjusting the camera...

Page 171: ...set immediately before will be displayed The camera will remember the frame position and size even when the camera is turned off Recording Motion Pictures that Pan and Zoom While Maintaining a Fixed...

Page 172: ...button or the shutter button again Changing the position and size of a crop frame Press Fn6 while the recording screen is displayed and perform steps 3 and 4 To cancel 4K Live Cropping recording Set O...

Page 173: ...100M 24p to 48fps and record a motion picture a slow motion effect of 1 2 can be gained Quick motion pictures Set a frame rate that provides less frames than the recording frame rate in Rec Quality do...

Page 174: ...recording with a Variable Frame Rate are indicated as VFR available on the screen 3 Select the menu P51 4 Press 2 1 to select the frame rate you will record the item with You can select a value betwe...

Page 175: ...rt the motion pictures to it you need a compatible Blu ray disc recorder or a PC installed with PHOTOfunSTUDIO When Variable Frame Rate is set audio related items in the Motion Picture menu are disabl...

Page 176: ...ording motion pictures 1 Start recording 2 Touch 3 Touch icon 4 Drag the slide bar to set The speed of the operation varies depending on the position you touch 5 Stop recording Minimising operational...

Page 177: ...alance of the entire image 1 Select the menu P51 2 Rotate the rear dial or front dial to adjust the setting When not adjusting the setting select 0 3 Press MENU SET Exit the menu after it is set Adjus...

Page 178: ...speed Adjust the shutter speed while looking at the screen so that flickering and horizontal stripes will be minimised If you press and hold 2 1 the shutter speed will be adjusted faster You can also...

Page 179: ...conds and the gain in ISO ANGLE ISO Displays the shutter speed in degrees and the gain in ISO The shutter speed below will be selectable When Synchro Scan is set to OFF 11 d to 360 d SEC dB Displays t...

Page 180: ...is ideal for saving the image on the external device Info Display Shows or hides the displays of information ON Outputs the displays on the camera as they are OFF Outputs only the image If you output...

Page 181: ...era is connected to an external monitor or a TV that supports 4K motion picture if you use one of the following settings the angle of view becomes even narrower than normal A size setting of 4K or C4K...

Page 182: ...you press 4 when displaying images one by one you can easily send an image to a web service P284 The playback screen appears if the camera is turned on while pressing When the camera is switched to th...

Page 183: ...s recorded with Snap Movie are played back automatically Operations during Motion Picture Playback 1 The fast forward rewind speed increases if you press 1 2 again 2 When a motion picture recorded wit...

Page 184: ...rom a Motion Picture Still pictures will be saved with Aspect Ratio set to 16 9 and Quality set to The number of pixels will differ according to the motion picture you play back When the motion pictur...

Page 185: ...ication is reset to 1k You can forward or rewind the image while maintaining the same zoom magnification and zoom position for the Playback Zoom by rotating the rear dial during Playback Zoom Displayi...

Page 186: ...nd then press MENU SET The recording date of the picture selected in the playback screen becomes the date selected when the Calendar screen is first displayed You can display the Calendar between Janu...

Page 187: ...e if you delete a picture group all pictures in the group are deleted A picture group saved at once with 4K PHOTO Bulk Saving P244 A picture group consisting of pictures taken with Focus Bracket P142...

Page 188: ...continuously from the picture being played back Operations during Group Pictures playback 1 Press 4 The same operation can be performed by touching or 2 Press 2 1 to flip through images Pressing 4 ag...

Page 189: ...ess MENU SET to set Repeat this step appears on the selected pictures If MENU SET is pressed again the setting is cancelled 4 When Delete Multi is selected Press 2 to select OK and then press MENU SET...

Page 190: ...lter Settings P193 Aspect Ratio P196 Picture Size P196 Quality P197 AFS AFF P89 Metering Mode P198 Burst Rate P114 4K PHOTO P117 Bracket P139 Self Timer P132 Time Lapse Animation P134 136 Highlight Sh...

Page 191: ...me Monochrome effect with no colour shades Scenery 1 An effect appropriate for sceneries with vivid blue skies and greens Portrait 1 An effect appropriate for portraits with a healthy and beautiful sk...

Page 192: ...ct is enhanced Picture resolution may deteriorate slightly s The noise reduction effect is reduced You can obtain pictures with higher resolution Saturation 1 r The colours in the picture become vivid...

Page 193: ...e for Creative Control Mode to images in other modes such as Aperture Priority AE Mode or Panorama Shot Mode P79 Settings ON OFF SET Change the settings by using the touch screen 1 Touch 2 Touch the i...

Page 194: ...sing Panorama Shot Mode Toy Effect Toy Pop Miniature Effect Sunshine are not available The image effects of Rough Monochrome Silky Monochrome Soft Focus Star Filter are not visible on the screen Using...

Page 195: ...ith an image effect will be taken first followed by a picture without it Only an image with an image effect is displayed for Auto Review Not available in these cases In the following case Simultaneous...

Page 196: ...camera 16 9 Aspect Ratio of a high definition TV etc 1 1 Square aspect ratio Picture Size Rec Picture Size When the aspect ratio is 4 3 When the aspect ratio is 3 2 Settings Image size Settings Image...

Page 197: ...ck and editing of RAW images require the camera or the dedicated software You can process RAW images in RAW Processing in the Playback menu P242 Use software SILKYPIX Developer Studio P305 by Ichikawa...

Page 198: ...e allocation of brightness on the whole screen automatically Usually we recommend using this method Centre weighted This is the method used to focus on the subject on the centre of the screen and meas...

Page 199: ...here the custom setting will be registered to Custom1 Custom2 Custom3 Adjustments can also be made by dragging the graph 2 Press MENU SET Highlight Shadow Rec Highlight Shadow Standard A state with no...

Page 200: ...hnology Settings HIGH STANDARD LOW EXTENDED OFF i Dynamic Rec i Dynamic Not available in these cases Compensation effect may not be achieved depending on the recording conditions This function is not...

Page 201: ...cause the images to misalign Recommended for use during hand held shooting OFF Image misalignment not adjusted Recommended when a tripod is used Do not move the unit during the continuous shooting af...

Page 202: ...MENU SET for one of the following operations 3 Shooting the second third and fourth exposures If Fn6 is pressed while taking pictures the photographed images are recorded and the multiple exposure pic...

Page 203: ...e card will be displayed Select a RAW image and press MENU SET to proceed to recording The recording information displayed for pictures taken with multiple exposures is the recording information for t...

Page 204: ...a picture Mechanical shutter Electronic shutter Description The camera starts an exposure electronically and ends it with the mechanical shutter The camera starts and ends an exposure electronically...

Page 205: ...to AUTO or Settings 200 400 800 1600 3200 6400 12800 OFF Applicable modes You can adjust the ISO sensitivity settings for every 1 3 EV Settings 1 3 EV 1 EV Red Eye Removal Rec Red Eye Removal is displ...

Page 206: ...Extended ISO Rec Extended ISO Not available in these cases This function is not available in the following cases When recording 4K photos When recording with Post Focus Long Shtr NR Rec Long Shtr NR...

Page 207: ...on the recording conditions Noise may stand out with higher ISO sensitivity Color Space Rec Color Space sRGB Colour space is set to sRGB colour space This is widely used in computer related equipment...

Page 208: ...es of up to 3 people are displayed Precedence for the names displayed when taking pictures is determined according to the order of registration Face Recog Rec Face Recog Face Recog only works when the...

Page 209: ...images Face front with eyes open and mouth closed making sure the outline of the face the eyes or the eyebrows are not covered with hair when registering Make sure there is no extreme shading on the...

Page 210: ...o P59 Age It is possible to register the birthday Add Images Add Images To add additional face images 1 Select the unregistered face recognition frame and then press MENU SET 2 Perform step 3 in Face...

Page 211: ...and then press MENU SET 4 Press 3 4 to select SET and then press MENU SET 5 Press 4 to select Exit and then press MENU SET to finish To cancel Age and Name Select the OFF setting in step 1 Profile Se...

Page 212: ...evel P213 Synchro Scan P178 i Zoom P146 Digital Zoom P146 Stabilizer P143 Time Code P213 HDMI Rec Output P180 Flkr Decrease P215 Sound Output P215 Silent Operation P176 Mic Level Disp P216 Mic Level A...

Page 213: ...or motion pictures Still pictures including those you take during motion picture recording will be taken with 0s255 When Rec Format is set to AVCHD or MP4 0 255 in Luminance Level will switch to 16 25...

Page 214: ...the time code without drop frame Used in image production etc Seconds and frames are separated by Example 00 00 00 00 The setting is fixed to NDF in the following cases When System Frequency is set t...

Page 215: ...ngth of 3 m 9 8 feet or more When headphones are connected electronic sounds and electronic shutter sounds are muted Switch the sound output method The sound level you set in Mic Level Adj is displaye...

Page 216: ...ound input level to 19 different levels j12 dB to i6 dB Displayed dB values are approximate Applicable modes The camera adjusts the sound input level automatically minimising the sound distortion crac...

Page 217: ...works only with the built in microphone When an external microphone is connected Wind Cut is displayed Applicable modes Coupled to the zoom operation it will clearly record far sounds with tele and su...

Page 218: ...Check the final picture quality on another device such as an external monitor Colour bars will be displayed and a test tone will be output You can set the test tone level from among three options s12...

Page 219: ...otion picture If you assign Color Bars to Fn Button Set P55 in the Custom menu each time you press the function button to which the setting is assigned you can display or hide colour bars In this oper...

Page 220: ...r Wi Fi connection lamp Sounds that are produced by the camera regardless of your operations such as the lens aperture sound cannot be muted Be sure to pay special attention to the privacy the likenes...

Page 221: ...to s Pinpoint AF Display Sets whether to display the assist screen that appears when Auto Focus Mode is set to in a window or full screen s AF Assist Lamp AF assist lamp will illuminate the subject w...

Page 222: ...e to the subject changes drastically r side The camera re adjusts the focus immediately You can bring different subjects into focus one after another s side The camera waits for a short period of time...

Page 223: ...hen Detect Level in SET is set to HIGH portions to be highlighted are reduced allowing you to achieve a more precise focus Changing the Detect Level setting also changes the Display Color setting as f...

Page 224: ...ollowing conditions the histogram is displayed in orange During Exposure Compensation When the flash is activated When the correct exposure is not achieved such as when the lighting is low The histogr...

Page 225: ...o be processed as a zebra pattern You can select a brightness value between 50 and 105 In Zebra 2 you can select OFF If you select 100 or 105 only the areas that are already white saturated are displa...

Page 226: ...xposure meter when performing Programme Shift setting aperture and setting shutter speed Unsuitable areas of the range are displayed in red When the Exposure meter is not displayed switch the display...

Page 227: ...ns or delete pictures When Duration Time is set to HOLD Playback Operation Priority is fixed to ON When recording with the 4K Photo function or Post Focus settings available for Duration Time in Auto...

Page 228: ...itivity and the method for switching between the monitor and viewfinder P37 Touch Settings Enables disables the Touch operation Touch Screen All touch operations Touch Tab Operations of tabs such as o...

Page 229: ...ch Mean Time Press 3 if you are using Daylight Savings The time will move forward by 1 hour Press 3 once more to return to the normal time If you cannot find the travel destination in the areas displa...

Page 230: ...recording AVCHD motion pictures Location cannot be recorded in the following cases When recording motion pictures When recording 4K photos When recording with Post Focus s Wi Fi Wi Fi Function P259 Wi...

Page 231: ...uminance AUTO The brightness is adjusted automatically depending on how bright it is around the camera MODE1 Make the monitor brighter MODE2 Set the monitor to the standard brightness MODE3 Make the m...

Page 232: ...wing cases When connecting to a PC or a printer When recording or playing back motion pictures During a slide show When recording with 4K Pre Burst of the 4K Photo function When using Multi Exp When u...

Page 233: ...vailable scan lines is used for output 1080i The interlace method with 1080 available scan lines is used for output 720p The progressive method with 720 available scan lines is used for output 576p Th...

Page 234: ...menu icons to set the desired language s Version Disp It is possible to check which version of firmware is on the camera Press MENU SET on the version display screen to display information about the s...

Page 235: ...avel Date departure date return date location The settings of Rotate Disp Picture Sort and Delete Confirmation in the Playback menu The folder number and the clock setting are not changed s Reset Wi F...

Page 236: ...t you use the default setting If you changed the setting but are not sure about the system frequency for the broadcasting system of your region perform Reset in the Setup menu P235 Once you change the...

Page 237: ...ext Stamp P249 Video Divide P250 Time Lapse Video P251 Stop Motion Video P251 Resize P252 Cropping P253 Rotate P254 Rotate Disp P254 Favorite P255 Print Set P255 Protect P257 Face Rec Edit P257 Pictur...

Page 238: ...ng is cancelled when MENU SET is pressed again Multi setting When a screen similar to the one on the right is displayed 1 Press 3 4 2 1 to select the picture and then press MENU SET repeat The setting...

Page 239: ...ect the group to play back by pressing 3 4 and then press MENU SET If you select Video Only 4K burst files and images recorded with Post Focus will also be played back Only an in focus representative...

Page 240: ...y Picture Only or Video Only can be selected Playback Playback Mode Select the group to play back by pressing 3 4 and then press MENU SET If you select Video Only 4K burst files and images recorded wi...

Page 241: ...ET Images with location information are indicated with To pause the recording of location information Press MENU SET while recording of the location information onto images is taking place During a su...

Page 242: ...ynamic setting HIGH STANDARD LOW OFF Contrast Allows you to adjust the contrast Highlight Allows you to adjust the brightness of bright portions Shadow Allows you to adjust the brightness of dark port...

Page 243: ...erations to make adjustments A Current setting If you touch the picture at the centre it will be enlarged If you touch the picture will be reduced to the original size Button operation Touch operation...

Page 244: ...s to be saved at once Select the frame in the same way as you select pictures from a 4K burst file Refer to P187 for details Pictures will be saved as a groups of Burst Mode pictures in JPEG format P1...

Page 245: ...Select the frames For information on button and touch operation refer to P123 Images displayed cannot be enlarged or shrunk or shown as in slide view in touch operation becomes 2 Press MENU SET The s...

Page 246: ...of the first frame such as shutter speed aperture and ISO sensitivity are also registered Range Merging setting Select the first and last frames to superimpose the brighter parts of the frames between...

Page 247: ...the operation of dragging your finger over the part you want to delete The part you want to delete can be dragged even while the picture is enlarged Pictures may appear unnatural because the backgroun...

Page 248: ...already registered 2 Enter the text P59 Title Edit To delete the title erase all the text in the text input screen You can print out texts comments using the software PHOTOfunSTUDIO P304 You can set u...

Page 249: ...dit will be stamped When you print pictures stamped with text the date will be printed over the stamped text if you specify printing of the date at the photo shop or on the printer You can set up to 1...

Page 250: ...the motion picture to divide and then press MENU SET Video Divide 2 Press 3 at the location to divide You can finely adjust the location for division by pressing 2 1 while the motion picture is paused...

Page 251: ...from group pictures taken with Stop Motion Animation Created motion pictures are saved in MP4 recording format Playback Stop Motion Video 1 Select the Stop Motion Animation group with 2 1 and then pr...

Page 252: ...he setting is cancelled when MENU SET is pressed again 3 Press 2 to select OK and then press MENU SET to execute You can set up to 100 pictures at one time in Multi The picture quality of the resized...

Page 253: ...en you want to crop the pictures in a picture group You cannot edit all pictures in a group at once When you crop pictures in a group the cropped ones are saved separately from the original ones in th...

Page 254: ...ay pictures vertically if they were recorded holding the camera vertically Playback Rotate Disp ON Rotate The picture is rotated manually Rotate Disp The picture is automatically rotated and displayed...

Page 255: ...ing store For details ask at your photo printing store When you set Print Set for a group pictures the print setting for the number of prints will be applied to every picture in the group Playback Pri...

Page 256: ...t your photo printing store or refer to the operating instructions for the printer The date print feature is disabled for pictures that are stamped with text The number of prints can be set from 0 to...

Page 257: ...erson and then press MENU SET 4 When REPLACE is selected Press 3 4 2 1 to select the person to replace and then press MENU SET Protect Even if you do not protect pictures on a card they cannot be dele...

Page 258: ...lder name file name This display format allows you to locate images in the card easily DATE TIME Displays images by recording date If the card contains pictures taken with more than one camera this di...

Page 259: ...stored in the camera P269 Combining motion pictures recorded with Snap Movie according to your preference on a smartphone P271 Easy connection You can easily set up a direct connection to your smartp...

Page 260: ...ng Mode while it is assigned to Fn4 when the camera is in Playback Mode For information about the function button refer to P55 Steps for pressing Wi Fi in Recording Mode 1 Touch 2 Touch When the camer...

Page 261: ...ddress Displays the MAC address and IP address of this unit Button operation Select Select a destination from History with the cursor button and then press MENU SET Touch operation Touch Select a dest...

Page 262: ...hone to a mobile phone network such as the 3G or LTE network or to a Wi Fi router and then display Help in the Image App Some of the screens and information provided in these operating instructions ma...

Page 263: ...splayed on the camera select Yes to connect For first time connection only Connecting to a smartphone tablet Connecting without using the password On the camera Setup Wi Fi Wi Fi Function New Connecti...

Page 264: ...ke time to display QR code For iOS devices A confirmation screen will be displayed Select OK to proceed 3 Use the Image App to scan the QR code displayed on the screen of the camera If you press MENU...

Page 265: ...3 Enter the password displayed on the camera into the smartphone For first time connection only If you are using an Android device marking the box for password display will allow the device to displa...

Page 266: ...ion methods described on P293 to connect the camera to the smartphone 2 Start Image App P262 1 Set the camera to Recording Mode 2 Select the camera s menu items to terminate the Wi Fi connection You c...

Page 267: ...jump the camera s shutter can be released automatically as the smartphone detects the peak of the jump This function is convenient for taking a picture while jumping Operate the smartphone Select the...

Page 268: ...tphone You cannot save pictures in RAW format motion pictures in AVCHD MP4 only those recorded with their size set to 4K in Rec Quality MP4 LPCM or MOV format 4K burst files and images recorded with t...

Page 269: ...nce you start recording location information with your smartphone do not change the camera s Home setting in World Time Location information cannot be written on images that were recorded when the clo...

Page 270: ...s to operate the smartphone Images with location information are indicated with Cautions for Use Be sure to pay special attention to the privacy the likeness rights etc of the subject when you use thi...

Page 271: ...ith Snap Movie according to your preference on a smartphone tablet 1 Select 2 Select Snap Movie Snap Movie motion pictures with recent recording dates will be selected and automatically sent to the sm...

Page 272: ...ead the operating instructions for your TV Setup Wi Fi Wi Fi Function New Connection Playback on TV If you display pictures using the Wi Fi function they cannot be output in 4K resolution To output th...

Page 273: ...n be sent to PC if the file size is 4 GB or smaller It cannot be sent if the size is greater than 4 GB 3 Excluding motion pictures recorded with their size set to 4K in Rec Quality Some images may not...

Page 274: ...Since the camera gives priority to recording sending may take longer during the recording If you turn off this unit or the Wi Fi connection before sending is complete unsent pictures will not be rese...

Page 275: ...o be sent Changing the settings for sending images Size Resize the image to send Original Auto 1 Change If you select Auto the image size is determined by the circumstances at the destination You can...

Page 276: ...nction 2 Select the wireless access point you want to connect to and set 3 Start Image App P262 When connecting with WPS Connection in Direct 1 Start Image App P262 WPS is a function that allows you t...

Page 277: ...want to connect 4 Check the send settings and select Set To change the send setting press DISP P275 5 When Send Images While Recording has been selected Take pictures P274 When Send Images Stored in...

Page 278: ...the connection by pressing Wi Fi P261 You can send images to a compatible printer and print them wirelessly Preparations To print out recorded pictures wirelessly you must use a printer that supports...

Page 279: ...ss access point B Home AV device Preparations When sending a picture to AV devices set your device to DLNA waiting mode Read the operating instructions of your device for details Setup Wi Fi Wi Fi Fun...

Page 280: ...to the operating instructions of PHOTOfunSTUDIO PDF When not using PHOTOfunSTUDIO For Windows Supported OS Windows 7 Windows 8 Windows 8 1 Windows 10 Example Windows 7 1 Select a folder you intend to...

Page 281: ...images to the PC Setup Wi Fi Wi Fi Function New Connection Send Images While Recording or Send Images Stored in the Camera PC 6 When Send Images While Recording has been selected Take pictures P274 Wh...

Page 282: ...aken and the location where the image was taken Check this information before uploading images to web services A Wireless access point B Web service C Cloud Sync Service Preparations To send images to...

Page 283: ...r your LUMIX CLUB login ID and password and log in to the service P286 3 Register your email address 4 Select the web service to be used and register it Follow the instructions on the screen to regist...

Page 284: ...e send setting press DISP P275 Step 4 5 are not necessary when you continue to send another image The image will be sent to the same web service with the same send settings To terminate the connection...

Page 285: ...synchronised with the device in use such as the PC or smartphone A Cloud Folder stores transferred images for 30 days up to 1000 pictures Transferred images are deleted automatically 30 days after th...

Page 286: ...be saved on this unit and used when connecting the next time To change the wireless access point you want to connect to press DISP and change the connection destination Proceed to the next page by sel...

Page 287: ...ra access the LUMIX CLUB website from your smartphone or PC and change the LUMIX CLUB password in advance The login ID and password registered to the LUMIX CLUB cannot be changed on this unit 1 Select...

Page 288: ...he Image App menu set the common login ID The login IDs for this unit and the smartphone become the same After connecting this unit to the smartphone the setup screen for a common login ID may appear...

Page 289: ...3 Select Yes on the confirmation screen for deleting the LUMIX CLUB account If you want to continue using the service selecting No will only delete the login ID Exit the menu after it is executed 4 Se...

Page 290: ...the same settings as used previously refer to P294 When a screen similar to the one below is displayed select a connection method Example of operation for displaying a screen Setup Wi Fi Wi Fi Functi...

Page 291: ...Protected SetupTM with a WPS mark Press the wireless access point WPS button until it switches to WPS mode Refer to the wireless access point instruction manual for details e g WPS PIN code Save PIN...

Page 292: ...with Manual Input 1 On the screen displayed in step 1 of If you are not sure about the WPS compatibility connecting by From List select Manual Input 2 Enter the SSID of the wireless access point you...

Page 293: ...on the wireless access point may not be available for use Connecting the camera and another device directly direct connection WPS Connection WPS Push Button 1 On the camera select WPS Push Button 2 Se...

Page 294: ...camera using Direct Change the Wi Fi settings of the device you want to connect to so that the access point to be used is set to the camera You can also select New Connection and reconnect the devices...

Page 295: ...n be saved in the history is limited We recommend that you save frequently used Wi Fi connection settings by registering them as favourites P294 Checking the connection detail of a record or favourite...

Page 296: ...irect connection to a smartphone ON Connects the camera and a smartphone using an SSID and password P264 OFF Connects the camera and a smartphone using an SSID P263 LUMIX CLUB Acquires or changes the...

Page 297: ...o a network such as the Internet Usually the addresses for homes are automatically assigned by the DHCP function such as a wireless access point Example 192 168 0 87 Wi Fi Function Lock To prevent inc...

Page 298: ...gs other than AUTO it cannot output at 24 frames second Connect the camera and a 4K compatible TV with an HDMI micro cable and display the playback screen P300 When VIERA Link is set to ON and the cam...

Page 299: ...ring on a PC Refer to P303 for details Storing on a Hard Disk or DVD You can dub 4Kmotion pictures to a hard disk using a Panasonic recorder that supports the transfer of 4K motion pictures Please not...

Page 300: ...may cause malfunction 2 Turn on the TV and select the input to match the connector in use 3 Turn the camera on and then press A HDMI socket on the TV B HDMI micro cable C HDMI socket on the camera Use...

Page 301: ...celled if a USB connection cable supplied is connected simultaneously No sound is output from the camera speakers Read the operating instructions for the TV The recorded pictures can be played back on...

Page 302: ...device using an HDMI micro cable for automatic linked operations Not all operations are possible VIERA Link is a unique Panasonic function built on an HDMI control function using the standard HDMI CE...

Page 303: ...e unit can be connected to any PC capable of recognising a mass storage device Windows support Windows 7 Windows 8 Windows 8 1 Windows 10 Mac support OS X v10 5 to v10 11 AVCHD motion pictures may not...

Page 304: ...port global cs soft download d_pfs99xe html This Site is English only Download expiration November 2021 Operating environment Refer to the operating instructions of PHOTOfunSTUDIO PDF file for further...

Page 305: ...t motion pictures with ease Check the site below to download and install the software http loilo tv product 20 Only the trial version will be installed For more information on how to use LoiLoScope re...

Page 306: ...elect PC and then press MENU SET If USB Mode P232 is set to PC in the Setup menu in advance the camera will be automatically connected to the PC without displaying the USB Mode selection screen 3 Copy...

Page 307: ...4 in the Setup menu has been executed When a card containing a folder with the same folder number has been inserted such as when pictures were taken using another maker of camera When there is a pictu...

Page 308: ...orded with this unit into a Panasonic recorder you can dub the content to a Blu ray Disc or DVD etc Methods to export still pictures and motion pictures to other devices will vary depending on the fil...

Page 309: ...ions Turn on the camera and the printer Perform the print quality and other settings at the printer before printing the pictures 1 Connect the printer and camera with the USB connection cable supplied...

Page 310: ...cable while Cable disconnect prohibit icon is displayed May not be displayed depending on the type of printer used Before inserting or removing a card turn the camera off and disconnect the USB conne...

Page 311: ...ay take precedence so check if this is the case Print with Date Sets date printing Num of prints Sets the number of pictures to be printed up to 999 pictures Paper Size Sets the paper size Page Layout...

Page 312: ...essing it in the direction indicated by arrow 1 Keep the Hot Shoe Cover out of reach of children to prevent swallowing When using other commercially available external flashes without communication fu...

Page 313: ...shotgun microphone is connected When an external flash is attached the following functions are available in addition to the functions available with the built in flash Aperture Bracket Focus Bracket...

Page 314: ...hin the range even narrower than that of SHOTGUN MANUAL Allows recording within the range you set manually Motion Picture Noise Reduction for Ext Mic Motion Picture Wind Cut While the external microph...

Page 315: ...ible particles in the air making it possible to take a picture with enhanced contrast Shutter Remote Control optional Always use a genuine Panasonic shutter remote control DMW RSL1 optional Record wit...

Page 316: ...155 Recording format Recording quality P159 Snap Movie P165 Recording format Recording quality 1 P159 Variable Frame Rate 1 P173 Picture size Aspect Ratio P196 Image size Panorama Shot Mode P74 Image...

Page 317: ...AFS BKT AFL LOW STAR 4 AF area P87 96 Spot metering target P198 Centre marker display P224 Self timer P132 Zoom Microphone P217 Mic level display P216 External Microphone P313 ND filter P44 Silent Mo...

Page 318: ...tching from Playback Mode to Recording Mode Touch tab P228 Touch zoom P147 Touch Shutter P49 Touch AE P50 Peaking P223 Function button P56 P176 Colour P65 Defocus control function P65 84 Brightness P6...

Page 319: ...8 98 AWB 1 60 0 0 0 Fn ISO AUTO Wi Fi L 3 2 AFS AFS C1 1 EXPS EXPS ISO AUTO 0 0 WL 3 Single P113 Burst P114 4K Photo P117 Self timer P132 Focus Mode P89 100 AF Mode P91 A Quality P197 Picture size As...

Page 320: ...ture recording display recording in progress No card Available recording time P29 98 Number of recordable pictures P29 Time Code P213 Recording format Recording quality P159 Mic level display P216 Mic...

Page 321: ...on P249 Elapsed playback time 1 P183 60 60 60 F2 8 F2 8 F2 8 0 0 AWB AWB AWB 1 98 1 98 1 98 200 00 200 200 L 3 2 1 1 PRQWK GD V PRQWK GD V PRQWK GD V PRQWK GD V 67 67 67 67 SLF SLF SLF SLF 8m30s 2 Slo...

Page 322: ...9 Upload Wi Fi P284 Burst Picture Group Display P188 Focus Bracket Group Display P188 Time Lapse Shot Picture Group Display P188 Display for the Stop Motion Animation Group P188 Sub Menu P284 ND filte...

Page 323: ...2 Recorded date and time World Time P229 3 Picture size Aspect Ratio P196 Recording format Recording quality P159 A Quality P197 Colour space P207 4K Photo 4K burst file P117 Post Focus P127 Focus St...

Page 324: ...eo Priority Display P227 in the Custom menu is set to ON 3 It is displayed in order of Title Location Name Baby1 Baby2 Pet Name Face Recog In playback 1 98 F2 8 60 ISO200 0 100 0001 1 Histogram P47 2...

Page 325: ...ll be deleted Memory Card Error This memory card cannot be used Use a card compatible with this unit P26 Insert SD card again Try another card An error has occurred accessing the card Insert the card...

Page 326: ...battery terminal is dirty clean it and remove any objects Failed to connect wireless access point Connection failed No destination found The wireless access point information set on this unit is wrong...

Page 327: ...quently by using the Economy etc P232 Is Focus Release Priority in the Custom menu set to FOCUS P222 You cannot take a picture until the subject is brought into focus If the problem is not resolved it...

Page 328: ...d and the self timer P132 when taking pictures with a slow shutter speed Try the following Decrease the ISO sensitivity P105 Increase the setting for Noise Reduction in Photo Style or lower the settin...

Page 329: ...0 You can set the shutter speed manually in the Creative Video Mode P168 When recording under fluorescent or LED lighting fixture etc increasing the shutter speed may introduce slight changes to brigh...

Page 330: ...ording in a quiet environment the sound of aperture focus or zoom operation may be recorded in motion pictures Focus operation can be set to OFF in Continuous AF P163 While recording motion pictures p...

Page 331: ...t affect the recorded images Being a characteristic of the viewfinder of this unit this phenomenon is not a problem Recorded images are not affected Is the card inserted Is this a folder or picture wh...

Page 332: ...you may not be able to establish a connection Move the camera away from the metal surface About a wireless access point Check if the wireless access point to connect is in operating state Check the ra...

Page 333: ...gin information login ID user name email address password is correct Is the size of the image too large Reduce the image size at Size P275 and then send Transmit after dividing the motion picture with...

Page 334: ...disappear disconnect the USB connection cable after turning this unit off Pictures cannot be printed using a printer that does not support PictBridge Set to PictBridge PTP in USB Mode P232 309 When us...

Page 335: ...then select the icon to set the desired language P234 In dark places the AF Assist Lamp P221 lights red to make it easier to focus on a subject The surface of the camera and the reverse side of the m...

Page 336: ...ff and remove the battery or disconnect AC adaptor optional Then reinsert the battery or reconnect AC adaptor and turn this unit on Do not use this unit near radio transmitters or high voltage lines I...

Page 337: ...malfunction If the camera is cold when you turn it on the picture on the Monitor Viewfinder will be slightly darker than usual at first However the picture will return to normal brightness when the in...

Page 338: ...bring the battery charger supplied so that you can charge the battery in the country that you are travelling in Dispose of unusable battery The battery has a limited life Do not throw the battery into...

Page 339: ...the terminals on the back of the card and do not touch the terminals with your fingers Notice for when transferring to another party or disposing of the memory card Format or delete using the camera...

Page 340: ...if above operations are not possible due to malfunction When transferring to another party or disposing of the memory card please refer to Notice for when transferring to another party or disposing o...

Page 341: ...fully Use the camera as a wireless LAN device When using equipment or computer systems that require more reliable security than wireless LAN devices ensure that the appropriate measures are taken for...

Page 342: ...dio wave band may cause a decrease in performance in both devices Do not connect to the wireless network you are not authorised to use When the camera utilises its Wi Fi function wireless networks wil...

Page 343: ...Control is a trademark of Panasonic Corporation Adobe is a trademark or registered trademark of Adobe Systems Incorporated in the United States and or other countries Pentium is a trademark of Intel C...

Page 344: ...red trademark of DynaComware Taiwan Inc QR Code is a registered trademark of DENSO WAVE INCORPORATED Other names of systems and products mentioned in these instructions are usually the registered trad...

Page 345: ...on points in accordance with your national legislation By disposing of them correctly you will help to save valuable resources and prevent any potential negative effects on human health and the enviro...

Reviews: