background image

SDXC Logo is a trademark of SD-3C, LLC.

“AVCHD Progressive”, “AVCHD”, the “AVCHD Progressive” Logo and the 

“AVCHD” Logo are trademarks of Panasonic Corporation and Sony 

Corporation.

Manufactured under license from Dolby Laboratories.

Dolby and the double-D symbol are trademarks of Dolby Laboratories.

HDMI, the HDMI Logo, and High-Definition Multimedia Interface are 

trademarks or registered trademarks of HDMI Licensing LLC in the United 

States and other countries.

HDAVI Control™ is a trademark of Panasonic Corporation.

QuickTime and the QuickTime logo are trademarks or registered trademarks 

of Apple Inc., used under license therefrom.

Mac and Mac OS are trademarks of Apple Inc., registered in the U.S. and 

other countries.

Windows and Windows Vista are either registered trademarks or trademarks 

of Microsoft Corporation in the United States and/or other countries.

Other names of systems and products mentioned in these instructions are 

usually the registered trademarks or trademarks of the manufacturers who 

developed the system or product concerned.

This product is licensed under the AVC patent portfolio license for the personal 

and non-commercial use of a consumer to (i) encode video in compliance with 

the AVC Standard (“AVC Video”) and/or (ii) decode AVC Video that was 

encoded by a consumer engaged in a personal and non-commercial activity 

and/or was obtained from a video provider licensed to provide AVC Video. No 

license is granted or shall be implied for any other use. Additional information 

may be obtained from MPEG LA, LLC. See http://www.mpegla.com.

VQT3S66

F0811HY0 ( 7000 

)

EU

Panasonic Corporation

Web Site: http://panasonic.net 

Pursuant to at the directive 2004/108/EC, article 9(2)

Panasonic Testing Centre
Panasonic Marketing Europe GmbH

Winsbergring 15, 22525 Hamburg, Germany

 Panasonic Corporation 2011

DMC-FZ150EB-VQT3S66_eng.book  40 ページ  2011年8月10日 水曜日 午後3時47分

Summary of Contents for DMC-FZ150K

Page 1: ...detailed instructions on the operation of this camera are contained in Operating Instructions for advanced features PDF format in the supplied CD ROM Install it on your PC to read it EB Web Site http...

Page 2: ...own private use may infringe copyright laws Even for the purpose of private use recording of certain material may be restricted Information for Your Safety Product identification marking WARNING TO RE...

Page 3: ...wiring code as stated below If in any doubt please consult a qualified electrician IMPORTANT The wires in this mains lead are coloured in accordance with the following code Blue Neutral Brown Live As...

Page 4: ...e with doors and windows closed CAUTION Danger of explosion if battery is incorrectly replaced Replace only with the same or equivalent type recommended by the manufacturer Dispose of used batteries a...

Page 5: ...torted by strong magnetic fields created by speakers or large motors Electromagnetic wave radiation generated by microprocessors may adversely affect this unit disturbing the pictures and or sound If...

Page 6: ...ormation about collection and recycling of old products and batteries please contact your local municipality your waste disposal service or the point of sale where you purchased the items Penalties ma...

Page 7: ...cting the Recording Mode 21 Taking Pictures with Your Favourite Settings Programme AE Mode 23 Programme Shift 24 Taking Pictures Using the Automatic Function Intelligent Auto Mode 25 Recording Motion...

Page 8: ...hen rattling sounds or vibrations will come from the camera but these are due to the motion of the aperture the zoom and the motor and do not indicate a defect This camera is not dust splash water pro...

Page 9: ...are Use it to install the software to your PC 6 CD ROM Operating Instructions 7 Shoulder Strap 8 Lens Cap Lens Cap String 9 Lens Hood SD Memory Card SDHC Memory Card and SDXC Memory Card are indicated...

Page 10: ...e by phoning our Customer Communications Centre Monday Thursday 9 00 a m 5 30 p m Friday 9 30 a m 5 30 p m Excluding public holidays Or go on line through our Internet Accessory ordering application a...

Page 11: ...Cable RP CDHM15 RP CDHM30 Class 10 64 GB SDXC Memory Card Class 10 32 GB SDHC Memory Card Class 10 16 GB SDHC Memory Card Class 10 8 GB SDHC Memory Card Class 10 4 GB SDHC Memory Card Class 6 32 GB SD...

Page 12: ...button 11 MENU SET button 12 Cursor buttons 13 Q MENU button Delete button 14 DISPLAY button 15 LCD monitor 3 Exposure compensation Auto Bracket Flash output adjustment 2 Self timer button 1 ISO 4 Fun...

Page 13: ...nsure that the Panasonic DC coupler DMW DCC6 For shop display purpose only and AC adaptor DMW AC8E optional are used Always use a genuine Panasonic AC adaptor DMW AC8E optional When using an AC adapto...

Page 14: ...left or right and deciding by pressing Rotating Selection of items or setting of values is performed during the various settings Pressing Operations that are the same as MENU SET button such as determ...

Page 15: ...arkets Some of these battery packs are not adequately protected with internal protection to meet the requirements of appropriate safety standards There is a possibility that these battery packs may le...

Page 16: ...e charger from the electrical socket and detach the battery after charging is completed When the CHARGE indicator flashes The battery temperature is too high or too low It is recommended to charge the...

Page 17: ...rned on When the Optical Image Stabilizer function is set to ON Recording once every 30 seconds with full flash every second recording Rotating the zoom lever from Tele to Wide or vice versa in every...

Page 18: ...This Site is English only Note Keep the Memory Card out of reach of children to prevent swallowing Built in Memory Card Remarks SD Memory Card 8 MB to 2 GB Use a card with SD Speed Class with Class 4...

Page 19: ...Battery Being careful about the battery orientation insert all the way until you hear a locking sound and then check that it is locked by lever A Pull the lever A in the direction of the arrow to rem...

Page 20: ...n this unit on Press MENU SET Press 2 1 to select the items year month day hour minute display sequence or time display format and press 3 4 to set Press MENU SET to set Press MENU SET Select CLOCK SE...

Page 21: ...al Rotate the mode dial slowly to select the desired mode A Basic Programme AE Mode The subjects are recorded using your own settings Intelligent Auto Mode The subjects are recorded using settings aut...

Page 22: ...nual settings Custom Mode Use this mode to take pictures with previously registered settings Scene Mode This allows you to take pictures that match the scene being recorded Creative Control Mode Recor...

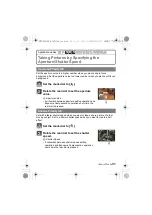
Page 23: ...ater freedom by changing various settings in REC menu Set the mode dial to Set the focus selector switch to AF Aim the AF area at the point you want to focus on Press the shutter button halfway to foc...

Page 24: ...the screen While the values are displayed about 10 seconds perform the Programme Shift by rotating the rear dial The Programme Shift indication A appears on the screen when Programme Shift is activate...

Page 25: ...beginners or those who want to leave the settings to the camera and take pictures easily Set the mode dial to Press the shutter button halfway to focus and then press it fully to take the picture A Fo...

Page 26: ...era automatically detects a person s face and it will adjust the focus and exposure Face Detection Scene Detection i PORTRAIT i SCENERY i MACRO i NIGHT PORTRAIT 1 i NIGHT SCENERY iHANDHELD NITE 2 i SU...

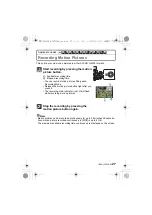
Page 27: ...um available recording time continuously is displayed on the screen Start recording by pressing the motion picture button A Available recording time B Elapsed recording time You can record motion pict...

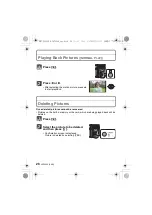
Page 28: ...ayback Deleting Pictures Once deleted pictures cannot be recovered Pictures on the built in memory or the card which are being played back will be deleted Press Press Select the picture to be deleted...

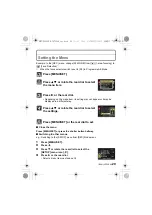
Page 29: ...o the SETUP menu from REC Mode menu 1 Press MENU SET 2 Press 2 3 Press 4 or rotate the rear dial to select the SETUP menu icon 4 Press 1 or the rear dial Select a menu item next and set it Press 3 4 o...

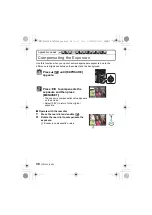
Page 30: ...the background Operate with the rear dial 1 Press the rear dial and enable 2 Rotate the rear dial to compensate the exposure A Exposure compensation value Press 3 until EXPOSURE appears Press 2 1 to c...

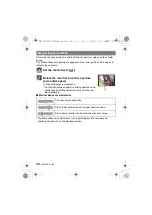
Page 31: ...een aperture setting operation and Exposure Compensation operation every time the rear dial is pressed Set with a faster shutter speed when you want to take a sharp picture of a fast moving subject Se...

Page 32: ...d C Manual Exposure Assistance It will switch between aperture setting operation and shutter speed setting operation every time the rear dial is pressed Manual Exposure Assistance The Manual Exposure...

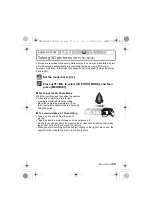
Page 33: ...cording and then slide the camera horizontally straight from left to right A guide is displayed while recording Move the camera approximately 10 cm 0 33 feet within approximately 4 seconds using the g...

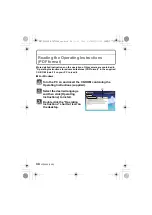
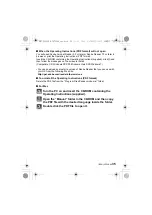
Page 34: ...or advanced features PDF format in the supplied CD ROM Install it on your PC to read it For Windows Turn the PC on and insert the CD ROM containing the Operating Instructions supplied Select the desir...

Page 35: ...ndows Vista SP2 Windows 7 You can download and install a version of Adobe Reader that you can use with your OS from the following Web Site http get adobe com reader otherversions To uninstall the Oper...

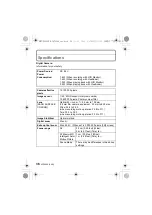
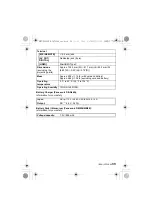
Page 36: ...lour filter Lens NANO SURFACE COATING Optical 24k zoom f 4 5 mm to 108 mm 35 mm film camera equivalent 25 mm to 600 mm Wide F2 8 to F8 0 when recording motion pictures F2 8 to F11 Tele F5 2 to F8 0 wh...

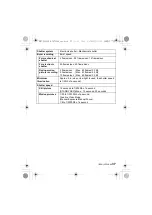
Page 37: ...mes sec Max 40 frames 3 5 M 5 frames sec Max 40 frames 3 5 M 10 frames sec Max 40 frames 3 5 M Minimum Illumination Approx 9 lx when i low light is used the shutter speed is 1 25th of a second Shutter...

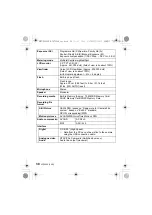
Page 38: ...cm 0 99 feet to 9 5 m 31 16 feet Wide ISO AUTO is set Microphone Stereo Speaker Monaural Recording media Built in Memory Approx 70 MB SD Memory Card SDHC Memory Card SDXC Memory Card Recording file f...

Page 39: ...HDMI TypeC Dimensions excluding the projecting parts Approx 124 3 mm W k81 7 mm H k95 2 mm D 4 89q W k3 20q H k3 74q D Mass Approx 528 g 1 16 lb with card and battery Approx 484 g 1 06 lb excluding ca...

Page 40: ...United States and or other countries Other names of systems and products mentioned in these instructions are usually the registered trademarks or trademarks of the manufacturers who developed the sys...

Reviews: